Pit-Fighter TM-357 1st Printing
Pit-Fighter (Tiger) (Tiger Electronics, 1991) · Technical Manual · 60 pages · 40 sections · original scan
TM-357 intin 1st printing
Operator’s Manual
This page carries no recoverable text. It is a drawing or a photograph. See the original scan.
A
ATARI
PREFIGHTER
Operator’s Manual
with Schematics
Copyright © 1990 by Atari Games Corporation. All rights reserved. No part of this publication may be reproduced by any mechanical, photographic or electronic process, or in the form of a phonographic recording, nor may it be stored in a retrieval system, transmitted, or otherwise copied for public or private use, without permission from the publisher. The game play, all graphic designs, this technical manual, its accompanying schematic diagrams, and the display manual are protected by the U.S. Copyright Act of 1976. This Act provides for substantial penalties for violating federal copyright laws. Courts can impound infringing articles while legal action is pending. If infringers are convicted, courts can order destruction of the infringing articles. In addition, the Act provides for payment of statutory damages of up to $50,000 per infringing transaction in certain cases. Infringers may also have to pay costs and attorneys’ fees and face an imprisonment of up to five years as well as fines of up to $250,000 in the case of individuals and up to $500,000 in the case of corporations. Atari Games Corporation will aggressively enforce its copyrights against infringers. We will use all legal means to immediately halt any manufacture, distribution, or operation of a copy of video games made by us. Anyone who purchases such copies risks forfeiting such a game.
Published by: Atari Games Corporation 675 Sycamore Drive Milpitas, California 95036-1110
Printed in the U.S.A 8/90
Produced by the Atari Games Technical Publications Department. Technical Writing & Editing: Andrea Dencker Illustration & Design: Mary Ohanessian Sumner Pit-Fighter
Notice Regarding Non-Atari® Parts
You may void the game warranty (printed on the inside back cover of this manual) if you do any of the following:
- Substitute non-Atari parts in the game.
- Modify or alter any circuits in the game by using kits or parts not supplied by Atari Games Corporation.
Pit-Fighter
Contents
1 Set-Up How to Use This Manual...... Inspecting the Game Control and Switch Locations Installing the Control Panel... Setting the Coin and Game Options. Game Play .... 2 Self-Test Entering and Exiting the Self-Test... RAM and ROM Test... Select Test Menu Switch Test..... Sound Test Coin Options..
Motion Object Test Playfield Test. Color Test... Convergence Test 3 Maintenance and Troubleshooting Maintaining the Coin Mechanism Repairing the Video Display Repairing and Replacing the Joystick Control ROMs and RAMs...... 4 Parts Illustrations See the list of illustrations that follows.
5 Schematics See the list of illustrations that follows.
Pit-Fighter Statistics Sheet Warranty Figure 1-1 Figure 2-1 2-2
2-4
2-7 2-8
2-10 Color Test Screen. 2-11 Convergence Test Screen Figure 3-1 Figure 4-1 4-2
Figure 5-1
5-2
5-3
Table 1-1
Table 2-1 2-2
2-4
Table 3-1 3-2
3-4 Illustrations
Control and Switch Locations..........0+
Select Test Menu Screen Switch Test Screen...... Sound Test Screen... Coin Options Screen. Game Options Screen. Statistics Screen... Alphanumeric Test Screen. Motion Object Test Screen Playfield Test Screen.
Maintaining the Joystick Assembly ....... 3-5 Cabinet-Mounted Assemblies Joystick Assembly ... Coin Controls, Inc. Coin Door Assembly 4-6 Power Supply Assembly. 49 Pit-Fighter Game PCB Assembl 4-10 JSA Audio II PCB Assembh 4-14 Pit-Fighter Game PCB Assembly Schematic Diagram . JSA Audio II PCB Assembly Schematic Diagram . Game Wiring Diagram. 5-10
Tables
Game Specifications... 1-2 Summary of the Self-Test Screens Bad RAM Location by Error Address .. Bad ROM Location by Error Address. Coin Option Settings: Game Option Settings. Troubleshooting Table... ones Voltage Inputs and Test Points on the PCBs..... What ROM Problems Look Like: Screen Colors Indicating Bad RAMS
iii
Pit-Fighter
Safety Summary
The following safety precautions apply to all game operators and service personnel. Specific warnings and cautions will be found in this manual whenever they apply.
Hz line power (used in Europe). If a 60 Hz machine operates on 50 Hz line power, the fluorescent line ballast transformer will overheat and cause a potential fire hazard. Check the product identification label on your machine for the line frequency required, ABOUT NOTES, CAUTIONS, AND WARNINGS In Atari publications, notes, cautions and warnings have the following meaning:
CHAPTER
Set-Up
How to Use This Manual
This manual is written for
operators and service personnel. It provides information for setting up, playing, testing, and maintaining your Pit-Fighter™ game. The is divided manual into] the following chapters: @ Chapter 1 contains set-up and game playing information. Ml Chapter 2 describes the self-test and how to use the self-test screens. I Chapter 3 contains maintenance, repair, and troubleshooting procedures. Be sure to perform the preventive maintenance tasks to
Ikeep the game in good condition. Ml Chapter 4
lists. Icontains the illustrated parts
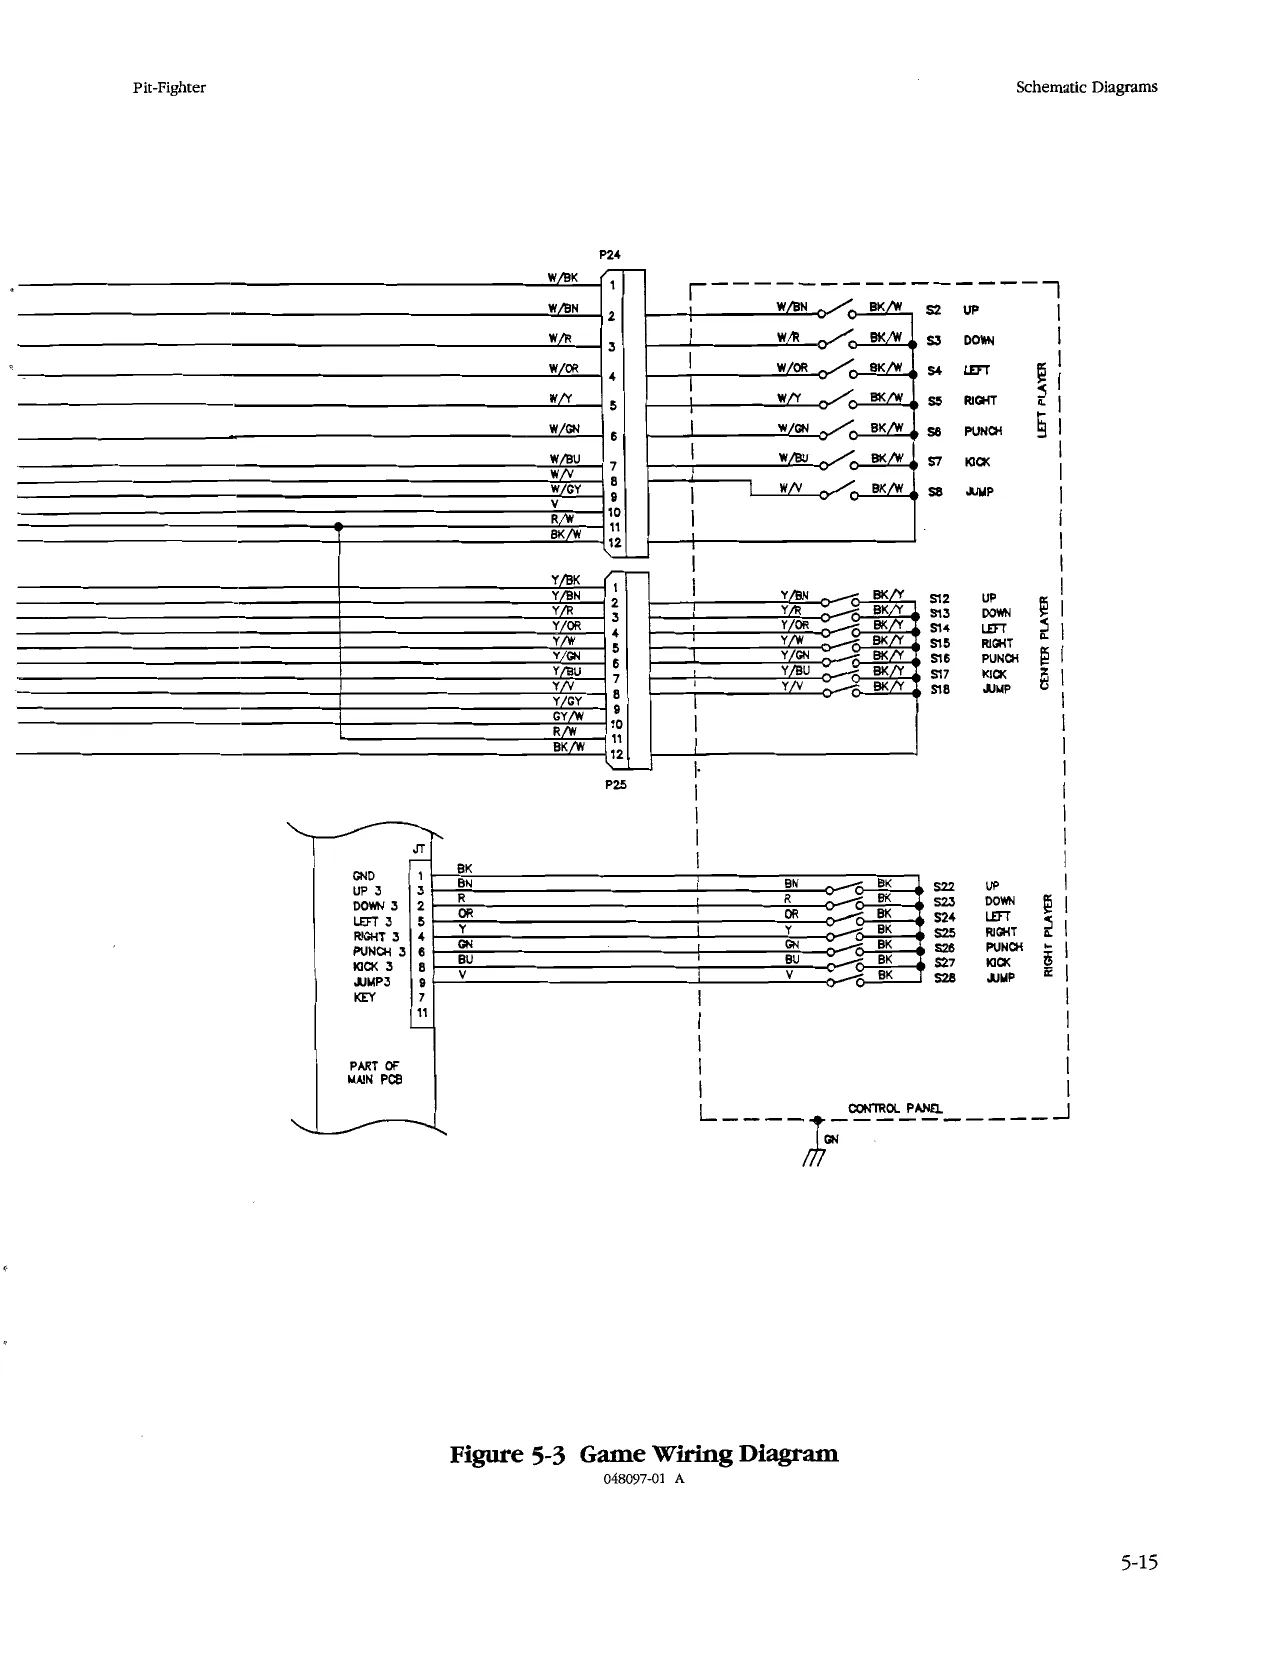
@ Chapter 5 contains the schematics for the Pit-Fighter game PCB and JSA Audio II PCB and the game wiring diagram.
Set-Up
Inspecting the Game
[ARNING To avoid electrically shocking yourself and damaging the game electronics, do not plug in the game until it has been inspected and set up for your line voltage.
This cabinet should be connected to a grounded threewire outlet only. If you have only two-wire outlets, we recommend that you hire a licensed electrician to install grounded outlets. Players can receive an electrical shock if the cabinet is not properly grounded. Inspect your Pit-Fighter game carefully to ensure that the game is complete and was delivered to you in good condition. Inspect the cabinet as follows:
- Examine the exterior of the cabinet for dents, chips, or broken parts.
- Open the service door. Unlock and open the coin doors. Inspect the interior of the cabinet as follows: a. Check that all plug-in connectors on the cabinet harnesses are firmly plugged in. Do not force connectors together. The connectors are keyed so they fit only in the proper orientation. A reversed connector can damage a printed-circuit board (PCB), This will void your warranty. b. Ensure that all plug-in integrated circuits on each PCB are firmly plugged into their sockets. c. Inspect the power cord for any cuts or dents in the insulation. d. Inspect the power supply. Make sure that the correct fuses are installed. Check that the harness is plugged in correctly and that the fuse block cover is mounted in place. Check that the green ground wire are connected.
Table 1-1 Game Specifications
Power Consumption - 127 W maximum “Line Fuse Rating 2 Amps e Voltage” 102 to 132 VAC. Temperature 5° 10 38°C GB ‘Humidity S Not to exceed : 33.25 inches (84 cm) “Depth 38.25 inches (97 &m) “Height 71.75 inches (182°cm) Weight 325 168148" kg) aig Pit-Fighter
e. Inspect other sub-assemblies, such as the video display, controls, printed-circuit boards (PCBs), and speakers. Make sure that they are mounted securely and that the ground wires are connected,
Control and Switch Locations
Most of the controls are located inside the drawer, behind the control panel (see Figure 1-1). The only exception is the power on/off switch. Power On/Off Switch The power on/off switch is located at the top left of the cabinet (behind the peak). Volume Control The volume control is located on the JSA Audio I PCB, which is in the drawer behind the control panel. Self-Test Switch The self-test switch is also located on the JSA Audio II PCB, in the drawer behind the control panel. Coin Counter
The coin counter is located on the bottom of the coin box, inside the lower coin door.
Installing the Control Panel
Make sure the game power is turned off. To install the separately packaged control panel, you need the following tools: = Hex driver or wrench = Four flat washers (provided with game) = Four nut-washer assemblies (provided with game) . Reach in through the openings on the front of the drawer, and open the spring draw latch on each side. Pull the drawer out partly. (See Figure 1-1.)
- Hold the control panel up to the front of the drawer, and match up the four threaded studs with the four smal] holes (one in each corner).
- Install one flat washer and nut/washer assembly onto each threaded stud.
- Plug the two control panel harness connectors into the game harness inside the drawer. These connectors are interchangeable, so be sure to match wire colors. Plug the third harness connector into the game PCB connector located near capacitors C42-C44, Attach the ground clip to the power supply base. This step is very important, since this clip grounds the control panel.
- Close the drawer and snap shut both latches.
Pit-Fighter Set-Up
Self-Test’ (Option Settings) Label
Drawer Latch|
Volume Controf | Self-Test Switch]
Figure 1-1 Control and Switch Locations
- Turn on the game power. Check that the video display and the attraction lamp have power.
Setiing the Coin and Game Options
The Pit-Fighter coin and game options are set in the self-test. Refer to Chapter 2 for the recommended settings and the procedure for setting the options.
Game Play
This section of the manual describes the theme of the Pit-Fighter game and the game play features.
Introduction This is Pit-Fighter, the new underground sport! There's no shortage of action in this no-holds-barred street fight. Players control one of three skilled masters as they challenge street-tough fighters like “The Executioner”, “Chainman Eddie”, “Angel”, and the “Masked Warrior’—the Ultimate Champion. Pit-Fighter is made entirely of digitally processed graphics for the ultimate in realism. It even includes a camera zoom and side-to-side pan for a cinematic look. Up to three can play, and players can join in at any time. Each player uses an 8-way joystick and three buttons to control his fighter. Using different button combinations, players command their fighters to punch, kick and jump. Using other control combinations generates a variety of other moves. The total number of fighters on the screen at any one time is determined by the number of paying players. In this free-for-all brawl, players can hit any fighter, even any of the good guys. Play Mode In Pit-Fighter, no rules exist. In this crude, unregulated form of prize fighting, anything goes. Fighters are in it for the money and glory of beating the champion. Players begin by selecting one of three characters. Each are unique in appearance and fighting style. Buzz — Former pro wrestler & bodybuilder. He specializes in brute-strength moves. Ty — Champion kickboxer & Pit-Fight veteran. He has powerful kicks & killer instinct. Kato — Master of the Flying Dragon style of Karate. He has incredible hand speed and agility. Each player has a lethal “Super Move” that is unleashed when all three buttons are pressed. This explosive move is much more damaging to a fighter than regular moves. Their special Super Moves are: Buzz — Killer Body Slam Ty — Flying Deadly Double Kick Kato — Lethal Dragon Punch In Pit-Fighter, players fight numerous challengers as they battle their way to the top. To keep players on
1-3
Set-Up
their toes, all the challengers have unique fighting skills and attack in a different way. Players must also be aware of a hostile crowd that will push and shove when fighters come too close. Some people will emerge from the crowd and stab fighters with knives. At the end of each match, players are awarded bonuses for Knockouts, Brutality, and a Fight Purse.
1-4 Pit-Fighter
Every third match is a Grudge Match. Here, players fight head-to-head with other paying players in a multi-player game, or a computer twin of themselves in a one-player game. The winner is the last man standing in a three-knockdown fight. The last Grudge Match is an Elimination Match to decide who will challenge the Masked Warrior, the Ultimate Champion. After defeating the champion, a new one is crowned.
CHAPTER 2
Self-Test
Use the Pit-Fighter self-test to|
check the condition of the
game circuitry and controls,
You will see the self-test infor-;
mation on the video display]
and hear the sound test infor-
mation through the speakers. You
need any additional equipment to
the self-test. Perform the self-test w! do not
perform
hen you first set up the game, each
time you collect the money,
lor when you suspect game
problems. This chapter shows
the screens in the self-test and
explains each of the tests. The
screens and explanations are arranged in the
order they appear in the self-test. Table 2-1
lists all the self-test screens.
Self-Test
Entering and Exiting the
To enter the self-test, turn on the self-test switch on the JSA Audio II PCB (next to the volume control). Doing so displays the select test menu (entitled “Self Test"); see Figure 2-1. Exit the self-test by turning off the self-test switch at any time.
Table 2-1 Summary of the Self-Test Screens
Sound Test Coin Options... ‘Game Options Gare ‘Statistics : “Alpha(numeric) ‘Test’
irst. Color Test Second Color Test. Red Color Purity, reen Color Purity. Blue Color Purity White Color’Purity tey Color Purity ‘Convergence Test < White Convergence. Violet Convergence. Blue Convergence* ~ Yellow Convergence
2-2 Pit-Fighter
RAM and ROM Test
When you turn on the power, the game automatically runs through the random-access memory (RAM) and read-only memory (ROM) test. This test is mot part of the self-test procedure. Regardless of whether or not the game has a problem, it will always advance to the attract mode. The game will stop only if you power it up and the self-test switch has been previously turned on.
Game RAM Test No message appears while the test is checking the RAMs. If more than 30 seconds elapse and the self-test menu doesn’t appear, the game has a problem. See Table 2-2 for the locations of bad RAMs. If the test finds no RAM errors, no message appears and the program goes to the ROM test after 15-20 seconds.
Game ROM Test If the test finds no ROM errors, no message appears and the program goes to the title screen in the attract mode. If a ROM fails, a message is displayed. Furthermore, if the failed ROM is a program ROM, then the error number with checksums is shown in the center of the screen. The ROM error test takes 2 few seconds. See Table 2-3 for the location of bad ROMs. If you think you have a ROM error, but the screen shows no messages, see Table 3-3 for information about the locations of various ROM functions. Depending on how bad the ROM error is, you may not be able to enter the self-test.
Select Test Menu
Choose which test or screen you want to see from this menu, shown in Figure 2-1. Move up and down the menu using any of the three joysticks. Start the select-
Figure 2-1 Select Test Menu Screen
Pit-Fighter
ed test by pressing any of the punch buttons.
Switch Test
The switch test screen is shown in Figure 2-2. Test the joysticks and pushbutton switches. As you use each control, the pink Xs for the pushbuttons change to 0s, or the joystick switch markers (small yellow dots) are highlighted. If the changes do not appear on the screen, check the switch wiring and the switches,
Press the left Kick and Punch buttons simultaneously to return to the menu screen.
AB ADDR DA 9000
D D000
Figure 2-2 Switch Test Screen
Sound Test
The sound test indicates the condition of the sound effects circuit on the game PCB, The sound test screen appears in Figure 2-3. Use one of the joysticks to select from the sounds; press one of the jump buttons to listen to it. (You can have numerous sounds playing simultaneously, or you can have silence, depending on which ones you select.) Pressing any punch button returns you to the menu screen.
:
Coin Options
Check and select the coin options on this screen, shown in Figure 2-4. The screen shows the factory default settings in green. To move through the options, to change or save the settings, or to return to the select test menu, follow the Self-Test
Figure 2-3 Sound Test Screen.
Figure 2-4 Coin Options Screen
instructions shown at the bottom of the screen. The coin option settings, with defaults, are shown and explained in Table 2-4.
Game Options
Check and select the game options on this screen, shown in Figure 2-5, The screen shows the factory default settings in green. To move through the options, to change or save the settings, or to return to the select test menu, follow the instructions shown at the bottom of the screen. The
2-3
Self-Test Pit-Fighter
_Table 2-4 Coin Option Settings
Figure 2-5 Game Options Screen game options, with defaults, are shown and explained in Table 2-5.
2-4
Game Statistics
Use the information shown in the four statistics and histogram (bar graph) screens to keep track of your game use and maximize your profits. Record the information on the Pit-Fighter statistics page in the back of this manual. The first of the four screens is shown in Figure 2-6. The game statistics are collected from the last time the statistics were cleared. You can clear the statistics by simultaneously pressing the Start 1 and 2 buttons (the left and center ones). Press the left Punch button to advance to the next statistics or histogram screen, or to go back to the Select Test menu.
Statistics Screen The first statistics screen lists the following information: a Left Coins shows the number of coins counted in the left coin mechanism. = Right Coins shows the number of coins counted in the right coin mechanism. m=O Plyr Mins shows the number of minutes that the game was idle. = 1 Plyr Mins shows the number of minutes that the
Pit-Fighter Self-Test
Table 2-5 Game Option Settings
Figure 2-6 Statistics Screen
game was played by one person only. m2 Plyr Mins shows the number of minutes that the game was played by two people. = 3 Plyr Mins shows the number of minutes that the game was played by three people. mw Session is measured from when the first player starts a game until the Game Over message appears. m New Games shows the number of unique games played. A unique game is counted every time a player starts a new game (not a continued game). ™ ~ =Cont Games shows the number of games that players continued. ™ =New Mins shows the number of minutes that the game was played as new games. = Cont Mins shows the number of minutes that the game was played as continued games. = Error Count shows the number of errors counted in the erasable memory. If you have an error count, the statistics may be wrong. If you consistently have errors counted for several weeks, replace the EEROM at 30E on the Pit-Fighter game PCB. = Total Credits is the number of credits accumulated by the game. u Average Time per Credit is displayed in seconds. This item is tabulated for all games played since the statistics were cleared. If there are no credits, this line will not be displayed. = Average Time per New Game is also displayed in seconds. = Average Time per Continued Game is also displayed in seconds.
Histogram 1 Screen The first histogram screen lists the length of time for all new games, grouped in 20-second increments (except for the shortest games lasting 0-39 seconds).
Histogram 2 Screen The second histogram screen lists the same information as Histogram 1, except for continued games. Histogram 3 Screen The third histogram screen lists the length in minutes for all game sessions.
Alphanumeric Test
The alphanumeric test, shown in Figure 2-7, checks the condition of the alphanumerics in the game. If you see an error on the screen, check the EPROM at 15L.
Self-Test Pit-Fighter
Center Jump, Kick Selects a picture that will be displayed and manipulated as ead the motion object.
- SaSRTEP ABCD ; oa “. ae * Press the left Punch button to go to the select test menu.
Playfield Test
The playfield test screen, shown in Figure 2-9, tests the movement of the playfield. Move the left joystick up, down, left, and right to check whether the whole picture moves accordingly. Press the left Punch button to go to the menu screen. ah aoe nee we ANE eR ER Pe ee mane were a 2 ie a i
Figure 2-7 Alphanumeric Test Screen
Moving any of the joysticks up or down scrolls the screen up and down. Press any Punch button to go to the menu screen.
Motion Object Test
The motion object test screen, shown in Figure 2-8, tests the movement and color of various game objects. The most important part of this screen is the ROM status squares on the right side. The squares should all be green (indicating good motion object ROMs); red. squares indicate bad ROMs. Choose an object and move it or change it as follows: Figure 2-9 Playfield Test Screen Control: This action results: Left joystick Left/right and up/down moves Color Test the object around on the screen. wae woo This test has seven screens, the first of which is shown Center joystick Up/down enlarges/shrinks the in Figure 2-10. Advance to each screen by pressing the object. Kick or Jump button. Left Jump, Kick Selects one of the three motion m The first color test indicates the dynamic range of objects (called 0, 1, and 2).
Figure 2-8 Motion Object Test Screen Figure 2-10 Color Test Screen
2-6
Pit-Fighter
the video display color circuit. The screen should show four bands (red, green, blue, and white, from top to bottom), ranging from bright to dark, left to tight. The red, green, and blue bands are produced by only one color gun being turned on in each band. At the bottom is a white band, in which all three color guns are turned on. m The second color test shows the same as the first color test, but with two color guns being turned on in three bands—a yellow band (red and green guns), cyan band (blue and green guns), and magenta band (blue and red guns). At the bottom is a white band. m The remaining five screens are color purity tests. The rectangles of color shown are red, green, blue, white, and grey. Each screen should display a straight rectangle of color, with no curving at the corners, no unevenness of color, and no lines in the display. If any of these screens are not correct, adjust the video display as described in the video display manual. Return to the menu screen by pressing any Punch button.
Convergence Test
The convergence test has four screens—white, violet, blue, and yellow grid lines. The white screen is shown in Figure 2-11, To see the remaining screens, press any Self-Test
Figure 2-11 Convergence Test Screen
Kick or Jump button. Press any Punch button to go to the menu screen. Check the following on the screens: u The grid lines should be straight within 3.0 mm and the lines should not pincushion or barrel. m The convergence of the lines on the violet and black screens should be within 2.0 mm. If these screens do not meet these criteria, adjust the video display as described in the video display manual.
2-7
This page carries no recoverable text. It is a drawing or a photograph. See the original scan.
CHAPTER 3
~ Troubleshooting
and Maintenance
This chapter contains troubleshooting tables and repair procedures for your Pit- Fighter™ game. The chapter| contains three troubleshoot-
ing tables. The first table has:
general troubleshooting information, the second table contains the volt-
age levels and test points on the game printed-circuit board, and the
last table describes ROM-
caused problems with specific ROMs to check and re-
place. The chapter also has instructions for removing
joystick control. land replacing the video display, in addition to repair information for the
Troubleshooting and Maintenance Pit-Fighter
Table 3-1 Troubleshooting Table
af. of the
3. Test the cE ‘switches ‘with the ‘sound te:
3. Check the voltage levels on the PCB. See Table
4, Check What ‘ROM Problems Look Like, Tablé ao
“them as shown i in Figure 4-29 055 ‘Check the harnesses and connectors.
- Is the speaker volume tumed up?
- Check the ‘Voltage on the JAMMA conne:
- 3. Check the wiring from the PCB to the * speak
- Check the voltage level to the PCB. See Table ne ep ce the speaker, ‘Video Display Problem :
Screen is dark.” el. Is he ‘game plugged in?
fy £ 2.Is the-game turned on? 2 3. Are the ‘connections good?” re the line fuse good?
- Is the display brightness tumed up?
6. Are'the connections’on the line filter and St
- ‘Are the connectors on the PCB tightly. connecte
- Check all of the items below: If you answer not ‘problem with the video display, not with the game ci display service: manual.: a. Do'you have power to the vi b, Are the video display’s filaments lit oe c. Do you have high voltage to the video displa' 3 9. “Is the voltage level to the video display PCB correct? i or 110.VAC, depending | on he type of video display. to 3.5 Volts.):
- If the level ‘Only a colored screen appears. Display area wavers or 1. Do'you 1 have voltage to the video display is too small. «2. Do you have high voltage ‘to the video displa “Picture is wavy. ls the monitor ground connected to the monitor?
- Are the sync inputs connected. Properly? ‘Doe: “Picture is upside down, Convergence, purity. or-color problems.
Pit-Fighter Troubleshooting and Maintenance
Table 3-2 Voltage Inputs and Test Points on the PCBs
(pin 11 of 125° ‘© Logic power from the switching power suppl Lights w when Ey Vis appli
Maintaining the Coin
Mechanism
The coin mechanism should be cleaned every three months. For detailed parts information on the coin door, see Figure 4-3. To maintain the coin mechanism:
- Turn off the power to the game. Open the upper coin door.
- Open the gate on the door covering the magnet. Use the blade of a screwdriver to scrape away any metal filings collected on the magnet.
- For a thorough cleaning, wash the coin mechanism in hot soapy water. Use a toothbrush to remove any stubborn build-up of residue in the coin path. 4, Dry the coin mechanism with compressed air.
- If you do not want to use water, brush the loose dust off with a soft brush and scrub the residue in the coin path with a toothbrush. Blow out all the loose dust and dirt with compressed air.
Repairing the Video Display
The video display frame in this game is designed to be used with both horizontal- and vertical-mounting displays, as well as 19- and 25-inch displays. Removing the Video Display If you have a problem with the video display, first run the self-test procedure to narrow down the cause. To make adjustments to the video display, unlock the service door on the rear of the cabinet. If you want to repair the video display, remove it from the game by following this procedure:
- Turn the game power off and wait two minutes. Unplug the power cord for safety.
- While you wait, unlock the top service door on the rear of the cabinet.
- Remove the three screws that attach the attraction shield retainer, and remove retainer, shield, and attraction film. Then remove the display shield, cardboard bezels, and cleats in front of the display.
- Remove the four nuts and washers that secure the video display.
- Discharge the high voltage from the cathode-ray tube (CRT). The display assembly contains a circuit for discharging the high voltage to ground when power is removed. However, to make certain, always discharge the display as follows: a.Attach one end of a solid 18-gauge wire to a well-insulated screwdriver or wooden handle. b.Attach the other end of the wire to an earth ground.
3-3
‘Troubleshooting and Maintenance Pit-Fighter
Problem |” Table 3-3 What ROM Problems Look Like
Program works, but the motion objects or playfield are'wrong. 0. se
Garbage on screen; program doesn’t work Wy 4 Game program is erratic. No sound or erratic sound: gral ‘Audio ROM: ‘Audio Program udio ADPCM
c. Quickly touch the blade end of the screwdriver to the CRT anode by sliding it under the anode cap. d. Wait two minutes and repeat part c.
- Disconnect the harness connectors from the video display.
- Pull the video display assembly out of the cabinet. Be extremely careful.
Replacing the Video Display Perform the following procedure to replace the video display in the cabinet.
- Carefully lift the video display into the cabinet.
- Install the nuts that hold the video display assembly.
- Connect the power and signal harnesses to the video display. If you replace the CRT and yoke together, adjust the brightness, size, and centering as described in the video display service manual. Check the purity and convergence according to that manual, but adjust both only if required. 4, Install the video display shield, bezel, and cleats. Replace the attraction film, shield, and retainer.
- Lock the rear service door on the cabinet.
Removing and Replacing the Joystick Control
The joystick control is shown in Figure 3-1. If you want to repair the joystick control, disassemble it by removing it from the control panel. To repair the joystick, disassemble it by removing the retaining ring at the bottom of the shaft. To replace any of the four switches, remove the two screws that secure each switch, .
ROMs and RAMs
If you think you have bad ROMs or RAMs, run the self-test. If you see only a colored screen and cannot enter the self-test, see Table 3-3. Also refer to Table 3-4 if you think you have a RAM problem.
Table 3-4 Screen Colors Indicating Bad RAMs
Pit-Fighter
}99-080041 j2" Washer
et Be
Top Plate
‘Stee! Washer
99-080030 ‘Compression Spring
99-080039 Base Assy. WiGold Switch | H | ‘Screw| |
‘Switen
99-080042 Microswitch Actuator
99-080043 3/8" Retaining Ring
Figure 3-1 Maintaining the Joystick Control Troubleshooting and Maintenance
99-080040 Black Joystick Assy.
Troubleshooting and Maintenance Pit-Fighter
N O T E S
3-6
CHAPTER 4
Parts Illustrations
This chapter provides in-
formation you need to or-
der replacement parts for|
your game. Common
hardware, such as screws, nuts, washers, are
included in these parts illustrations, When
you order parts, give the part number, part
name, the number of this manual, and the serial number of your
game. With this informa-
tion, we can fill your order
rapidly and correctly. We
hope this will create less downtime and more
profit from your games. Atari Games Cus-
tomer Service phone numbers are listed on
the inside front cover of this manual.
Parts Illustrations
/046929-01 Glass Retainer 3/4" x 1/8" 178263-1202
75-3816D Vinyl Foam Ts 171096-001 88-02 x1" im ape Flourescent Lamp Fixture 176015-110 Ei Bash (2 places) amp Retring Ci ip (epeces)
‘A047011-01 ‘Speaker Panel Assy. 176019220 8x1 1/4" Sq, Dr. Screw (4 places)
Control Panel Assy,|
178013001; Drawer Latch (2 places) 176015-112) #10 x 314") Pan-Hd. Screw) 170003-001 18%, 15W Flourescent Light
#10 x 5/8" Pan-Hd. Screw Pit-Fighter
199022401 25" Color Display 725516 114-20 x 1" Hex Sorew (4 places) 3350 72.0: 116" Lock Washer (4 places) 75-07002 Flat Washer
#81 1/4" Sq. Dr. Screw (6 Places)
W4-20 x1 1/4" Sq. Neck Carr. Bott (8 Places) 75-9515 174-20 Nv Washer Assy. (@ Places) 176015-110 410 x 5/8" Pan-Hd. Scrow (12 Places)
‘A047955-02
Pan-Hd. Scrow (4 places)
)a048447-01 Drawer Assy.
(045057-01 Ctl, Mounting Bracket (4 places) 176015-110 #10 x 5/8" Pan-Hd. Sorew (8 places) 0049444-01 Control Pod Assy.
Figure 4-1 Cabinet-Mounted Assemblies, Front View A048450-01 C
4-2 a4e44s-o1 |Wood Drawer
171089-001 .25 Cent Coin Door Assy. 176015110 #10.x 5/6" Pan-Hd, Screw
Pit-Fighter Parts Illustratrations
009992-01 ON/OFF Switch Enclosure 176015-112 #10 x 3/4" Pan-Hd. Screw items Not Shown:
‘A047073-01 Main Hamess Assy. ‘A047607-01 ‘Video Harness Assy. 176015-110 #10 x 5/8" Pan-Hd. Screw (places)
‘47876-01 Rear Door 1176020-220 #8 x1 1/4°LPW Screw
049939-01 Leg Leveler Plate 176015-112 #10 9/4" PanHd, Screw (18 places) 178255-004 B18 x1 1/2" Adjustable Glide (4 places}
Figure 4-1 Cabinet-Mounted Assemblies, Rear View A048450-01 C
Parts Illustrations Pit-Fighter
99-080040 Black Joystick Assy.
Figure 4-2 Joystick Assembly 171097-001
Pit-Fighter Parts Illustratrations
N O T E S
Parts Illustrations Pit-Fighter
99-15104 Base Plate 1 W/Pivot & Stud 99-15025 Coin inlet. Left 99-15086 Coin Mechanism
99-15113, Key Hook
99-15056 Screw for Bezel
/ / 99-15096 Sw. Adjuster
99-15056 Screw 99-15026 99-15131 Elastic Locknut 99-5132 Snap-on Sleeve
99-15130 Snap-on Clip \ ns WO \ / /
99-15133 Hold Down Bracket
99-15056 ‘Screw for Bezel 99-15128 99-15027 NavWasher for MWS Mounting Screw! Coin Ret. Plate
99-15028 |Coin Ret. Box
99-15056 Screw for Bezel 99-15129 Mounting Stud (2 places)
99-15051 |99-15134 Lamp Holder| 4-40-1" Pan-Head Screw 5028 99-15126 *precket MWS Flat-Head Mounting Screw 99-15042| 99-15085 Switeh| Coin Door Hames
Figure 4-3 Coin Controls, Inc. Coin Door Assembly 171093-001 .
Pit Fighter Parts Illustratrations
99-15038 }99-15036 Bezel for Button Cover
99-15001 thru 99-15012 Return Button
'99-15039 Bezel for Cover
99-15125 Frame Hinge Screw L
a 99-15052
Spring for Button
a i-
N. |99-15088 Clamp
99-1515 Frame Clamp Screw
99-15116 Upper Door
99-15115 Lower Door!
99-1514 Die Cast Frame
wr
s° : | 99-15111 “ y Coin Counter
99-15089, 99-15127 Lock Assy Meter Mounting Screw
Figure 4-3 Coin Controls, Inc. Coin Door Assembly : 171093-001
4-7
Parts Illustrations
N
4-8 Pit-Fighter
S
Pit-Fighter Parts Illustratrations
rexsoat001 2P os, Teminal lock TaNANaOeS engi Teconaee hog SUP Rec Sew (5V, 7A). (2 places) 7eAHadeoes eee, ossg201 KhesSoew ‘ Gpuces” _——_~Pr Supply Chassis Base Fase | frre al (6, (Ww, 8)
@ @|
®
2}
® simp fs. @ mer
40006-1065 lune Fr (5A) = 7aaaa09s ieaecae ——— Ree Screw a
aoerr9-01 ®@ Jumper Assy. (8K, 6)
oar aR Jumper sy. 1 Pos. Fuse Bock BNW (BK 6") 148008-3022, shu Blow Fuse BUW "142059-001 037640-01 (250V, 2A) 7 \solation Transformer PwrSupply Label 72-HA45053 Pwr Supply Label (120V, 1.54) (Warming) 46-32 x38" (Fuse FI) ‘T2HASGO6S: %-Rlec Screw teatro hae Seren (4 places)
Figure 4-4 Power Supply Assembly (+5/—5/+12V) A047606-02 C
Power Supply Assembly Parts List
| Part No. | Description | Part No. | Description |
| 046924-01 | Power Supply Chassis Base | ‘A043367-02 | Jumper Assy. Black, 6") |
| 149014-001 | 5 Volt 7 Amp Switching Power Supply | A043367-03 | Jumper Assy. (White, 6") |
| 140008-105 | 5 Amp Line Filter | 043908-01 | Power Supply Fuse Label (F1) |
A047728-02 Assy., Jumper (White, 6") 72-HA4606S Screw, Thread-Rolling, Cross-Recessed,
| 142053-001 | ‘Transformer, Isolation (120 Volt, 1.5 Amp) | #6-32 x 3/8" | |
| 79-15021001 | Terminal Block, 2-Position | 72-HA4806S | Screw, Thread-Rolling, Cross-Recessed, |
| 179225-2201 | Fuse Block, 1-Position | #8-32 x 3/8" | |
| 146008-3022 | Fuse, 3 Amp, Slow-Blow, 250 Volt | A047728-01 | Assy., Jumper (Black, 6") |
4-9
4-10 A047896-02 A (1-MB EPROM Version) Figure 4-5 Pit-Fighter Game PCB Assembly Fs Lu Ste imo ve “if 2nat08. ww th 38
Iscesnz 500 oes 0 ora tiidltlen eo ort) a
naerd rrt69 =* ven R
| Py pe Oi
rrr fae] gQgTiee] QQ vee] 1S Ter
PeFo8 Sort oto ath ety ints r4e78
og S05 HEY eee ss POS ese
zeros ca eel ct
= :
P Pa Tk ep
oe Ban ME cy B84 pon
ene a jest EAT oct Oo) SBM p rez doe] cay a
20F 195 ne KS 7 Pst
nea ae se aoc 4 a my py 0p] IBS SE py Se ee = bay _ eerste Bogan pHi oa ori hs ore a! fo = ATARI GMES G ey MOE IN USA
i Eat) patszus
8 mara pate raris3 sx) | oe aD = Es =
mee Sn Piusiesa, —_7urar7 Soar BOS se 8 7F 169
e359 ruses: rasie30 rusis7
ene os) pear? £0!
oe
7auszw ras2¥s
] {et } 2m ae rmS2638 eS ve
museus fo» eS 7ausise 7urasy
ws 0 ee ro.sa7 } Sos" Bese russe
) as rps tags ee ] ALU2 a 41 74F138. e
Sp SS Pa a) =
a
r4F20 oe) oe ey a ‘ gps} = EI gr
ney a 0 F463 a
zuy7, ge D ~ E DUDE EA)
n c = , o
Game PCB. Chapter 5 of this manual applies to both versions of the The schematic published in of this manual. listed on the inside front cover Games Customer Service. may contain 4-MB ROMs. A manual supplement with a version is available from Atari Your Pit-Fighter Game PCB
Parts list for the 4-MB ROM 177000-536, #6-32 Nylon Nut
Contact them at the ‘locations 178278-616, #6 Threaded PCB Support Standofis PCB Assy. PCB Assy. (this illustration) A047 184-05, JSA Audio I A047896-02, Pit-Fighter Game consists of: The Pit-Fighter Board Set Assembly (part no, A047965-02)
Pit-Fighter
Pit-Fighter Game PCB Assembly Parts Illustratrations
Parts List
| Designator | Description | Part No. | Designator | Description | Part No. |
| Sockets | 40D | IC, 7418244 | 137038-001 | ||
| Socket, 20 Pin, .300" | 179259-020 | 40E | Ic, SCUM | 137526-001 |
Socket, 24 Pin, 600" 179257-024
| Socket, 28 Pin, .600" | 179257-028 | 40F | IC, 747245 | 137591-001 | |
| Socket, 32 Pin, .600" | 179257-032 | 40H | IC, 7418245 | 137134001 | |
| Socket, 40 Pin, .600" | 179257-040 | 40L | IC, 7418163 A | 137114-001 | |
| Socket, 64 Pin, 900" | 179256.064 | 40M | IC, 7418158 | 137203-001 | |
| Integrated Circuits | 40N | IC, 747138 | 137521-001 | ||
| 5B | IC, EPROM, 27C512 | 136081-1029 | 40P | IC, GALIGv8 | 136079-1045 |
| sD | IC, EPROM, 27C512 | 136081-1028 | 40S | IC, GALIGV8 | 136079-1047 |
| SE | IC, 747244 | 137502-001 | 45B | IC, 74F260 | 137570-001 |
| SL | IC, 7418379 | 137374-001 | |||
| 45C, 45D | IC, RAM, 2K x 8, 35 nsec, .3 | 137534-001 | |||
| oM | IC, 74F169 | 137496-001 | 4SE | IC, 74F153 | 137492-001 |
| 10A2 | IC, 74,8244 | 137038-001 | 45F | IC, 74F169 | 137496-001 |
| 10E | IC, 745244 | 137502-001 | 45H | IC, 748245 | 137134001 |
| 10H | IC, MC68HC000P12F, LI2F | 13769-0001 | |||
| 43 | IC, 7418163 A | 137114-001 | |||
| 10K | IC, 74F20 | 137530-001 | 45K | IC, 746377 | 137622-001 |
| 10L | IC, 7418379 | 137374-001 | 45M | IC, OTP 27C512 | 136082-1025 |
| 10M | IC, 7497 | 137090-001 | 45N | TC, 7497 | 137090-001 |
| 10P | Ic | 136079-1053 | |||
| 45P | IC, 7418377 | 137145-001 | |||
| 15B | IC, EPROM, 27C512 | 136081-1031 | 458 | IC, 7418157 | 137029-001 |
| iSD | IC, EPROM, 27512 | 136081-1630 | 50¢, 50D | IC, 74HC273 | 137556-001 |
| 15E | IC, GALIGV8 | 136079-1043 | 50E | IC, 74F153 | 137492-001 |
| 1SF | IC, 7AF244 | 137502-001 | |||
| 50F | IC, 7418378 | 137305-001 | |||
| 15H | IC, 7418377 | 137145-001 | SoH | IC, 7418377 | 137145-001 |
| 15} | IC, 7413378 | 137305-001 | 50) | IC, 7418163 A | 137114-001 |
| 15L | IC, OTR 27C512 | 136081-1027 | 50K | IC, 748377 | 137622-001 |
| 15M | IC, 7418378 | 137305-001 | |||
| 50N | IC, 74LS157 | 137029-001 | |||
| 15N | IC, 74F86 | 137649-001 | 50P | IC, 7428377 | 137145-001 |
| 15P, 158 | IC, 745163 | 137345-001 | 50s | IC, 74F169 | 137496-001 |
| 208 | IC, Slapstic 111 | 137412-111 | 55B | IC, 7406 | 137052-001 |
| 20M | Te, 7418151 | 137101-001 | |||
| 55N | IC, 74F169 | 137496-001 | |||
| 20P | iC, 74F163 | 137345-001 | SSP, 558 | Tc, 7418244 | 137038-001 |
| 20s | IC, PROM | 136079-1040 | 60c | TC, 74F374 | 137420-001 |
| 25F | IC, 74F00 | 137327-001 | 60D | IC, 7418377 | 137145-001 |
| 25H | IC, 7418245 | 137134001 | |||
| 60E | IC, 74FiS3 | 137492-001 | |||
| 25) | IC, RAM, 32K x 8, 70 nsec | 137615-070 | GOH | IC, PFHS | 137419-104 |
| 25L | IC, 7418377 | 137145-001 | 60K | IC, 747153 | 137492-001 |
| 25M | IC, 7418166 | 137118-001 | 65B | IC, 745260 | 137570-001 |
| 25N | IC, 74F08 | 137483-001 | |||
| 65C | IC, 7418244 | 137038-001 | |||
| 25P | IC, 7418378 | 137305-001 | 65D | IC, GALIGV8 | 136079-1046 |
| 258 | Ic, PROM | 136079-1041 | 65E | IC, 74F153 | 137492-001 |
| 30E | TC, 28C16-300, 300 nsec | 137648-300 | 65E | TC, 745260 | 137570-001 |
| 30F | IC, 74F245 | 137591-001 | |||
| osH | IC, VRAM, 64K x 4, 120 nsec | 137553-001 | |||
| 30H | Ic, 7418245 | 137134001 | 65K | IC, 74F153 | 137492-001 |
| 30L | IC, 7418157 | 137029-001 | 65N | IC, EPROM, 27C010 | 136081-1002 |
| 30M | IC, 7415158 | 137203-001 | O5R | IC, EPROM, 27C010 | 136081-1001 |
| 30N | IC, GALI6v8 | 136079-1052 | |||
| 70B | IC, 7418244 | 137038-001 | |||
| 30P | IC, 74F169 | 137496001 | 70D | IC, 74F153 | 137492-001 |
| 308 | IC, PROM | 136079-1042 | 70E | IC, 7418244 | 137038-001 |
| 354 | IC, 7418244 | 137038-001 | OF | iC, 7418157 | 137029-001 |
| 35) | IC, RAM, 32K x 8, 76 nsec | 137615-076 | |||
| 70H | IC, VRAM, 64K x 4, 120 nsec | 137553-001 | |||
| 40B | IC, 74F00 | 137327-001 | 703 | IC, 7418157 | 137029-001 |
| 40C | IC, 74F374 | 137420-001 | 70K | IC, 74F153 | 137492-001 |
Parts Ulustrations Pit-Fighter
Pit-Fighter Game PCB Assembly Parts List, Continued
| Designator | Description | Part No. | Designator | Description | Part No. |
| 70N | IC, EPROM, 27C010 | 136081-1004 | 120} | IC, SOS | 137550-001 |
| 120M | IC, OTR, 27€512 | 136081-1018 | |||
| 70OR | IC, EPROM, 27C010 | 136081-1003, | |||
| 75B | IC, 7418244 | 137038-001 | 120N | IC, EPROM, 27C010 | 136081-1014 |
| 75C, 75D | IC, 74F32 | 137486-001 | 120R | IC, EPROM, 27C010 | 136081-1013 |
| 735E | IC, 7418378 | 137305-001 | 125B | IC, 74F20 | 137530-001 |
| 125¢ | IC, 74F138 | 137521-001 | |||
| 75F | 1G, 7418157 | 137029-001 | |||
| 75H | IC, VRAM, 64K x 4, 120 nsec | 137553-001 | 125D | IG, 7ALS197 | 137240-001 |
| 73 | IC, 7418157 | 137029-001 | 125E | IC, 74F04 | 137437-001 |
| 75K | IC, 74F153 | 137492-001 | 125F | 1C, GAL16V8 | 136079-1048 |
| 125H, 125) | IC, 74F169 | 137496-001 | |||
| 75M | IC, OTR 27C512 | 136081-1022 | |||
| 75N | IC, EPROM, 27C010 | 136081-1006 | 125K2 | IC, 7418138 | 137177-001 |
| 75R | IC, EPROM, 27C010 | 136081-1005 | 1308 | IC, 74F32 | 137486-001 |
| 80) | IC, 7418157 | 137029-001 | 130D | TC, 74F08 | 137483-001 |
| 130E | IC, 74F169 | 137496-001 | |||
| 80K | IC, 747153, | 137492-001 | |||
| 85C | IC, 7474 | 137436-001 | 130F | IC, 7418379 | 137374-001 |
| 85D | IC, 7418378 | 137305-001 | 130H | IC, 7AF169 | 137496-001 |
| 855 | IC, 74F169 | 137496-001 | 130M | IC, OTR, 27¢512 | 136081-1017 |
| 130N | IC, EPROM, 27C010 | 136081-1016 | |||
| 85F | Ic, 7418157 | 137029-001 | 130R | IC, EPROM, 27C010 | 136081-1015 |
| 8511 | IC, VRAM, 64K x 4, 120 nsec | 137553-001 | |||
| 90y | IC, 7418157 | 137029-001 | Capacitors | ||
| 90K | IC, 74F153 | 137492-001 | ci-c4 |
122002-104
| 90M | IC, OTP, 27€512 | 136081-1021 | 5, C6 | |
| 90N | IC, EPROM, 27C010 | 136081-1008 | 45%, Ceramic | 122016-101 |
| 90R | IC, EPROM, 27C010 | 136081-1007 | 7 | Capacitor, .1 pF, 50 V, |
| 95C | IC, 74F08 | 137483-001 | +80%-20%, Ceramic | 122002-104 |
8 Capacitor, .01 UF, 50 V,
| 95D | IC, 747163 | 137345-001 | +80%-20%, Ceramic | 122002-103 |
| 95E | IC, 74F169 | 137496-001 | ||
| 95F | IC, 7418157 | 137029-001 | o | Capacitor, .1 HF, 50 V, |
| BH, 100] | IC, 74FO4 | 137437-001 | +80%-20%, Ceramic | 122002-104 |
c10 Capacitor, .01 AF, 50 V,
| 100K | IC, 74F153 | 137492-001 | +8096-20%, Ceramic | 122002-103 |
| 100N | IC, EPROM, 27C010 | 136081-1010 | cu | Capacitor, .1 UF, 50 V, |
| 100R | IC, EPROM, 27C010 | 136081-1009 | +80%-20%, Ceramic | 122002104 |
| 105B | IC, 7418379 | 137374-001 | 12 | Capacitor, .01 pF, 50 V, |
+80%-2006, Ceramic 122002-103
| 105¢ | IC, 7474 | 137436-001 | ||
| 105E | TC, 74F32 | 137486-001 | C13, | Capacitor, .1 LE, 50 V, |
| 105F | IC, GALI6v8 | 136081-1051 | +80%-20%, Ceramic | 122002-104 |
| 10SH | IC, 74F175 | 137498-001 | c14 | Capacitor, .01 HE, 50 V, |
480%-20%, Ceramic 122002103,
| 1108, | TC, 74704 | 137437-001 | cis | Capacitor, .1 UF, 50 V, |
| 110) | IC, SOS | 137550-001 | +80%-20%, Ceramic | 122002-104 |
| 115C | IC, 74F32 | 137486-001 | C16 | Capacitor, .01 nF, 50 V, |
| 115D, 115E | IC, 74F02 | 137481-001 | +80%-20%, Ceramic | 122002-103 |
| LSE | IC, GALI6v8 | 136081-1050 | ci7 | Capacitor, .1 HF, 50 V, |
+80%-20%, Ceramic 122002-104
| 15H | IC, 7418157 | 137029-001 | cis | Capacitor, .01 UF, 50 V, |
| 115N | IC, EPROM, 27C010 | 136081-1012 | +80%-20%, Ceramic | 122002-103 |
| 115R | IC, EPROM, 27C010 | 136081-1011 | c19 | Capacitor, .1 HF, 50 V, |
+8096-20%, Ceramic 122002-104
| 1203 | IC, 74832, | 137486-001 | 20 | Capacitor, .01 UF, 50 V, |
| 120¢ | IC, 74F 138 | 137521-001 | +80%-20%, Ceramic | 122002-103 |
| 120D | IC, 74F74 | 137436-001 | ||
| 120E | IC, 741808 | 137012-001 | ca | Capacitor, .1 HF, 50 V, |
+80%-20%, Ceramic 122002-104
| 120F | IC, GALI6V8 | 136079-1049 | C22 | Capacitor, .01 pF, 50 V, |
| 120H | IC, 74F139 | 137488-001 | +80%-20%, Ceramic | 122002-103 |
4-12
Pit-Fighter
Pit-Fighter Game PCB Assembly Parts Illustrations
Parts List, Continued
| Designator | Description | Part No. | Designator | Description | Part | No. |
| €23-C27 | Capacitor, .1 HF, 50 V, | R20 | Resistor, 10 KQ, £5%, 1/8 W | 110027-103 |
_#80%-20%, Ceramic 122002-104
| €28-C32 | Capacitor, 100 pF, 100 ¥, | Rat | Resistor, 100 0, £5%, 1/8 W | 110027-101 |
| 45%, Ceramic | 122016-101 | R22 | Resistor, 47 Q, £5%, 1/8 W | 110027-470 |
| R23 | Resistor, 100 Q, £5%, 1/8 W | 110027-101 | ||
| €33-C46 | Capacitor, .1 UF, 50 V, | R24, R25 | Resistor, 47 ©, £5%, 1/8 W | 110027-470 |
+80%-20%, Ceramic 122002-104
| C47, C48 | Capacitor, 100 pF, 100 V, | R26 | Resistor, 100 Q, +5%, 1/8 W | 110027-101 |
| 5%, Ceramic | 122016-101 | R27-R29 | Resistor, 220 Q, £5%, 1/8 W | 110027-221 |
| C49 | Capacitor, 47 HE, 25 V, | R30-R34, | Resistor, 470 O, $5%, 1/8 W | 110027-471 |
| Electrolytic | 124009-476 | R36-R3B, R40 | ||
| €50-C66 | Capacitor, .1 pF, 50 V, | RAZ, RAB | Resistor, 10 O, 5%, 1/8 W | 110027-100 |
+80%-20%, Ceramic 122002-104
| R44-RAG | Resistor, 470 Q, +5%, 1/8 W | 110027-471 | ||
| 67, C68 | Capacitor, 100 pF, 100 V, | RA7 | Resistor, 47 Q, +5%, 1/8 W | 110027-470 |
| 45%, Ceramic | 122016-101 | R48 | Resistor, 2.2 KQ, +5%, 8 W | 110027-222 |
| 069-C95,C97-C135._ | Capacitor, .1 uF, 50 V, | R49 | Resistor, 1 KQ, +5%, 18 W | 140027-102 |
+80%-20%, Ceramic 122002-104
| C136 | Capacitor, 100 pF, 100 V, | R50 | Resistor, 47 Q, 5%, 1/8 W | 110027-470 | |
| 45%, Ceramic | 122016-101 | RSL | Resistor, 2.2 KQ, 45%, 1/8 W | 110027-222 | |
| C137-C148 | Capacitor, .1 uF, 50 V, | R52 | Resistor, 1 KO, £5%, 1/8 W | 110027-102 | |
| +80%-20%, Ceramic | 122002-104 | R53 | Resistor, 47 Q, +5%, 1/8 W | 110027-470 | |
| c149 | Capacitor, 100 pF, 100 V, | R54 | Resistor, 2,2 KO, +5%, 1/8 W | 110027-222 | |
| £5%, Ceramic | 122016-101 | R55-R57 | Resistor. 1 KQ, +5%, 1/8 W | 110027-102 | |
| €150-C192 | Capacitor, .1 pF, 50 V, | R58 | Resistor, 470 Q, +5%, 1/8 W | 110027-471 | |
| +80%-20%, Ceramic | 122002-104 | R59-R69 | Resistor, 1 KQ, +5%, 1/8 W | 110027-102 | |
| Miscellaneous | R70 | Resistor, 470 Q, +5%, 1/8 W | 110027-471 | ||
| cRI | Diode, MV5053, Light Emitting | 131027-002 | Ra | Resistor, 1 KQ, 45%, 1/8 W | 110027-102 |
| ++1005V1 | Test Point | 179051-001 | R72 | Resistor, 470 Q, £5%, 1/8 W | 110027-471 |
| GND1,GND3_—_— | Test Point | 179051-001 | R73, R74 | Resistor, 1 KO, £5%, 1/8 W | 110027-102 |
| ul | Inductor, 100 pH | 141024001 | |||
| R75, R76 | Resistor, 470 Q, +5%, 1/8 W | 110027-471 | |||
| ‘Connectors | R77 | Resistor, 1 KQ, £5%, 1/8 W | 110027-102 | ||
| AUDQ1) | Conn, 40 Ckt, .1x .1 Hdr | 179291-040 | R78 | Resistor, 470 Q, 5%, 1/8 W | 110027-471 |
| I | Conn, 6 Ckt, Hdr, .100 Ctr, | R79 | Resistor, 1 KO, £5%, 1/8 W | 110027-102 |
Key 4 179118-006
| Jv | Conn, 11 Ckt, Hdr, 100 Ctr, | R80 | Resistor, 470 Q, +5%, 1/8 W | 110027-471 | |
| Key 2 | 179118-011 | R81 | Resistor, 1 KQ, £5%, 1/8 W | 110027-102 | |
| RESET. | Conn, 2 Ckt, Hdr, .100 Cer | 179648-002 | R82 | Resistor, 470 2, 45%, 1/8 W | 110027-471 |
| RS3 | Resistor, 10 KQ, 45%, 1/8 W | 110027-103 |
vip Cona, 11 Ckt, Hdr, .100 Ctr,
| Key 3 | 179118-011 | R85 | Resistor, 1 KQ, +5%, 1/8 W | 110027-102 | |
| WDDIS | Conn, 2 Ckt, Hdr, .100 Cir | 179048-002 | R86, R87 | Resistor, 10 ©, +5%, 1/8 W | 116027-100 |
| R88 | Resistor, 100 KQ, +5%, 1/8 W | 110027-104 | |||
| Transistors | R89 | Resistor, 220 Q, 45%, 1/8 W | 110027-221 | ||
| Q1-93 | Transistor, 2N3904 | 133041-001 | |||
| 24,05 | Transistor, 2N5306 | 133033-001 | R90 | Resistor, 10 9, +5%, 1/8 W | 110027-100 |
| 26 | Transistor, 2N3904 | 133041-001 | RO1 | Resistor, 1 KQ, +5%, 1/8 W | 110027-102 |
| R92 | Resistor, 10 Q, +5%, 1/8 W | 110027-100 | |||
| Resistors | RO4-ROG | Resistor, 1 KQ, £5%, 1/8 W | 110027-102 | ||
| RI-R4 | Resistor, 10 KQ, +5%, 1/8 W | 110027-103 | |||
| RS | Resistor, 470 Q, 45%, 1/8 W | 110027-471 | ROT, ROB | Resistor, 100 Q, +5%, 1/8 W | 110027-101 |
| RO | Resistor, 10 KO, 45%, 1/8 W | 110027-103 | R99, R100 | Resistor, 10 KQ, +5%, 1/8 W | 110027-103 |
| R7 | Resistor, 470 Q, £5%, 1/8 W | 110027-471 | RIOL | Resistor, 10 Q, £5%, 1/8 W | 110027-100 |
| R103-R105 | Resistor, 1 KQ, £5%, 1/8 W | 110027-102 | |||
| RB, RO | Resistor, 10 KQ, +5%, 1/8 W | 110027-103 | |||
| R10 | Resistor, 470 Q, +5%, 1/8 W | 110027-471 | R106 | Resistor, 470 Q, +5%, 1/8 W | 110027-471 |
| Ri | Resistor, 10 KQ, £5%, 1/8 W | 110027-103 | R107, R108 | Resistor, 1 KQ, +5%, 1/8 W | 110027-102 |
| R12 | Resistor, 470 Q, 45%, 1/8 W | 110027-471 | RNI-RN3 | Resistor Network, R2R | 118016-001 |
| R13-Ri6 | Resistor, 1 KQ, +5%, 1/8 W | 110027-102 | |||
| RIT, RIB | Resistor, 100 Q, +5%, 1/8 W | 110027-101 | |||
| RIS | Resistor, 220 Q, 15%, 1/8 W | 110027-221 |
Parts Illustrations
NOTES:
- THE FOLLOWING COMPONENTS ARE NOT STUFFED: RLRZ,R15,R16,RUL,RSS,RE7. €1,Co,C7 ,CHY,CH6, C62. 41,x1,03, Pit-Fighter
The Pit-Fighter Board Set Assembly (part no, A047955-02) consists of: A047896-02, Pit-Fighter Game PCB Assy. A047 184-05, JSA Aucio Il PCB Assy. (this illustration) 178278-616, #6 Threaded PCB Support Standoffs 177000-536, #6-32 Nylon Nut
a
| S&S | Duh | F | we | = | Q@ct |
| Me | Me | oo | |||
| i | g | 1S | |||
| 2 | | | ee | > | gdo | |
| } | ot | 3 | ag a | | |
3304 rey ow
| ae | Py | Tra | Ga OF | 2 | = | a, |
| ui | op | am | ||||
| @/|@| | 2 | ao | aie | |||
| a | 3 | a | a | r | 18 | |
| ; | a | i |
~ ce
| > | | | 1 | ||
| tie | Og | BF | ||
| cy | 33 | Csr-2 | 3 | Bix |
, iS?
Figure 4-6 JSA Audio II PCB Assembly A047184-05 B
4-14
Pit-Fighter Paris Illustratrations
JSA Audio II PCB Assembly Parts List
| Designator | Description | Part No. | Designator | Description | Part | |
| Sockets | a7 | Capacitor, .1 AF, 50 V, Ceramic | 122002-104 | |||
| 1B | Socket, 28 Pin, .600-Inch | 179257-028 | C28 | Capacitor, 0068 HF, 50 V, Ceramic | 122015-682 | |
| 1D | Socket, 40 Pin, .600-Inch | 179257-040 | 29 | Capacitor, .22 WF, 50 V, Ceramic | 122017-224 | |
| 2B | Socket, 28 Pin, .600-Inch | 179257-028 | C30 | Capacitor, .1 WF, 50 V, Ceramic | 122002-104 | |
| 3A | Socket, 24 Pin, .600-Inch | 179257-024 | ||||
| 7D, TE, 7, 7K | Socket, 28 Pin, .600-Inch | 179257-028 | C31 | Capacitor, .001 HF, 50 V, Ceramic | 122002-102 | |
| C32 | Capacitor, 10 pF, 25 V, Electrolytic | 124009-106 | ||||
| ‘Miscellaneous | €33-C35 | Capacitor, .1 PF, 50 V, Ceramic | 122002-104 | |||
| ql | Connector, 40-Ckt, 1.x .1 | 179292-040 | C36 | Capacitor, .001 1F, 50 V, Ceramic | 122002-102 | |
| TAB | Nut/Washer Assy, #6-32 | 75-9516 | ||||
| 7A/B | Screw, Pan Hd, X-Rec, #6-32 x 3/8°L | _72-1606S | C37, C38 | Capacitor, .1 WF, 50 V, Ceramic | 122002-104 | |
| ++1005V1 | Test Point | 179051-001 | 39 | Capacitor, .001 IF, 50 V, Ceramic | 122002-102 | |
| C40, C4i | Capacitor, .1 4F, 50 V, Ceramic | 122002-104 | ||||
| AGND1 | Test Point | 179051-001 | ca2 | Capacitor, .0068 pF, 50 V, Ceramic | 122015-682 | |
| GNDi, GND2 | Test Point | 179051-001 | ||||
| HS! | Heat Sink, TDA2030 | 178190-016 | C43, | Capacitor, .001 pF, 50 V, Ceramic | 122002-102 | |
| SW | Switch, Slide, SPDT | 160040-901 | CAS | Capacitor, .015 HF, 100 V, 45%, Poly, | ||
| 7A/B | Thermal Compound | 78-16001 | Radial | 126009-153, | ||
| cA7 | Capacitor, .1 fF, 50 V, Ceramic | 122002-104 | ||||
| Integrated Circuits | C48, | Capacitor, 10 UF, 25 V, Electrolytic | 124009-106 | |||
| 1B | Integrated Circuit, EPROM, 200nsec | —_136081-1060 | ||||
| 1D | Integrated Circuit, 6502 A | 137577-001 | 49 | Capacitor, .1 pF, 50 V, Ceramic | 122002-104 | |
| 2B | Integrated Circuit, RAM, 8Kx8, 100 nsec | 137535-004 | 50 | Capacitor, .22 wR, 50 V, Ceramic | 122017-224 | |
| 2D | Integrated Circuit, PALI6L8 | 136056-2101 | C51, C52, | Capacitor, 10 UF, 25 V, Electrolytic | —_—_-124009-106 | |
| C53 | Capacitor, .1 HF, 50 V, Ceramic | 122002-104 | ||||
| 2F | Integrated Circuit, 7418240 | 137251-001 | ||||
| 3A | Integrated Circuit, YM2151 | 137401-001 | 54 | Capacitor, 47 UF, 25 V, Electrolytic | —_-124009-476 | |
| 3B | Integrated Circuit, 4066B | 137580-001 | 55 | Capacitor, 22 UF, 50 V, Ceramic | 122017-224 | |
| 3c | Integrated Circuit, 7418174 | 137122-001 | C56 | Capacitor, 22 KF, 35 V, Electrolytic | -:124090-226 | |
| €57-C59 | Capacitor, .1 HF, 50 V, Ceramic | 122002-104 | ||||
| 3D | Integrated Circuit, SCUM | 137526-001 | ||||
| 3F | Integrated Circuit, 74138 | 137177-001 | 60, C61 | Capacitor, 470 pF, 25 V, Elecrrolytic, | ||
| 4D | Integrated Circuit, 7418273 | 137040-001 | Radial | 123003-477 | ||
| 4F | Integrated Circuit, 74LS$132 | 137096-001 | C63-C67 | Capacitor, .1 pF, 50 V, Ceramic | 122002-104 | |
| 4K | Integrated Circuit, 7415393 | 137146-001 | Diodes | |||
| 5A | Integrated Circuit, YM3012 | 137402-001 | CRI, CR2 | Diode, 1N4001 | 131048-001 | |
| SF | Integrated Circuit, 741874 | 137023-001 | CR3-CRS | Diode, MV5053, Light-Emitting | 131027-002 | |
| 5K | Integrated Circuit, 7415393 | 137146-001 | CRO, CRT | Diode, 1N4001 | 131048-001 | |
| 6A, 6B, 6C | Integrated Circuit | 137579-001 | ‘Transistors | |||
| 6D/E | Integrated Circuit (Surface Mount) | _—_137607-001 | Ql, @2, Q4 | Transistor, 2N5306 | 133033-001 | |
| OF | Integrated Circuit, | 741874 | 137023-001 | 25, Q6 | ‘Transistor, 2N3904 | 133041-001, |
| OK | Integrated Circuit, 741886 | 137079-001 |
Resistors
| 7A/B | Integrated Circuit, TDA2030 | 137301-001 | R3 | Resistor, 10 KQ, 45%, 1/8 W | 110027-103 |
| 7D | Integrated Circuit, OTR 200 nsec | —136081-1064 | RERI2 | Resistor, 1 KQ, 45%, 1/8 W | 110027-102 |
| JE | Integrated Circuit, OTP, 200 nsec | 136081-1063 | R13. | Resistor, 0 Q, £5%, 1/4 W | 110005-001 |
| a | Integrated Circuit, OTP, 200 nsec | 136081-1062 | R14, R17 | Resistor, 1 KQ, 45%, 1/8 W | 110027-102 |
| TK | Integrated Circuit, OTP, 200 nsec | 136081-1061 | |||
| R18 | Resistor, 100 KQ, +5%, 1/8 W | 110027-104 | |||
| Capacitors | R19 | Resistor, 240 Q, 25%, 1/8 W | 110027-241 | ||
| C2-€5, C8, C9 | Capacitor, .1 pF, 50 V, Ceramic | 122002-104 | R20 | Resistor, 10 KQ, $5%, /8 W | 110027-103 |
| C10 | Capacitor, 1 JF, 50 V, Electrolytic | 124001-105 | R21 | Resistor, 7.5 KQ, 45%, 1/8 W | 110027-752 |
| C1116 | Capacitor, .1 lF, 50 V, Ceramic | 122002-104 | |||
| c17-C20 | Capacitor, 100 pF, 100 V, Ceramic | 122016-101 | R22 | Resistor, 15 KQ, 45%, /8 W | 110027-153 |
| R23 | Resistor, 7.5 KQ, 45%, 1/8 W | 110027-752 | |||
| €21-C23 | Capacitor, .1 HF, 50 V, Ceramic | 122002-104 | R24, R25 | Resistor, 36 KQ, 45%, 1/8 W | 110027-303 |
| C24 | Capacitor, .22 UF, 50 V, Ceramic | 122017-224 | R26, R27 | Resistor, 15 KQ, 45%, 1/8 W | 110027-153 |
| C25 | Capacitor, 3300 pF 50 V | 122015-332 | |||
| C26 | Capacitor, .0022 pF, 100 V, Plastic | 121022-222 | R28 | Resistor, 7.5 KQ, +5%, 1/8 W | 110027-752 |
| R29, R30 | Resistor, 470 2, 5%, 1/8 W | 110027-471 | |||
| R31-R33 | Resistor, 1 KQ, 45%, 1/8 W | 110027-102 |
4-15
Parts Illustrations Pit-Fighter
JSA Audio II PCB Assembly Parts List, Continued
| Designator | Description | Part No. | Designator | Description | Part No. | |
| R34 | Resistor, 150 KQ, 45%, 1/8 W | 110027-154 | R51 | Resistor, 1.2 KO, 35%, 1/8 W | 110027-122 | |
| R52 | Resistor, 470 Q, 5%, 1/8 W | 110027-471 | ||||
| R35 | Resistor, 470 Q, +5%, 1/8 W | 110027-471 | RSS | Resistor, 100 KQ, $5%, 1/8 W | 110027-104 | |
| 36 | Resistor, 360 2, 45%, 8 W | 110027-561 | ||||
| R37 | Resistor, 3.3 KO, +5%, 1/8 W | 110027-332 | R54 | Resistor, 6.8 KQ, 45%, 1/8 W | 110027-682 | |
| R38, R39 | Resistor, 12 KO, +5%, 1/8 W | 110027-123 | R56 | Resistor, 20 KO, 45%, 1/8 W | 310027-203 | |
| R57 | Resistor, 10 KO, 45%, 1/8 W | 110027-103 | ||||
| R40 | Resistor, 20 KQ, £5%, 1/8 W | 110027-203 | R58 | Resistor, 6.8 KQ, £5%, 1/8 W | 110027-682 | |
| R42 | Resistor, 100 KQ, 45%, 1/8 W | 110027-104 | ||||
| R43 | Resistor, 2 KQ, | +5%, 1/8 W | 110027-202 | R59 | Resistor, 16 KQ, +5%, 1/8 W | 110027-163 |
| RAG | Resistor, 10 KQ, 45%, 1/8 W | 110027-103 | R6O | Potentiometer, 10 KQ, Horizontal | 119022-103 | |
| R61 | Resistor, 15 KQ, 45%, 1/8 W | 110027-153 | ||||
| RAS | Resistor, 68 KQ, +5%, 1/8 W | 110027-683 | R62, ROS | Resistor, 47 KQ, 45%, 1/8 W | 110027-473 | |
| R46 | Resistor, 15 KO, +5%, 1/8 W | 110027-153 | ||||
| RA7 | Resistor, 33 KQ, 45%, 1/8 W | 110027-333 | R64 | Resistor, 68 KQ, +5%, 1/8 W | 110027-683 | |
| RAB | Resistor, 1 KQ, +5%, 1/8 W | 110027-102 | ROS | Resistor, 33 KO, 45%, 1/8 W | 110027-333 | |
| ROG | Resistor, 1 KQ, +5%, 1/8 W | 110027-102 | ||||
| RA, R50 | Resistor, 10 KQ, +5%, 1/8 W | 110027-103 |
4-16
CHAPTER 5
Schematic
Diagrams
This chapter contains wiring diagram is also
| the schematics dia- | ° | included. The two |
| grams for your Pit- | a | PCB assembly draw- |
| Fighter™ game PCB | ee | ings are illustrated in |
and the JSA Audio II PCB. The game _— Chapter 4 of this manual.
This page reads as a drawing: its text was drawn rather than typeset, and comes out in fragments. See the original scan.
This page reads as a drawing: its text was drawn rather than typeset, and comes out in fragments. See the original scan.
Schematic Diagrams Pit-Fighter
+SV ‘- io wee w 68, /AUDIRO- Peal PRE Prafiqree | eon Ac erals —gog gedit z iro ase] weet tale 4] Pg a deat ats] 45C,_ vpLank— RIS trop ‘1 68, /RES: S@dreset aig eo./tRaack—> oak iH aay aio jg 850 = en BY Fo ce.renned PS Pret A
| 4300 | rt | 5 | |
| |, (EEROM—E | aa) | 3 | fa |
| 88. 7ae0 | me | PF | 83 |
| 68.cuk—f | 2 | fe | |
| 68, /07RGK | 1 | fy |
- /VPR nis Osa Fre] 68.05. ose ay Et) fy on or| 68.A8: oe Fr FS) FeO Lever
PRE % tee" hey 2 3 lo § al Feo
| al | dle | sog | 75 | ms |
Ge. /FROR Hy Det 68. /0TACK ie [53
bz bt, erm SESSS: FR BSSSSSES
- /CRAM pib-68./FROM oe 68 :/ECROM 24268. /AUORD pites./A20 pides./si Ppstetstetet SERS2aRS 1108 68./ns2q>*— 68.05 Foa 1108 68.R/4 S02 68.6/R Fod Bs bE; 68./1RORCK Bit 69. /HOCNT bi2 6. /AUORES 25 68 /AUDWR > 68, /UNLOCK p48 68. /wo0d
145c ‘
5-4
This page reads as a drawing: its text was drawn rather than typeset, and comes out in fragments. See the original scan.
Schematic Diagrams
sine-4+—_*lSot | 3, 408, FE Hey aS FO0 une
‘ue C3 2220
[> viD-14
JaM-P
yip-9
yio-10
cS. €32200P ENDS yin-8 Pit-Fighter
This page reads as a drawing: its text was drawn rather than typeset, and comes out in fragments. See the original scan.
Schematic Diagrams
Ja-4 Ji-40 J1-2 J1-32 J1-39 Ja-40
J1-3 Ji-4 J1-7 J1-8 4-43
5-8 N68 a <TLo84 Pit-Fighter
C2,8,9,22,23, 30,47 ,63-67
at CBYPASS >
41-33)—-—>
Jie5t J1-35 > ++ 1k J1-36
Pit-Fighter
AUD ——
3579K Schematic Diagrams
CceL ceo 4 ye J1-15 470/25V 470/25V
me [oe > Ji-16
a 13), ao? ‘VRGNO
PR
Sv
REG baat 10K
Ls74 /1
/TROACK 71RQ anaadt
SELF-TEST A YB
mnt SFULL = nl i
the vit
ala S vie a7 4 ne sla 3 ye ik Sn Rid ny a s07
S06
sos
sO4
$02
sD1
soo
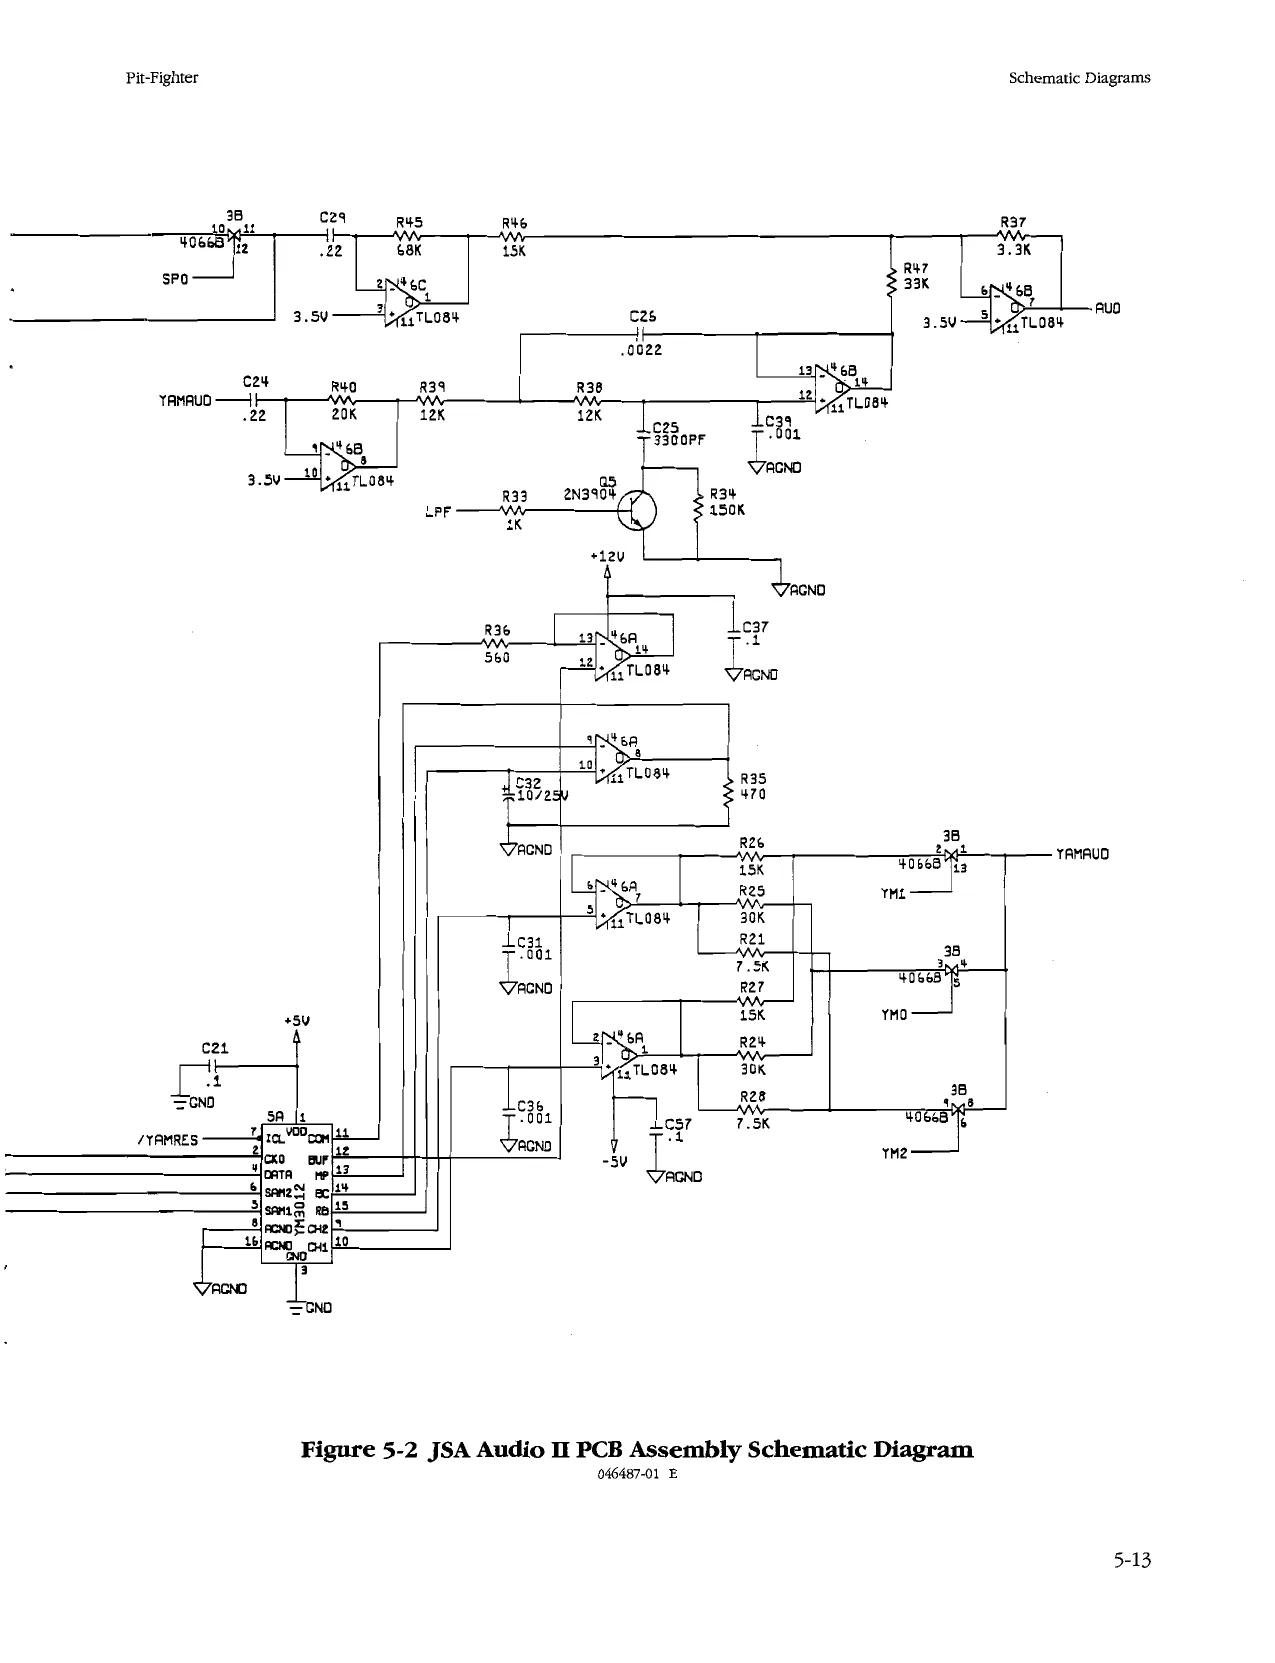
Figure 5-2 JSA Audio It PCB Assembly Schematic Diagram 046487-01 E
5-9
This page reads as a drawing: its text was drawn rather than typeset, and comes out in fragments. See the original scan.
This page reads as a drawing: its text was drawn rather than typeset, and comes out in fragments. See the original scan.
Schematic Diagrams Pit-Fighter
3300PF
RSS 3.3K
VAGNO
Sui.
SELF-TEST cs
J1-29
J1-23
Ja-21
J1-25,
5-12
This page is a drawing, shown as the original scan.
This page reads as a drawing: its text was drawn rather than typeset, and comes out in fragments. See the original scan.
This page is a drawing, shown as the original scan.
Schematic Diagrams
N
5-16 O Pit-Fighter
S
AL oS, ° > = m
Date:
Statistics Screen
Left Coins;
Right Coins: 0 Player Minutes: 1 Player Minutes: 2 Player Minutes: 3 Player Minutes: Sessions:
New Games:
Continued Games: New (Game) Mins: Cont. (Game) Mins:
Error Count:
Total Credits:
Avg Time/Credit: Avg Time/New Game: Avg. Time/Cont. Game: Location:
Histogram Screens
Histogram 1: Histogram 2: New Games Continuations in in Seconds Seconds
| 0-39 | — | 0-39 | — |
| 4059 | _ | 40-59 | — |
| 60-79, | 60-79 | — | |
| 80-99, | 80-99 | — | |
| 100-119, | ___ | 100-119 | ___ |
| 120-139 | __ | 120-139 | __ |
| 140-159 | __ | 140-159 | ___ |
| 160-179 | ___ | 160-179 | ___ |
| 180-199 | __ | 180-199 | __ |
| 200-219 | ___ | 200-219 | ___ |
| 220-239 | ___ | 220-239 | __ |
| 240-259 | __ | 240-259 | ___ |
| 260-279 | ___ | 260-279 | __ |
| 280-299 | __ | 280-299 | |
| 300-319 | __ | 300-319 | __ |
| 320-339 | __ | 320-339 | __ |
| 340-359 | 340-359 | __ | |
| 360-379 | __ | 360-379 | __ |
| 380-399 | __ | 380-399 | __ |
400 & up 400 & up Histogram 3: Sessions in Minutes
0-2
35 __
12-14
15-17
18-20
21-23
24-26
27-29 —
30-32 — 33-35 — 36-38 —— 39-41 — 42-44
45-47 — 48-50 —
51-53 —
54-56 —
57&up ___
This page carries no recoverable text. It is a drawing or a photograph. See the original scan.
This page carries no recoverable text. It is a drawing or a photograph. See the original scan.
Atari Games Corporation
675 Sycamore Drive
P.O. Box 361110
Milpitas, CA 95036