Narc Preliminary Service Manual with Schematics (16-3036-101) Dec 1988
Narc (rev 7.00) (Williams, 1988) · Schematics · 60 pages · 13 sections · original scan
This page is a drawing, shown as the original scan.
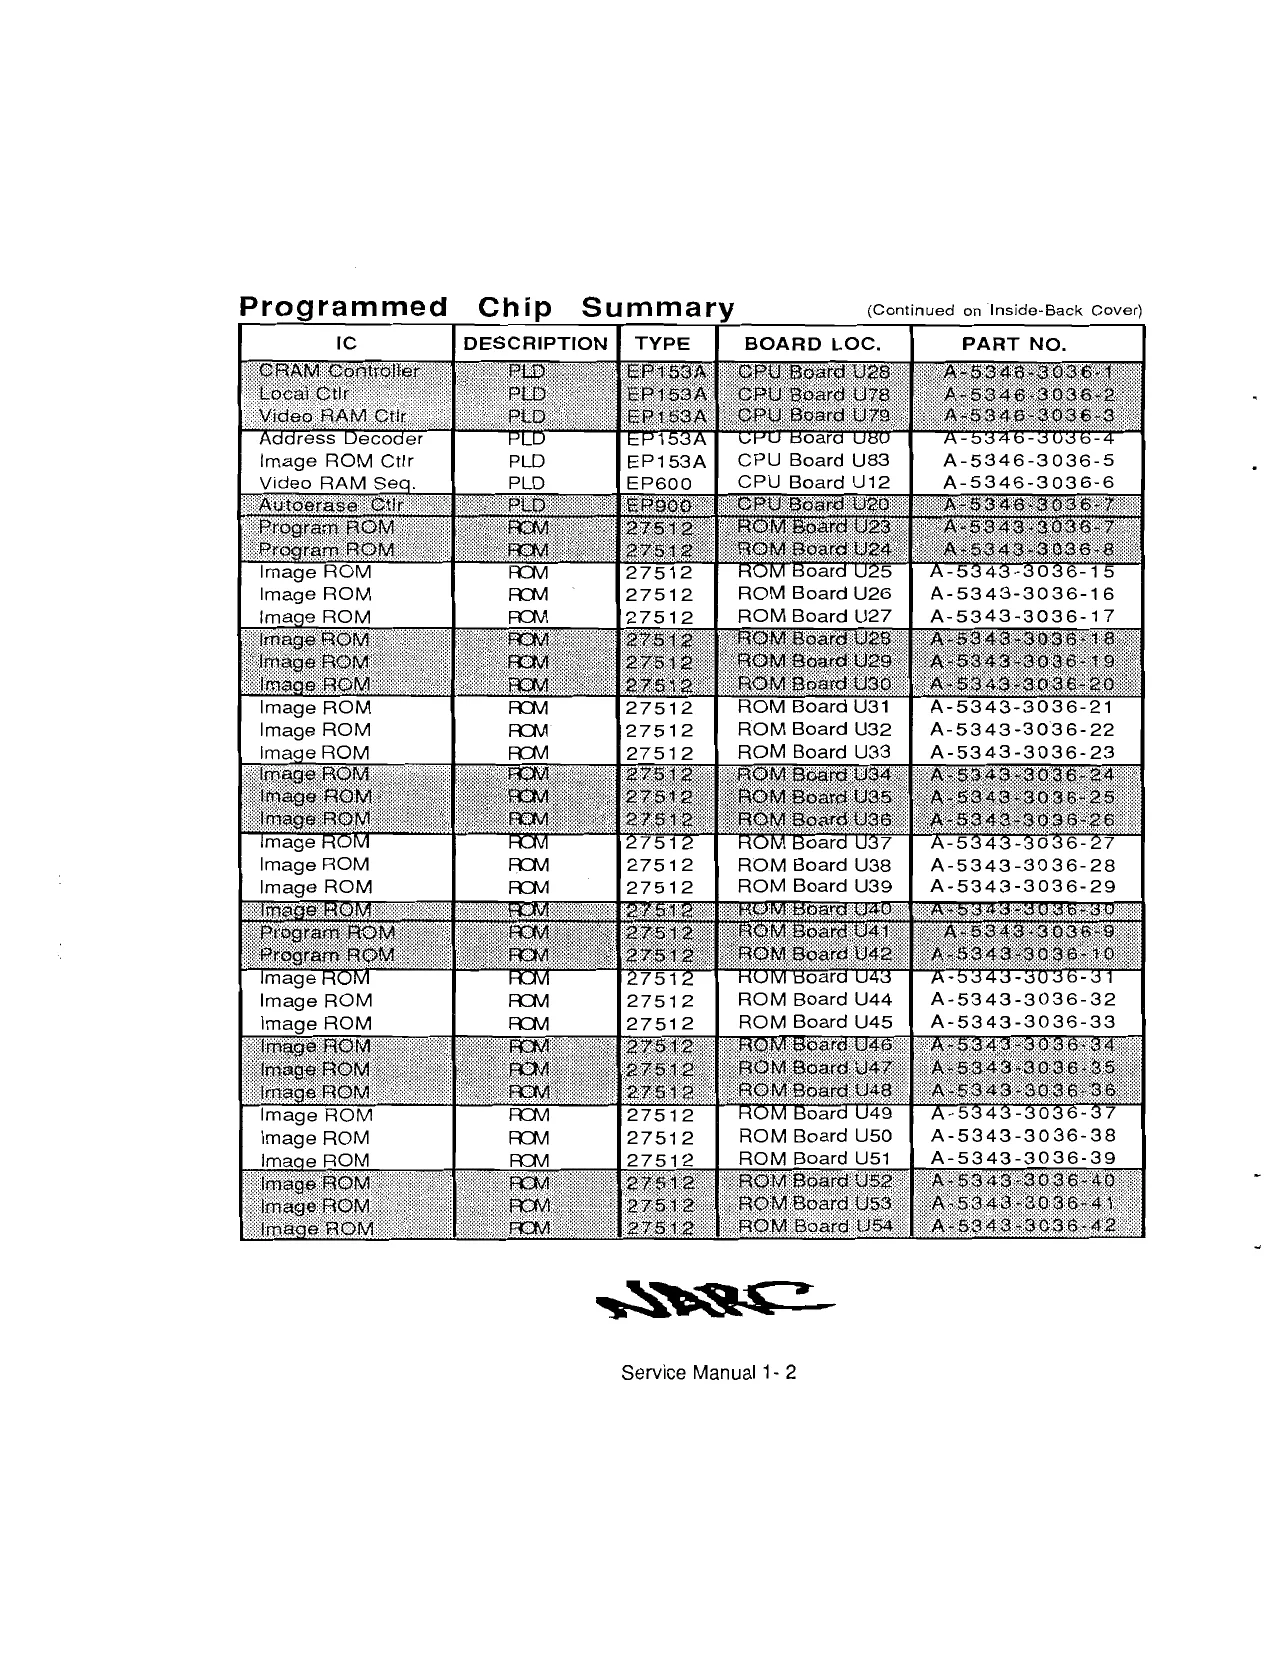
This page is a drawing, shown as the original scan.
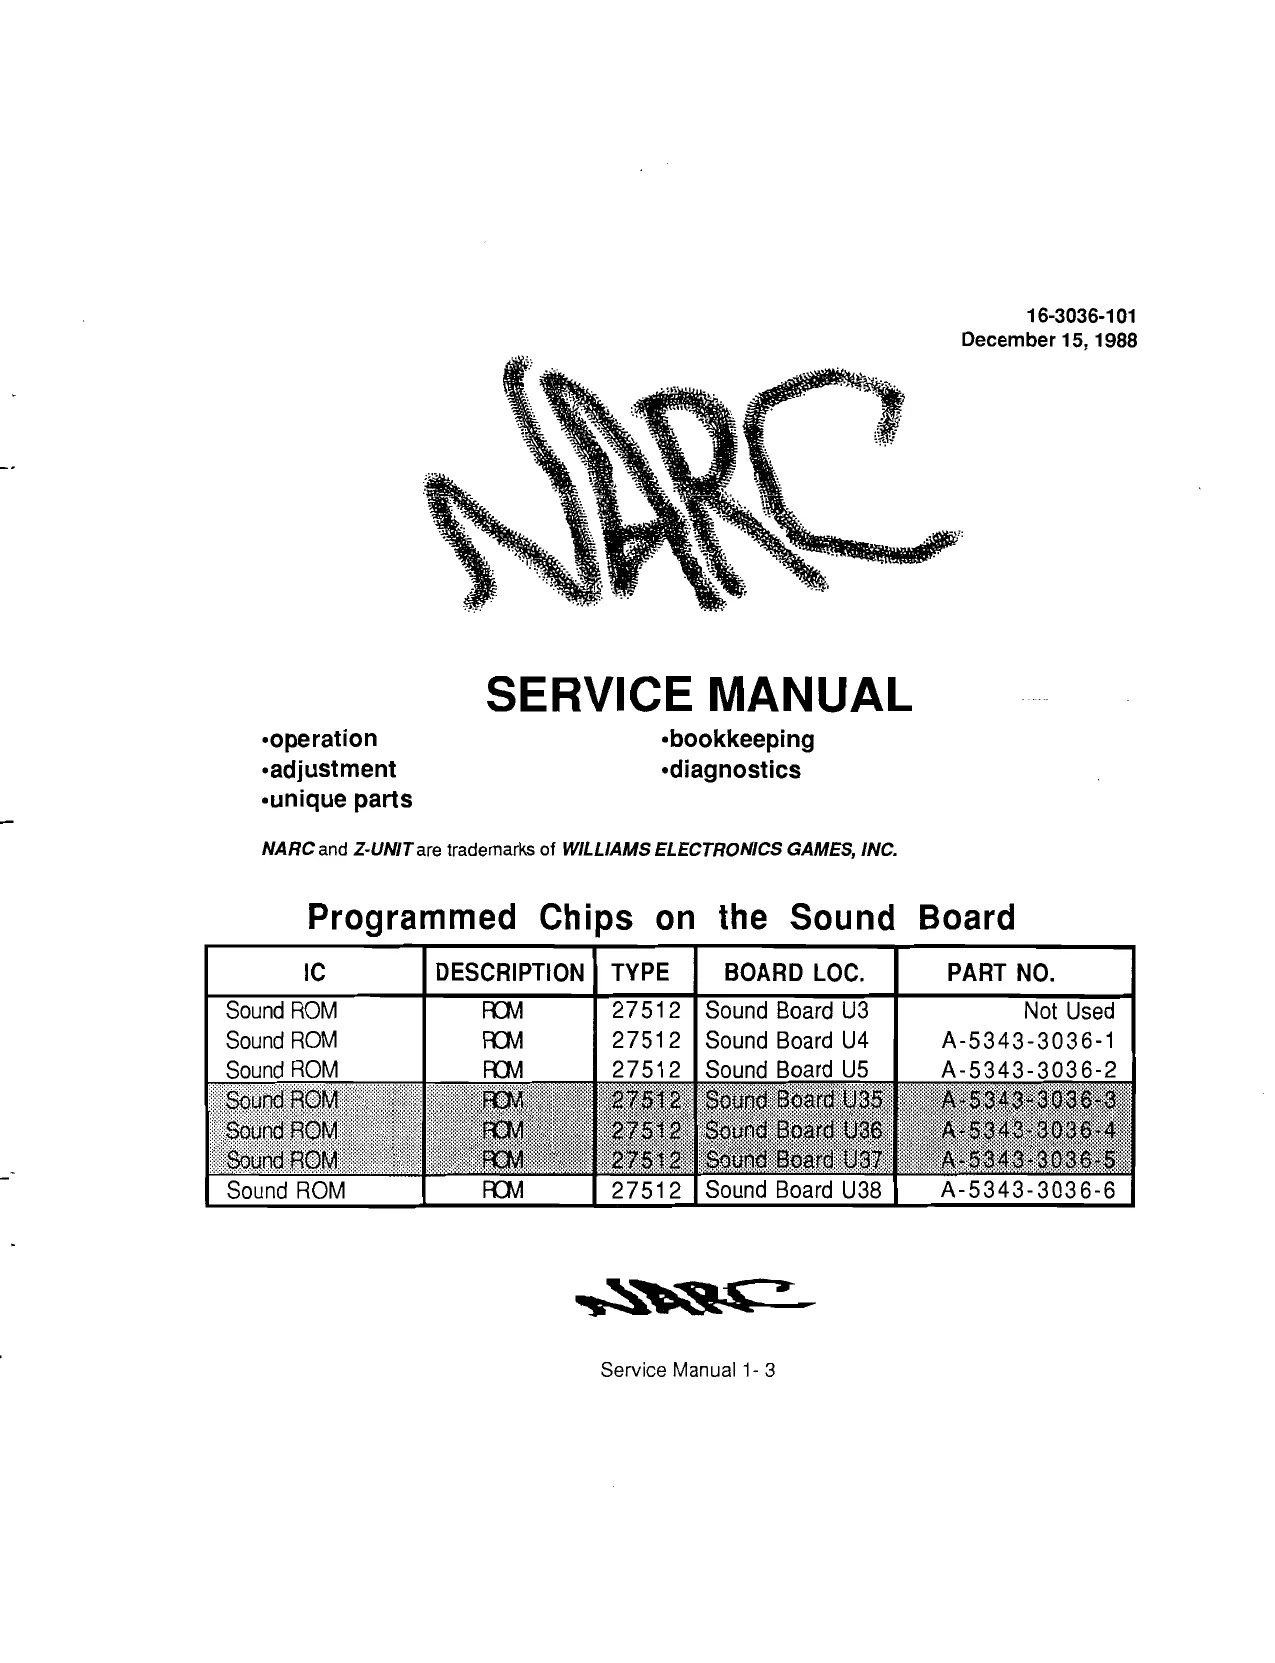
This page is a drawing, shown as the original scan.
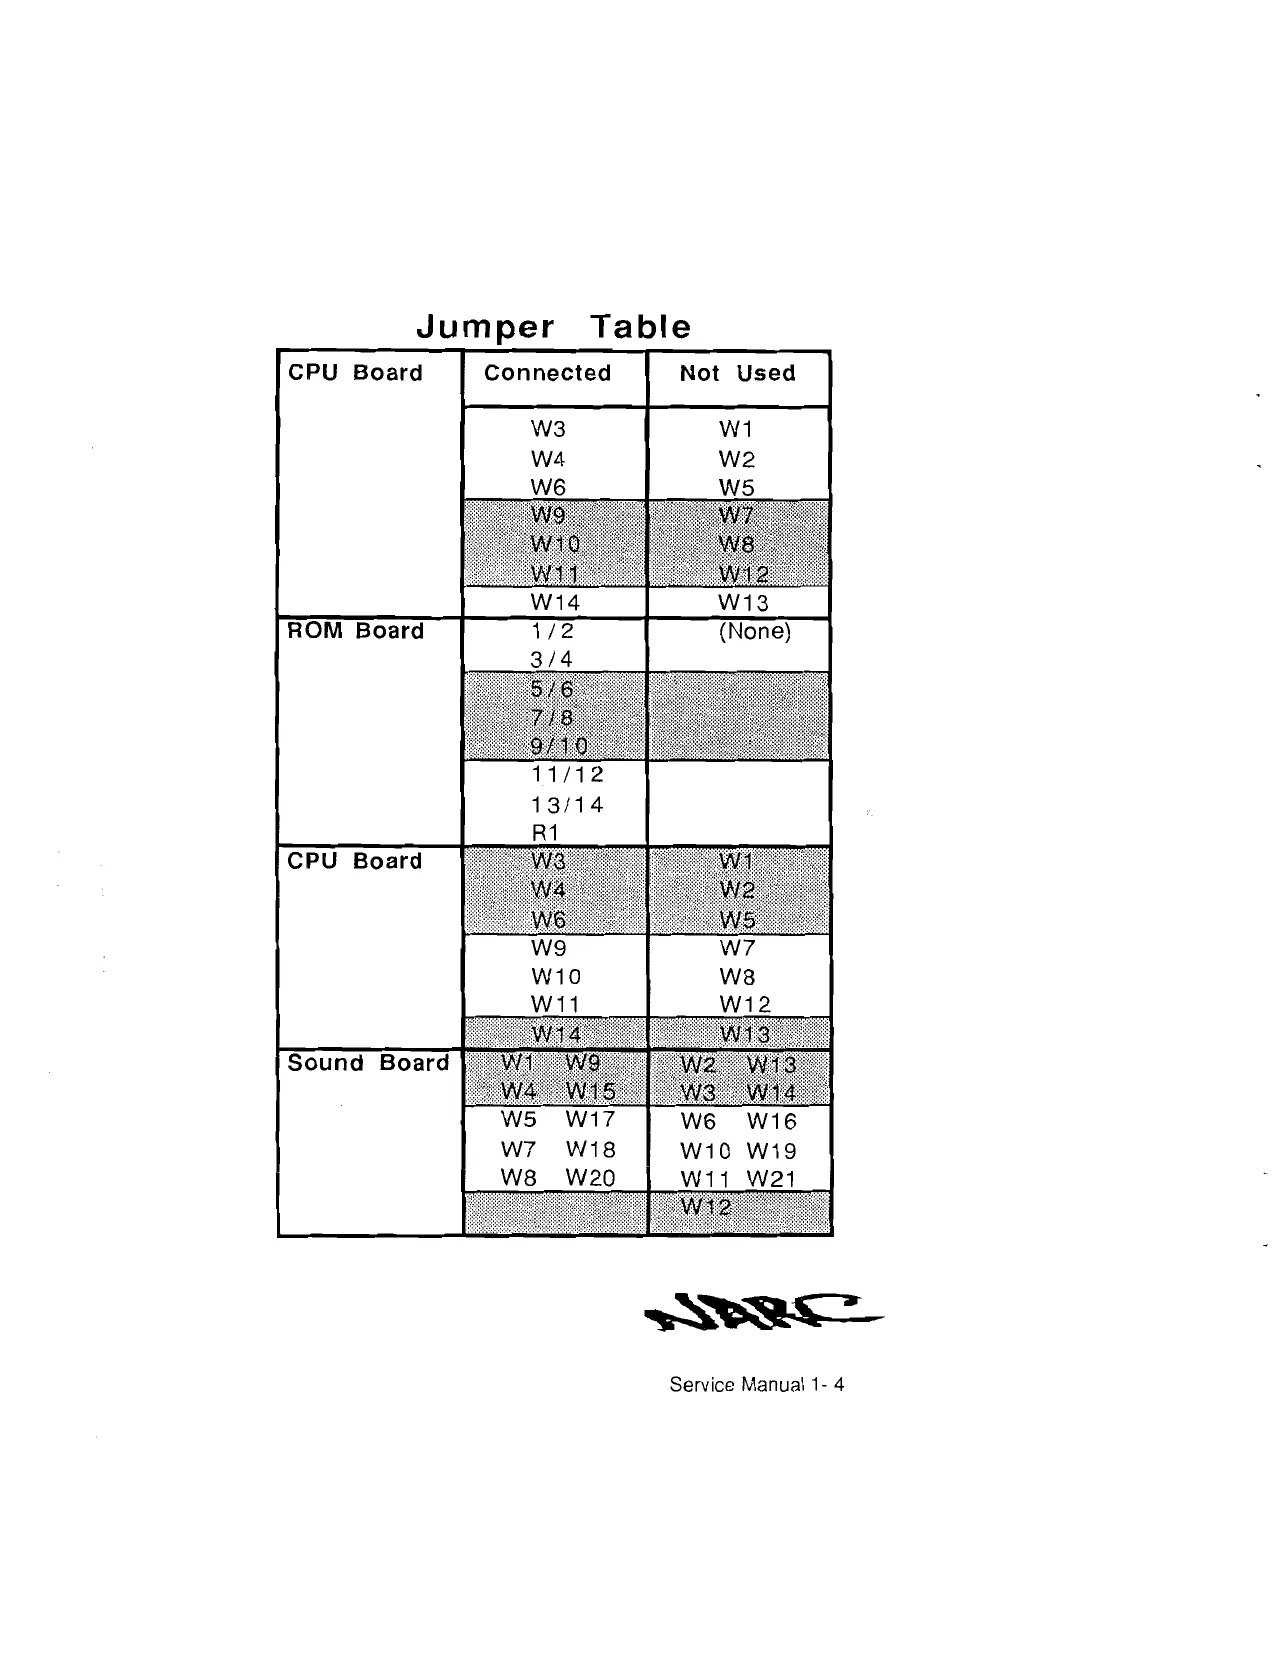
This page is a drawing, shown as the original scan.
This page is a drawing, shown as the original scan.

This page is a drawing, shown as the original scan.
This page is a drawing, shown as the original scan.
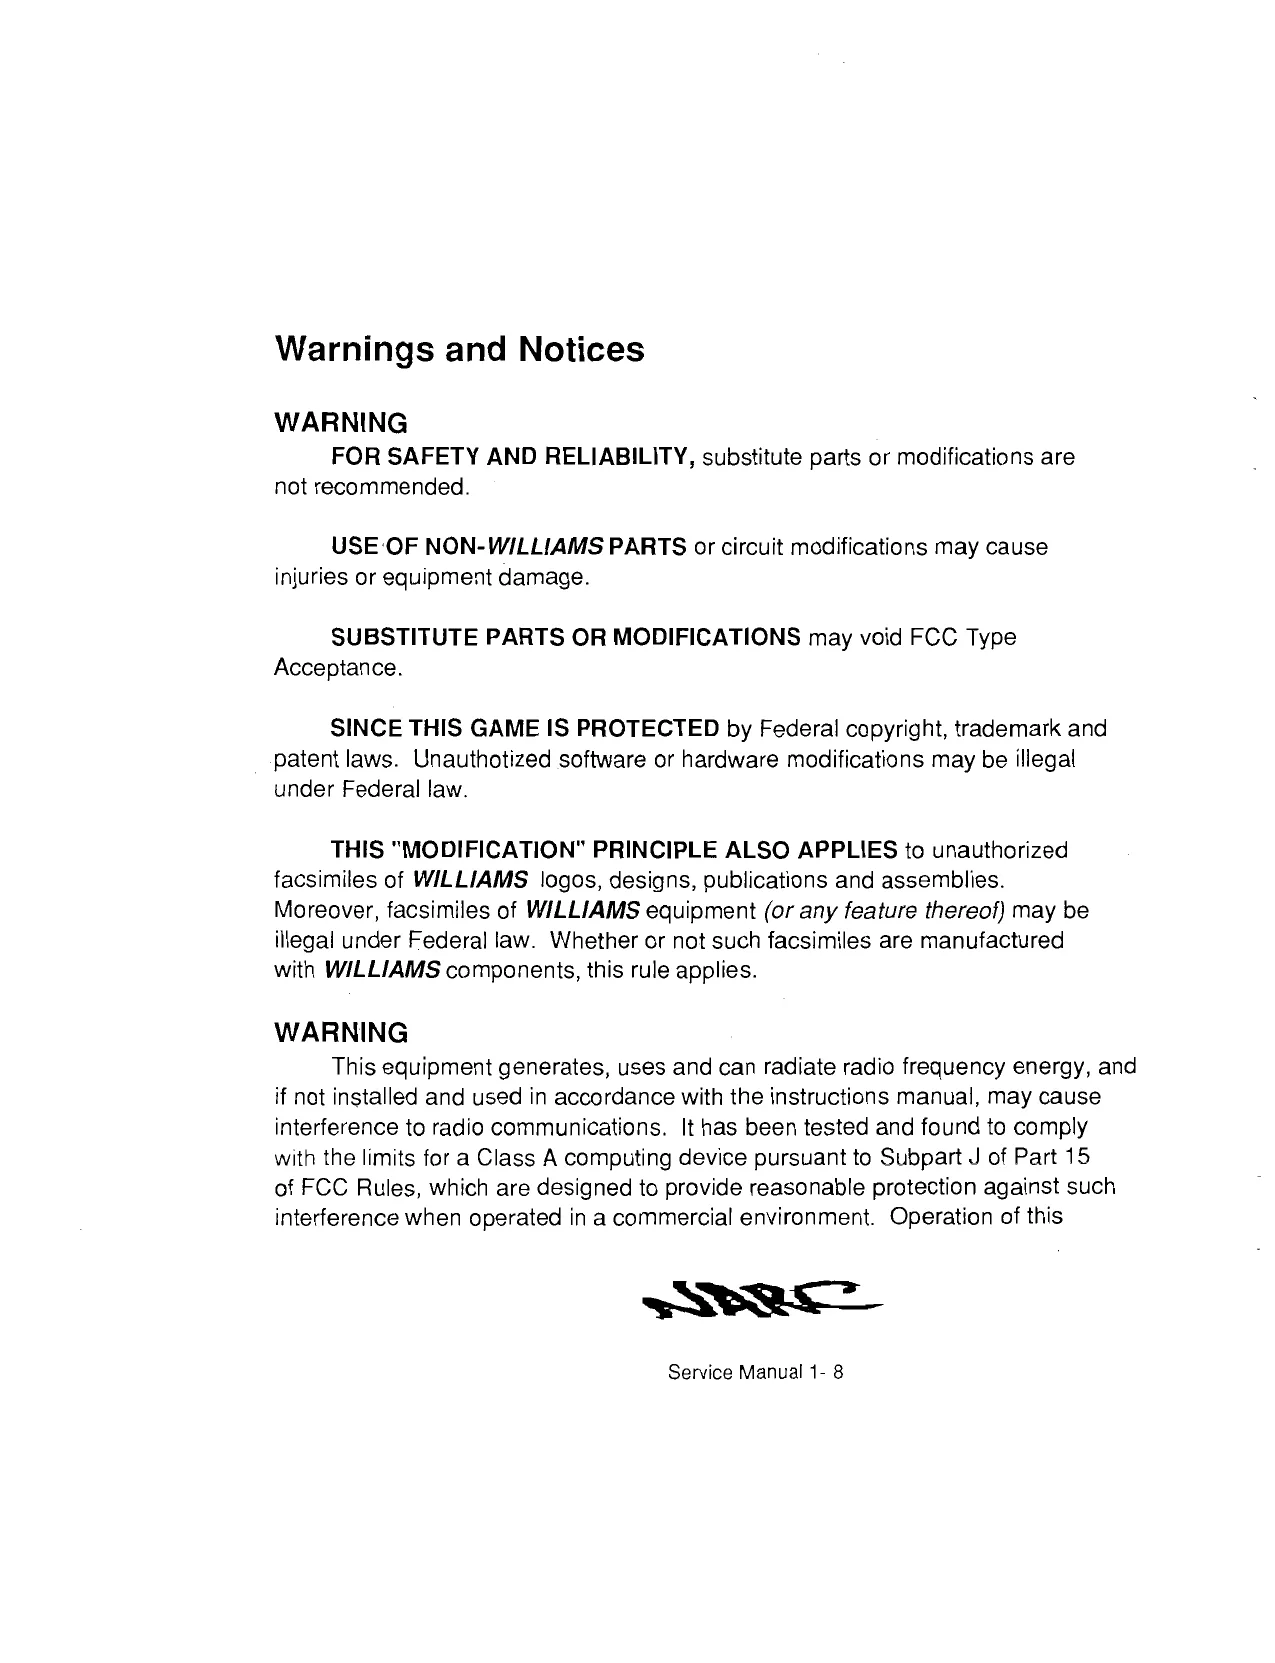
Warnings and Notices
USE-‘OF NON-WILLIAMS PARTS or circuit mcdifications may cause injuries or equipment damage.
SUBSTITUTE PARTS OR MODIFICATIONS may void FCC Type Acceptance.
SINCE THIS GAME IS PROTECTED by Federal copyright, trademark and patent laws. Unauthotized software or hardware modifications may be illegal under Federal law.
THIS "MODIFICATION" PRINCIPLE ALSO APPLIES to unauthorized facsimiles of WILLIAMS logos, designs, publications and assemblies. Moreover, facsimiles of WILLIAMS equipment (or any feature thereof) may be ilegal under Federal law. Whether or not such facsimiles are manufactured with WILLIAMS components, this rule applies.
SR
Service Manual 1- 8
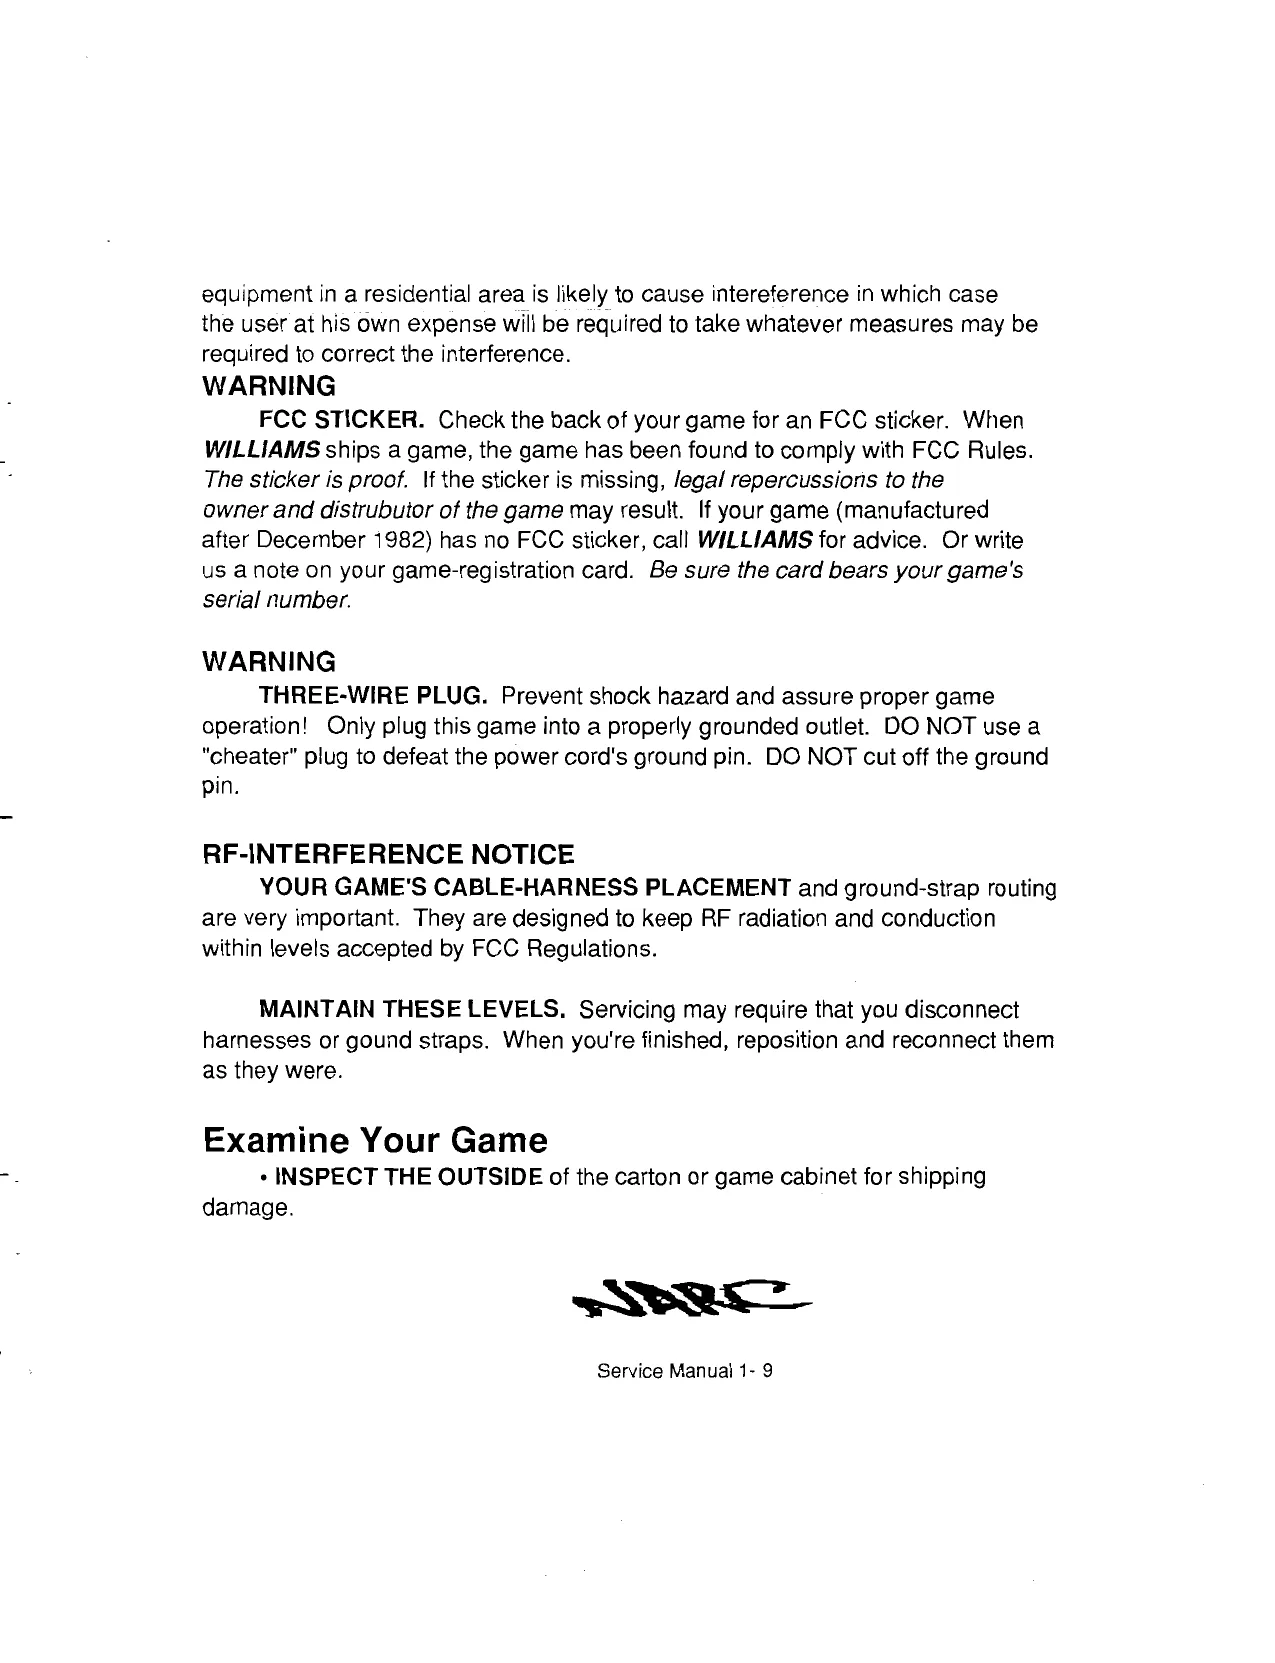
equipment in a residential area is likely to cause intereference in which case the user at his own expense will be required to take whatever measures may be required to correct the interference.
RF-INTERFERENCE NOTICE YOUR GAME'S CABLE-HARNESS PLACEMENT and ground-strap routing are very important. They are designed to keep RF radiation and conduction within levels accepted by FCC Regulations.
MAINTAIN THESE LEVELS. Servicing may require that you disconnect harnesses or gound straps. When you're finished, reposition and reconnect them as they were.
Examine Your Game + INSPECT THE OUTSIDE of the carton or game cabinet for shipping damage.
SEV
Service Manuai 1- 9
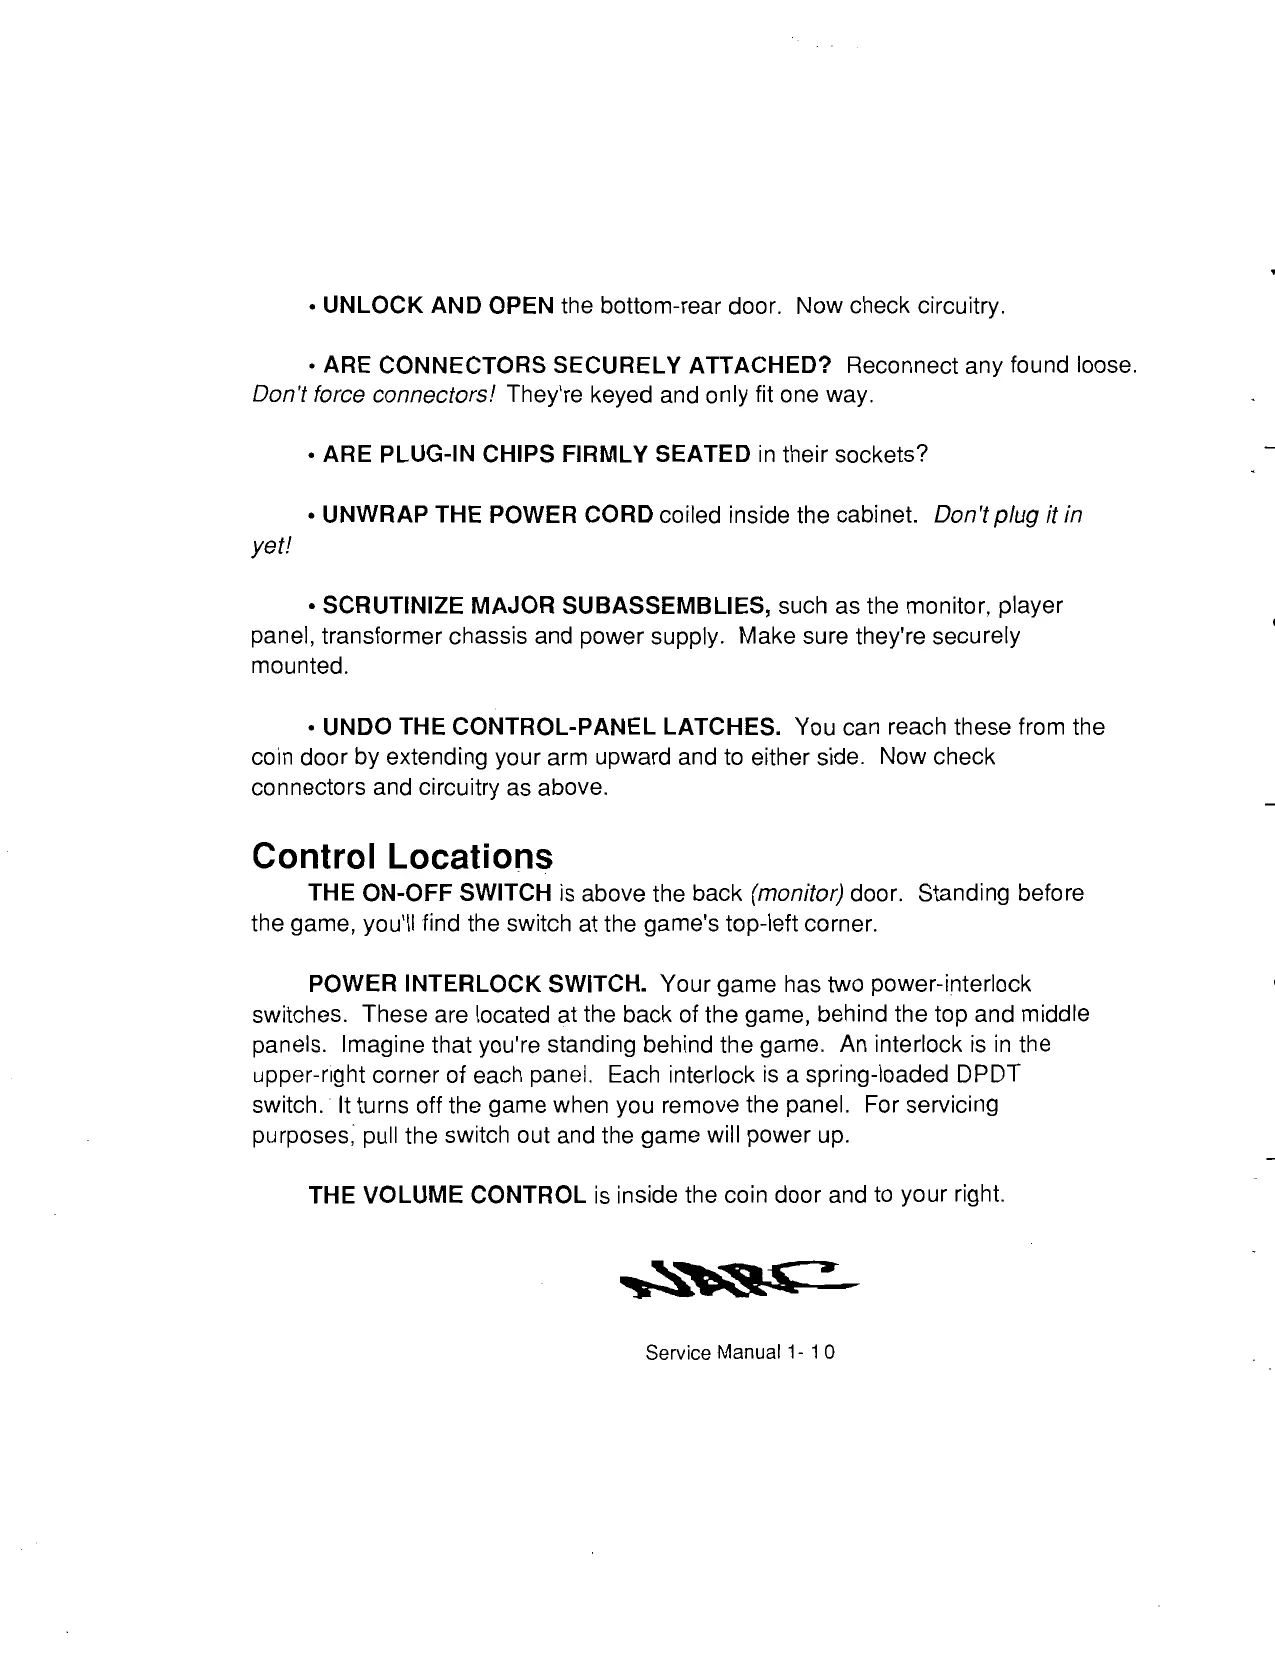
+ UNLOCK AND OPEN the bottom-rear door. Now check circuitry.
+ ARE CONNECTORS SECURELY ATTACHED? Reconnect any found loose. Don't force connectors! They're keyed and only fit one way.
- ARE PLUG-IN CHIPS FIRMLY SEATED in their sockets?
+» UNWRAP THE POWER CORD coiled inside the cabinet. Don't plug it in yet!
+ SCRUTINIZE MAJOR SUBASSEMBLIES, such as the monitor, player panel, transformer chassis and power supply. Make sure they're securely mounted.
+ UNDO THE CONTROL-PANEL LATCHES. You can reach these from the coin door by extending your arm upward and to either side. Now check connectors and circuitry as above.
Control Locations THE ON-OFF SWITCH is above the back (monitor) door. Standing before the game, you'll find the switch at the game's top-left corner.
POWER INTERLOCK SWITCH. Your game has two power-interlock switches. These are located at the back of the game, behind the top and middle panels. Imagine that you're standing behind the game. An interlock is in the upper-right corner of each panel. Each interlock is a spring-loaded DPDT switch. It turns off the game when you remove the panel. For servicing purposes, pull the switch out and the game will power up.
THE VOLUME CONTROL is inside the coin door and to your right.
SSR
Service Manual 1- 10
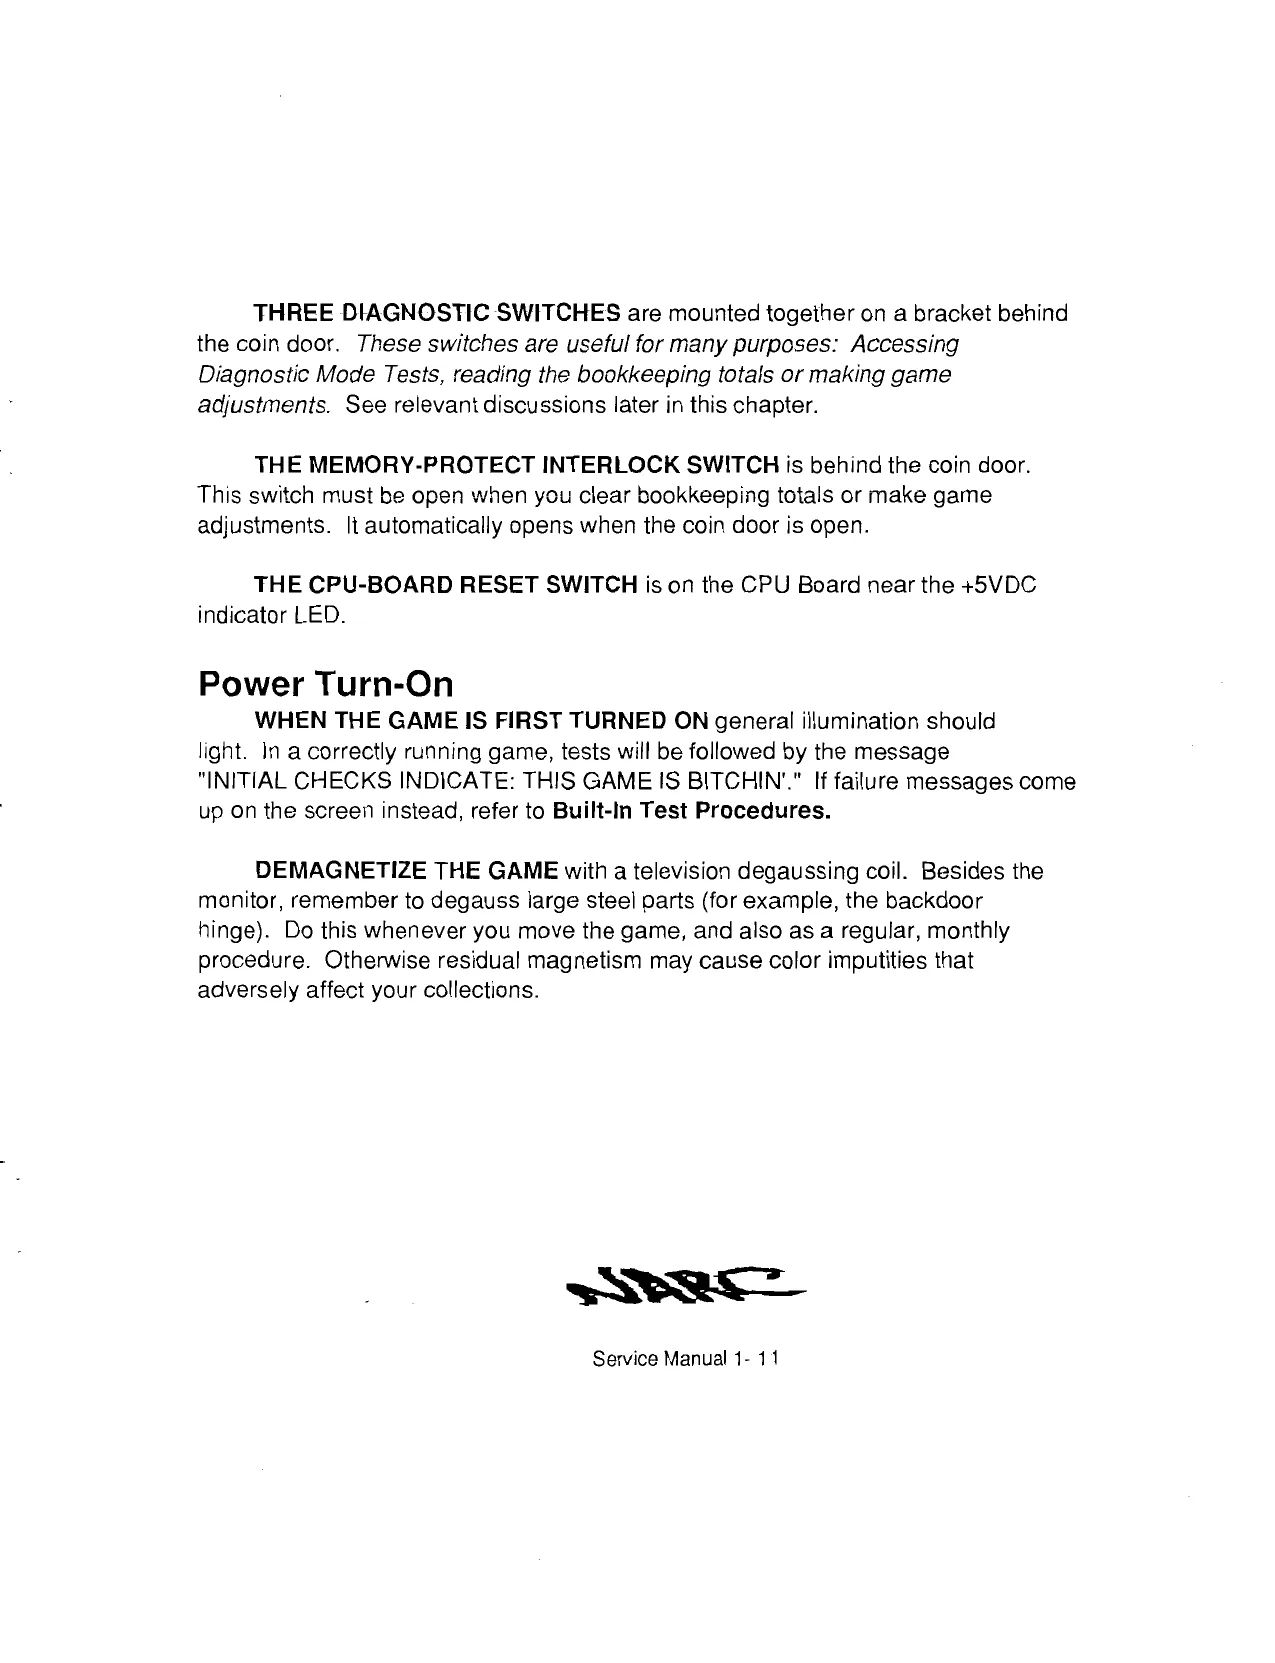
THREE DIAGNOSTIC SWITCHES are mounted together on a bracket behind the coin door. These switches are useful for many purposes: Accessing Diagnostic Mode Tests, reading the bookkeeping totals or making game adjustments. See relevant discussions later in this chapter.
THE MEMORY-PROTECT INTERLOCK SWITCH is behind the coin door. This switch must be open when you clear bookkeeping totals or make game adjustments. It automatically opens when the coin door is open.
THE CPU-BOARD RESET SWITCH is on the CPU Board near the +5VDC indicator LED.
Power Turn-On WHEN THE GAME IS FIRST TURNED ON general illumination should light. In a correctly running game, tests will be followed by the message "INITIAL CHECKS INDICATE: THIS GAME IS BITCHIN'." If failure messages come up on the screen instead, refer to Built-In Test Procedures.
DEMAGNETIZE THE GAME with a television degaussing coil. Besides the monitor, remember to degauss large steel parts (for example, the backdoor hinge). Do this whenever you move the game, and also as a regular, monthly procedure. Otherwise residual magnetism may cause color imputities that adversely affect your collections.
SS Ce
Service Manual 1- 11
Game Operation
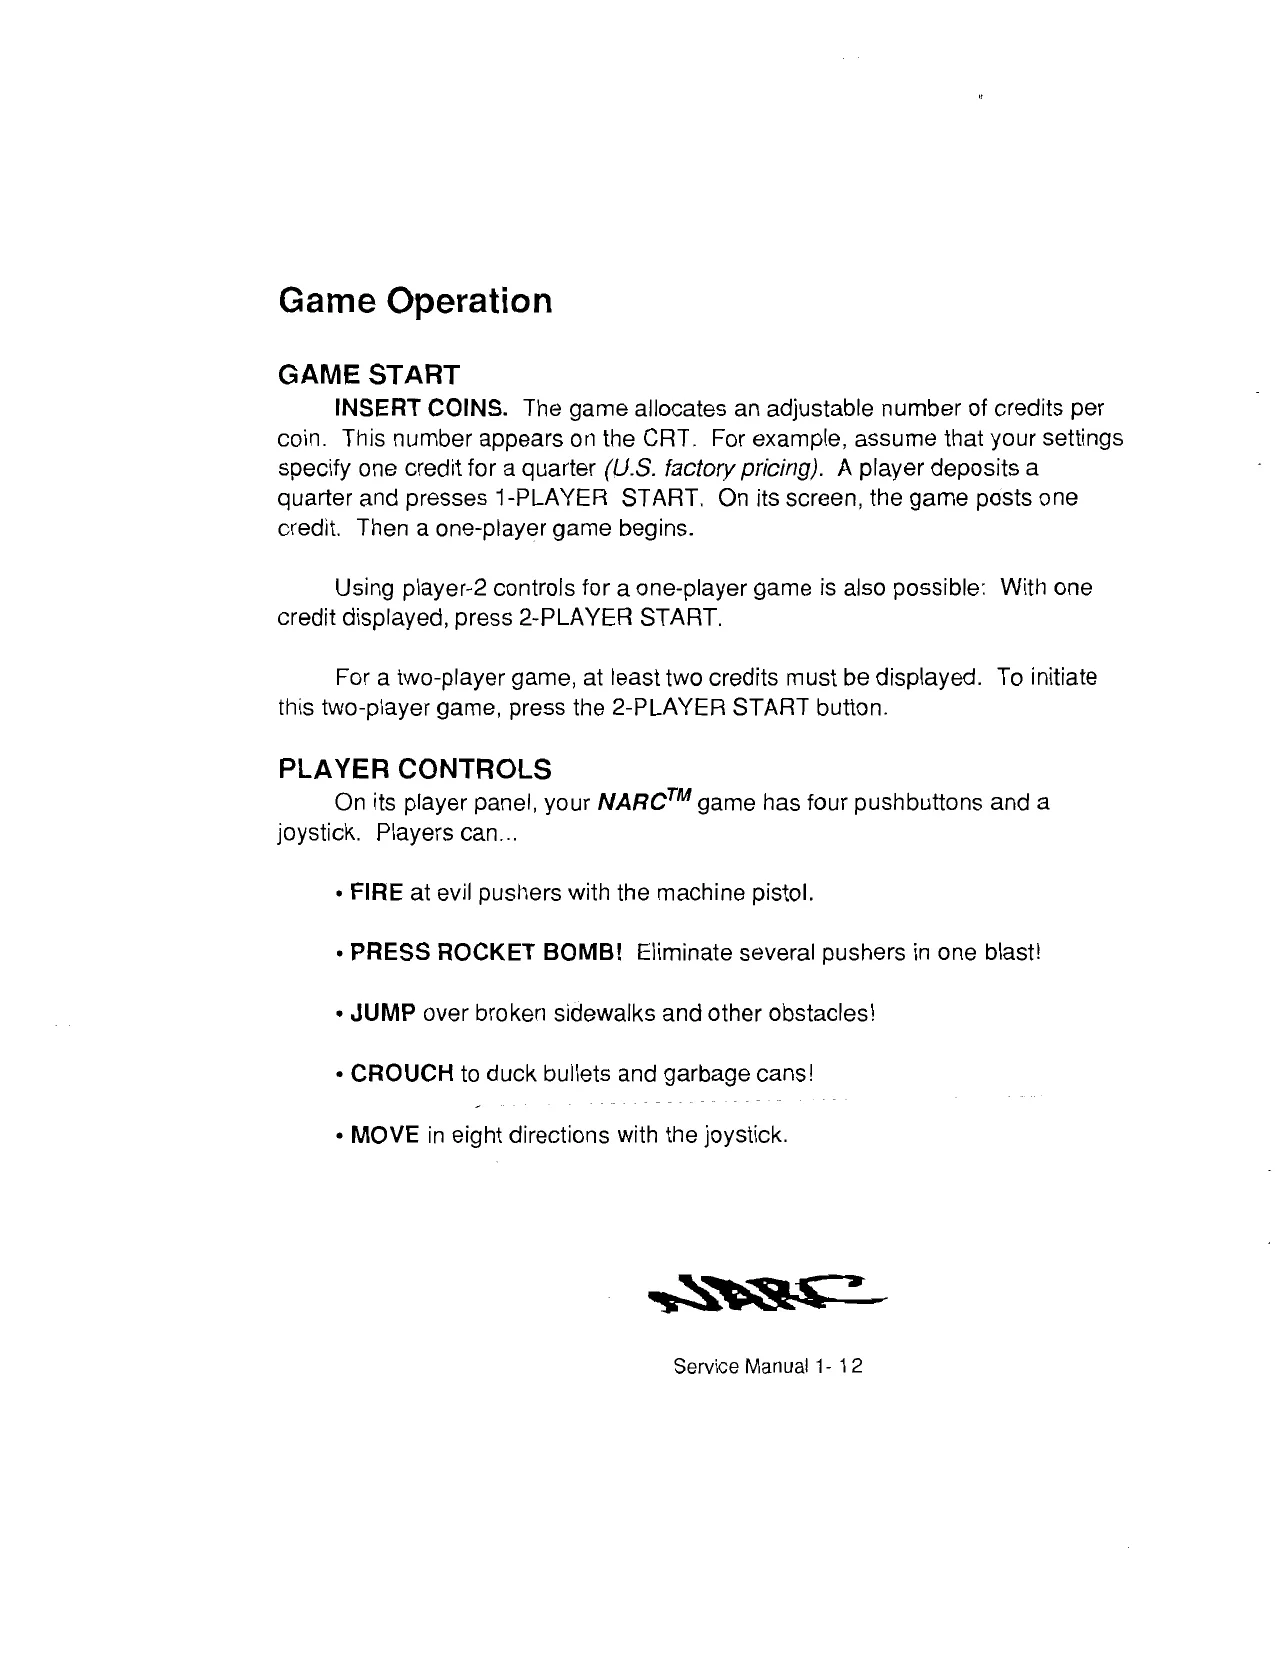
GAME START INSERT COINS. The game allocates an adjustable number of credits per coin. This number appears on the CRT. For example, assume that your settings specify one credit for a quarter (U.S. factory pricing). A player deposits a quarter and presses 1-PLAYER START. On its screen, the game posts one credit. Then a one-player game begins.
Using player-2 controls for a one-player game is also possible: With one credit displayed, press 2-PLAYER START.
For a two-player game, at least two credits must be displayed. To initiate this two-player game, press the 2-PLAYER START bution.
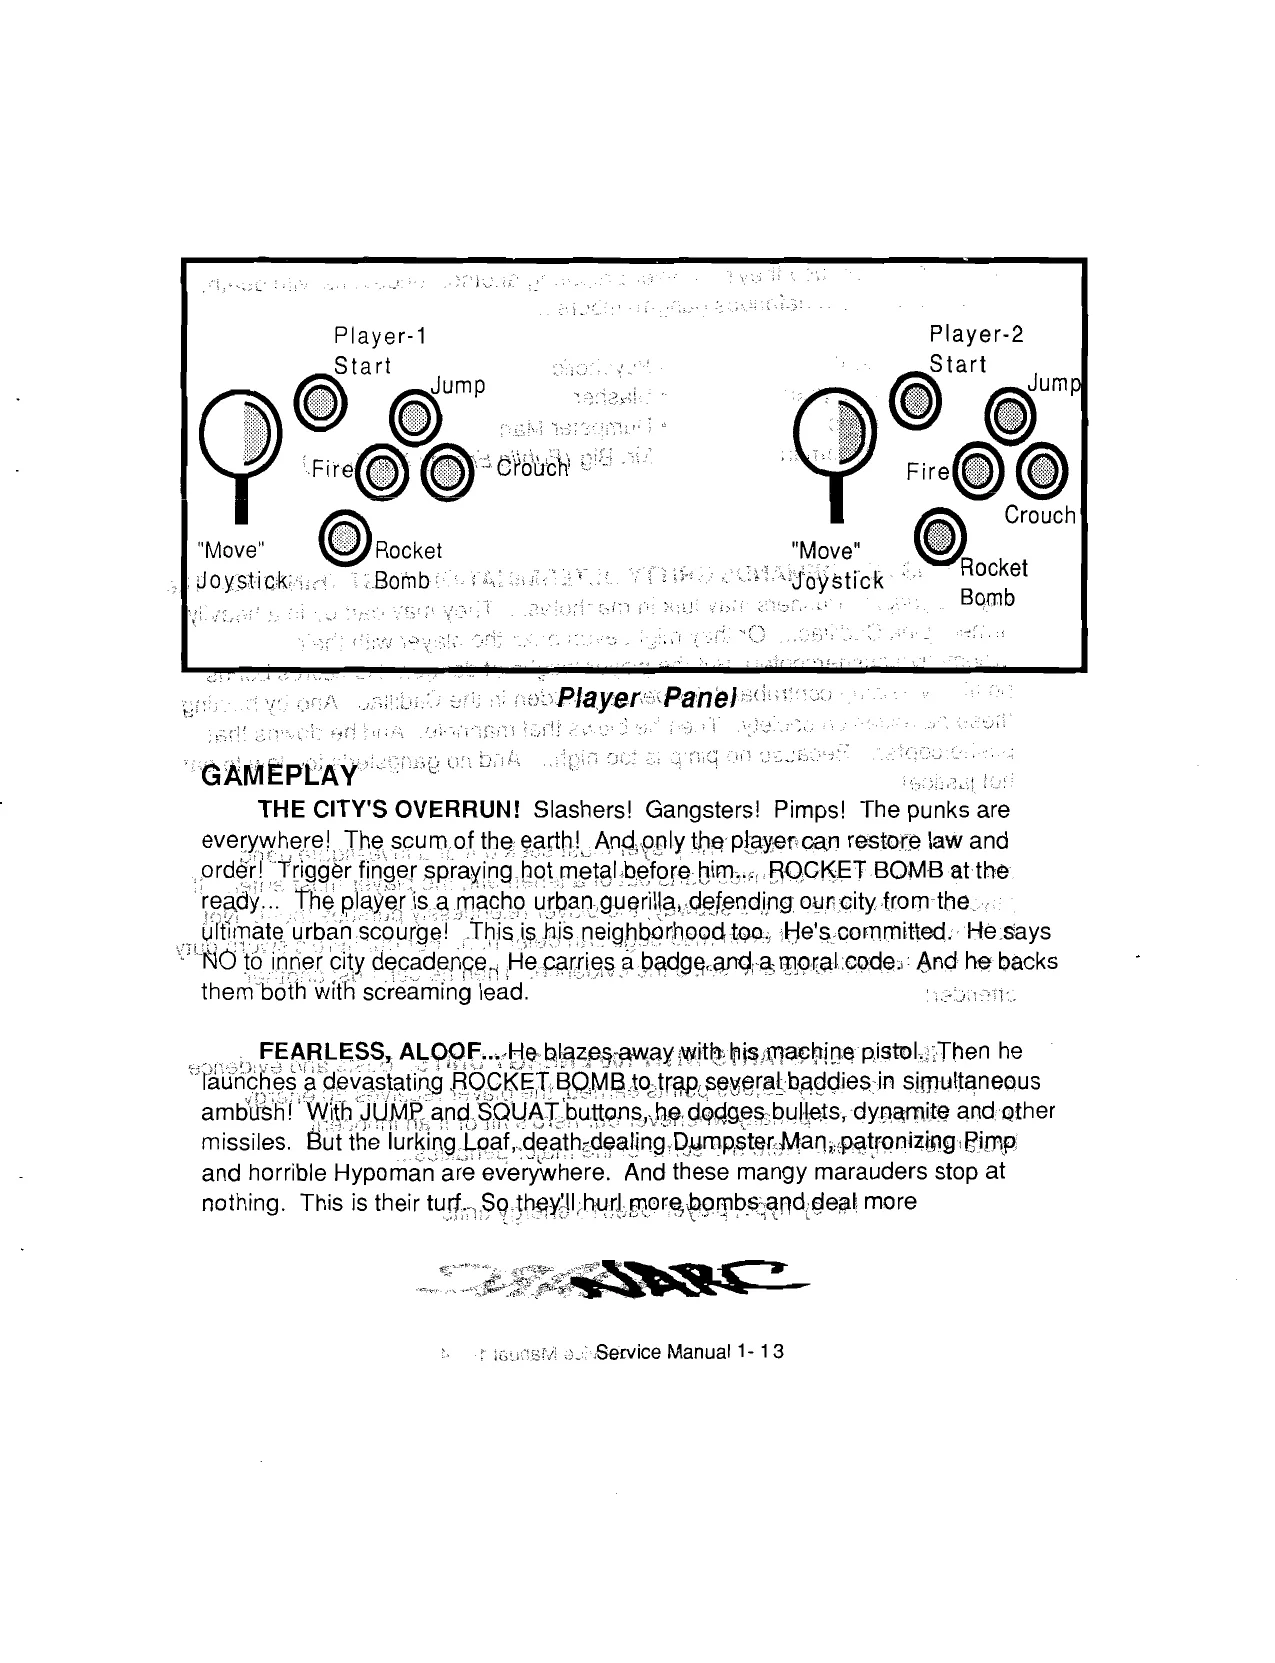
PLAYER CONTROLS On its player panel, your NARC™ game has four pushbuttons and a joystick. Players can...
+ FIRE at evil pushers with the machine pistol.
+ PRESS ROCKET BOMB! Eliminate several pushers in one blast!
+ JUMP over broken sidewalks and other obstacles!
+ CROUCH to duck bullets and garbage cans!
+ MOVE in eight directions with the joystick.
SS 5 ee
Service Manual 1- 12
This page is a drawing, shown as the original scan.
corruption. Because they're forever preparing another rendevous with death. Here's a list of the nefarious gangmembers...
+ Loaf * Psychotic + Gangster + Slasher + Pimp + Dumpster Man
- Hypoman * Mr. Big (Public Enemy Number 1)
THIS JOB DEMANDS GRITTY DETERMINATION, FAST THINKING! The city is a jungle. Pushers may lurk in manholes... They may dart by in a heavily armed, pink Cadillac... Or they might even buzz the player with their preemptive pushercopter! But the player laughs at danger. He scores bonus points by seizing contraband (evidence!) hidden in the Cadillac. And by busting these parasites on society. Then he blows that manhole. And he downs that pushercopter. Because no pimp is too high... And no gangster's too low to eat hot justice!
ENTER BUILDINGS. The player must seek out and investigate gang strongholds. When enemies darts out of a tenement, the player must enter. If psycho fiends slither in the subway, the player relentlessly pursues them. Not bullets, not bombs, not even mad dogs can deter him. For our hero's sworn duty is to case the hideouts and seize the evidence. Then he can bust another offender!
THE PLAYER STARTS WITH 100 ENERGY UNITS. Busts and evidence win points. For every 25,000 points earned, the player receives 20 energy units. But there's a penalty whenever our hero's hit or if an innocent bystander's injured. Here are some of the major penalties...
+ Hit by hypo, player loses16 energy units
SEE
Service Manual 1- 14
+ Attacked by Slasher, player sacrifices10 energy units
+ Struck by a bullet, player's penalized five units
THE BIG TARGET. Ultimately the player pursues Public Enemy Number One, Mr. Big. Mr. Big is the shimmering, super slug king of the sleazy, slimy underworld empire. His glitzy, cosmopolitan crib is brimming with evidence. And he's the inevitable prospect for a megabust. But he's wily. He's quick. And he's amply equipped with the latest Hyper-Crimewave Technology. But the player must not permit him to escape! The dragnet must not fail!
Game Adjustments, Bookkeeping, Diagnostics
MENU CONCEPT. For your convenience, game adjustment, bookkeeping, audit totals and diagnostics are menu-driven features. Each menu is a list of several choices that you may act upon as desired.
LEVELS OF MENUS. Your game has several levels of menus. That is, one menu selection will send the game to another menu. The menus are arranged in outline fashion. That is, a menu of general options selects menus of more specific options.
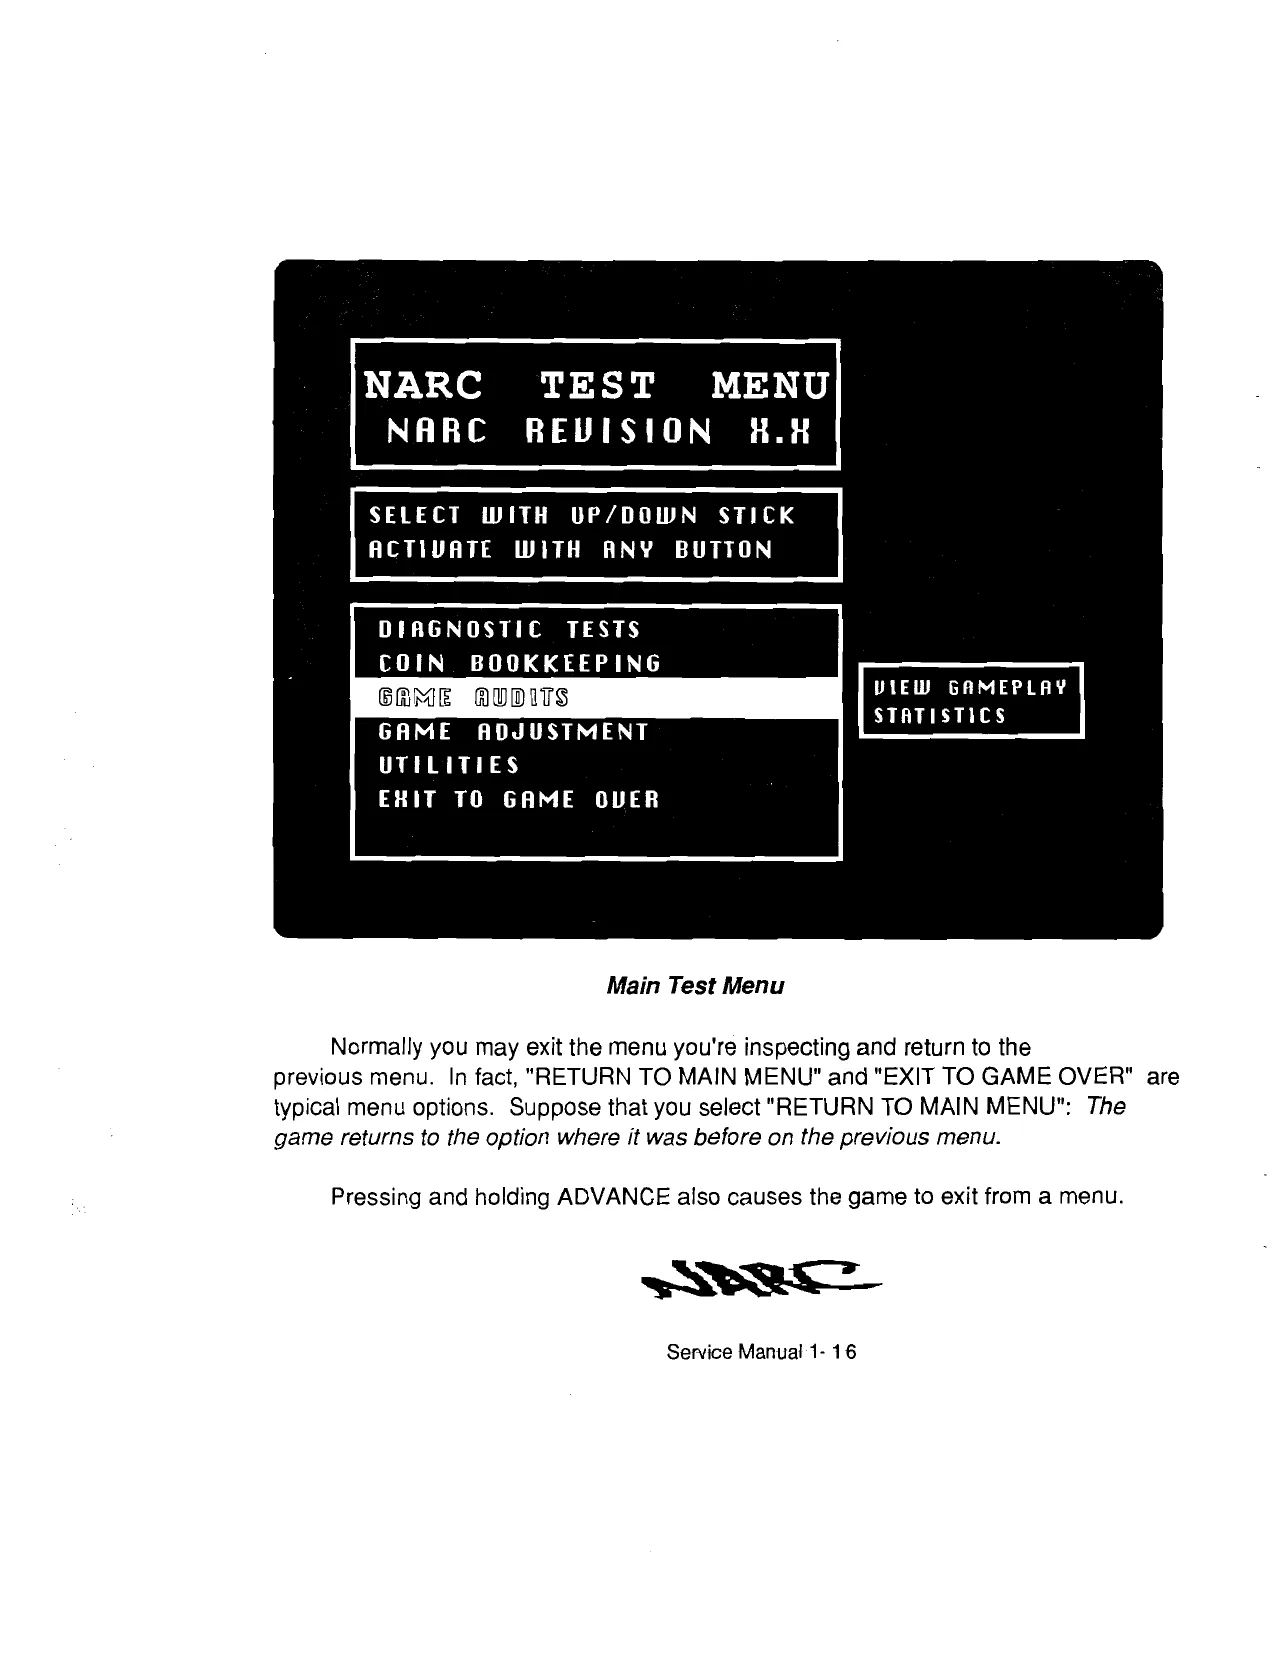
PRESS ADVANCE. Adjustments, bookkeeping and diagnostics are available from the main test menu. Enter the main test menu by pressing the ADVANCE button inside the coin door. ADVANCE is mounted on a bracket bolted to the inside of the door. Besides initiating diagnostics and other modes, ADVANCE permits you to browse through and alter menus. When you press ADVANCE, the game steps through the options of one menu.
SVB
Service Manual 1- 15
This page is a drawing, shown as the original scan.
This page is a drawing, shown as the original scan.
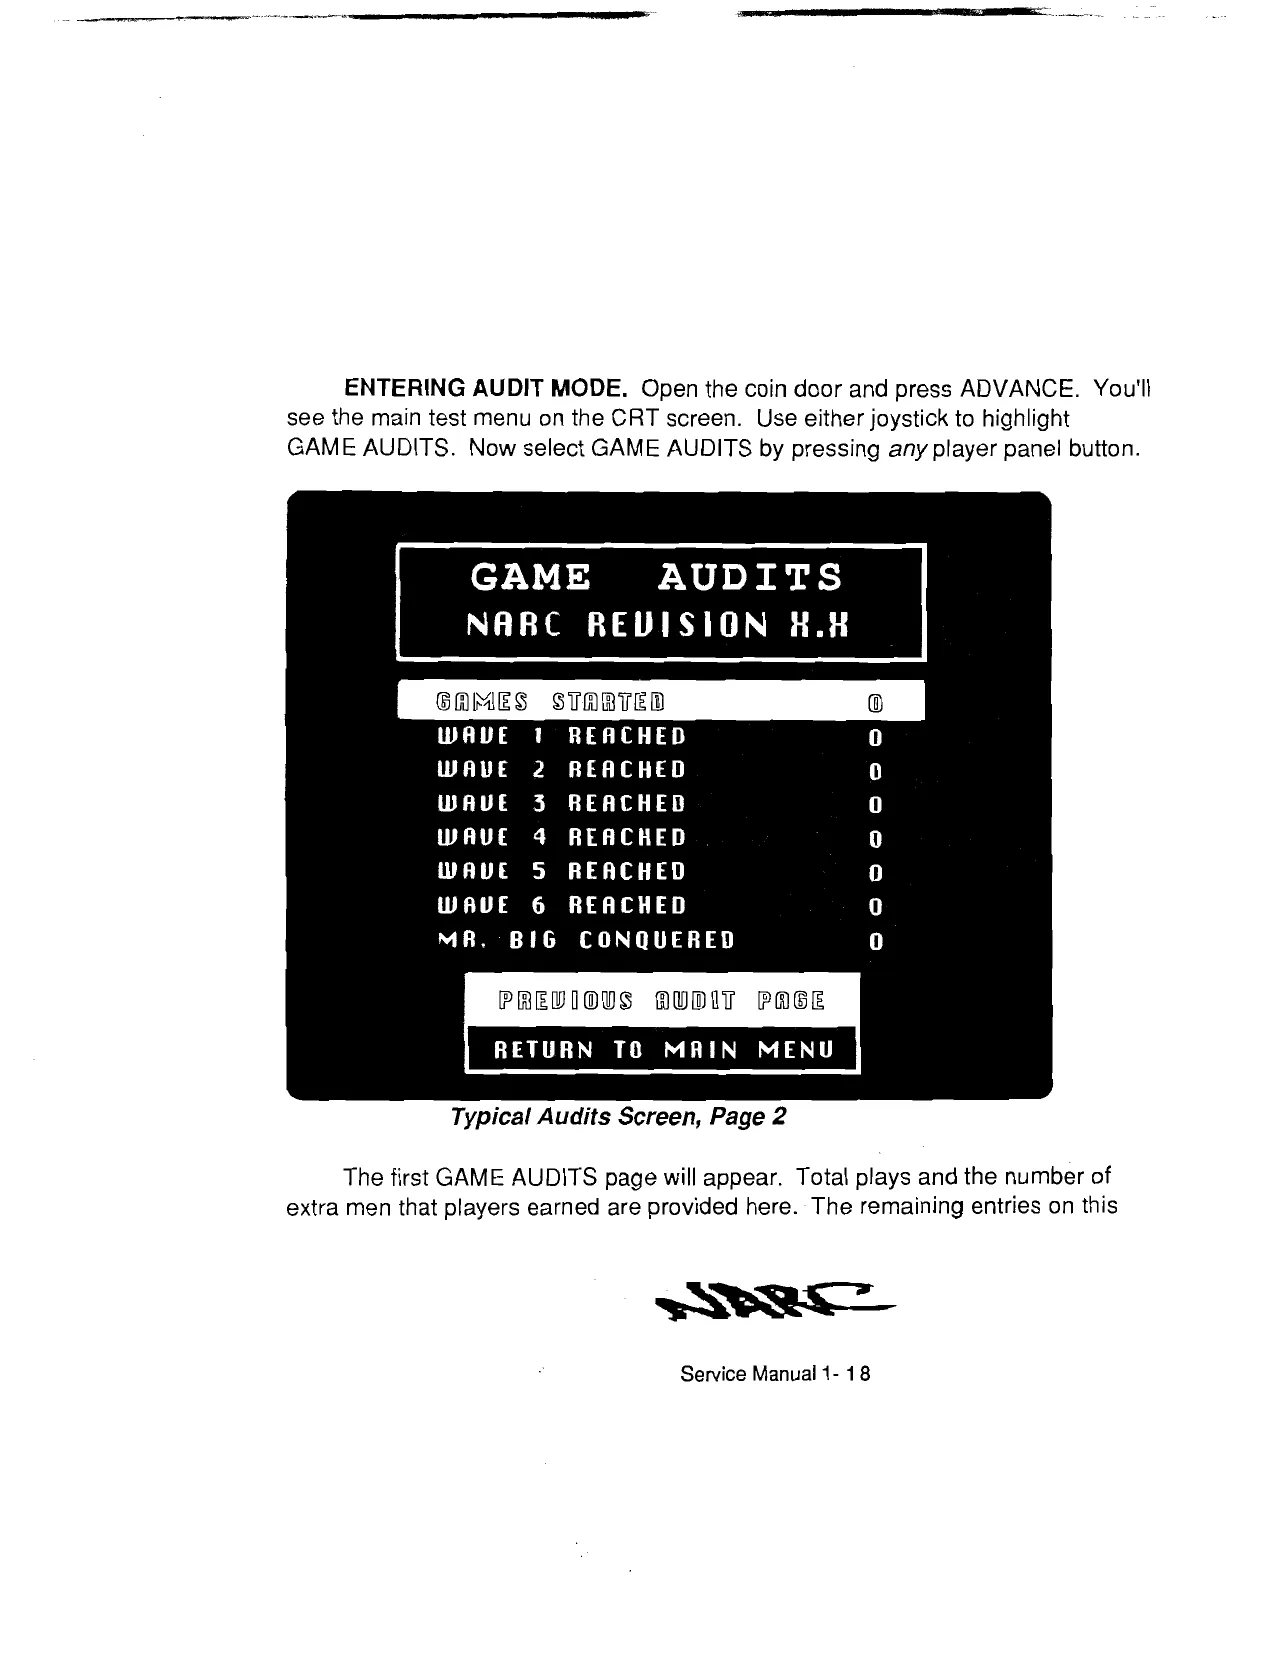
This page is a drawing, shown as the original scan.
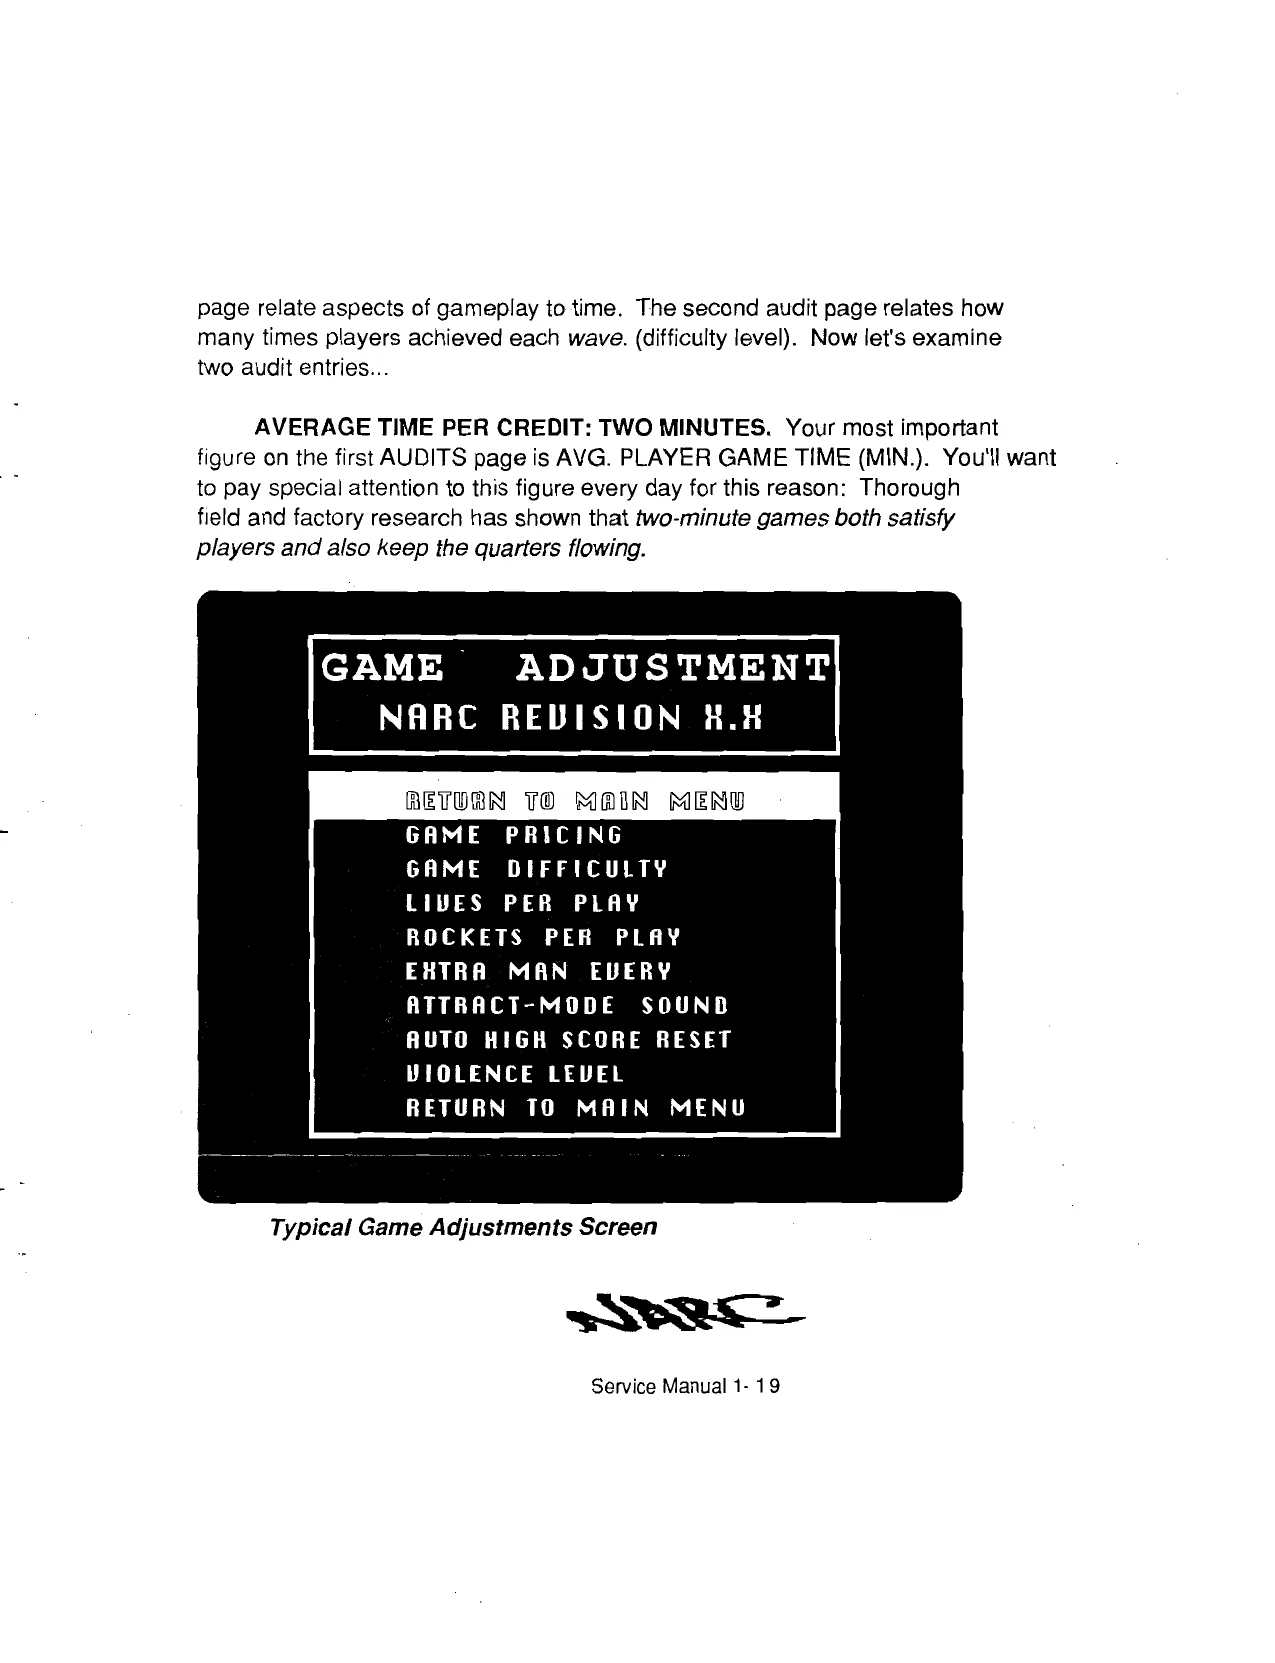
This page is a drawing, shown as the original scan.
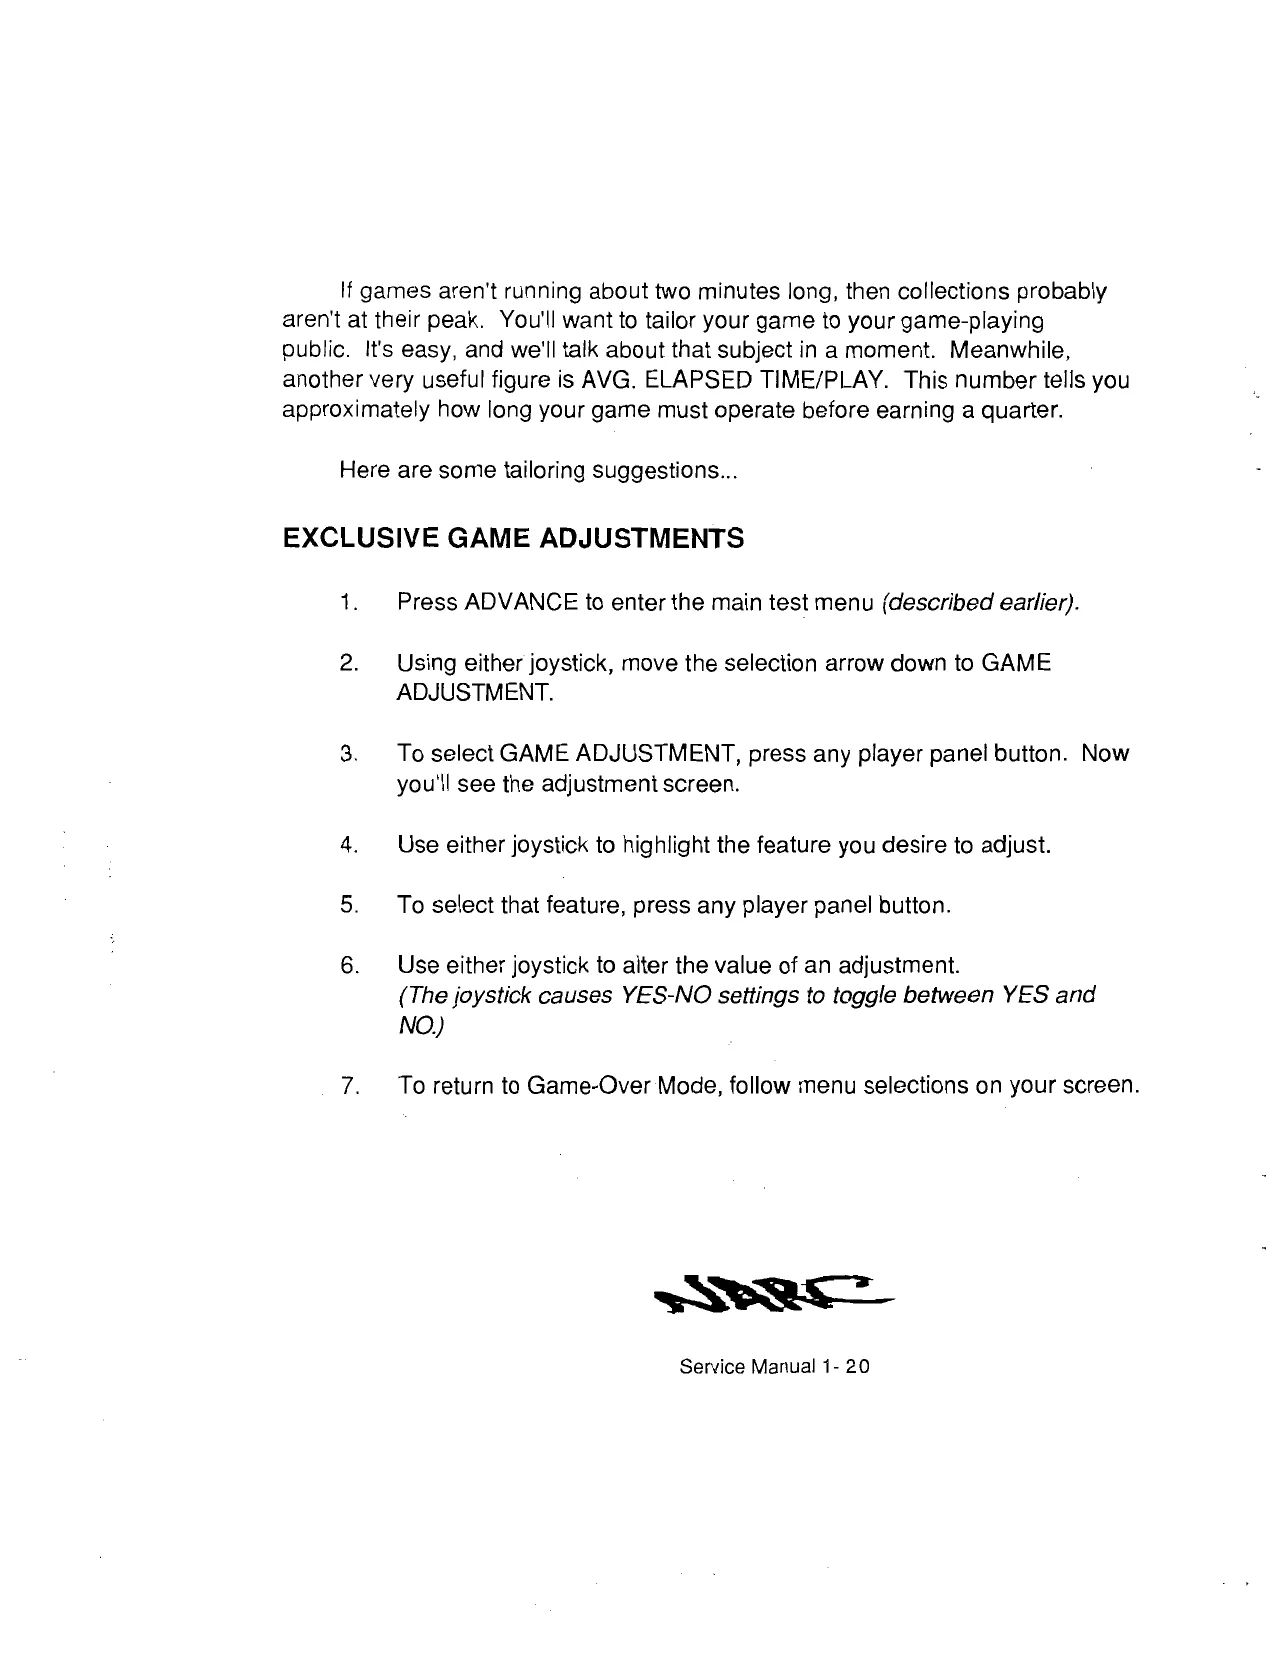
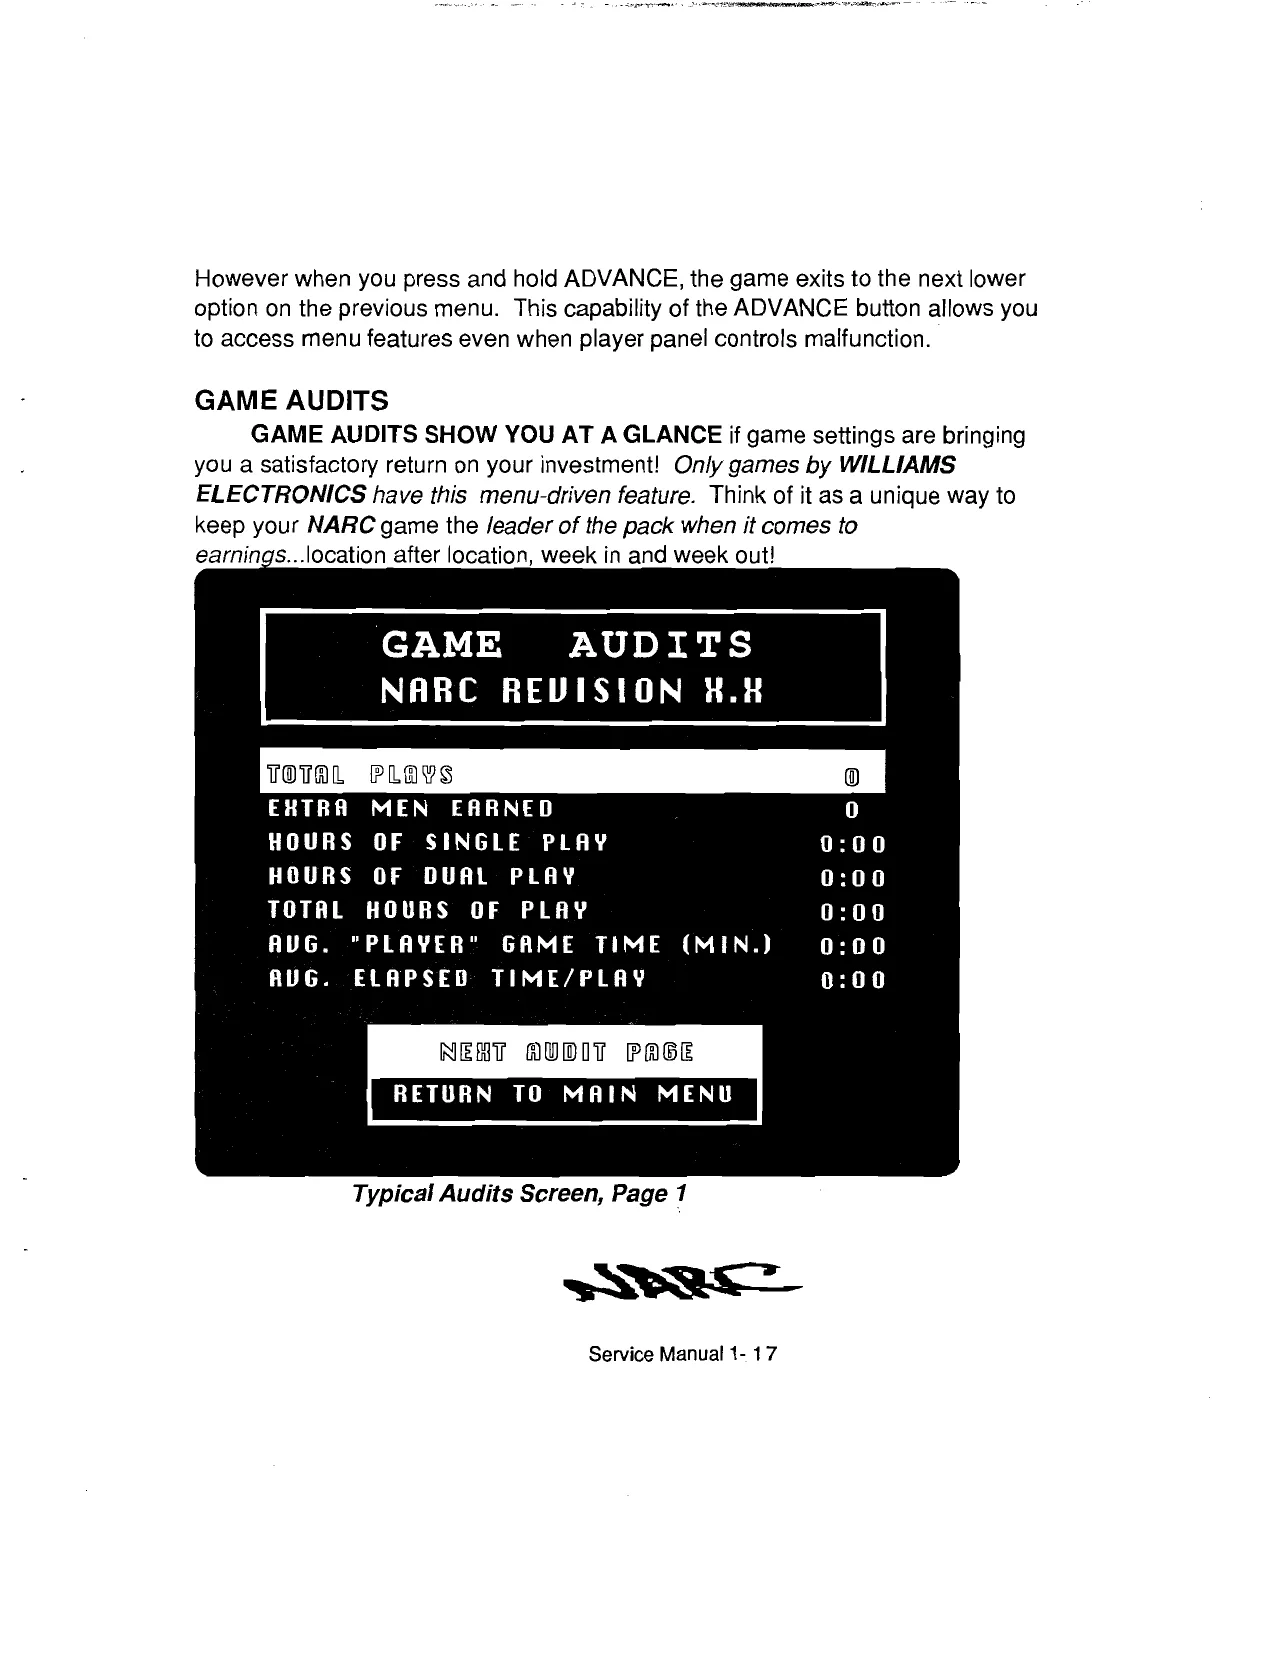
If games aren't running about two minutes long, then collections probably aren't at their peak. You'll want to tailor your game to your game-playing public. It's easy, and we'll talk about that subject in a moment. Meanwhile, another very useful figure is AVG. ELAPSED TIME/PLAY. This number tells you approximately how long your game must operate before earning a quarter.
Here are some tailoring suggestions...
EXCLUSIVE GAME ADJUSTMENTS
1.
2. Press ADVANCE to enter the main test menu (described earlier).
Using either joystick, move the selection arrow down to GAME ADJUSTMENT.
To select GAME ADJUSTMENT, press any player panel button. Now you'll see the adjustment screen.
Use either joystick to highlight the feature you desire to adjust.
To select that feature, press any player panel button.
Use either joystick to alter the value of an adjustment. (The joystick causes YES-NO settings to toggle between YES and NO)
To return to Game-Over Mode, follow menu selections on your screen.
SEV
Service Manual 1- 20
This page is a drawing, shown as the original scan.
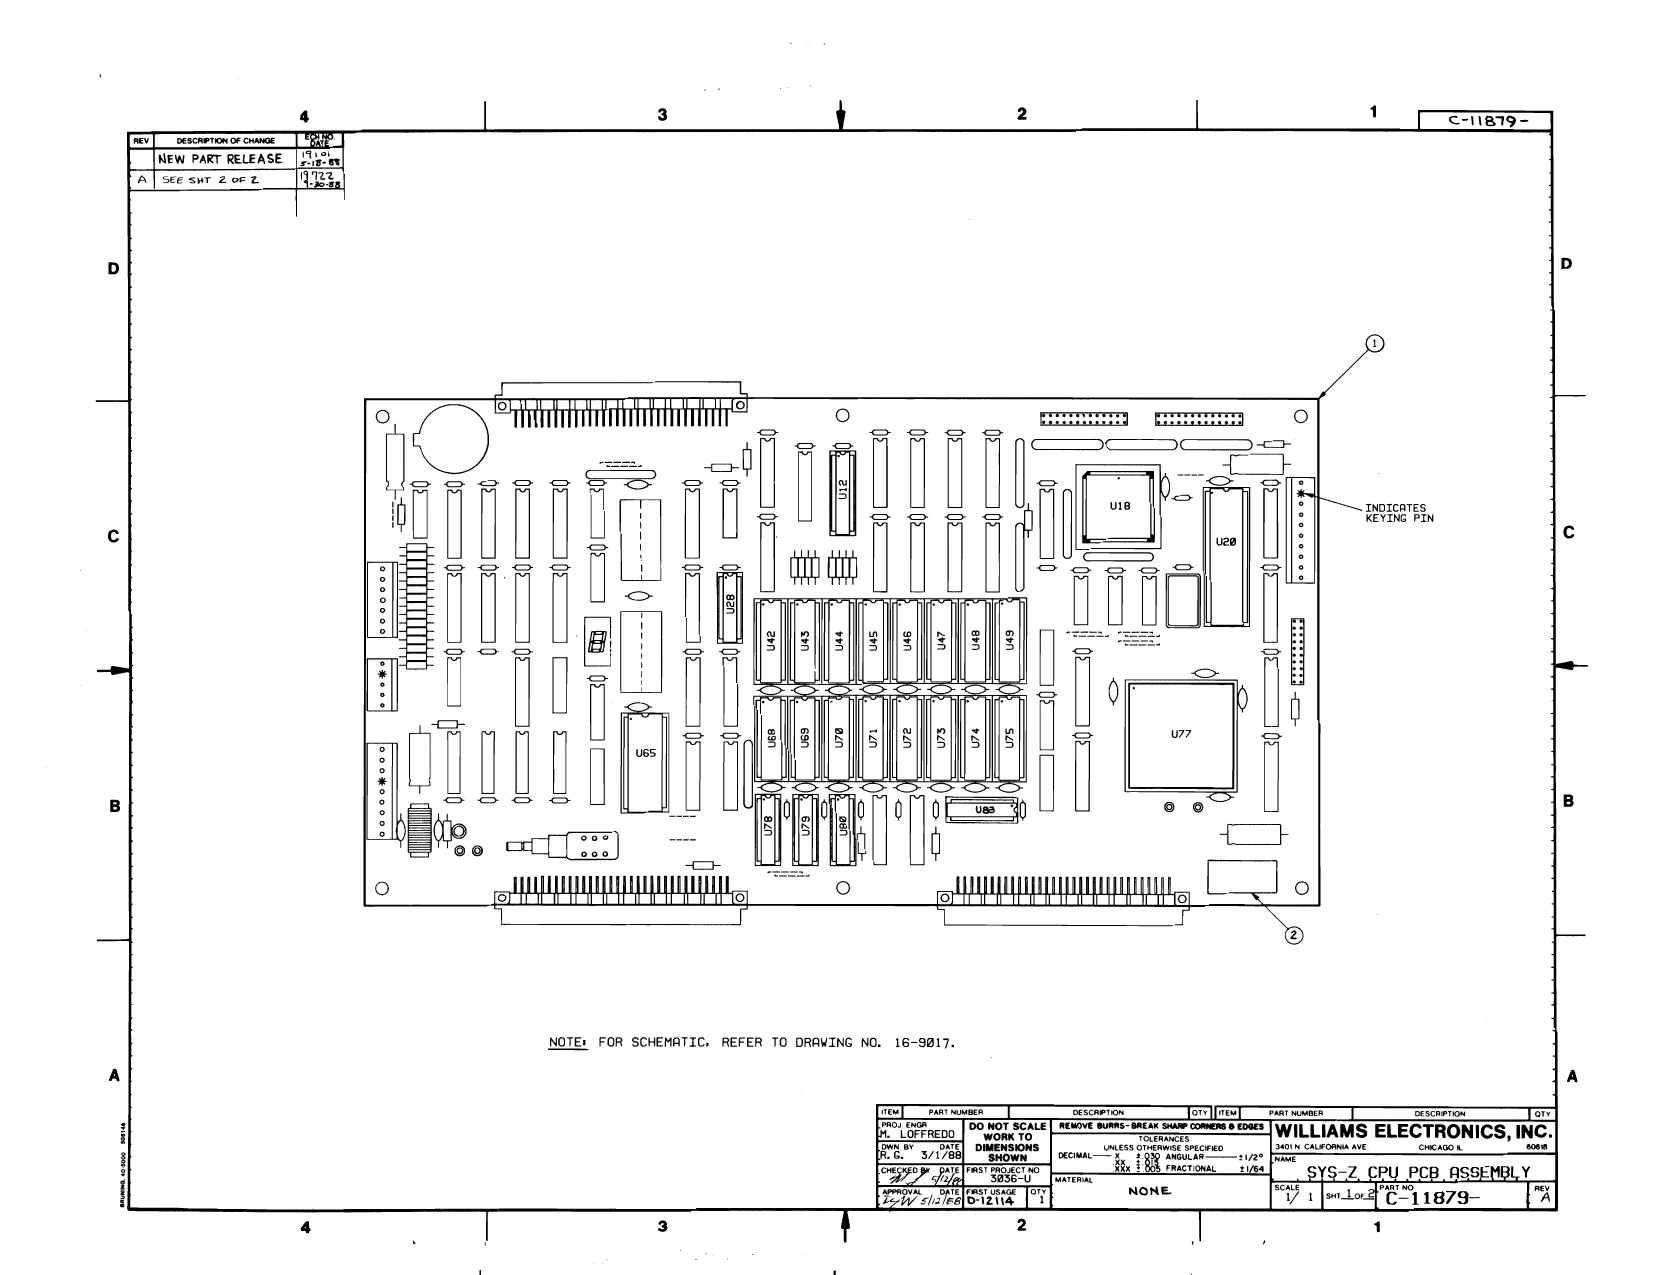
This page is a drawing, shown as the original scan.
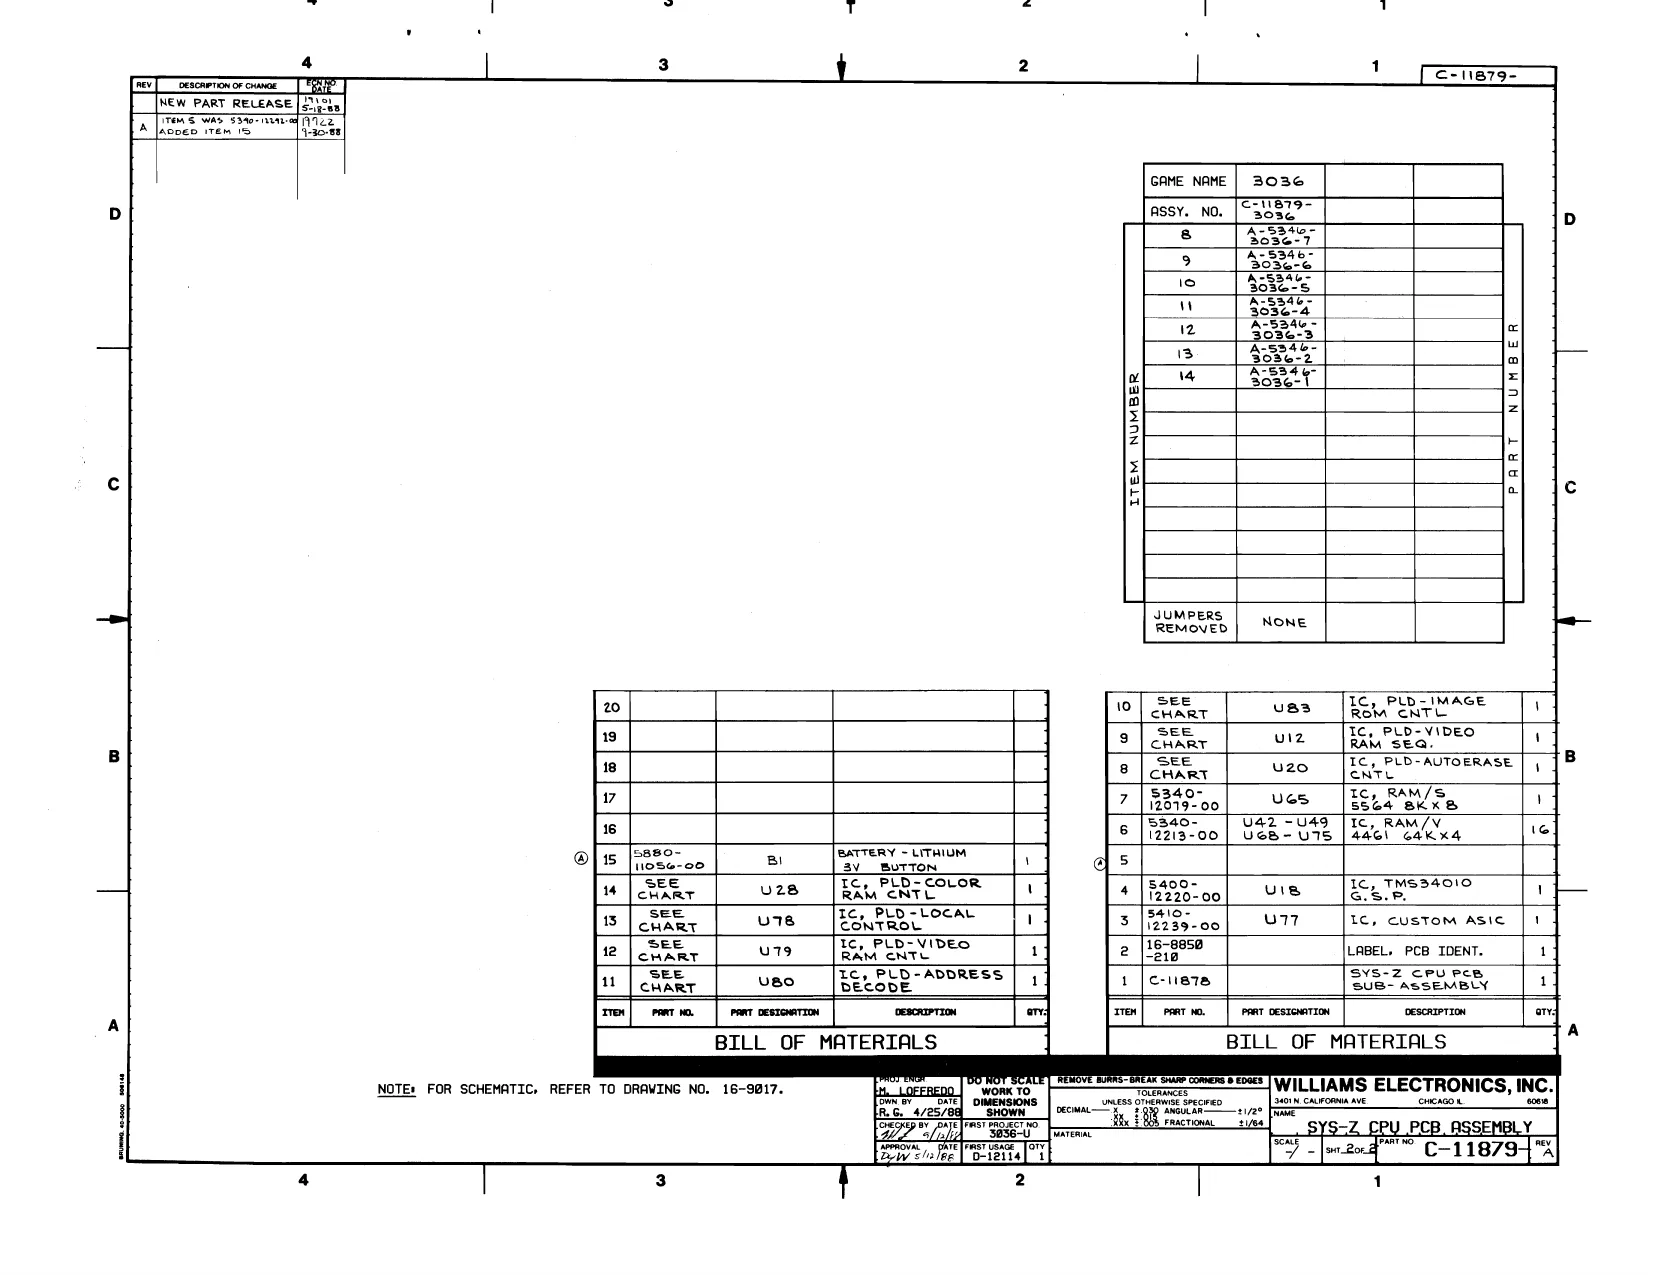
This page is a drawing, shown as the original scan.
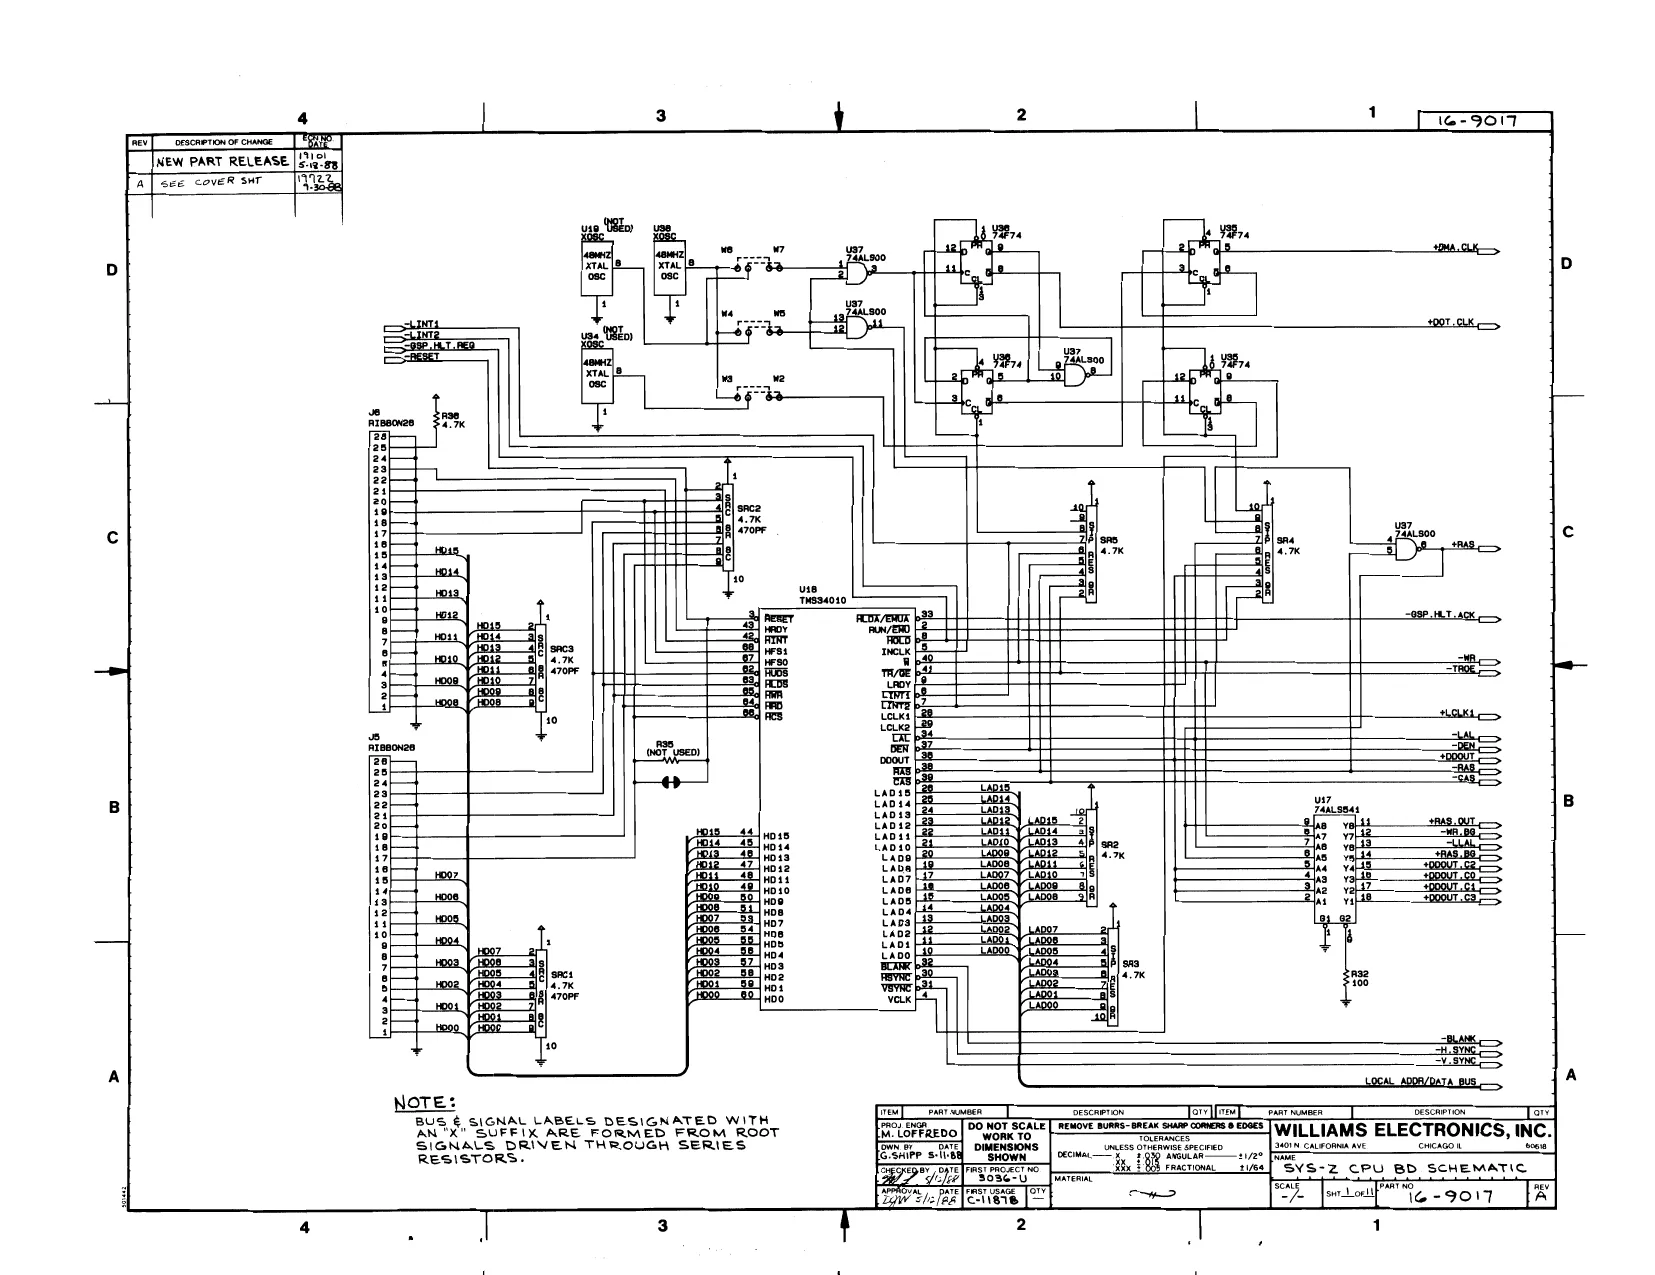
This page is a drawing, shown as the original scan.
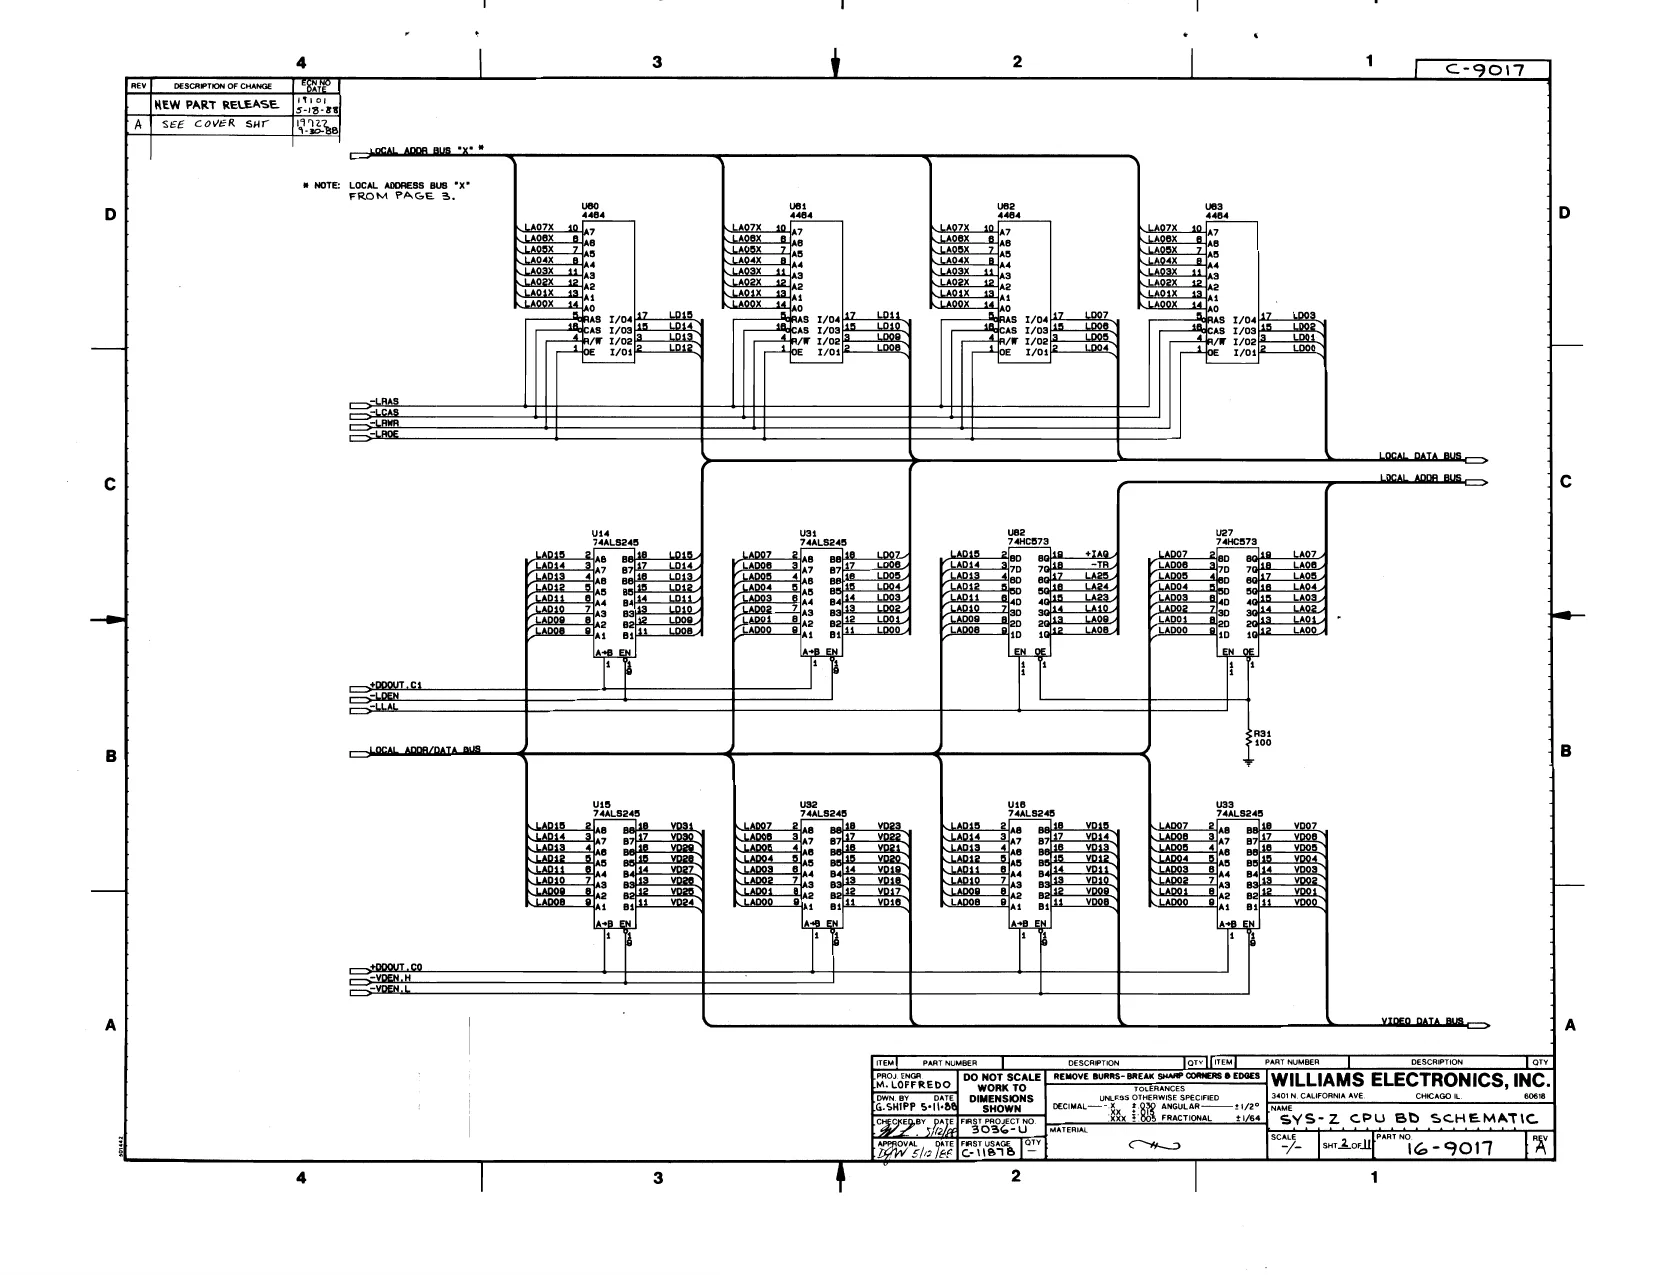
This page is a drawing, shown as the original scan.
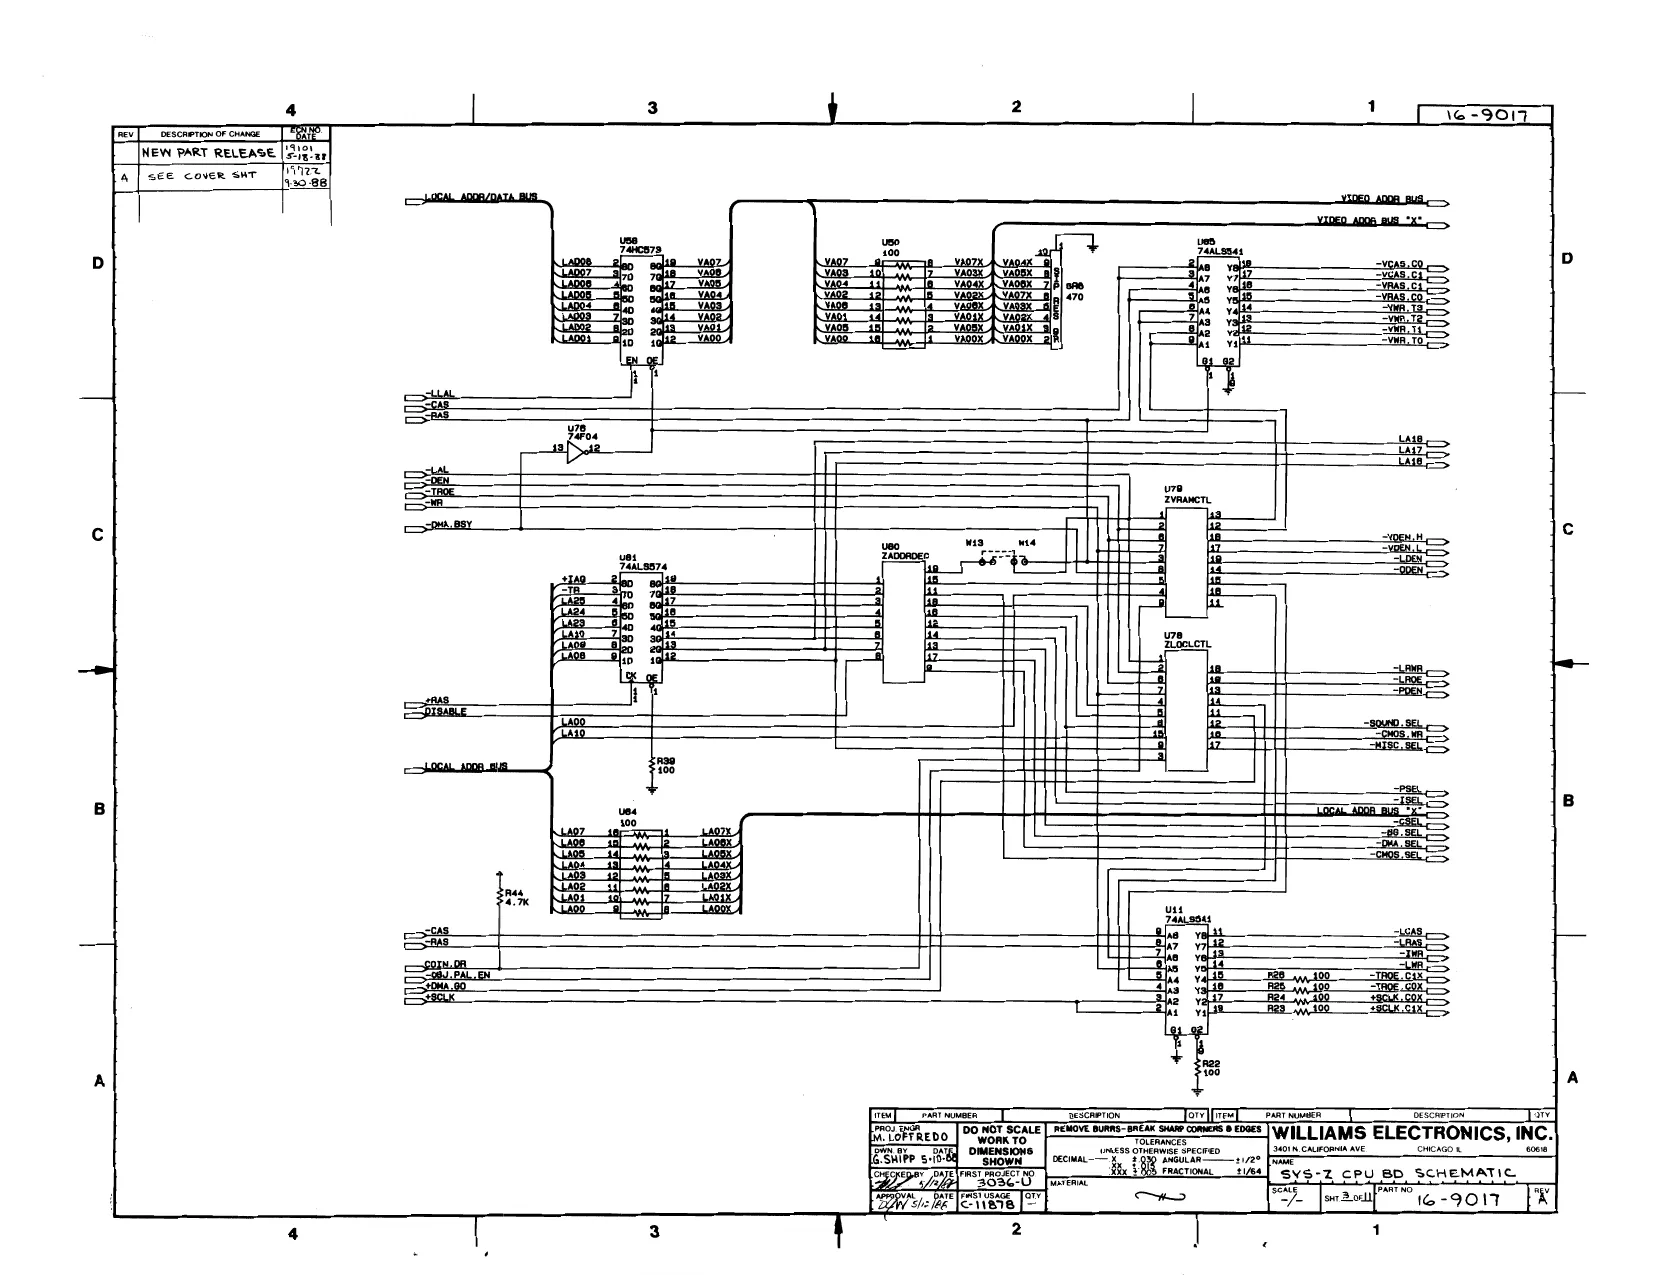
This page is a drawing, shown as the original scan.
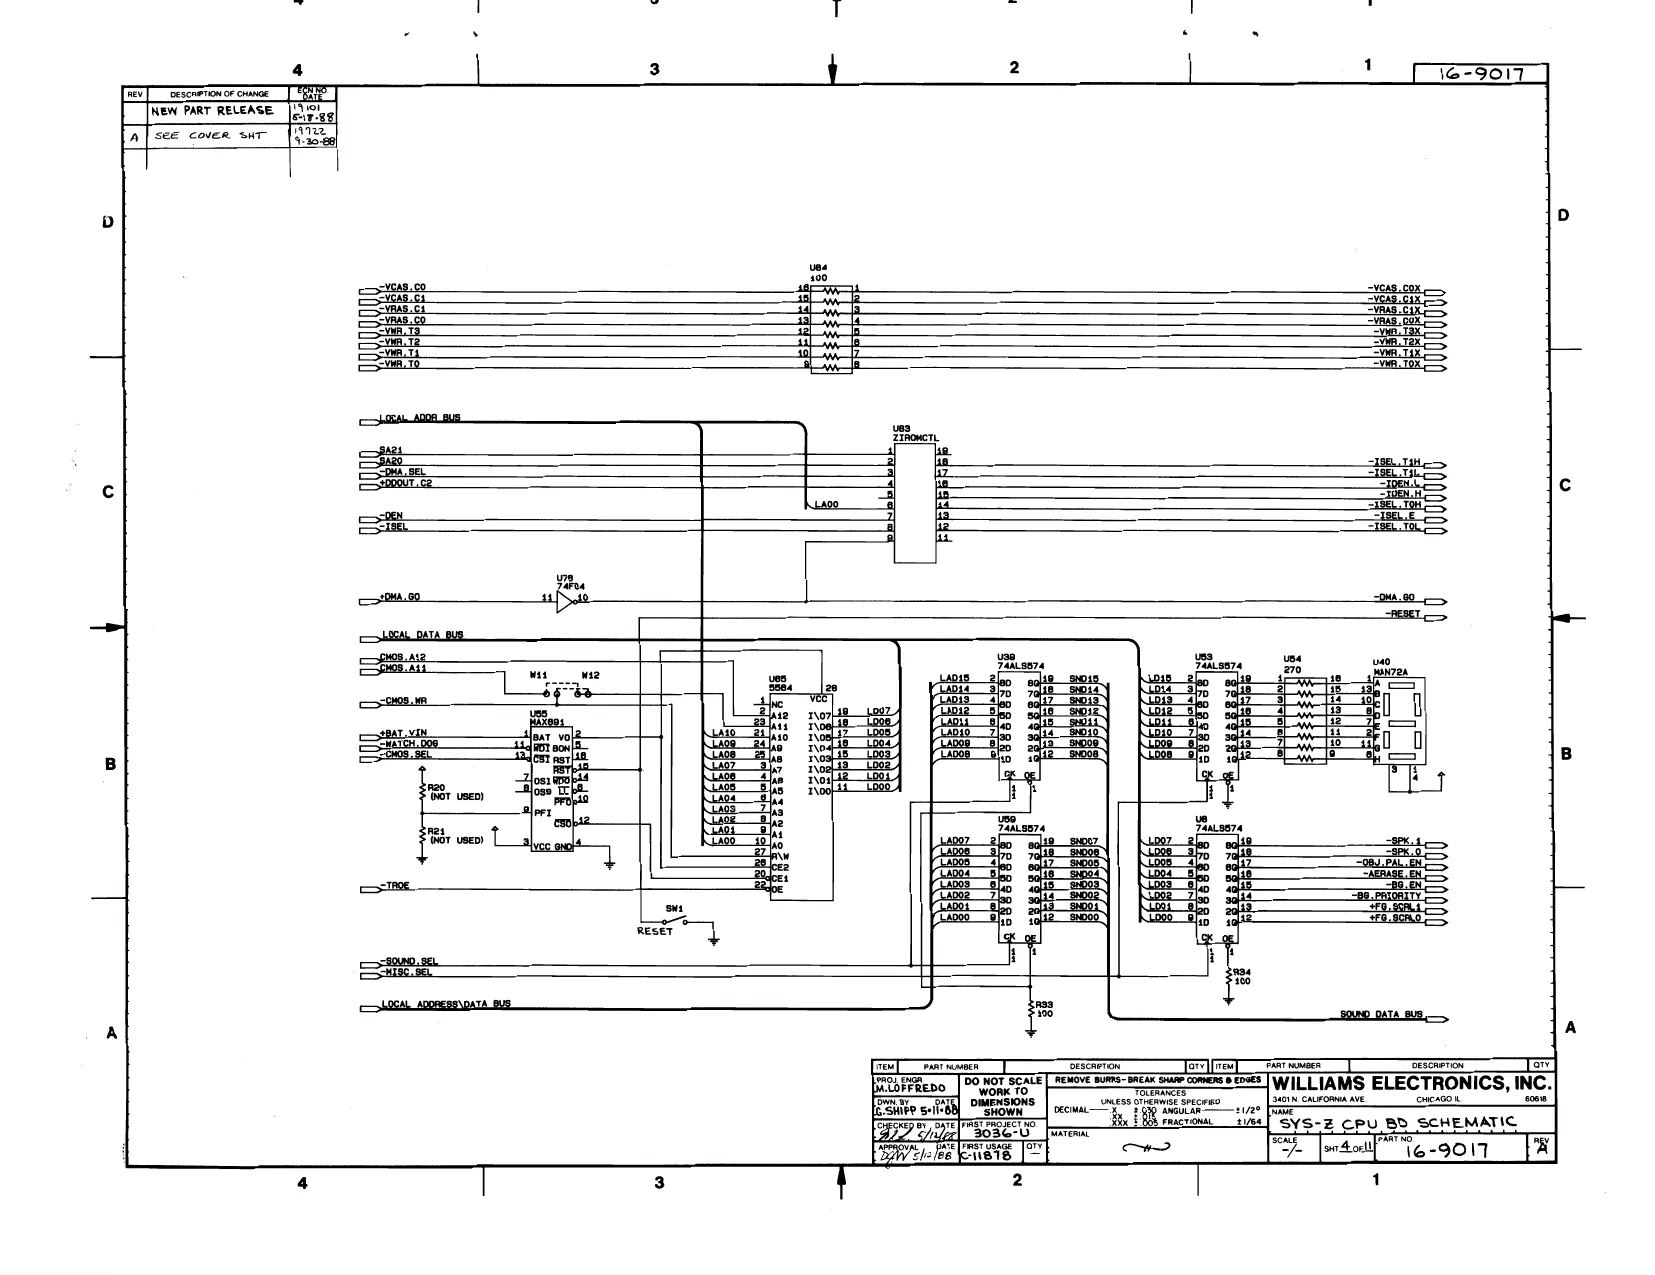
This page is a drawing, shown as the original scan.
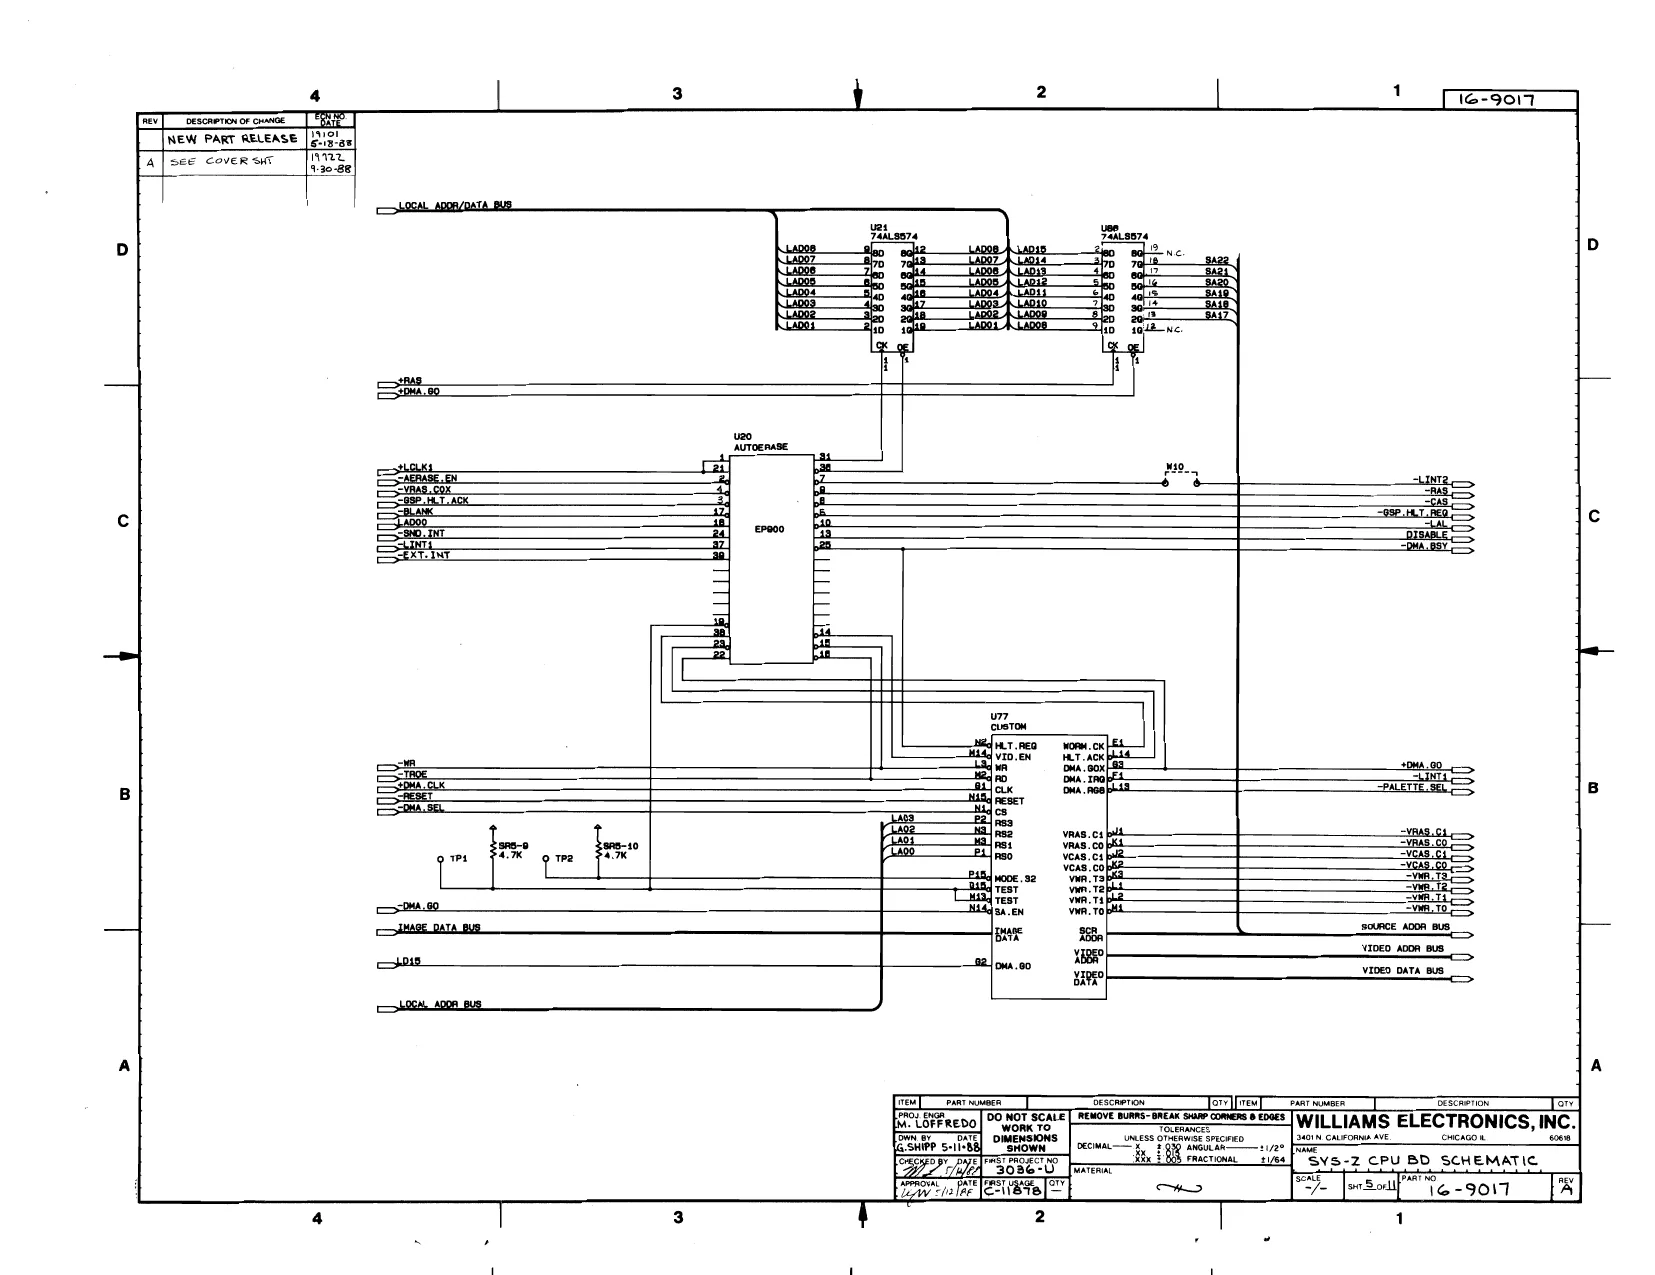
This page is a drawing, shown as the original scan.
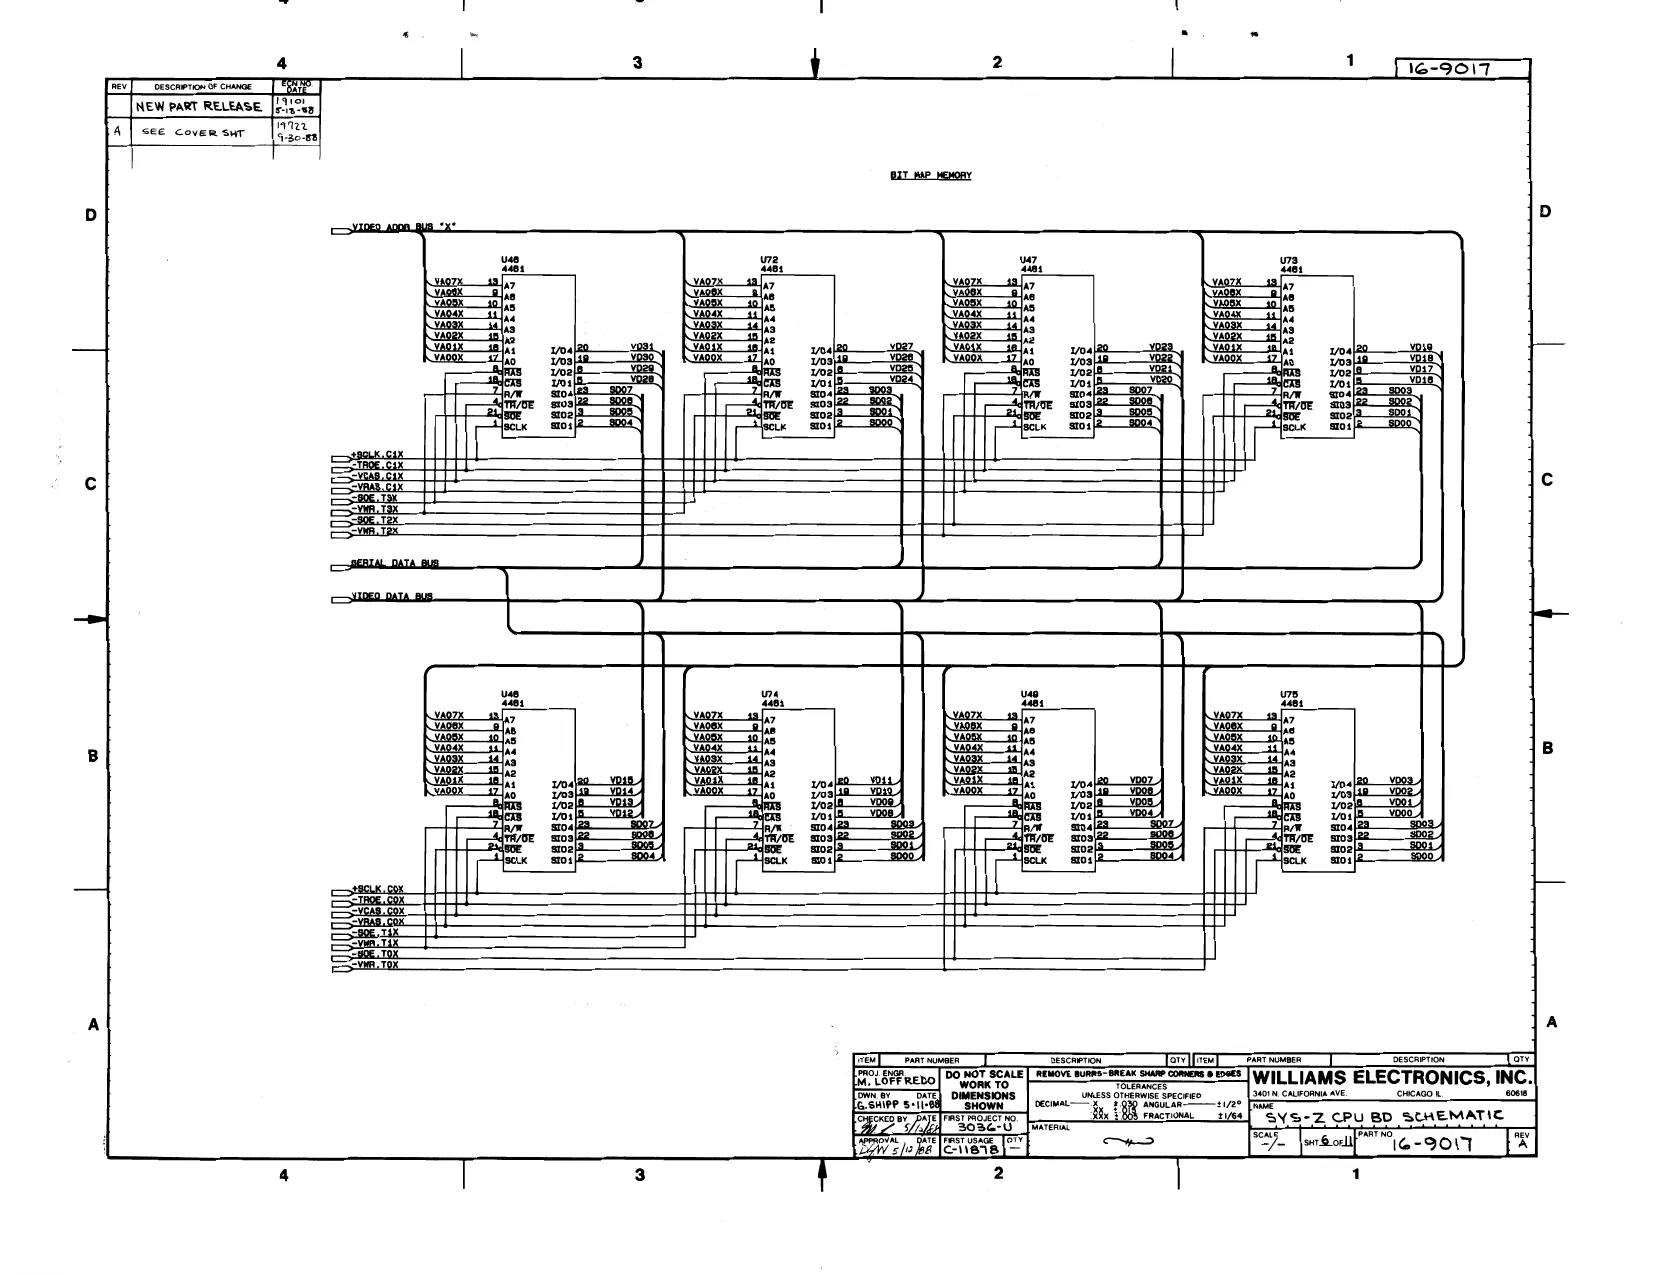
This page is a drawing, shown as the original scan.
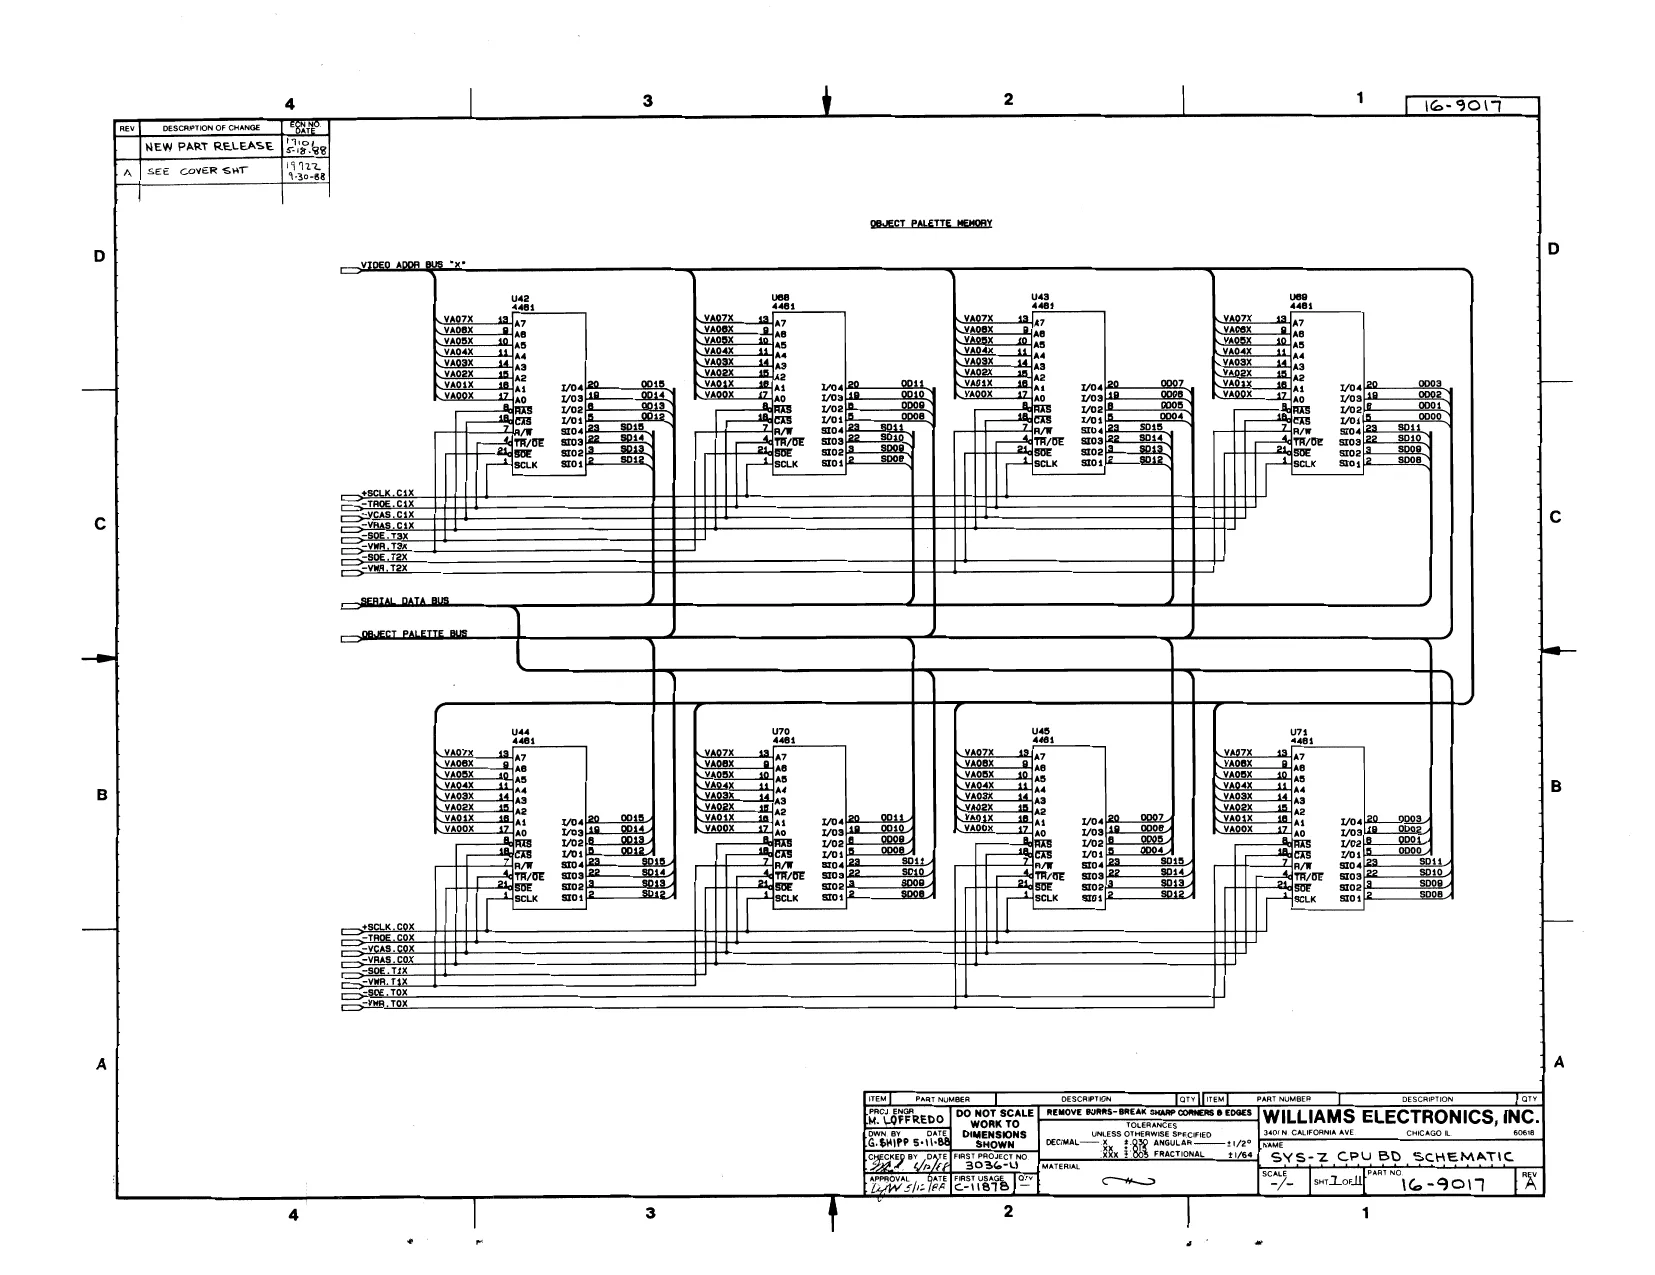
This page is a drawing, shown as the original scan.
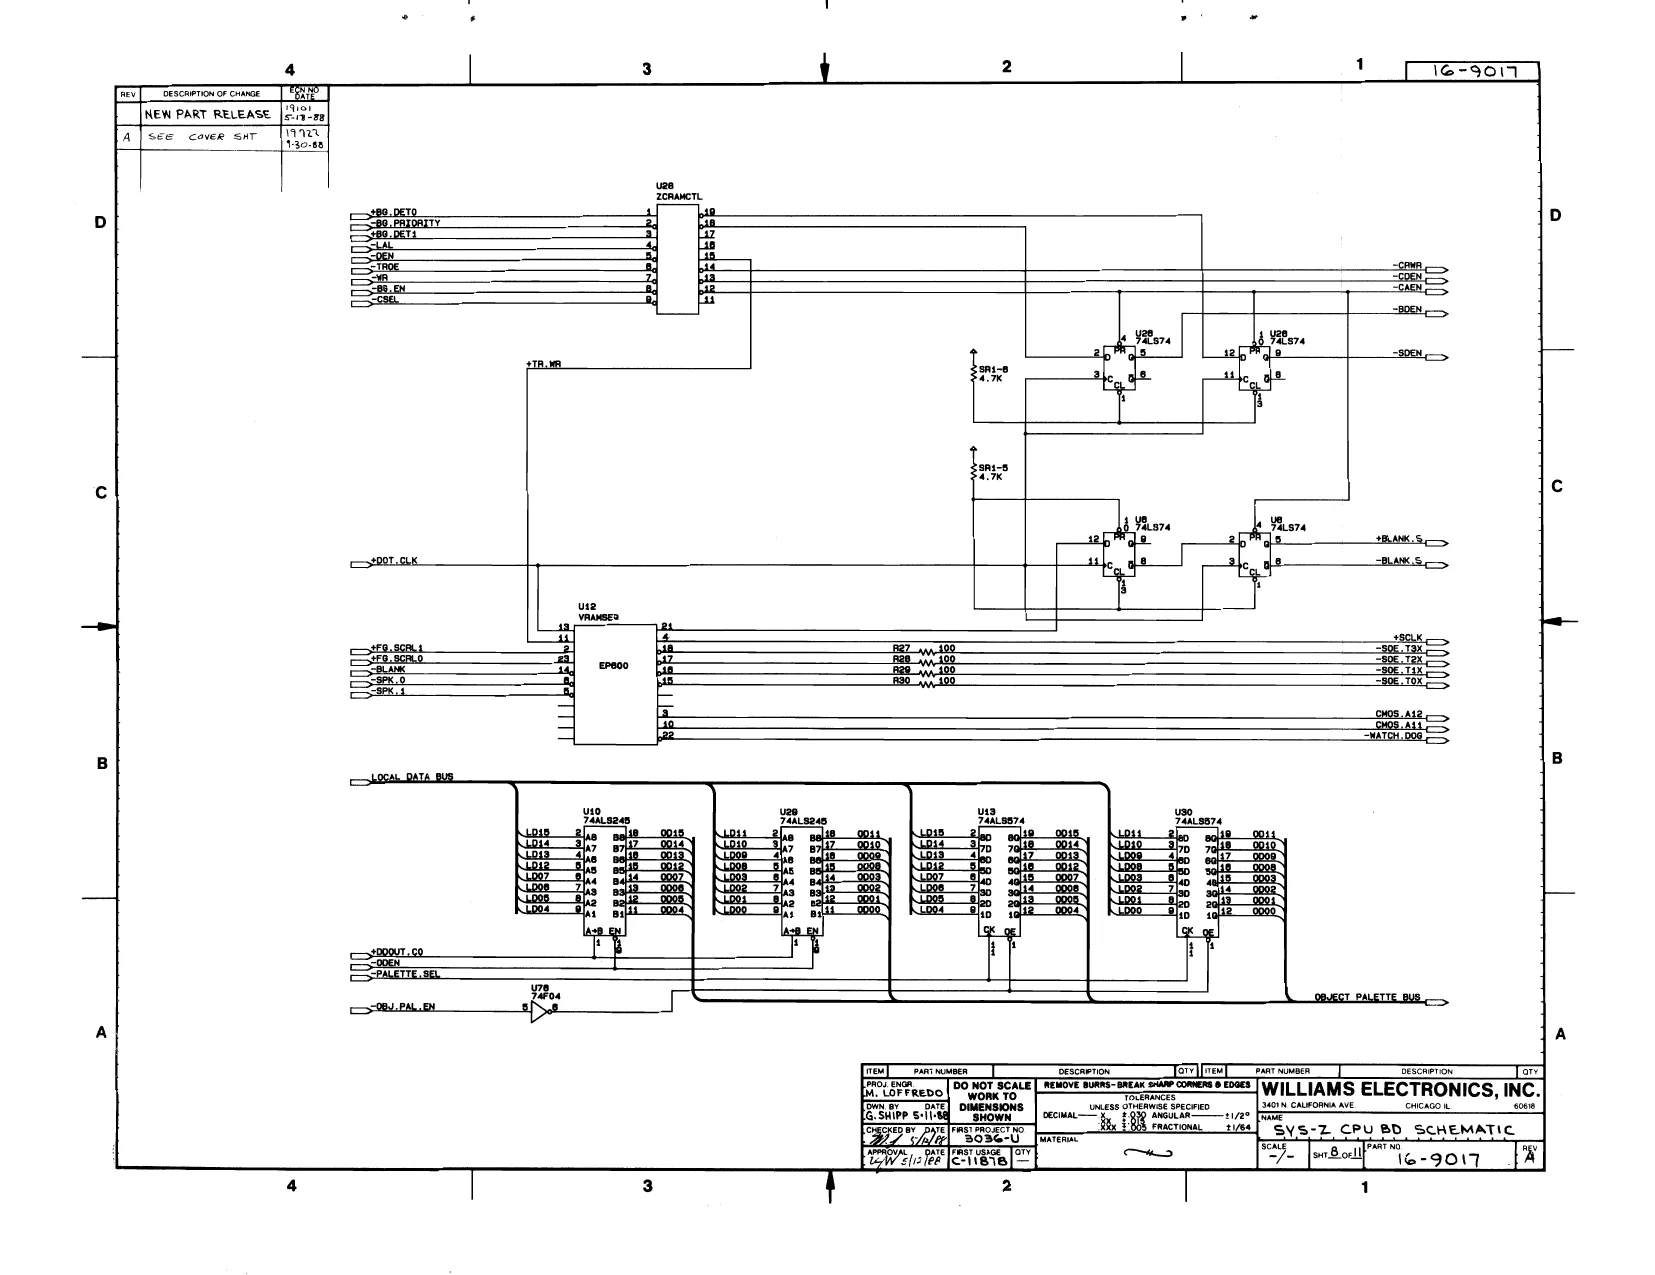
This page is a drawing, shown as the original scan.
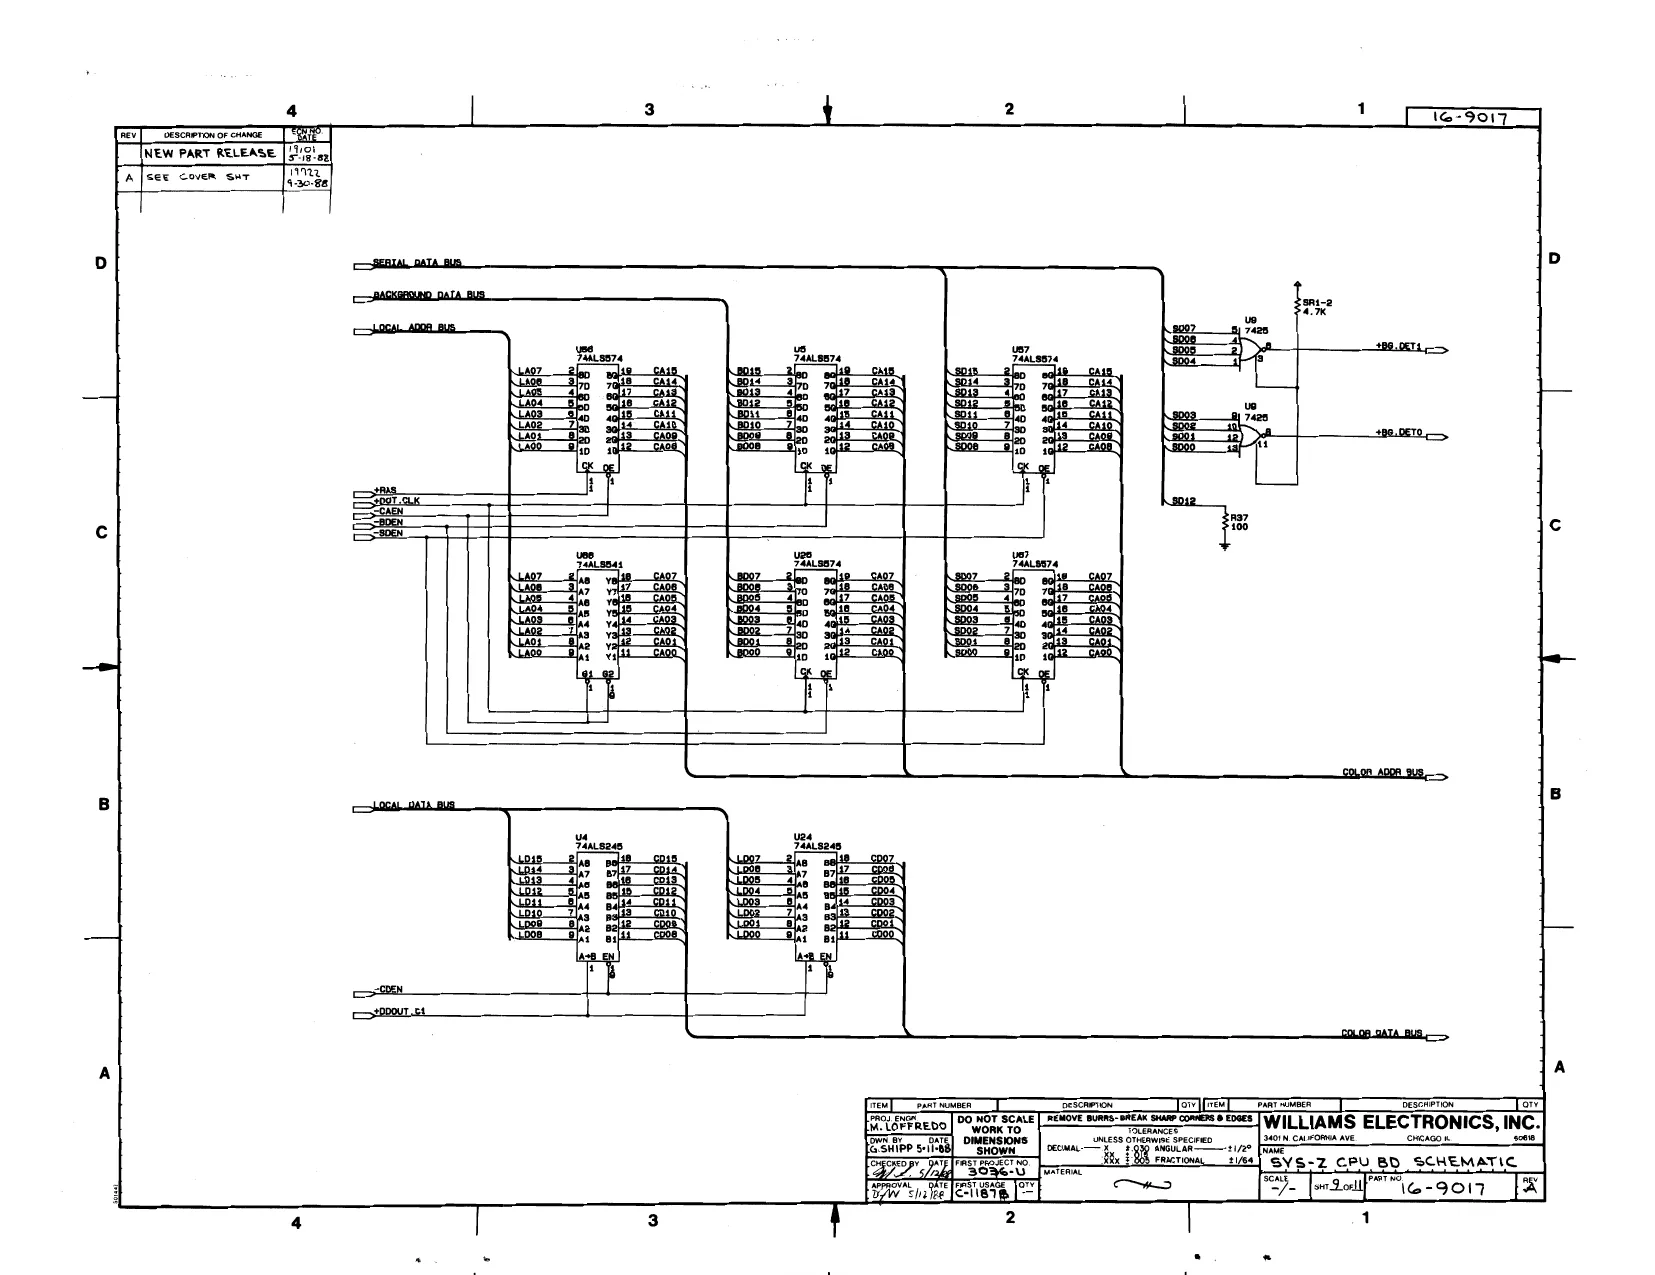
This page is a drawing, shown as the original scan.
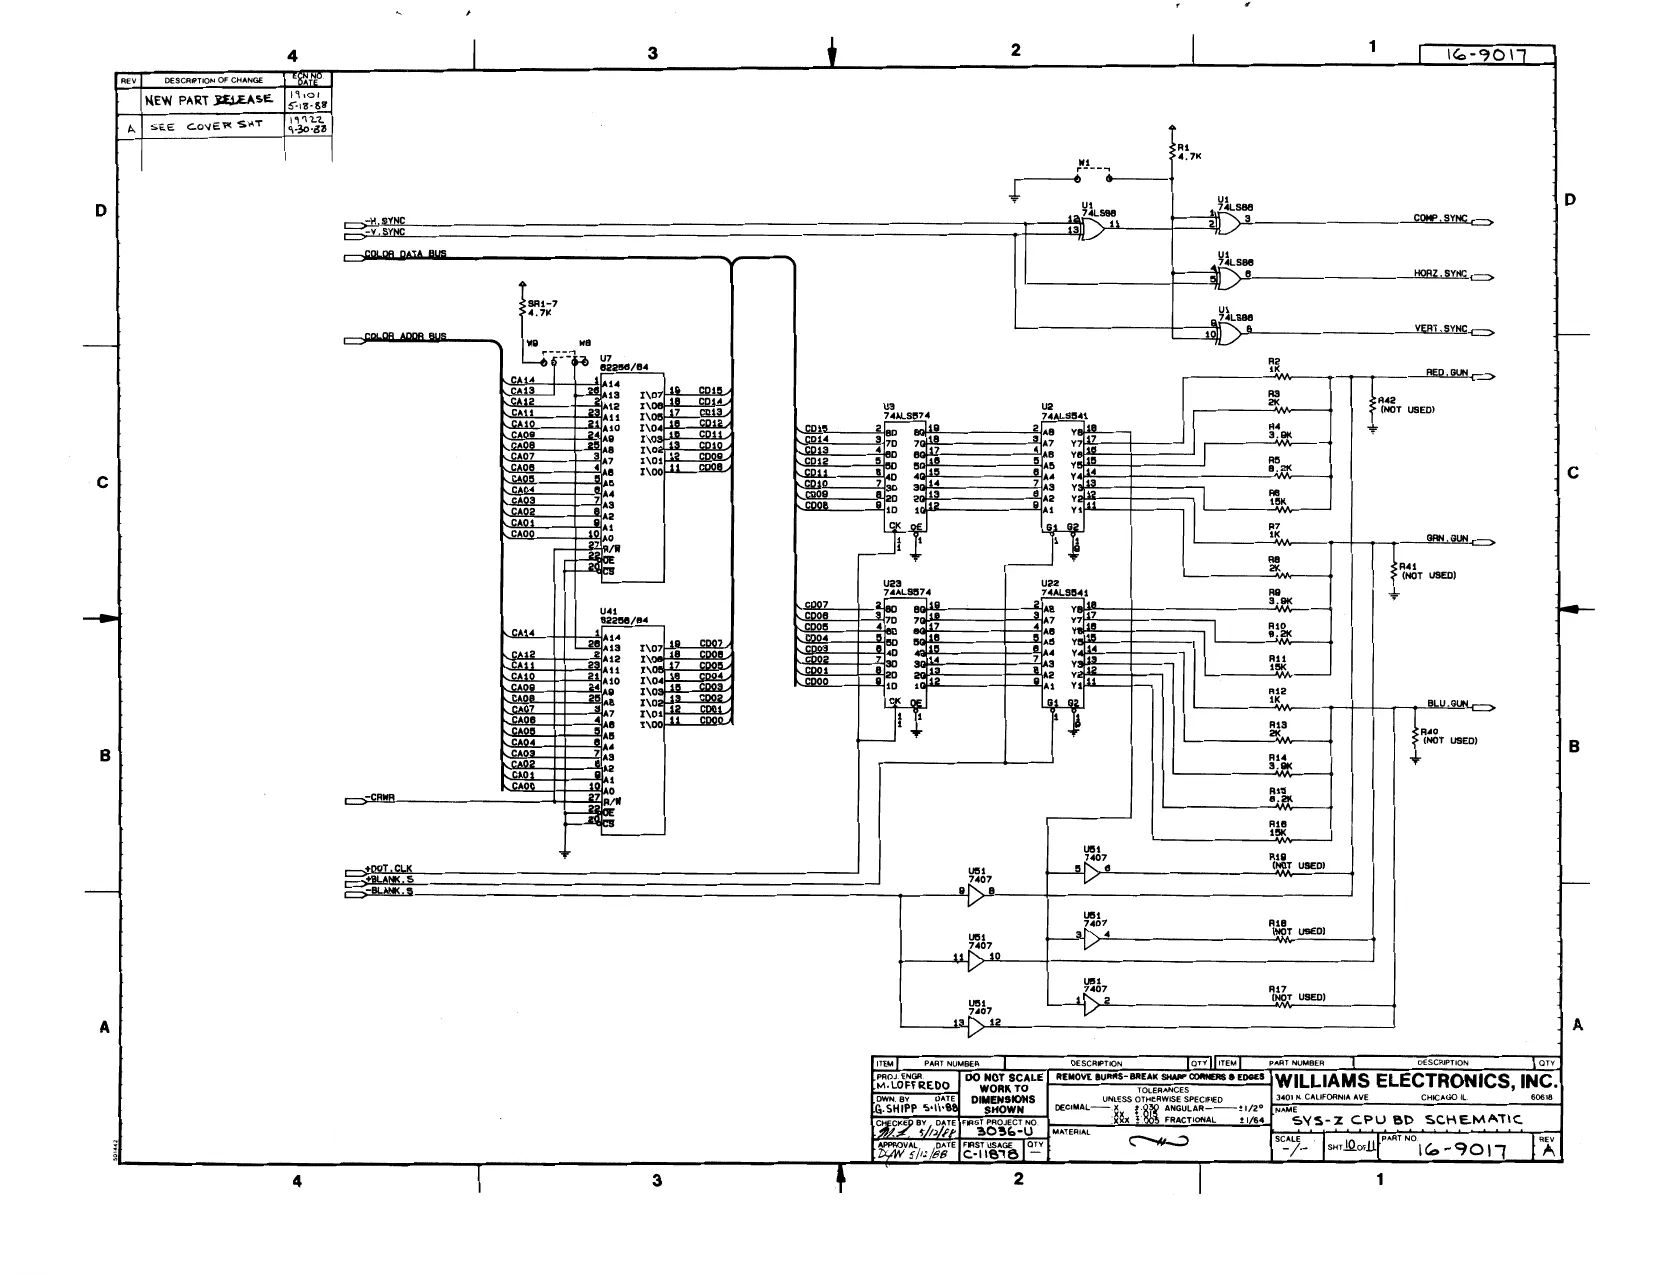
This page is a drawing, shown as the original scan.
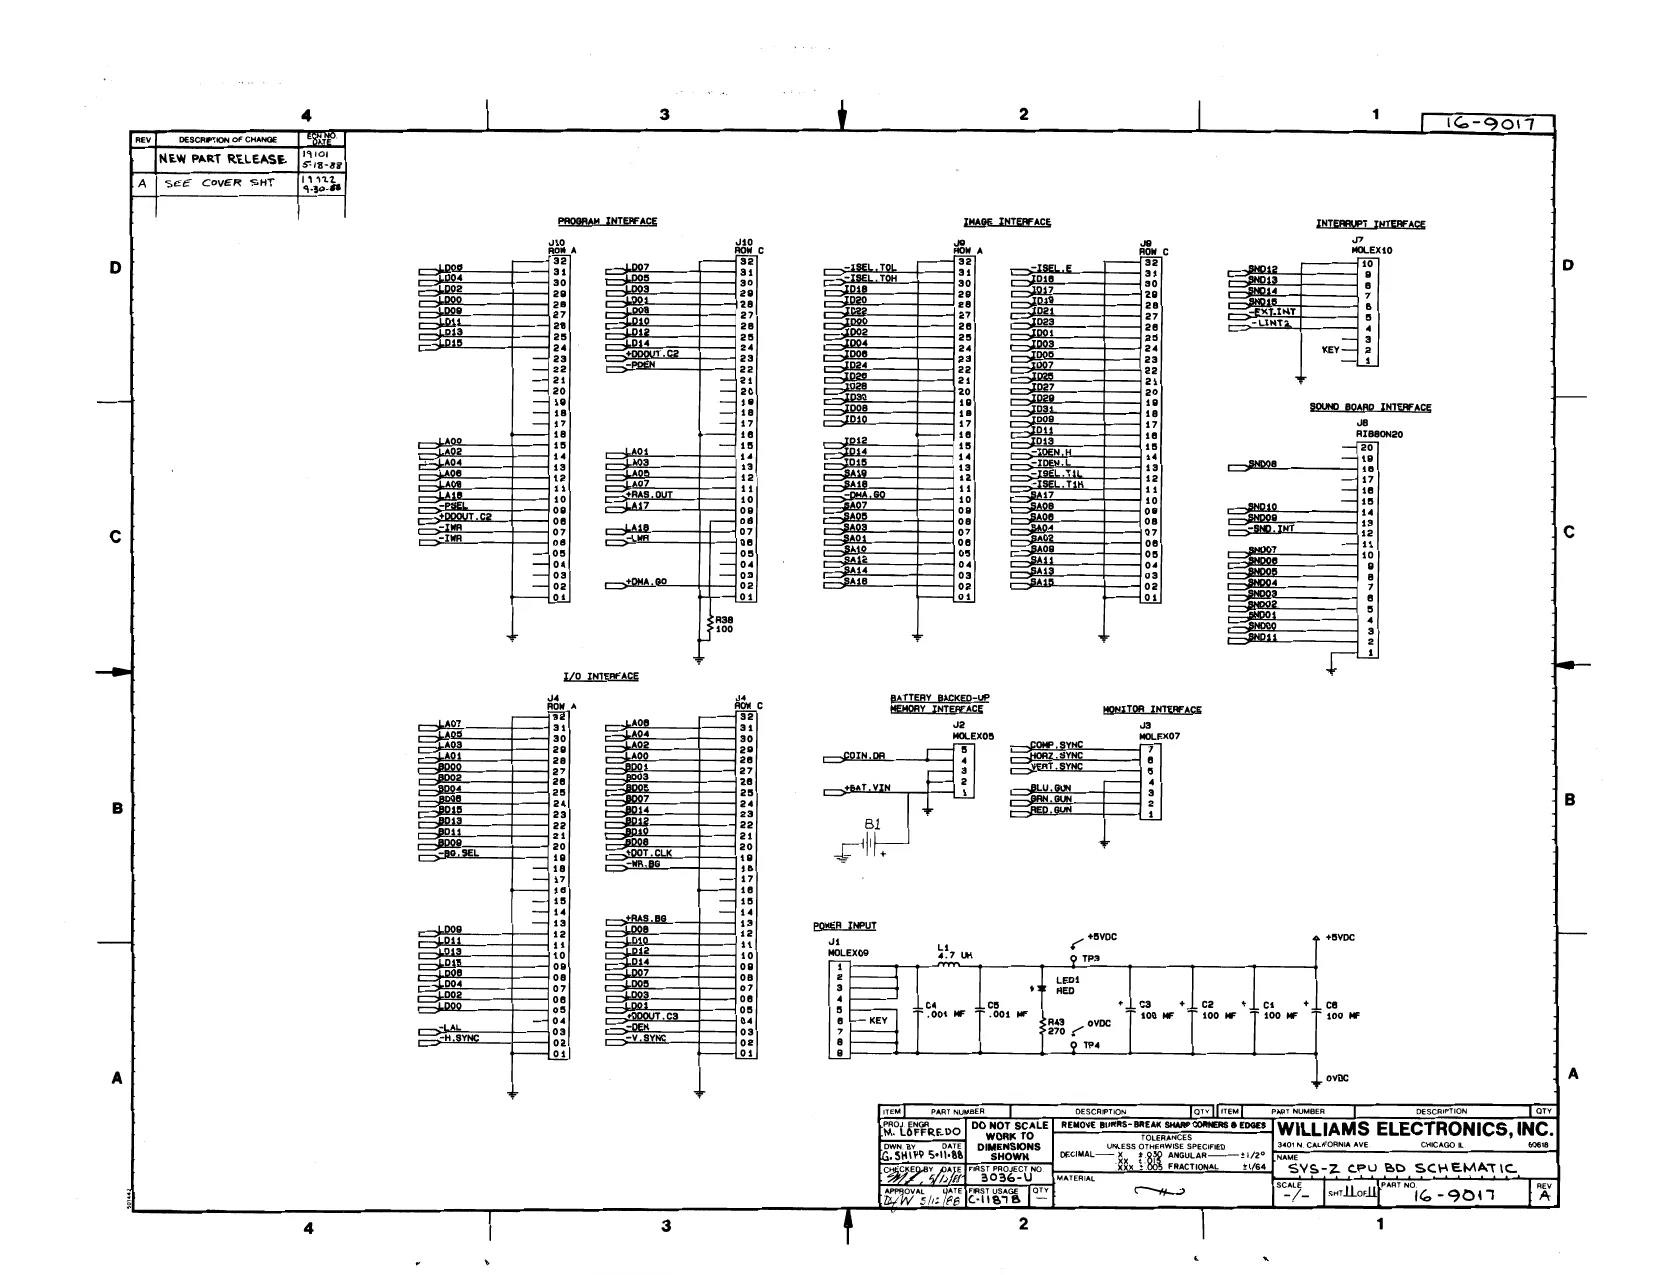
This page is a drawing, shown as the original scan.
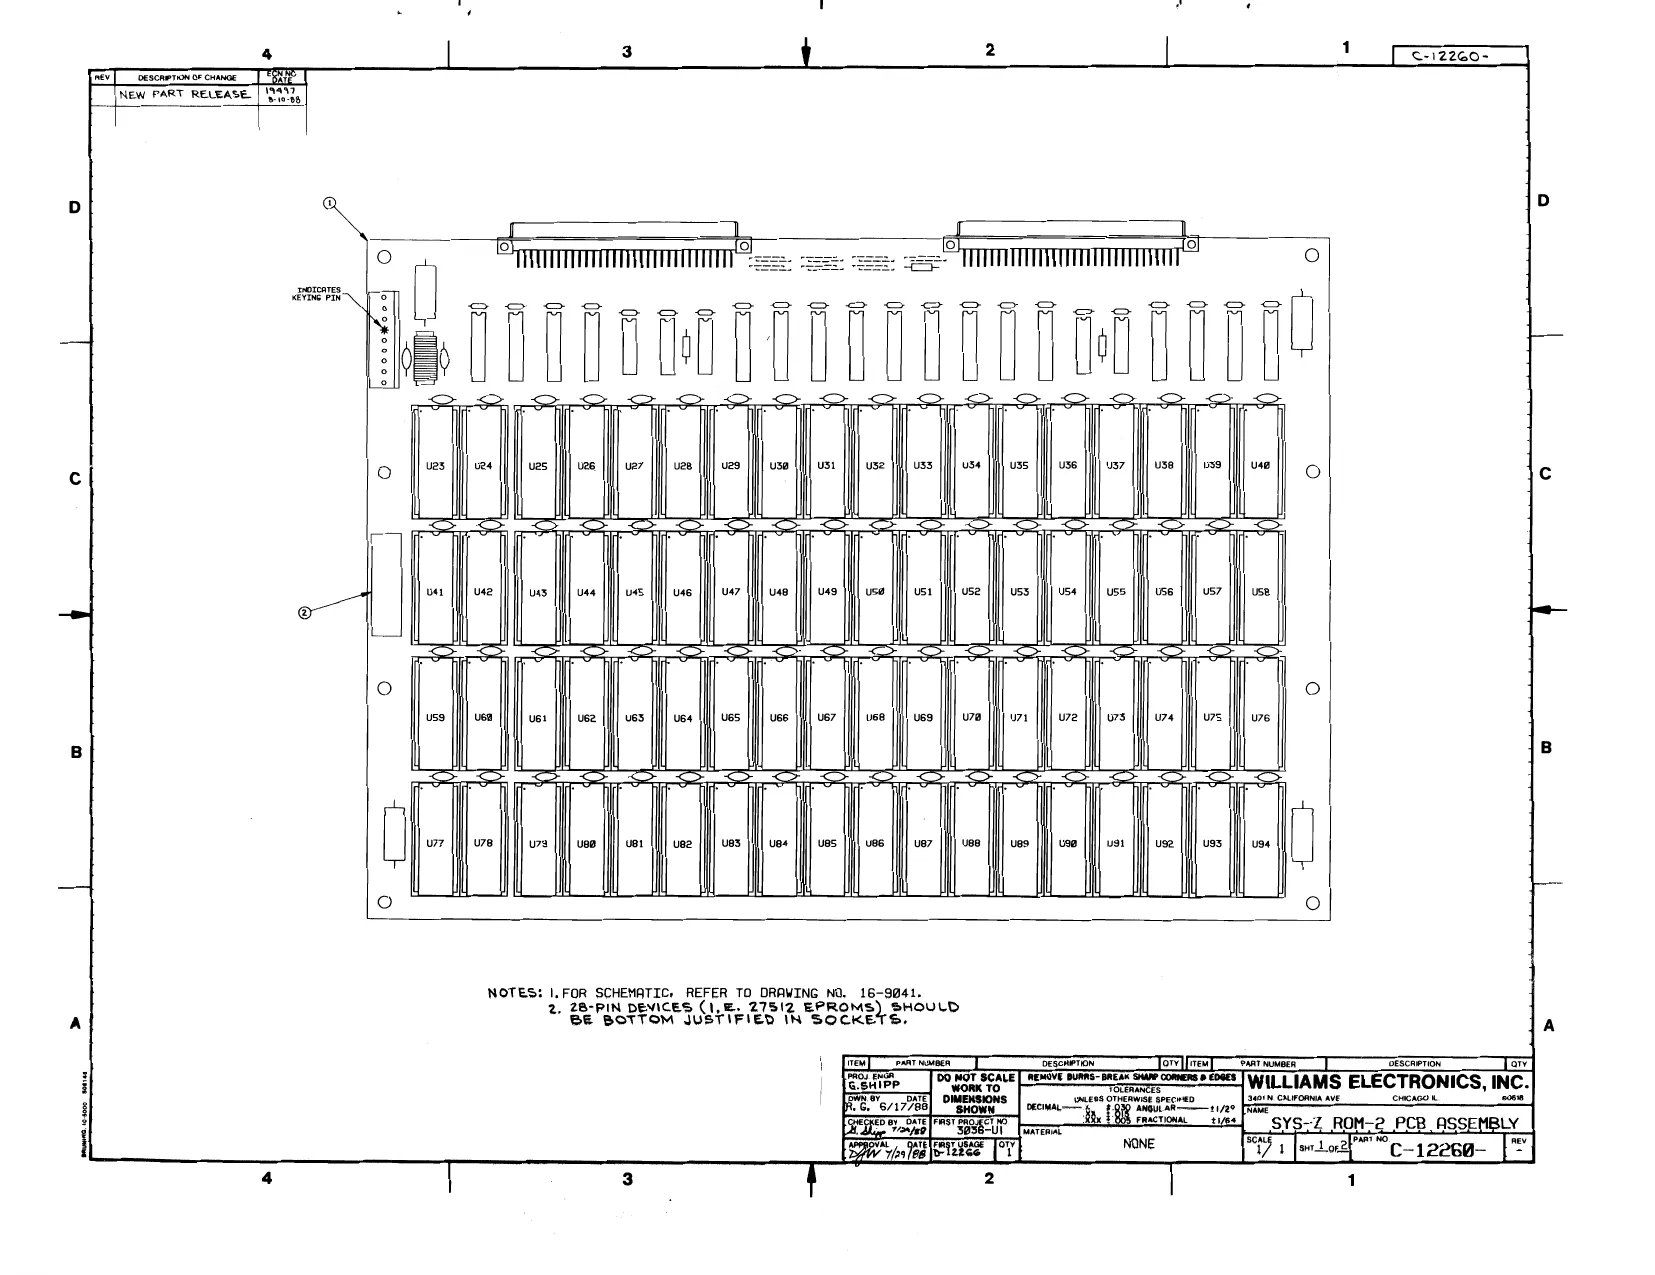
This page is a drawing, shown as the original scan.
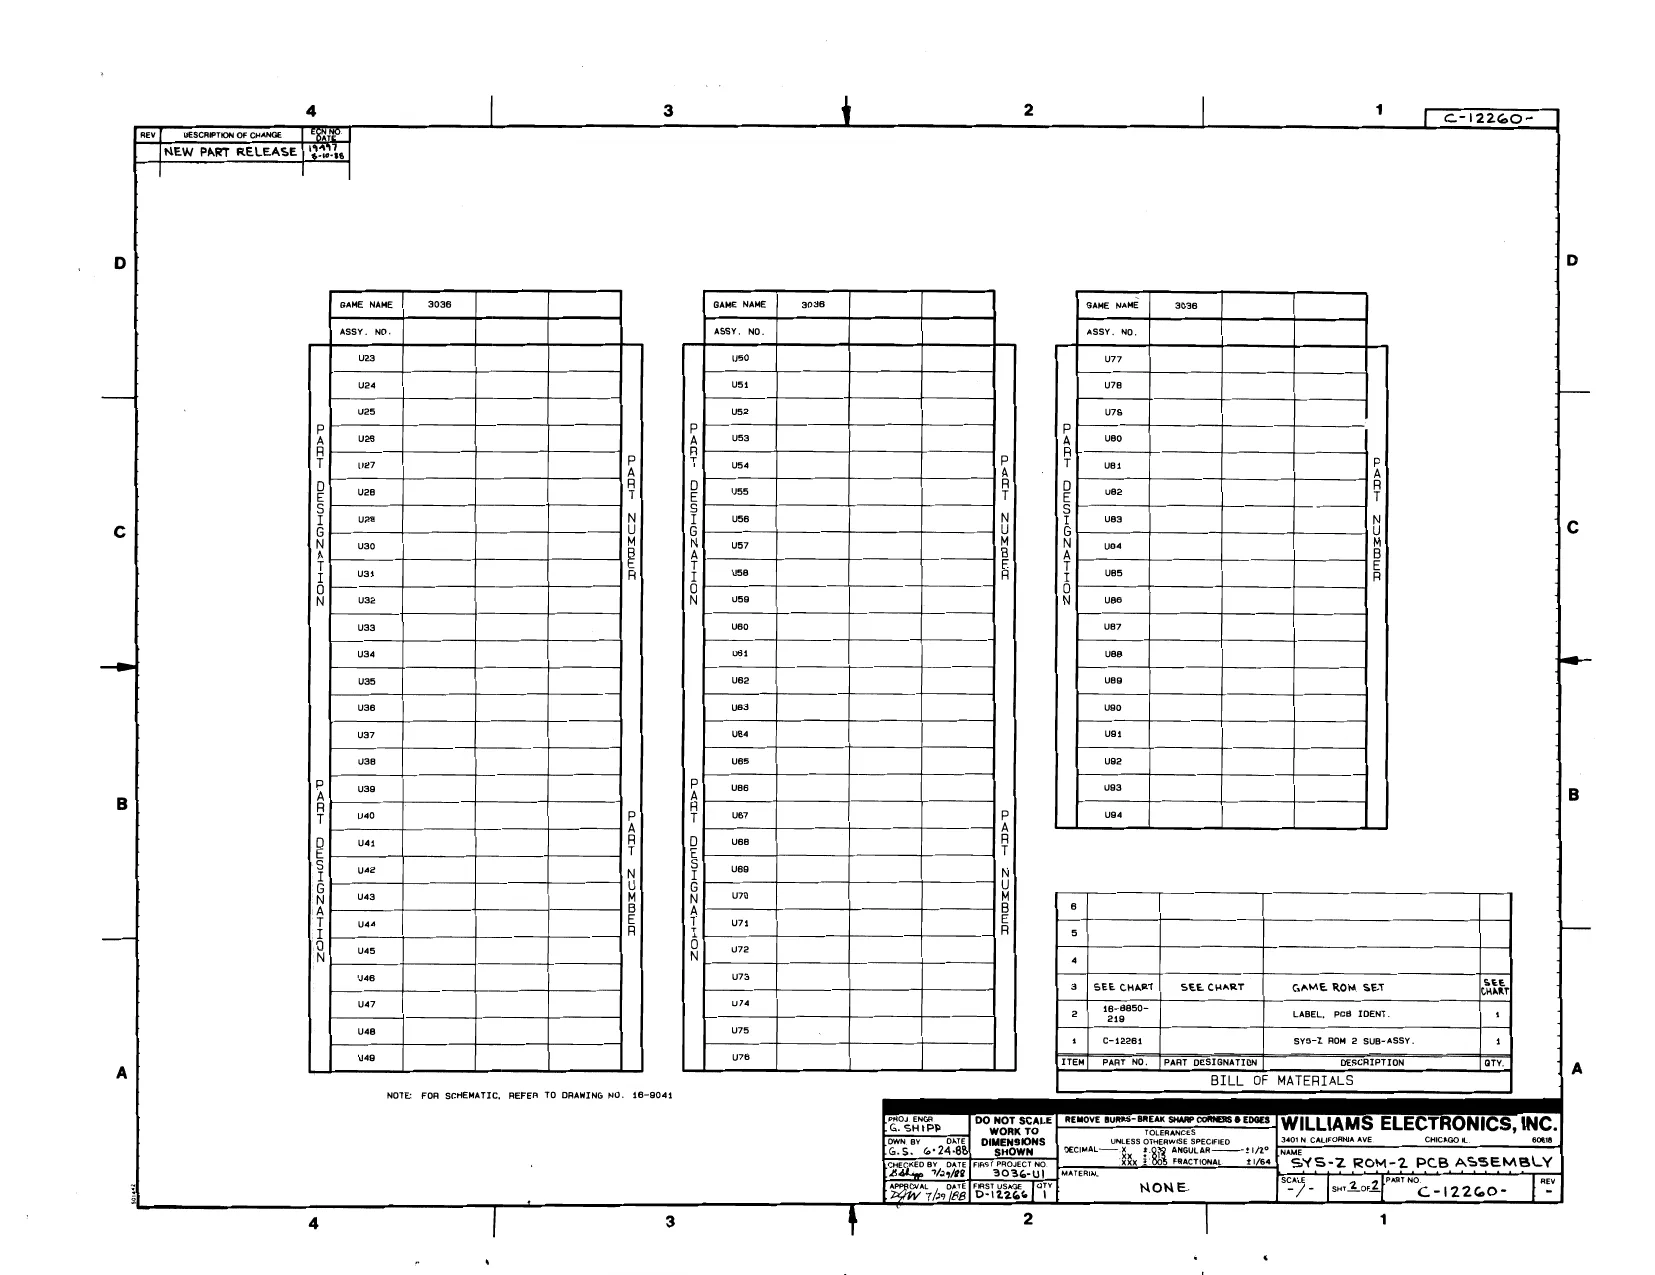
This page is a drawing, shown as the original scan.
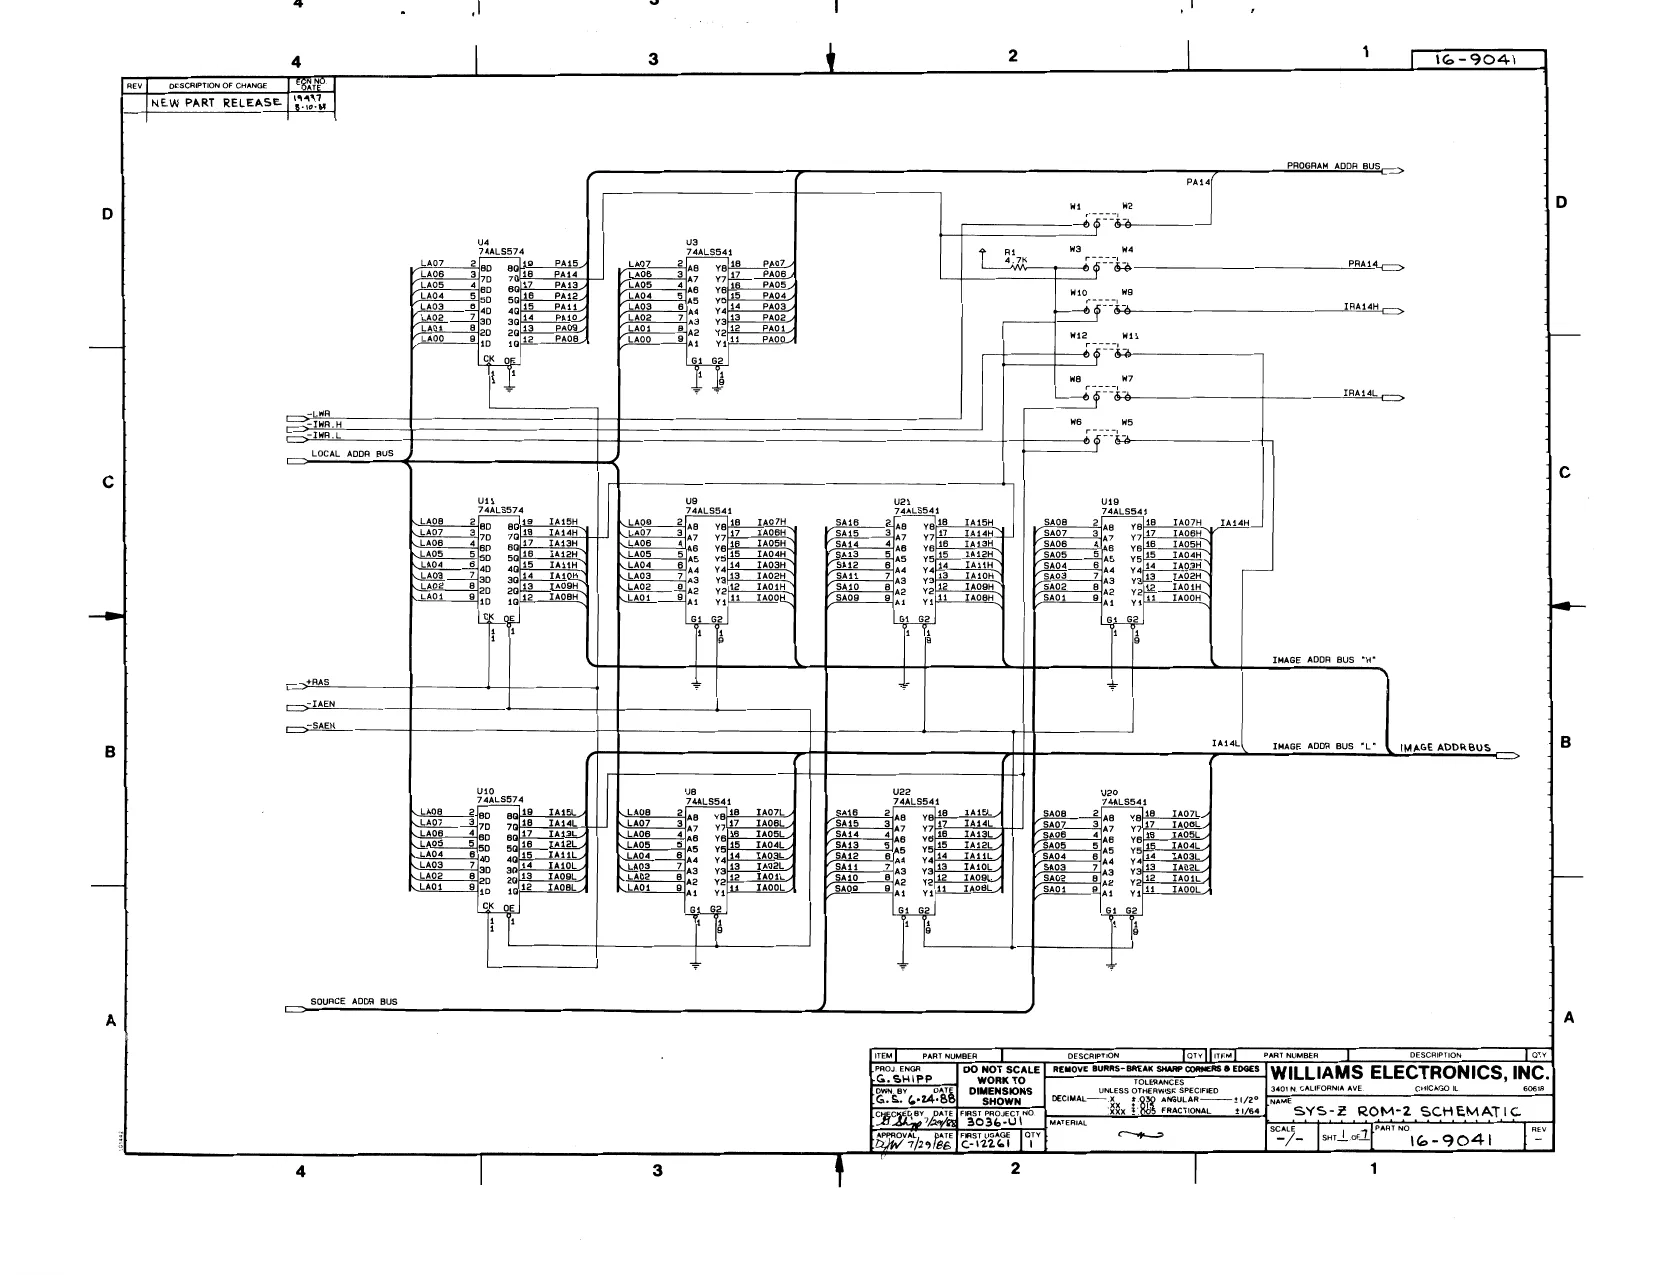
This page is a drawing, shown as the original scan.
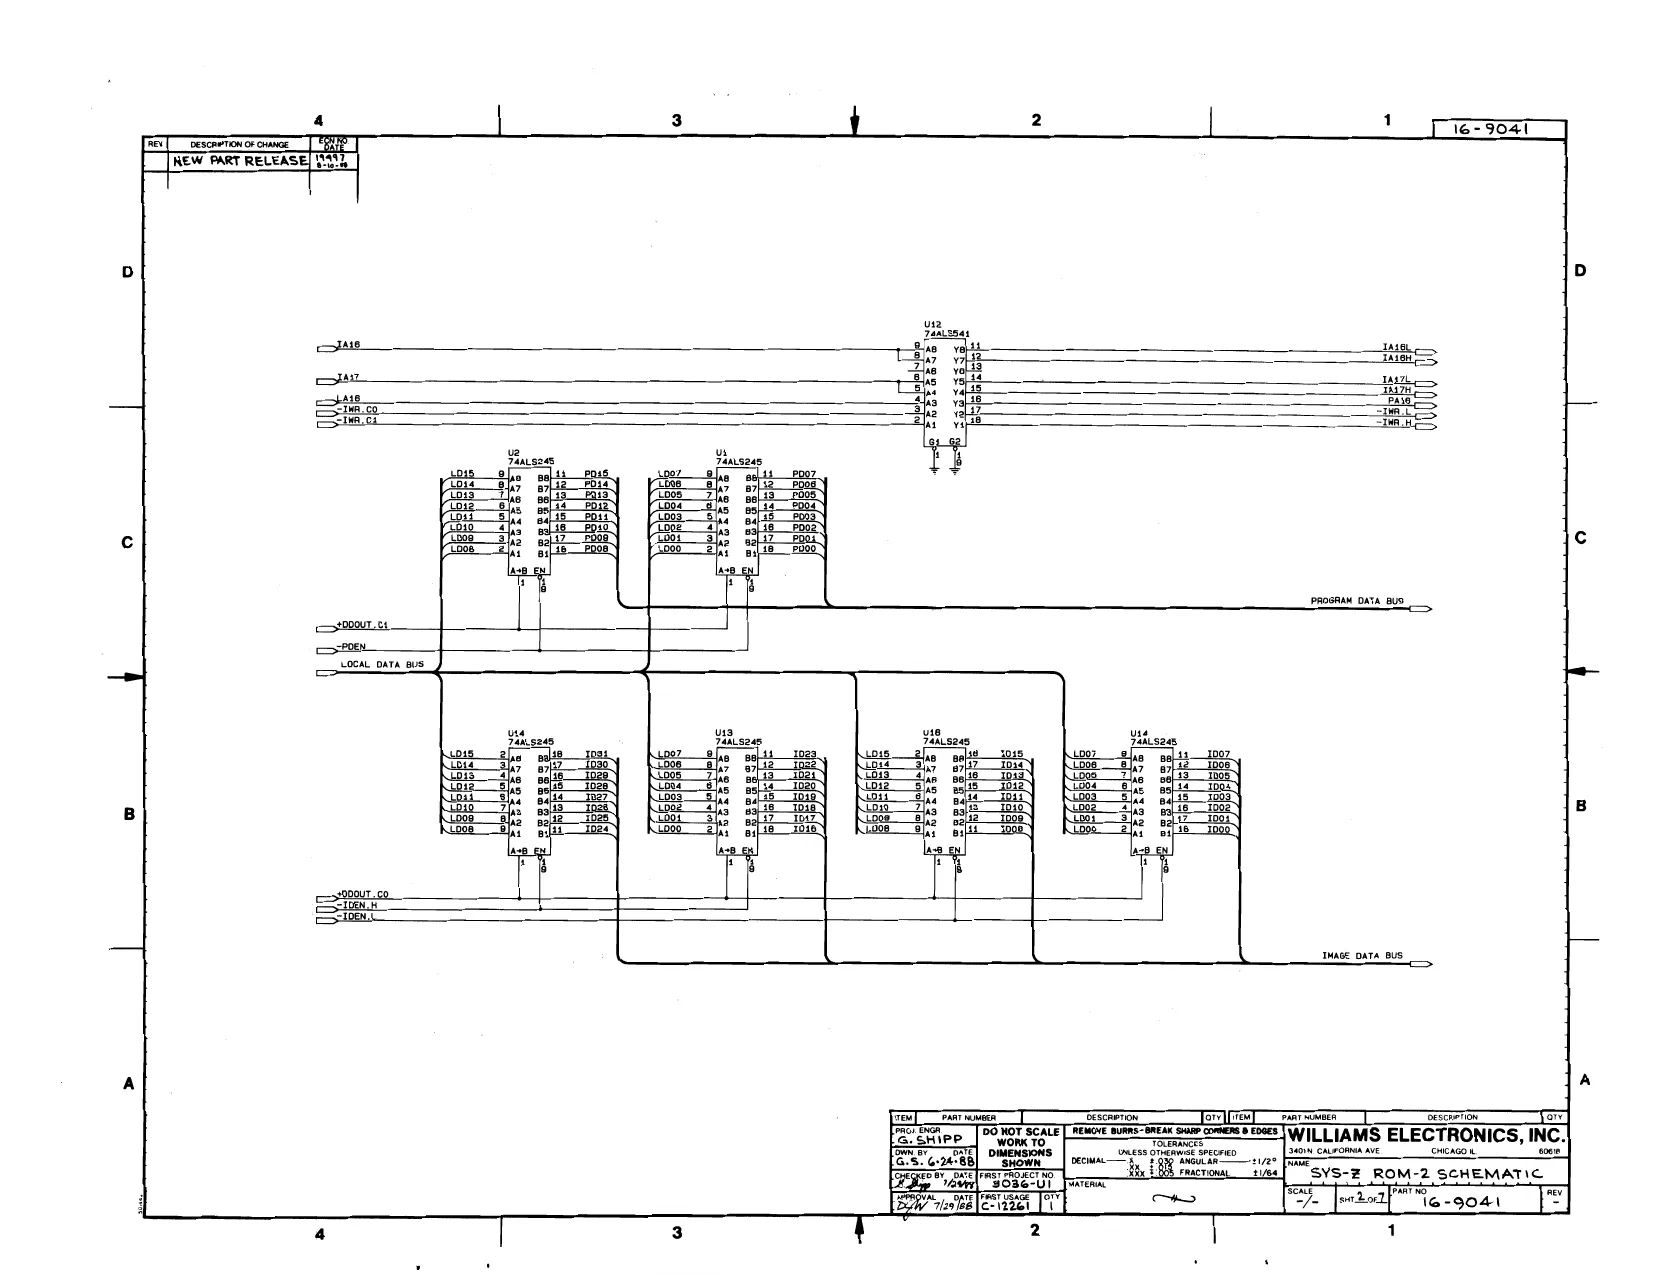
This page is a drawing, shown as the original scan.
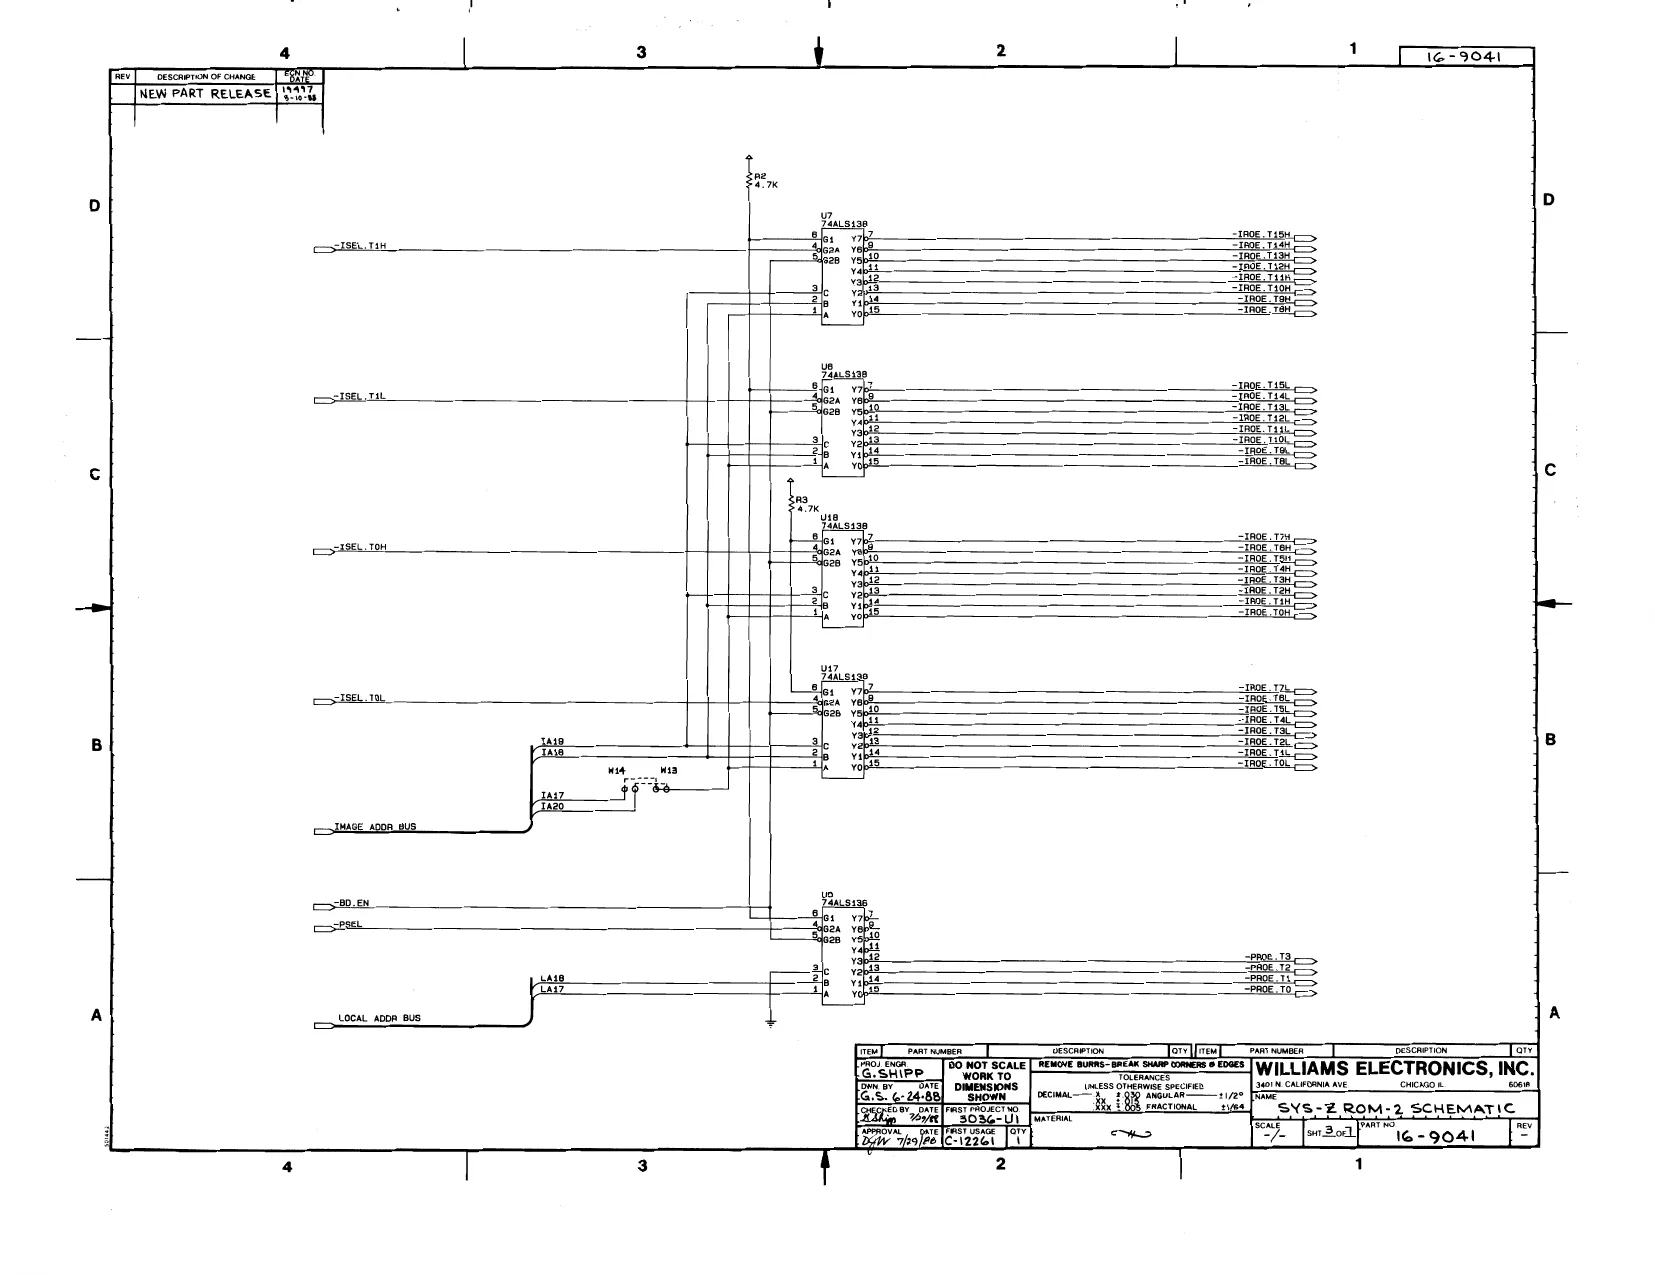
This page is a drawing, shown as the original scan.
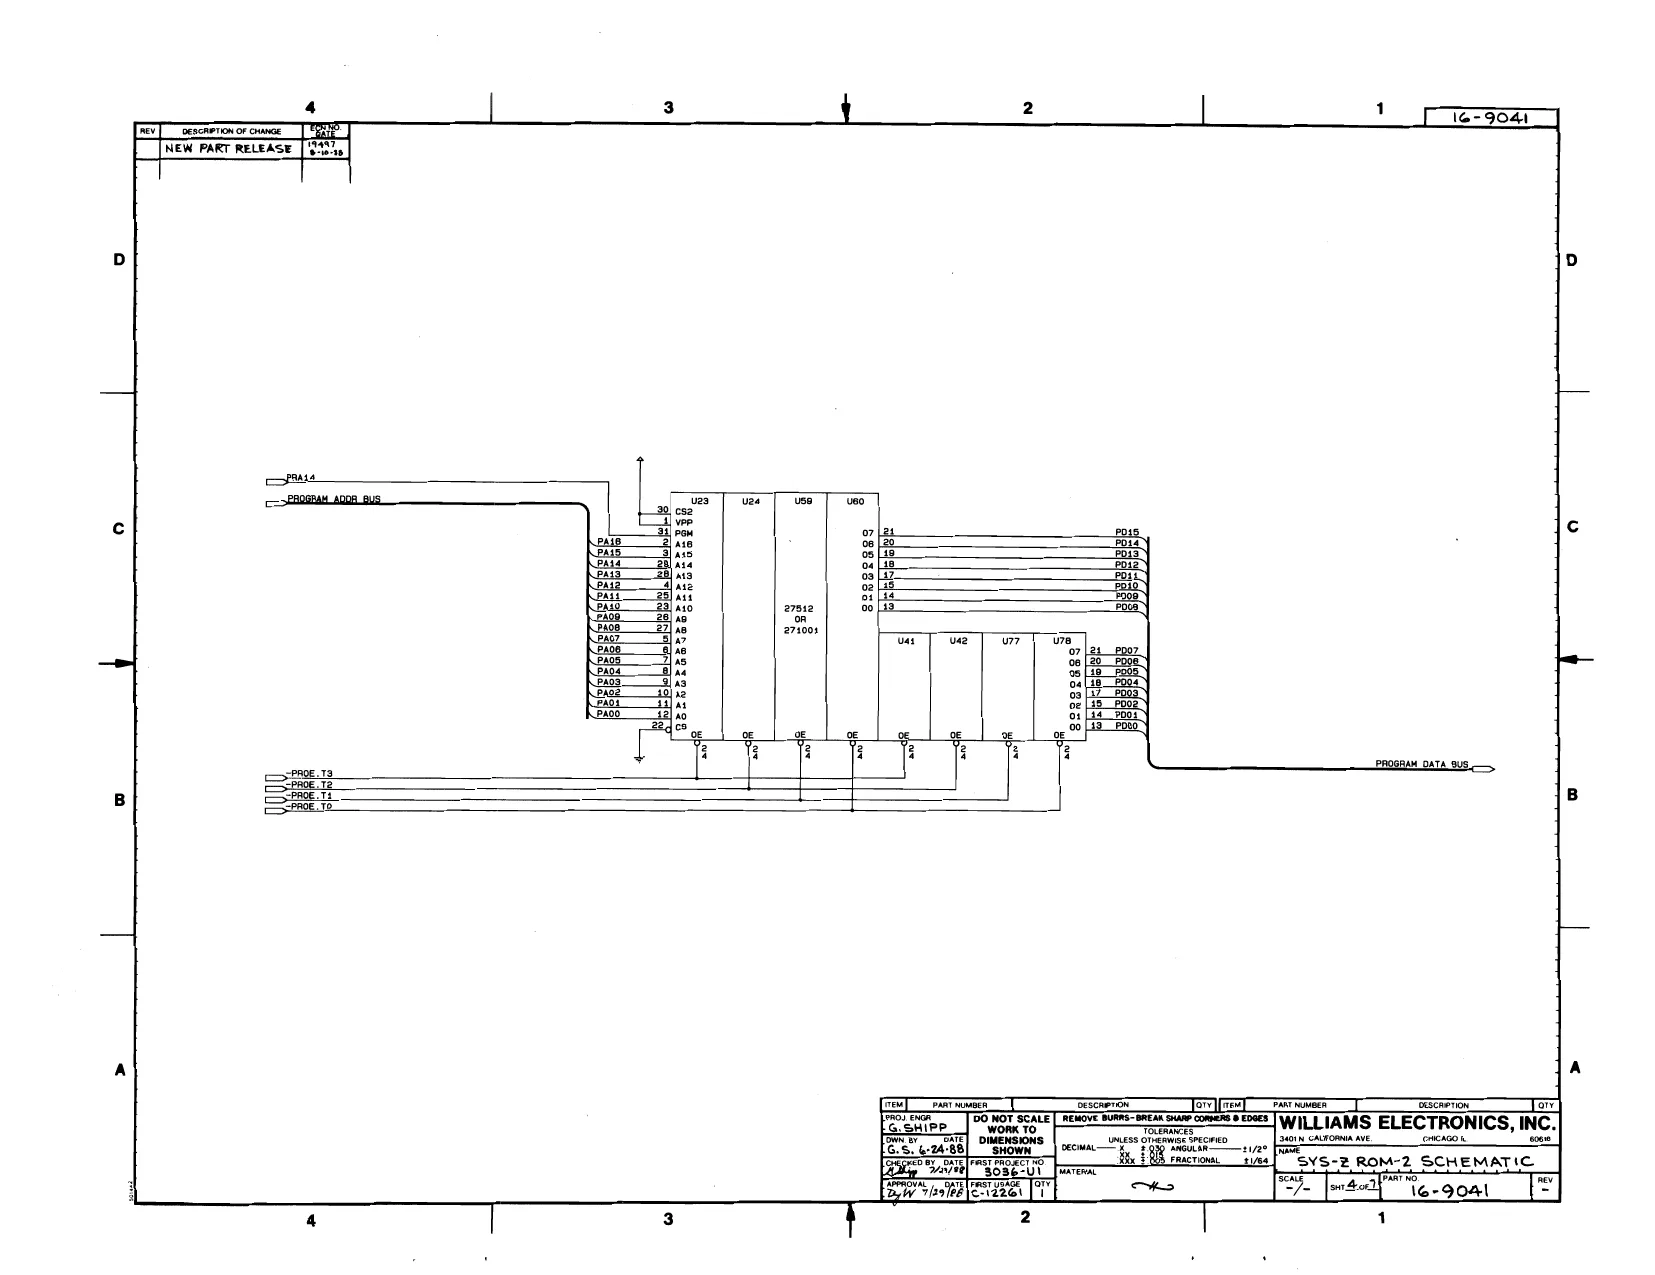
This page is a drawing, shown as the original scan.
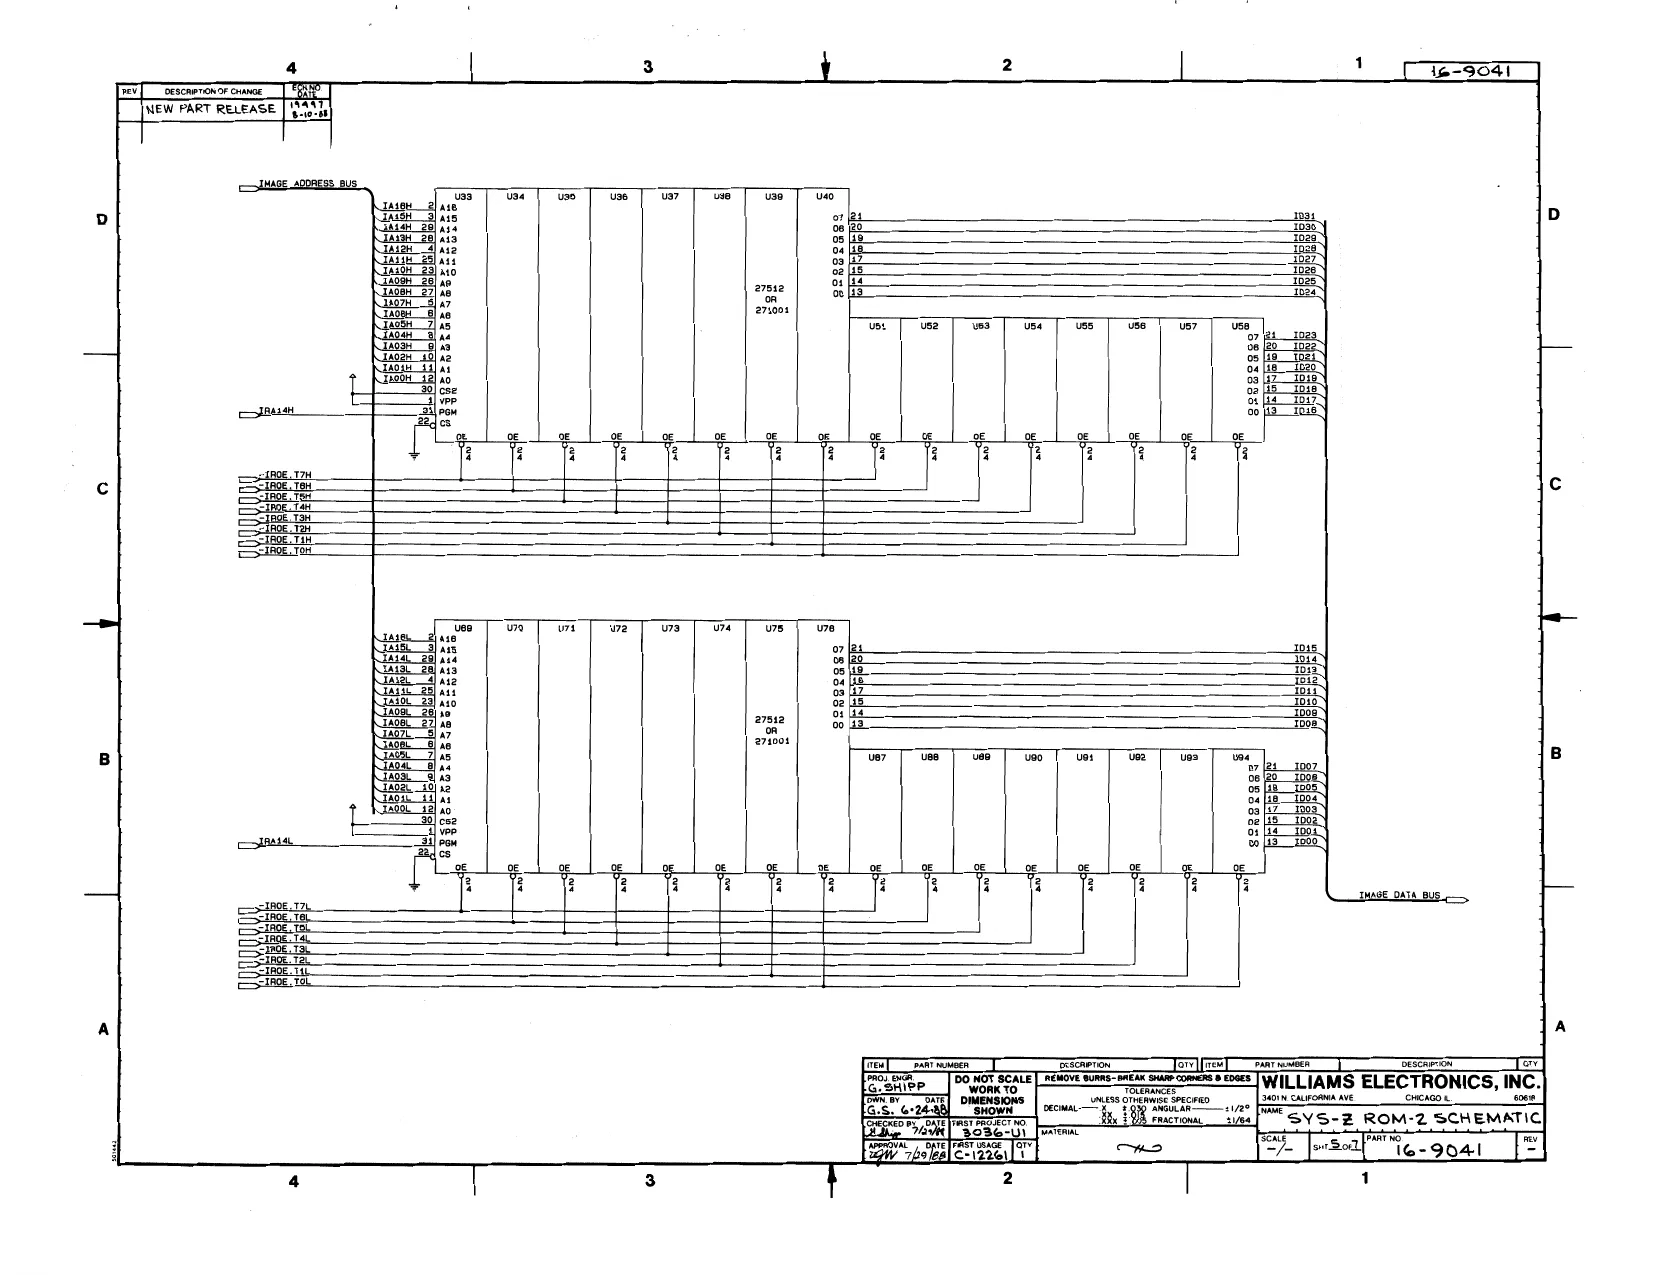
This page is a drawing, shown as the original scan.
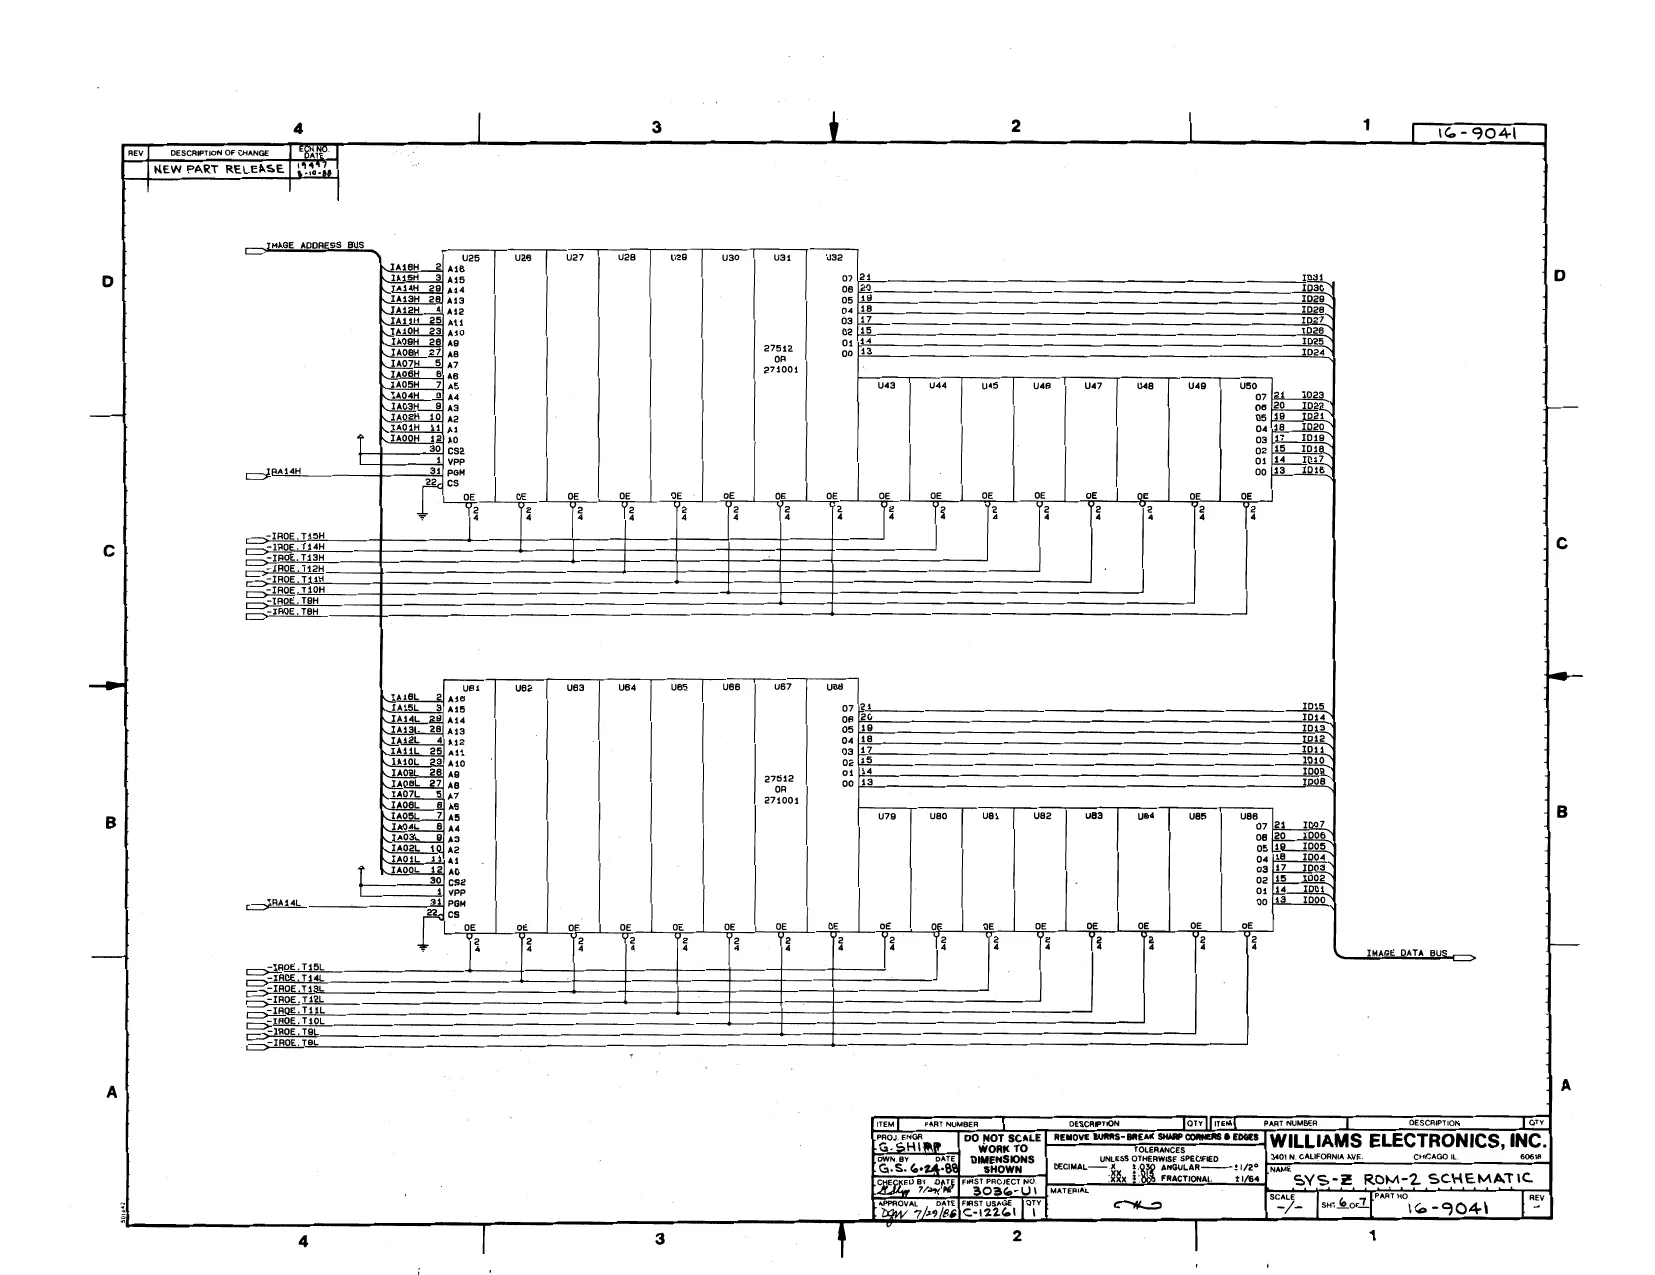
This page is a drawing, shown as the original scan.
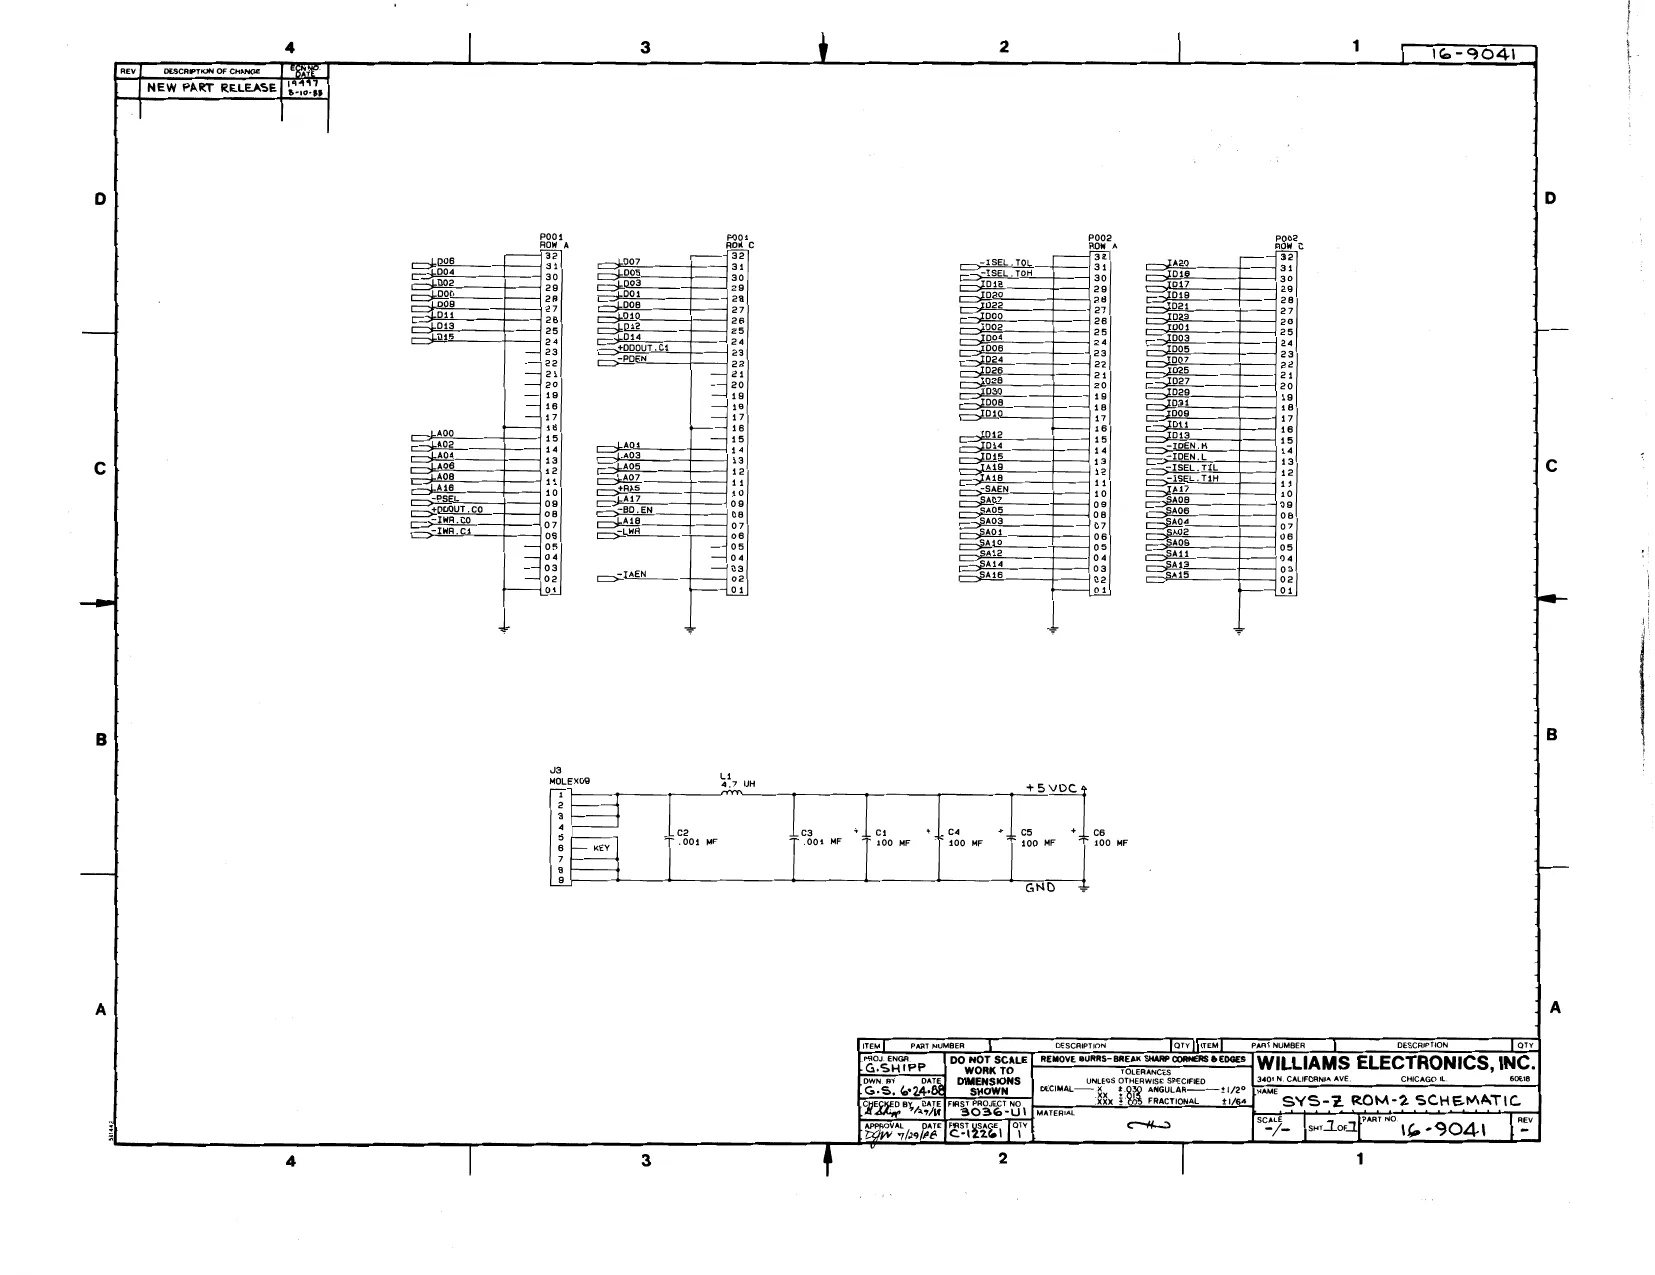
This page is a drawing, shown as the original scan.
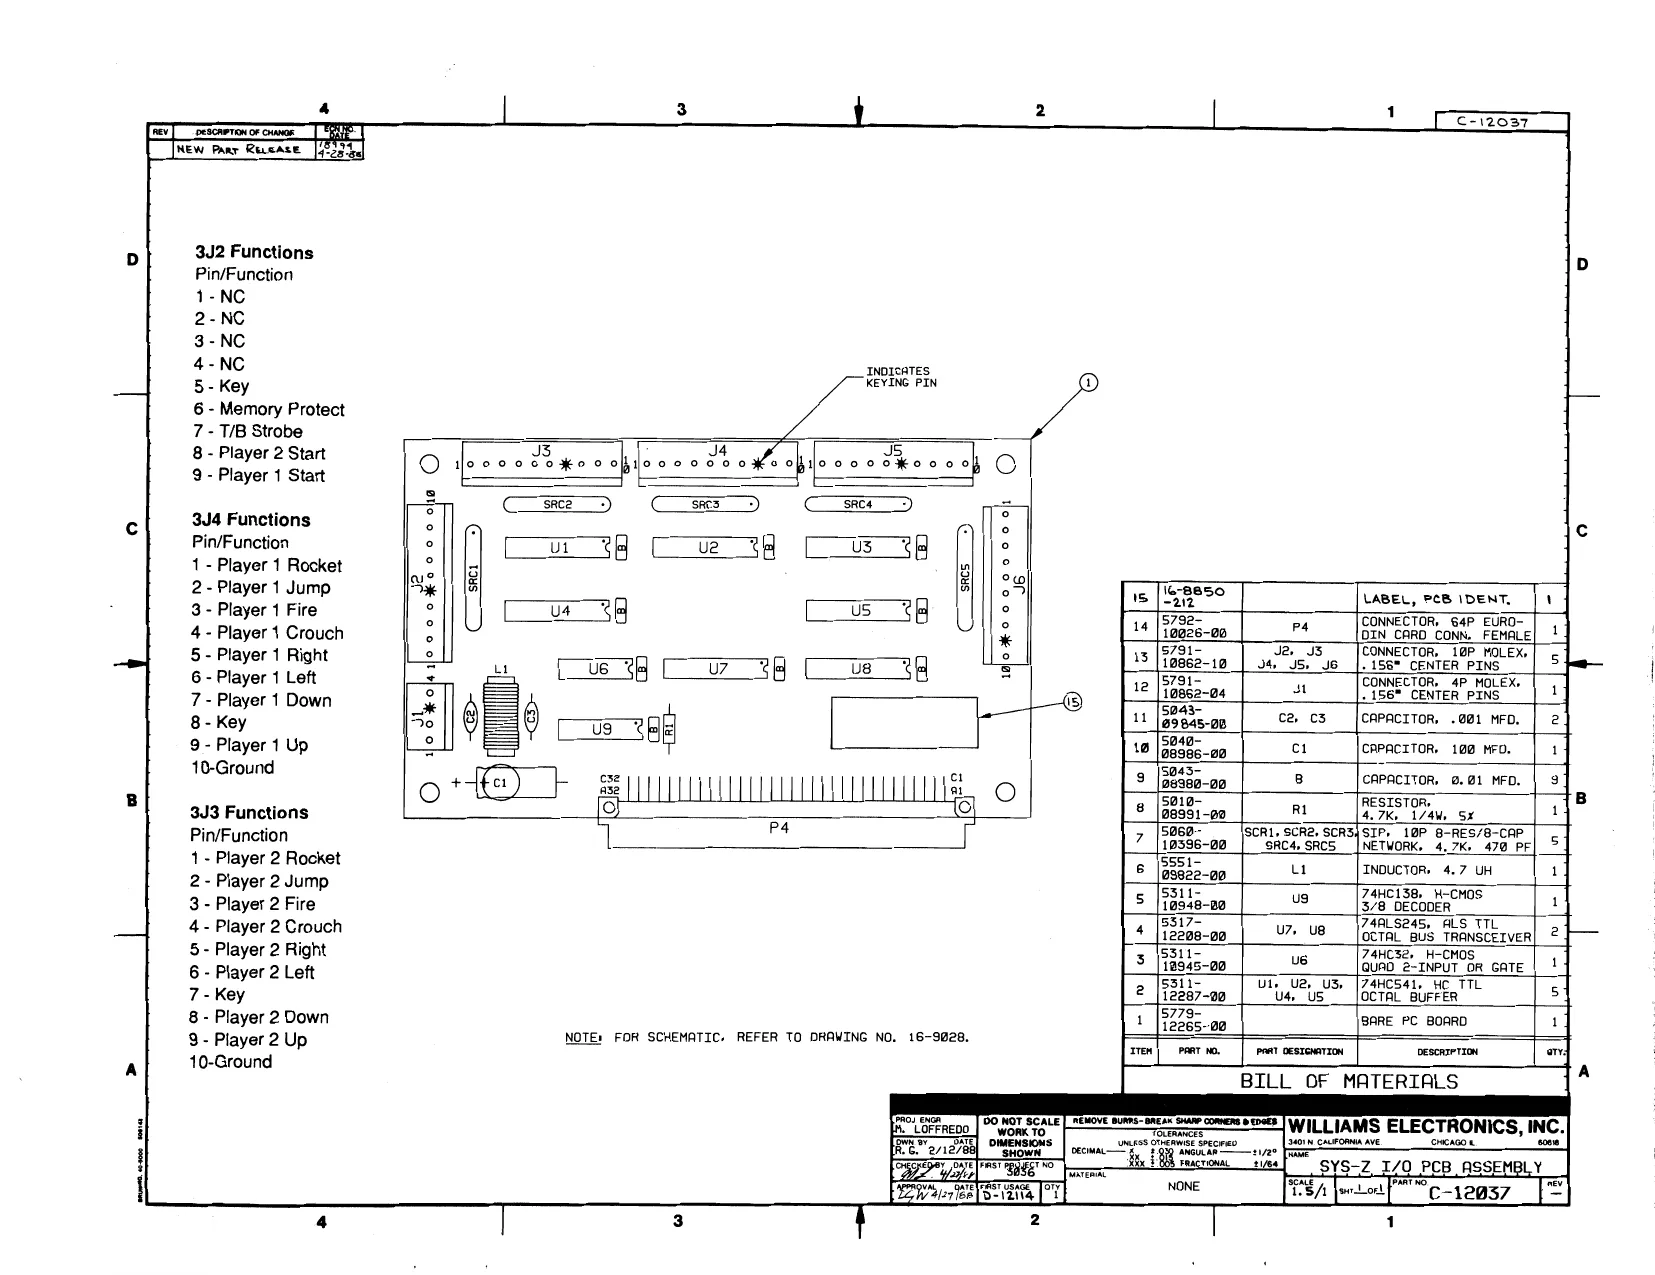
This page is a drawing, shown as the original scan.
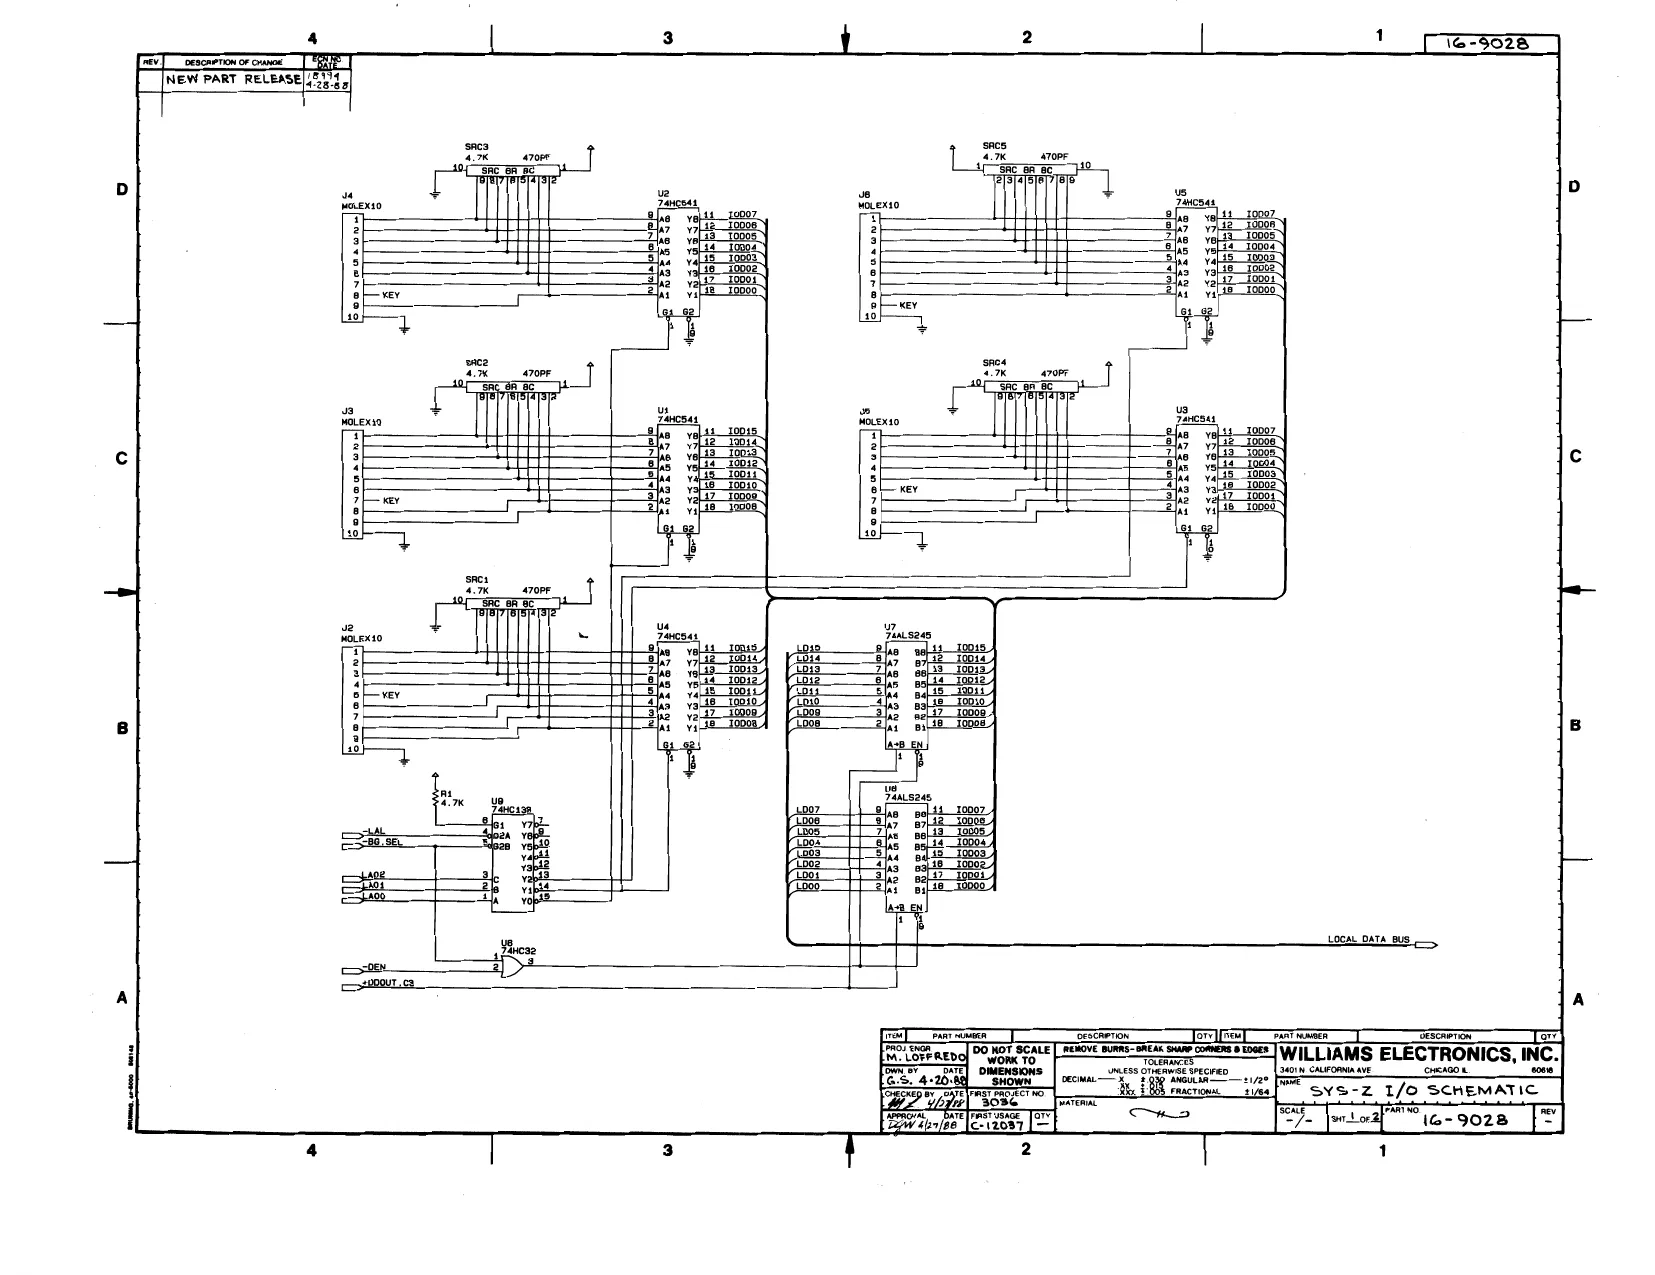
This page is a drawing, shown as the original scan.
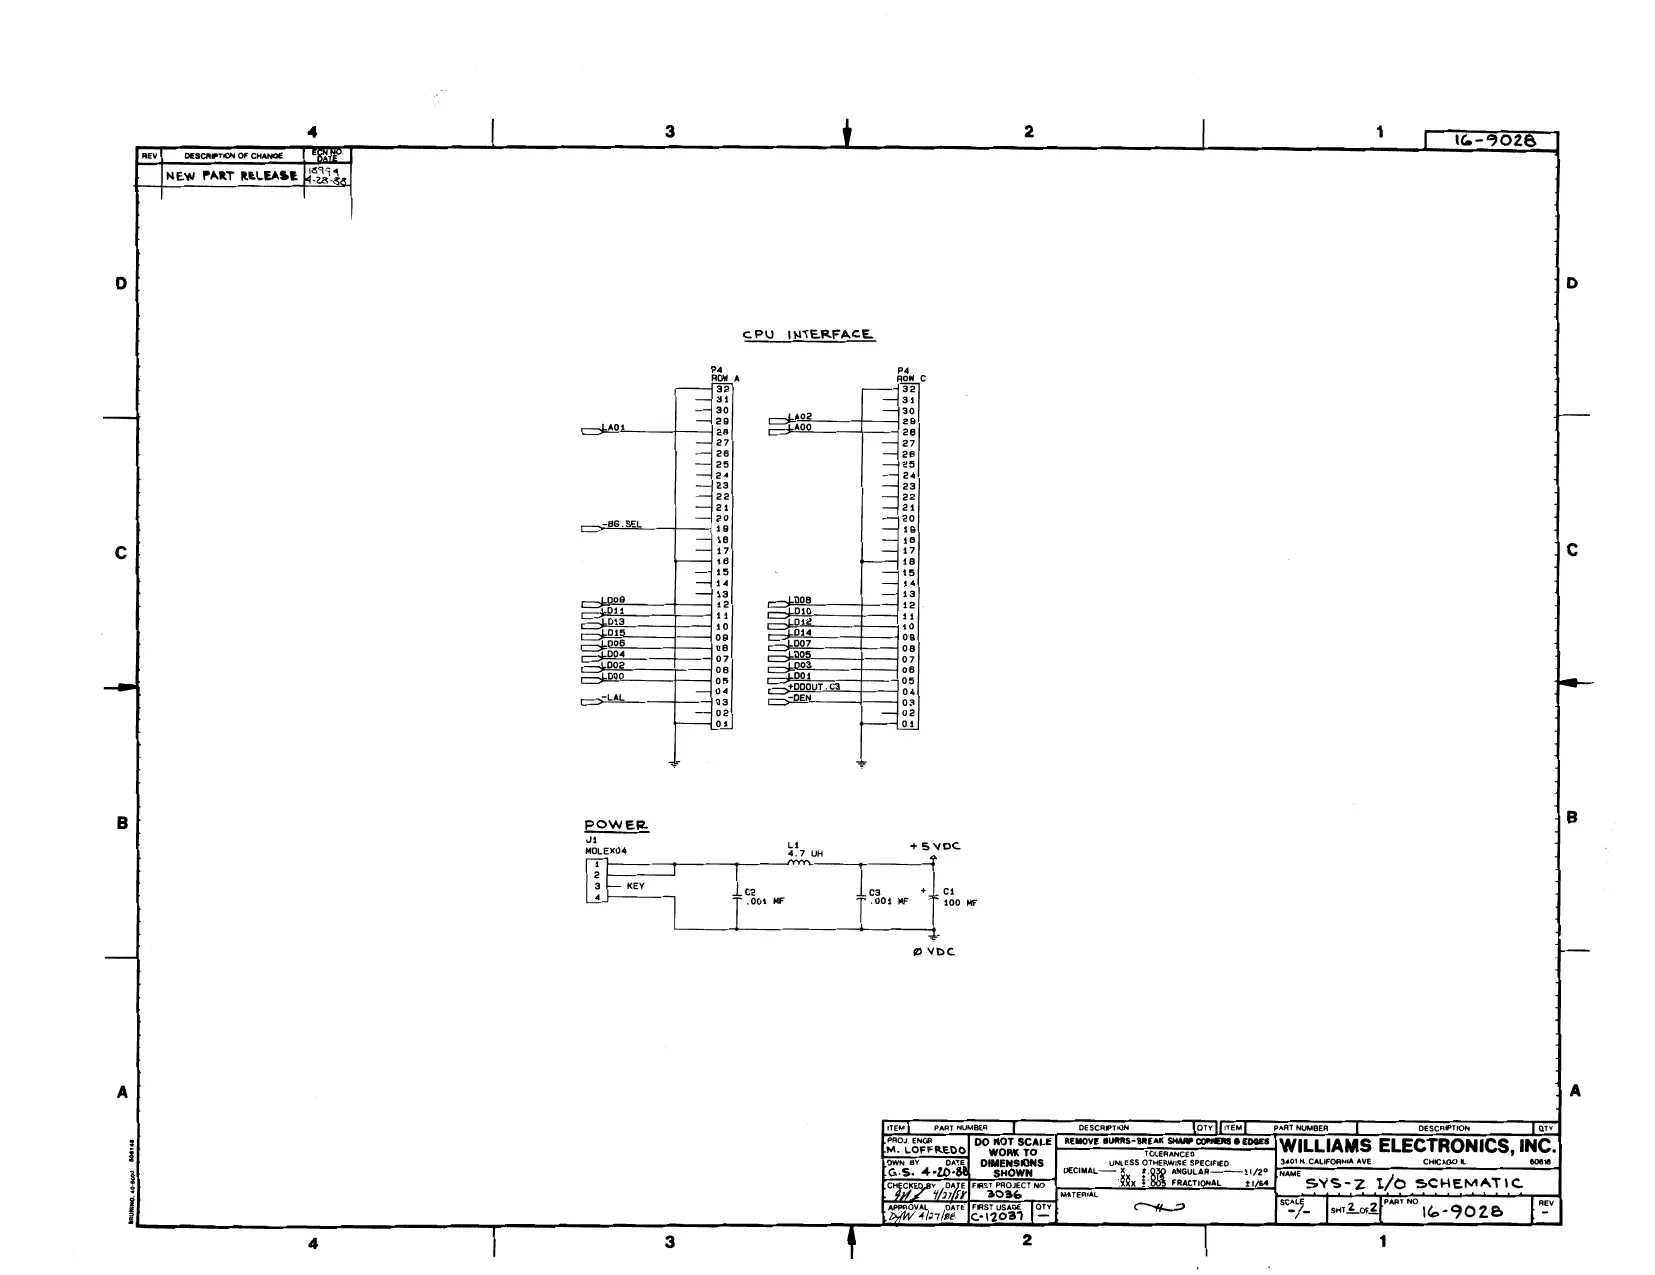
This page is a drawing, shown as the original scan.
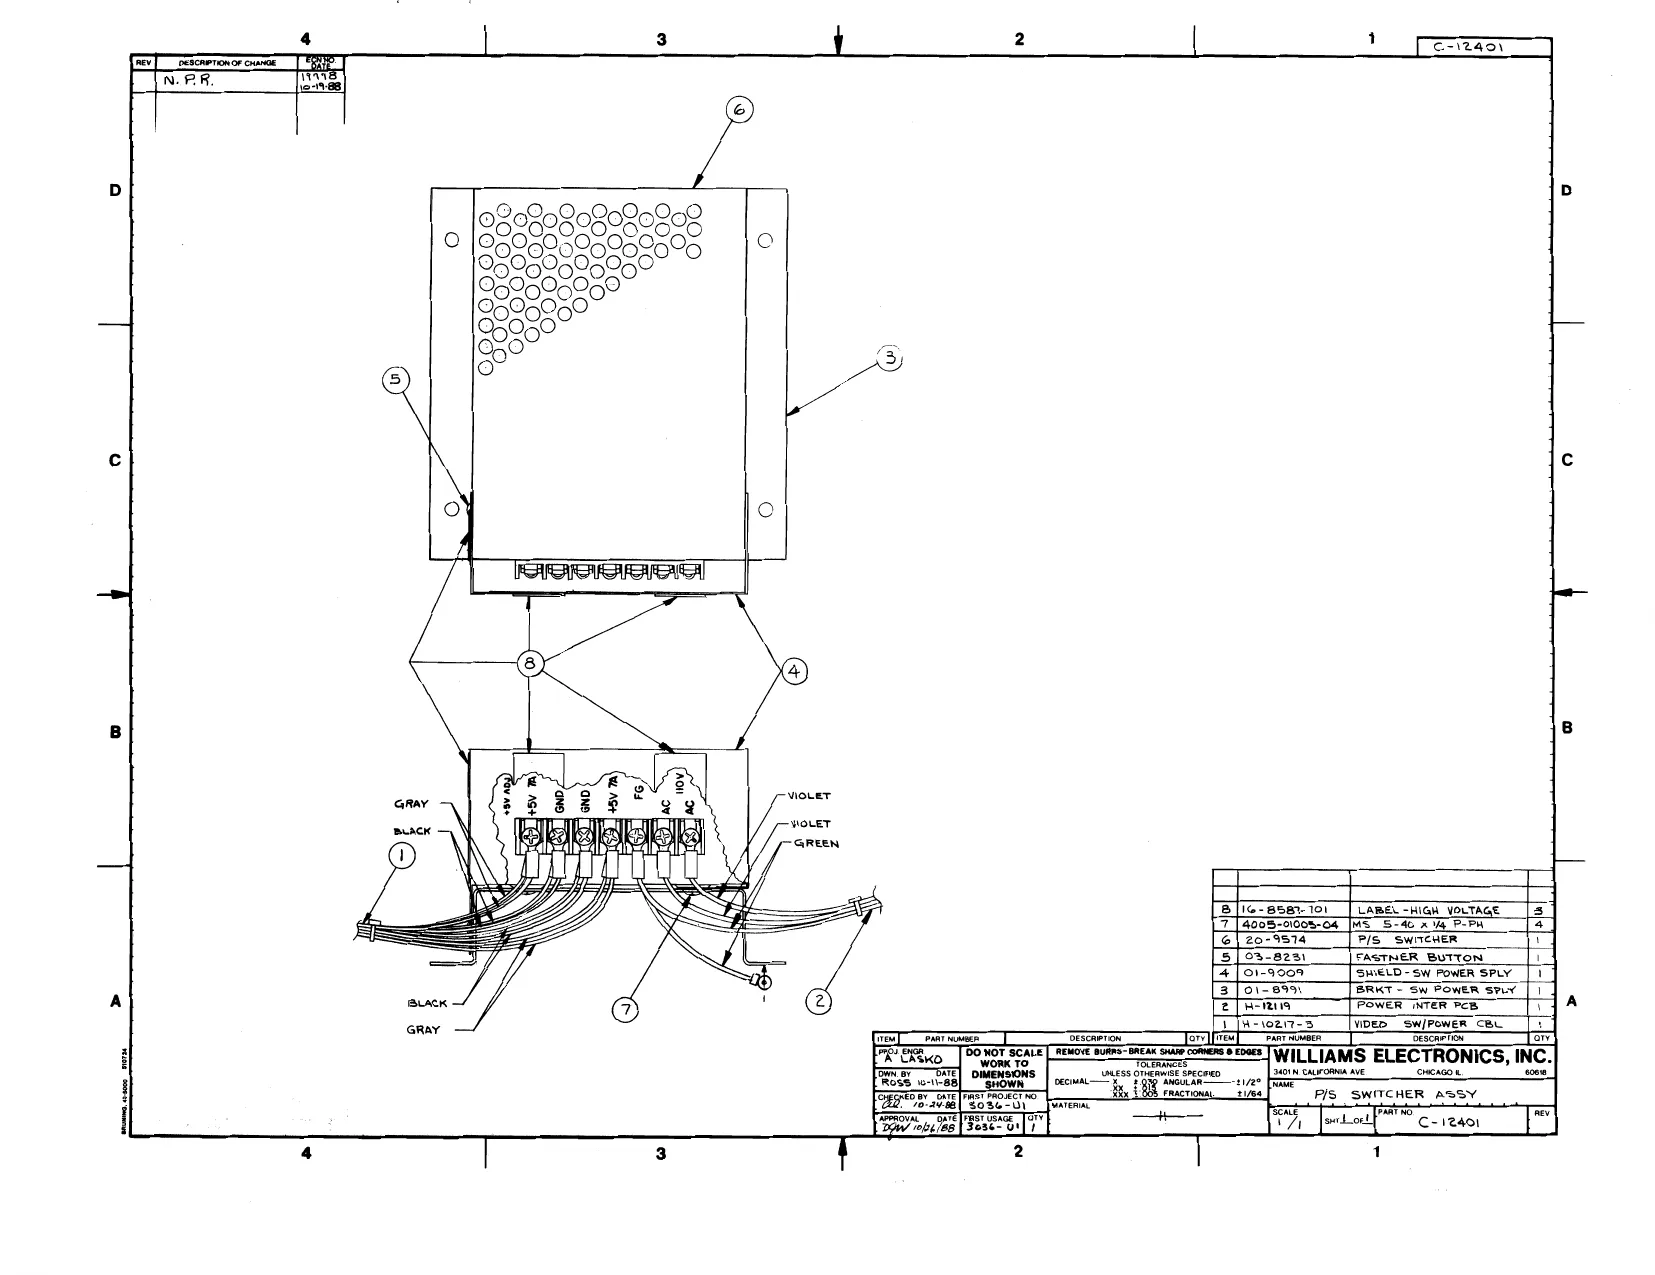
This page is a drawing, shown as the original scan.
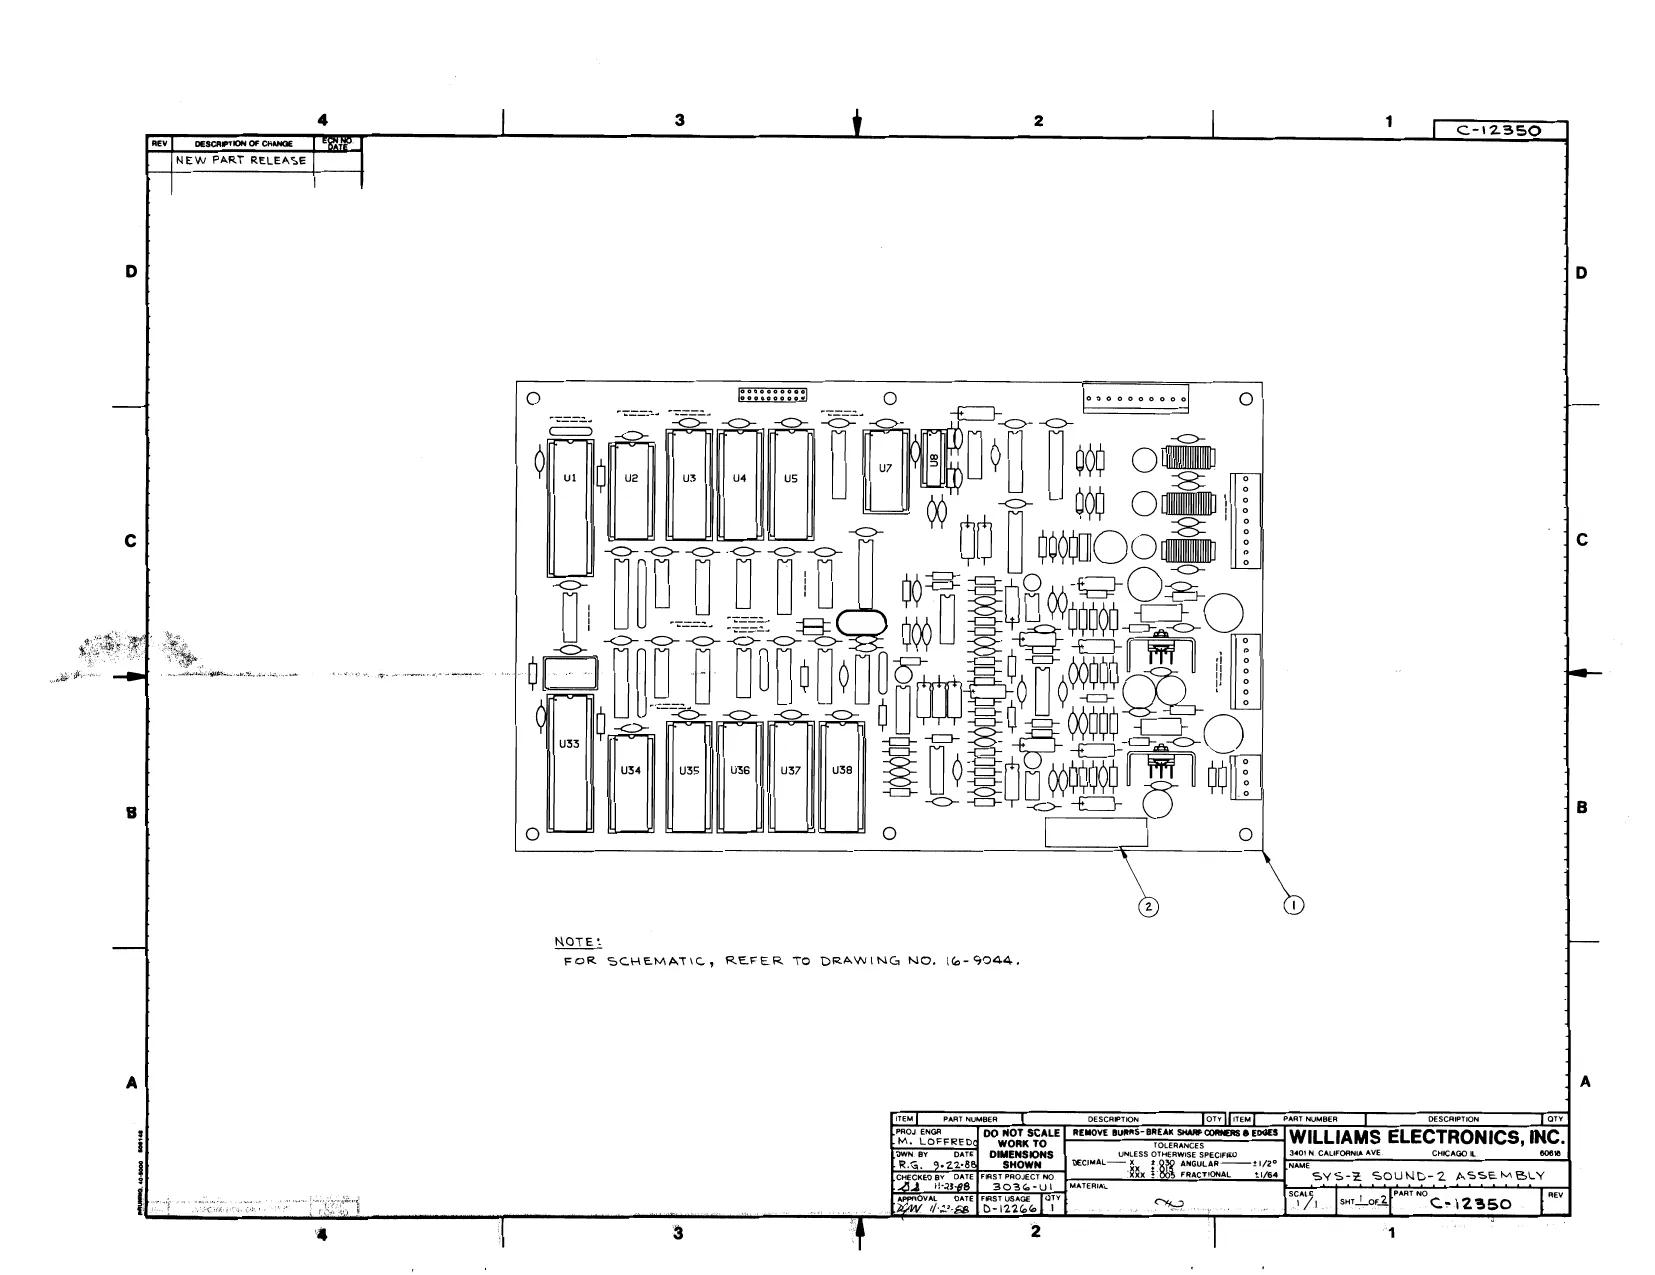
This page is a drawing, shown as the original scan.
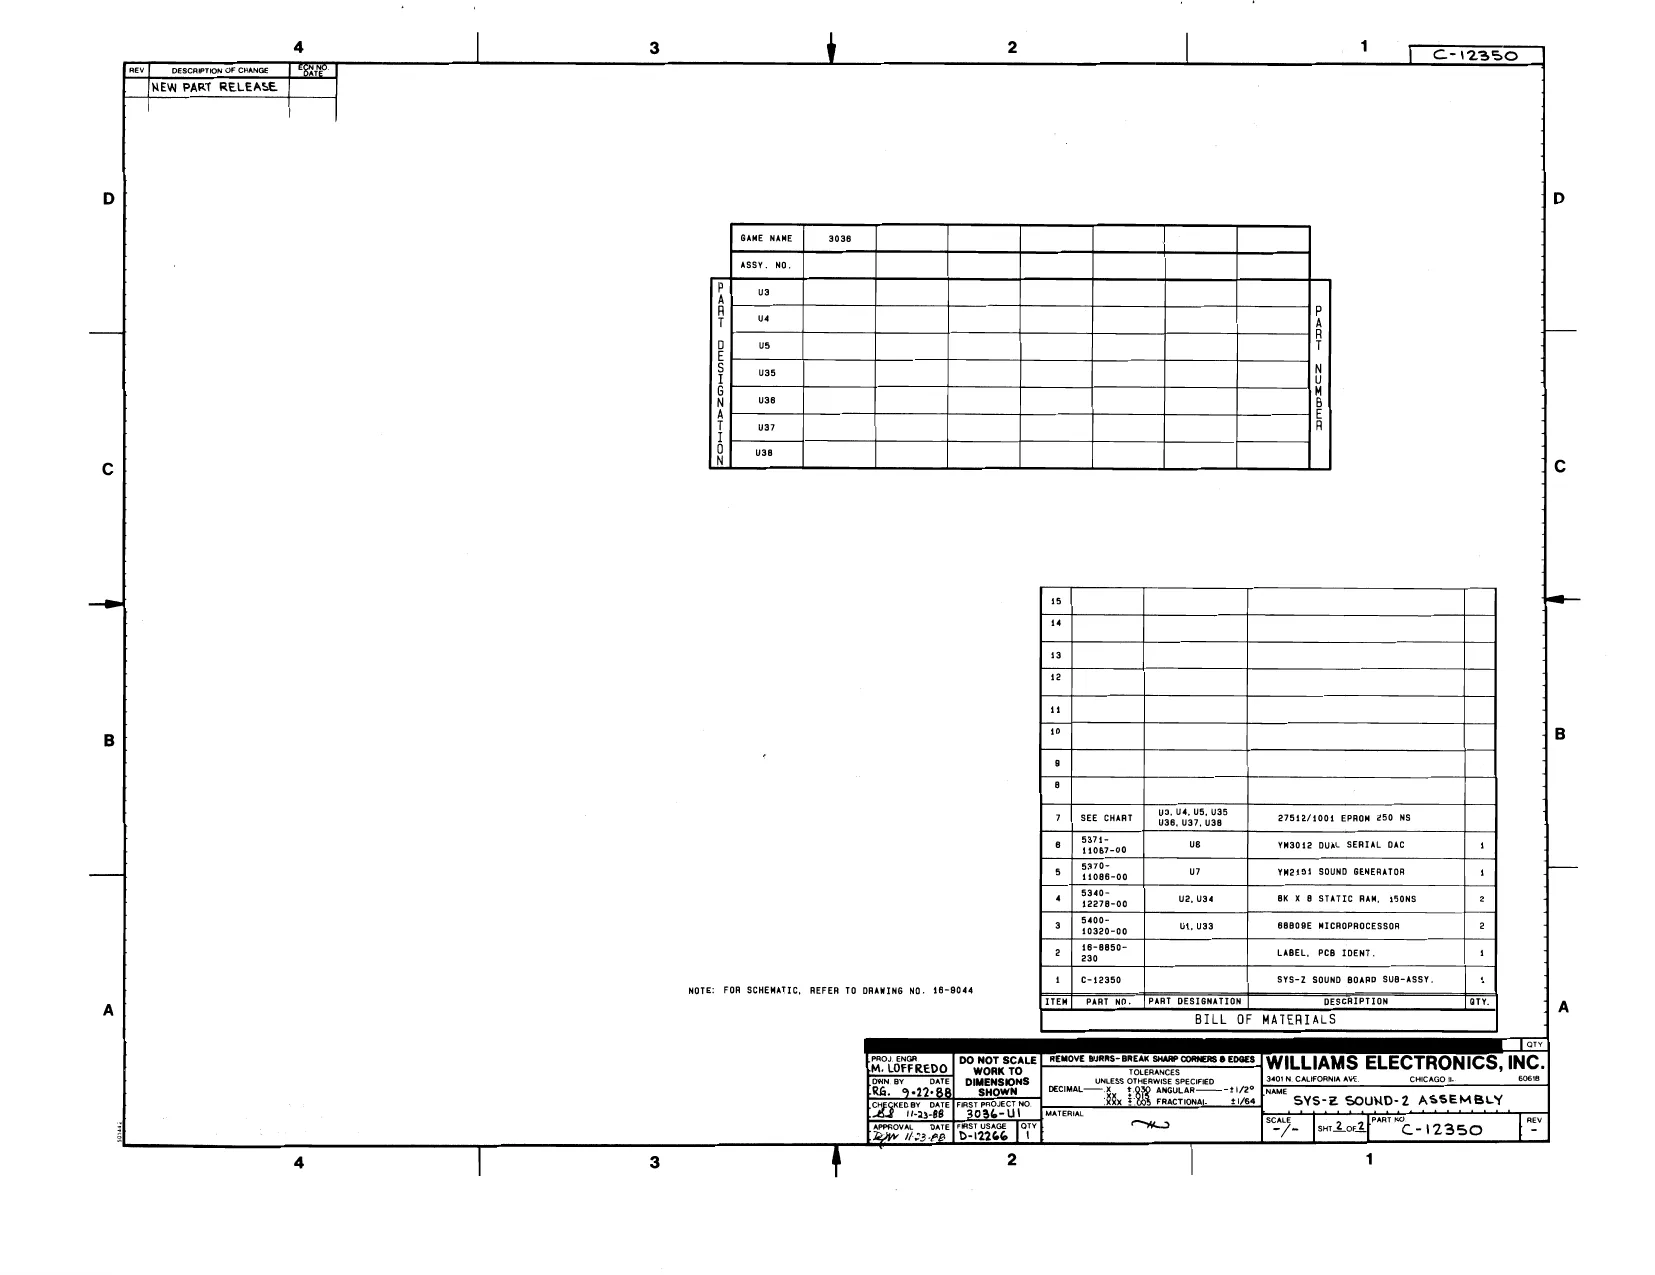
This page is a drawing, shown as the original scan.
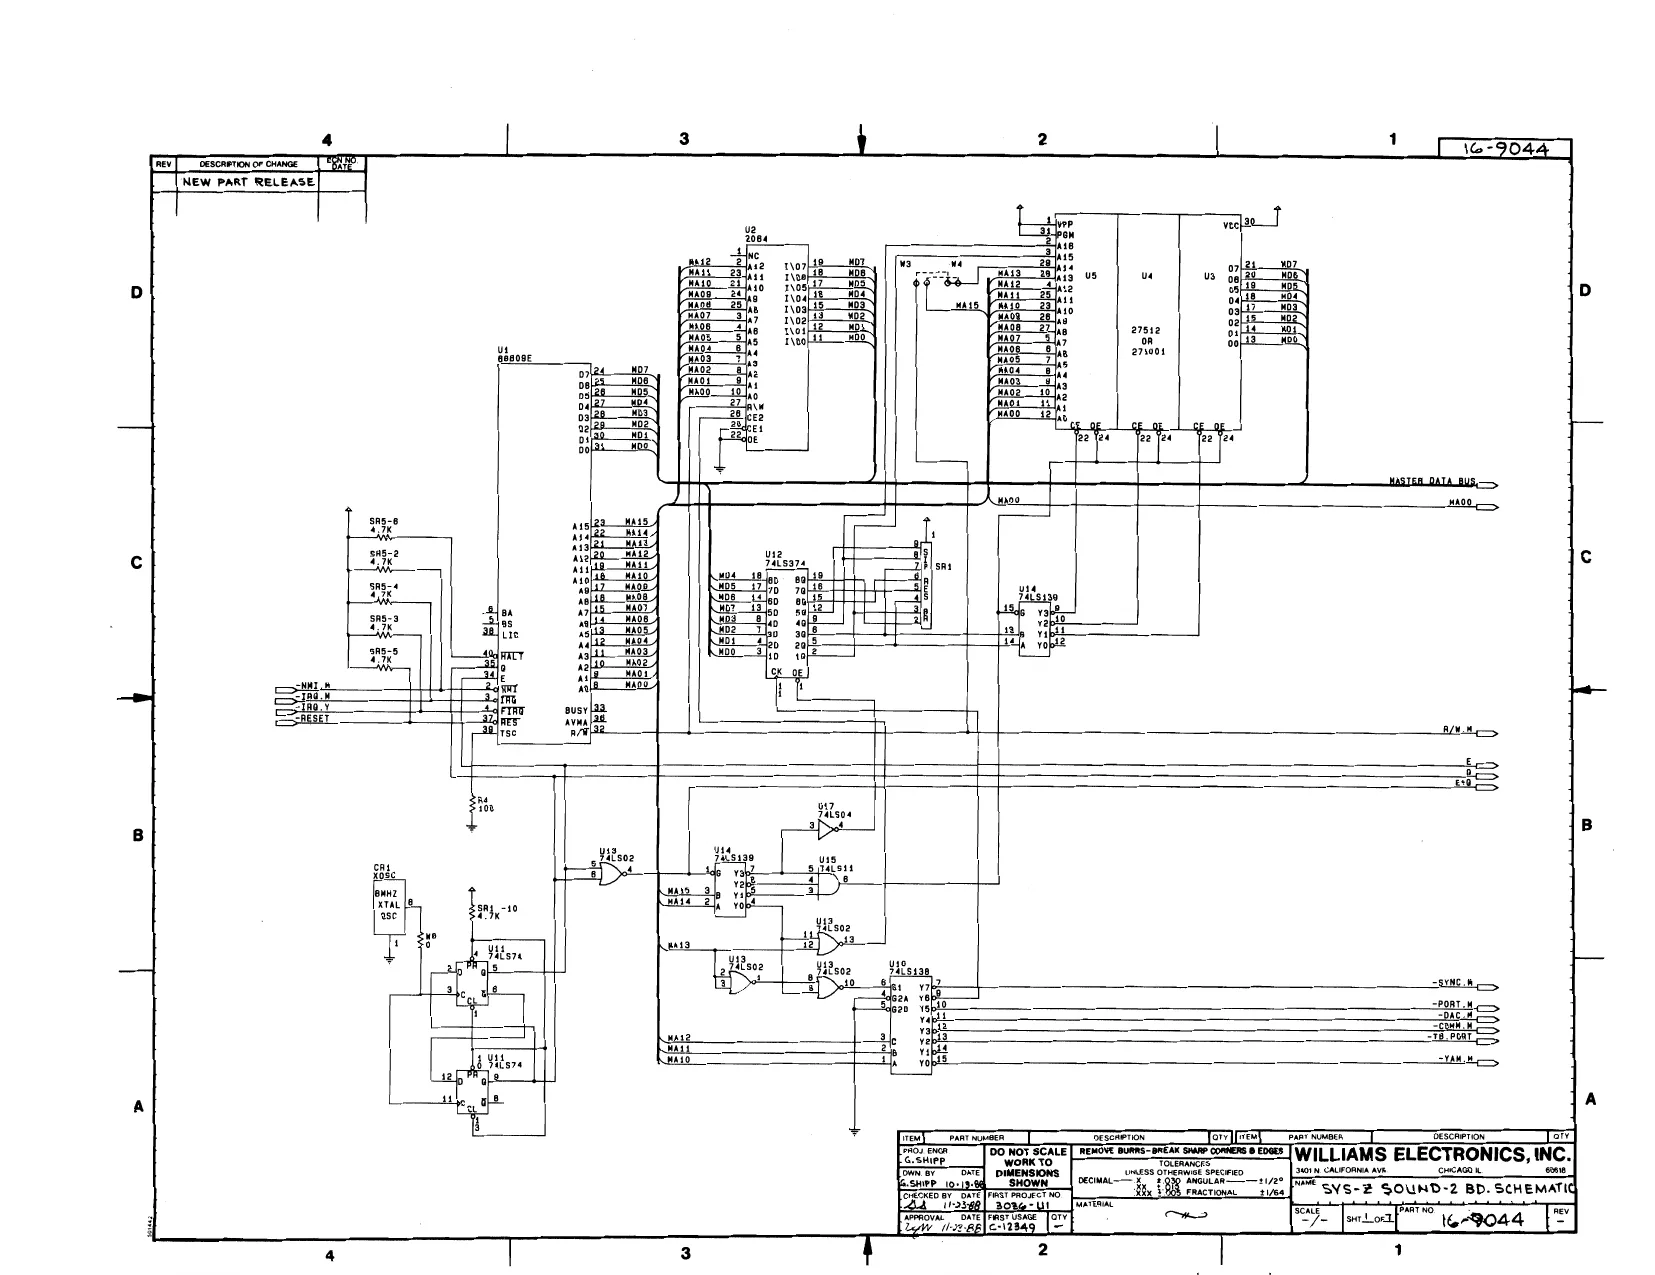
This page is a drawing, shown as the original scan.
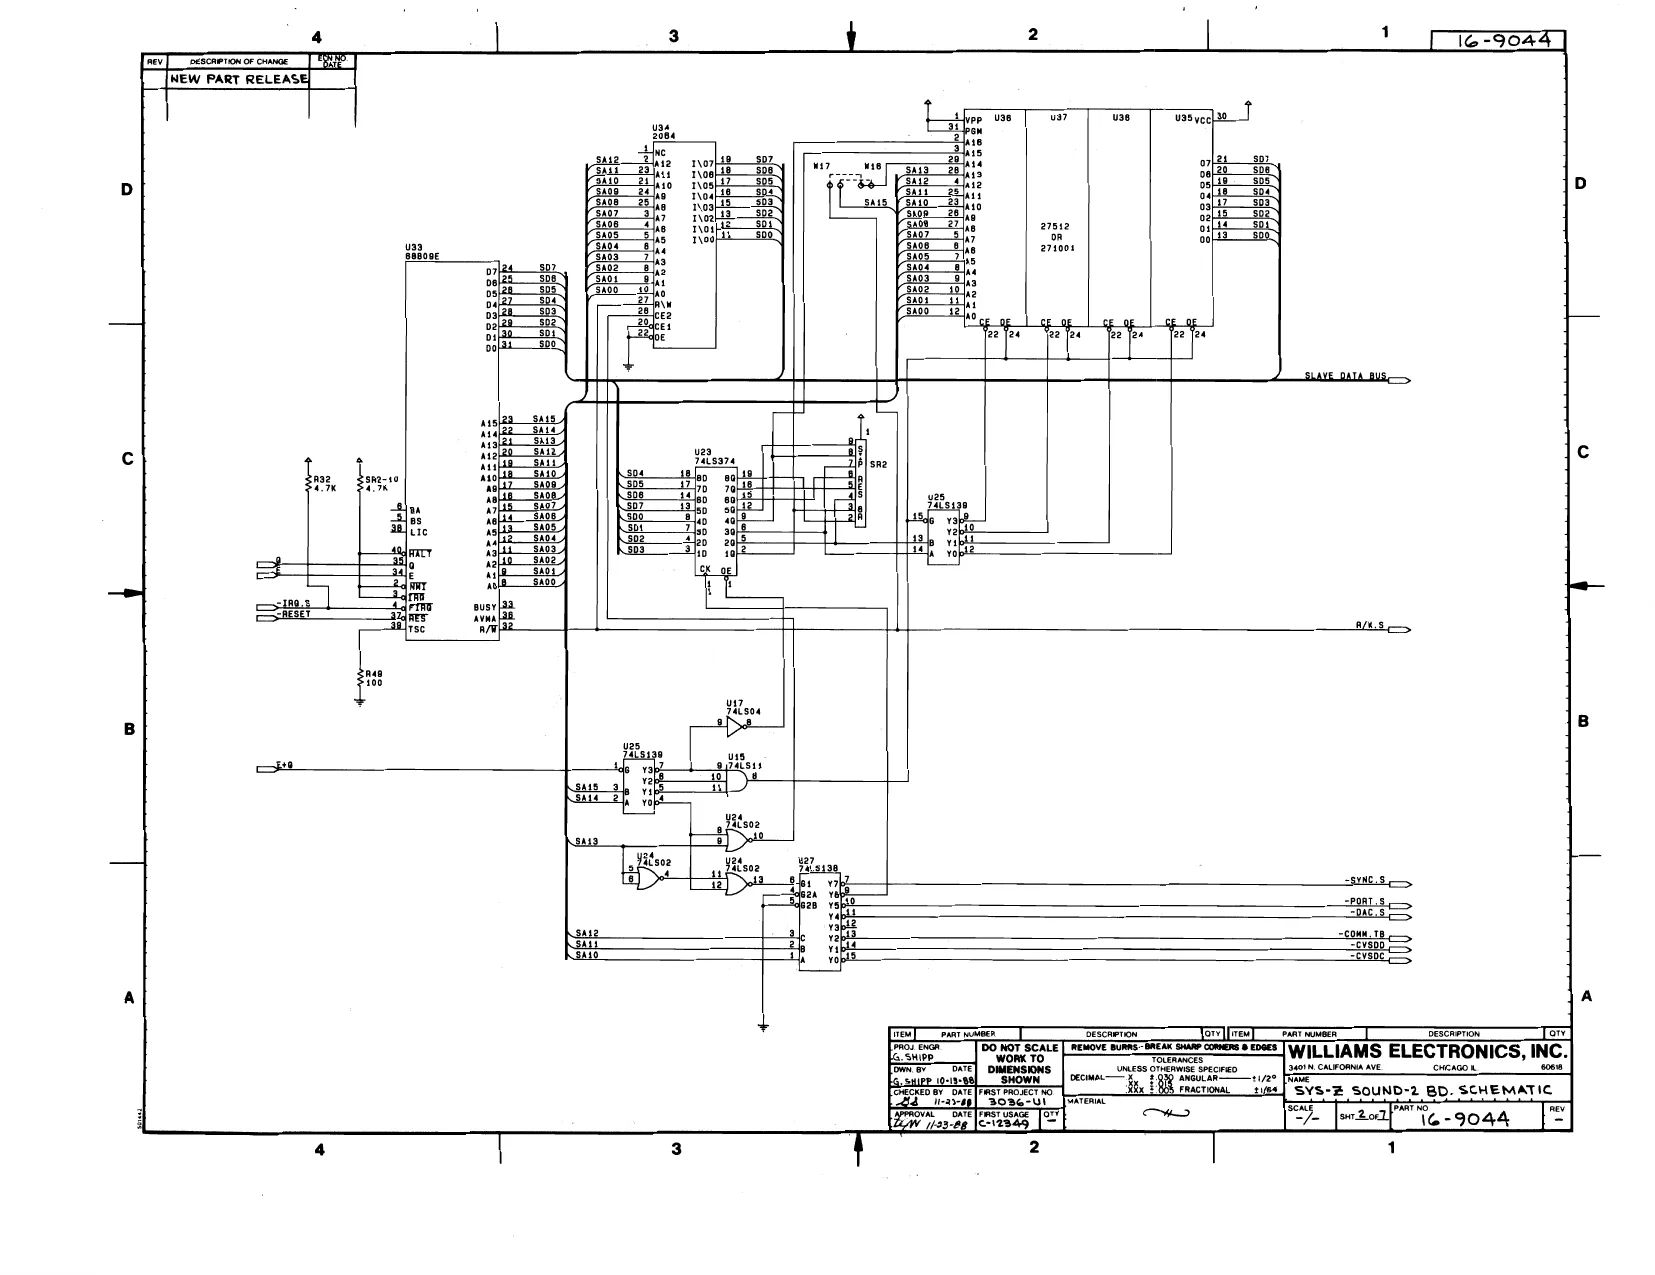
This page is a drawing, shown as the original scan.
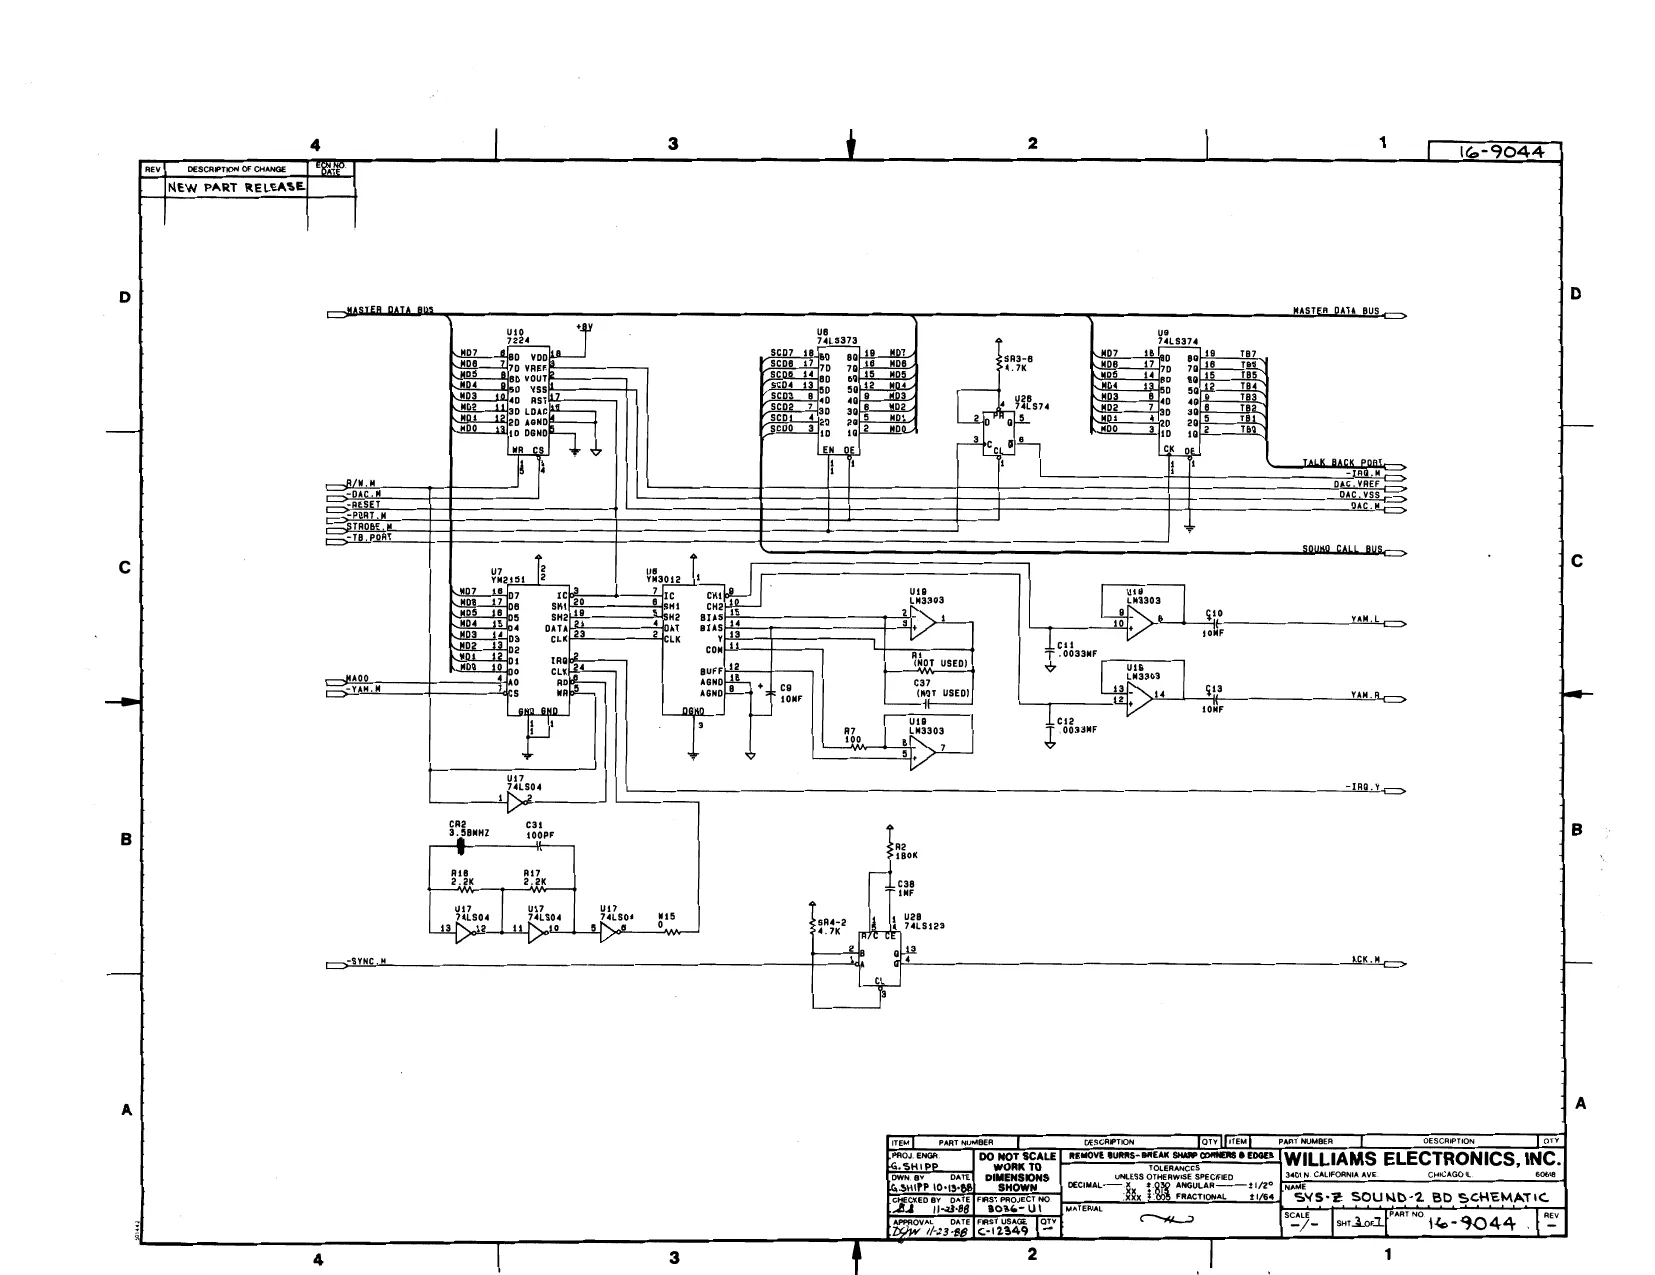
This page is a drawing, shown as the original scan.
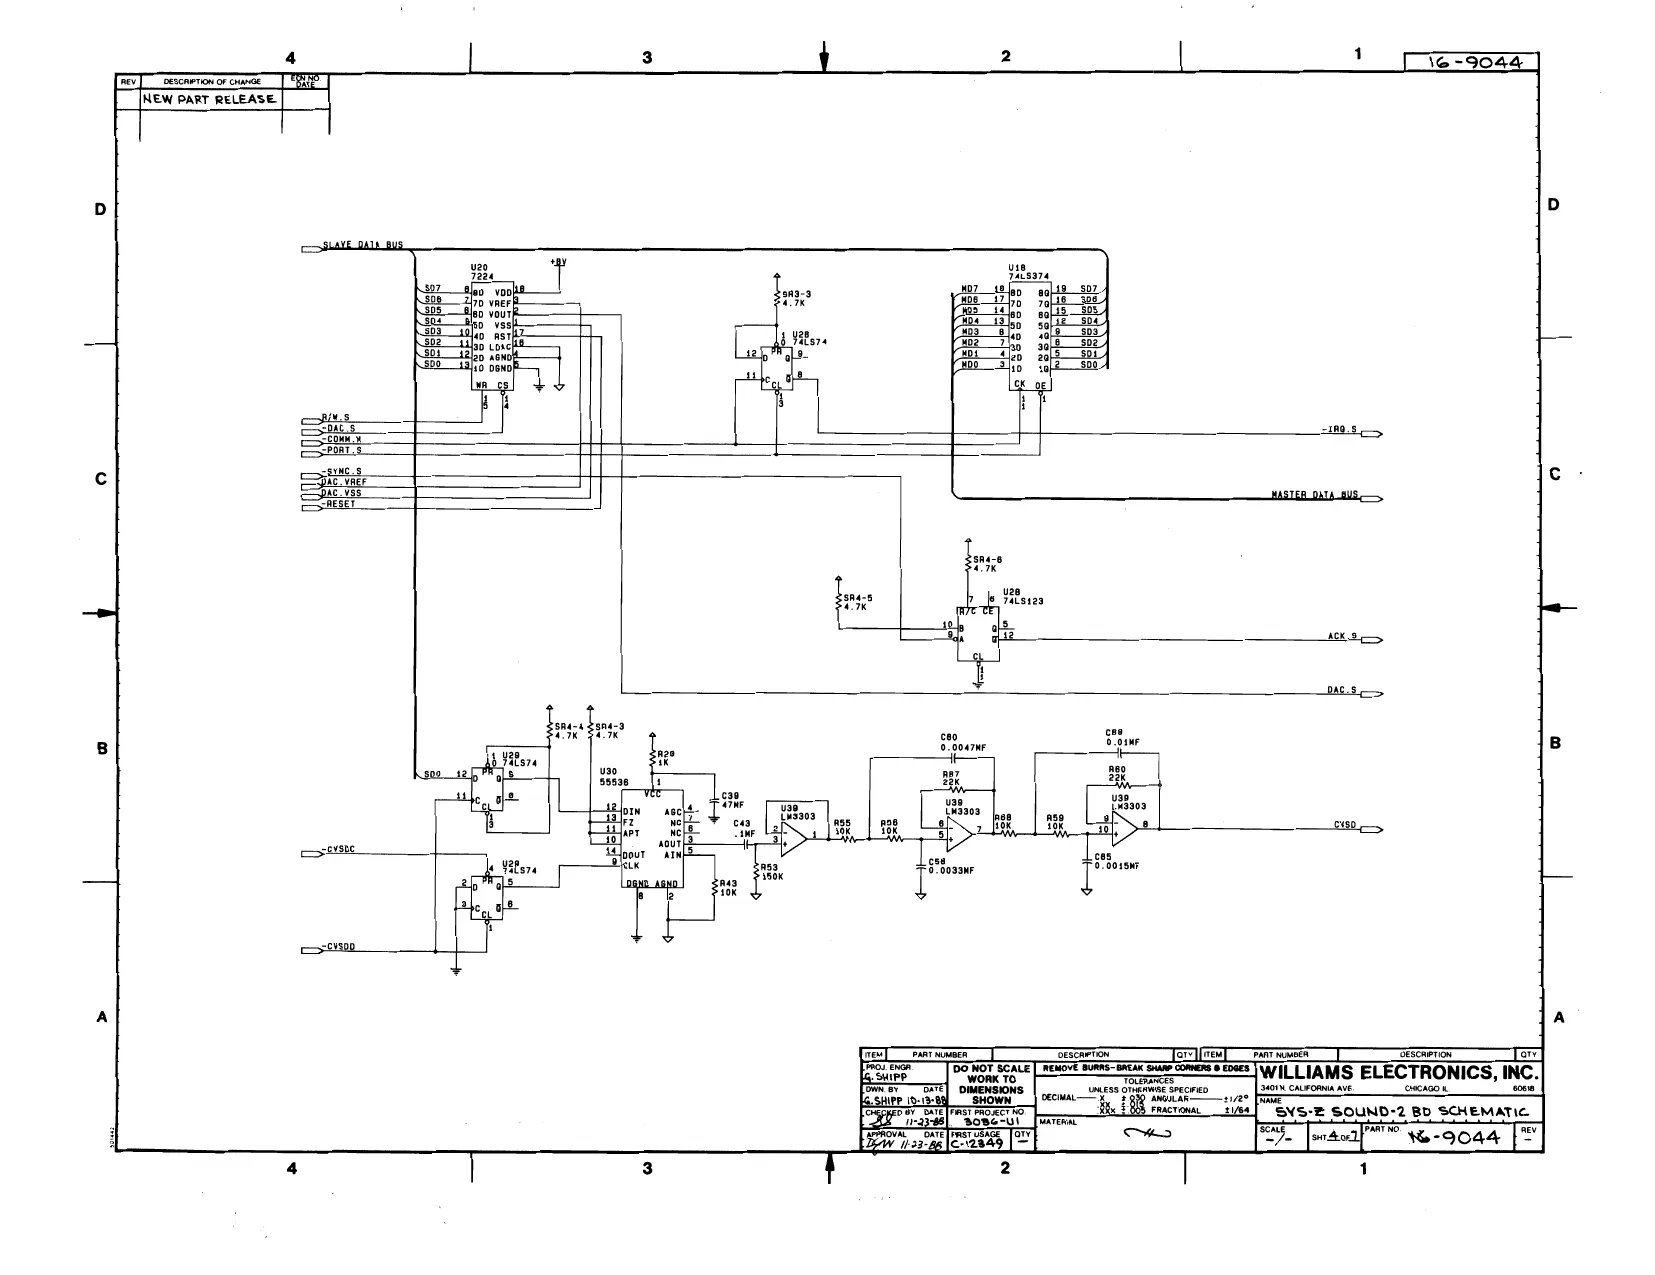
This page is a drawing, shown as the original scan.
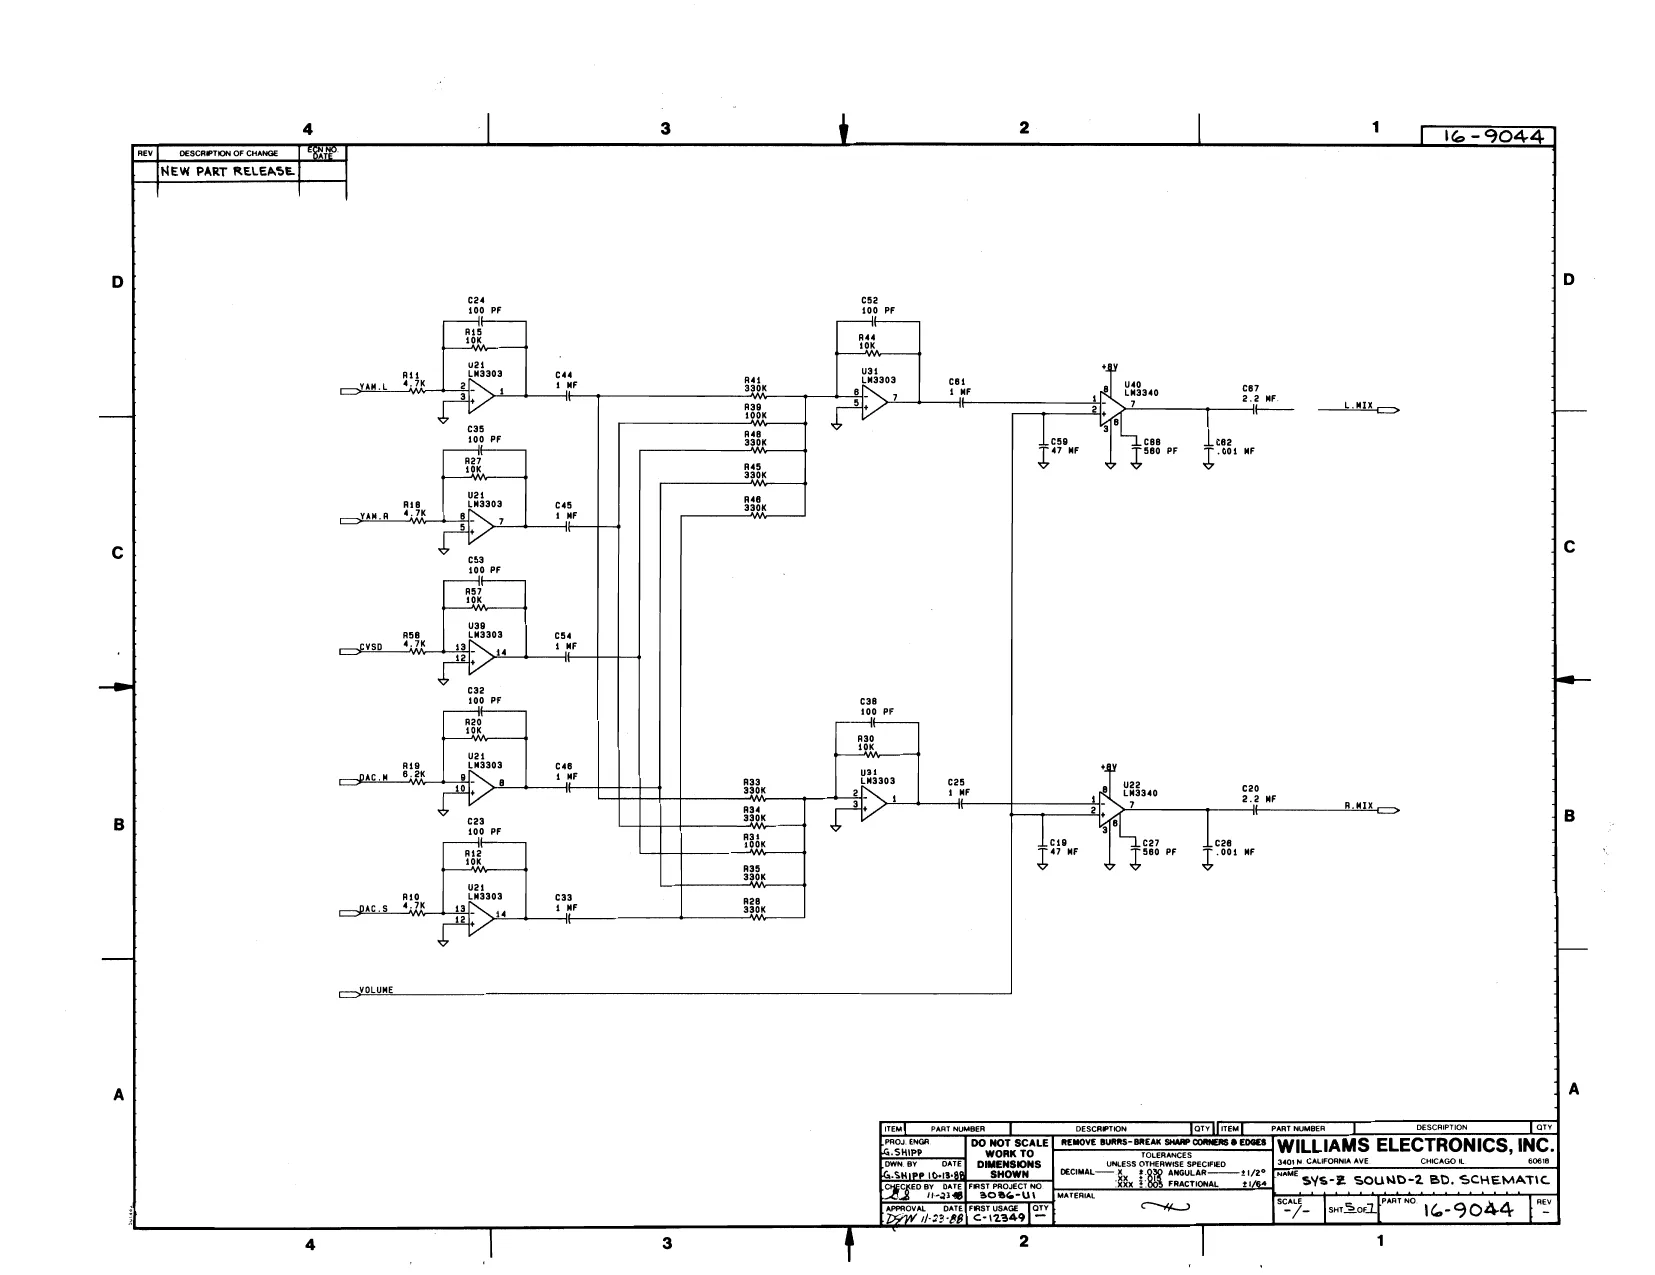
This page is a drawing, shown as the original scan.
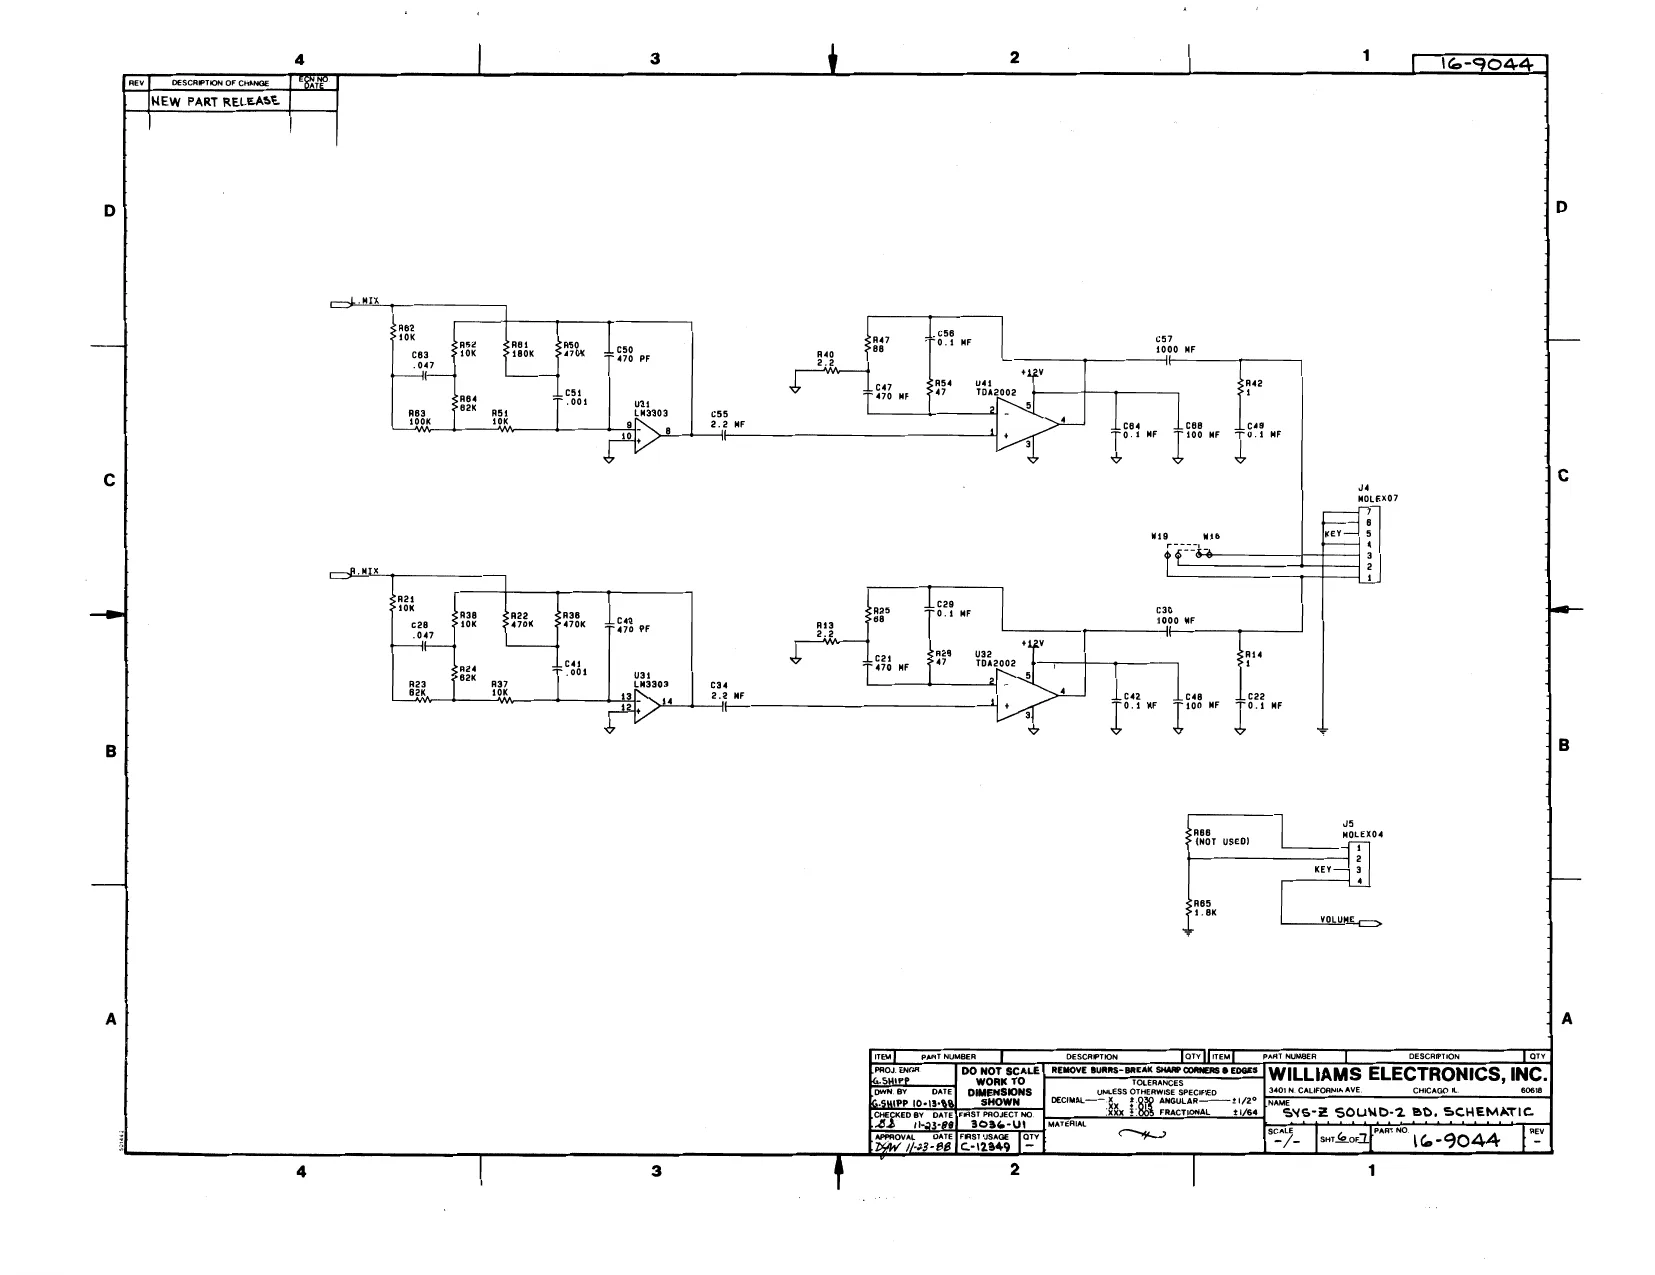
This page is a drawing, shown as the original scan.
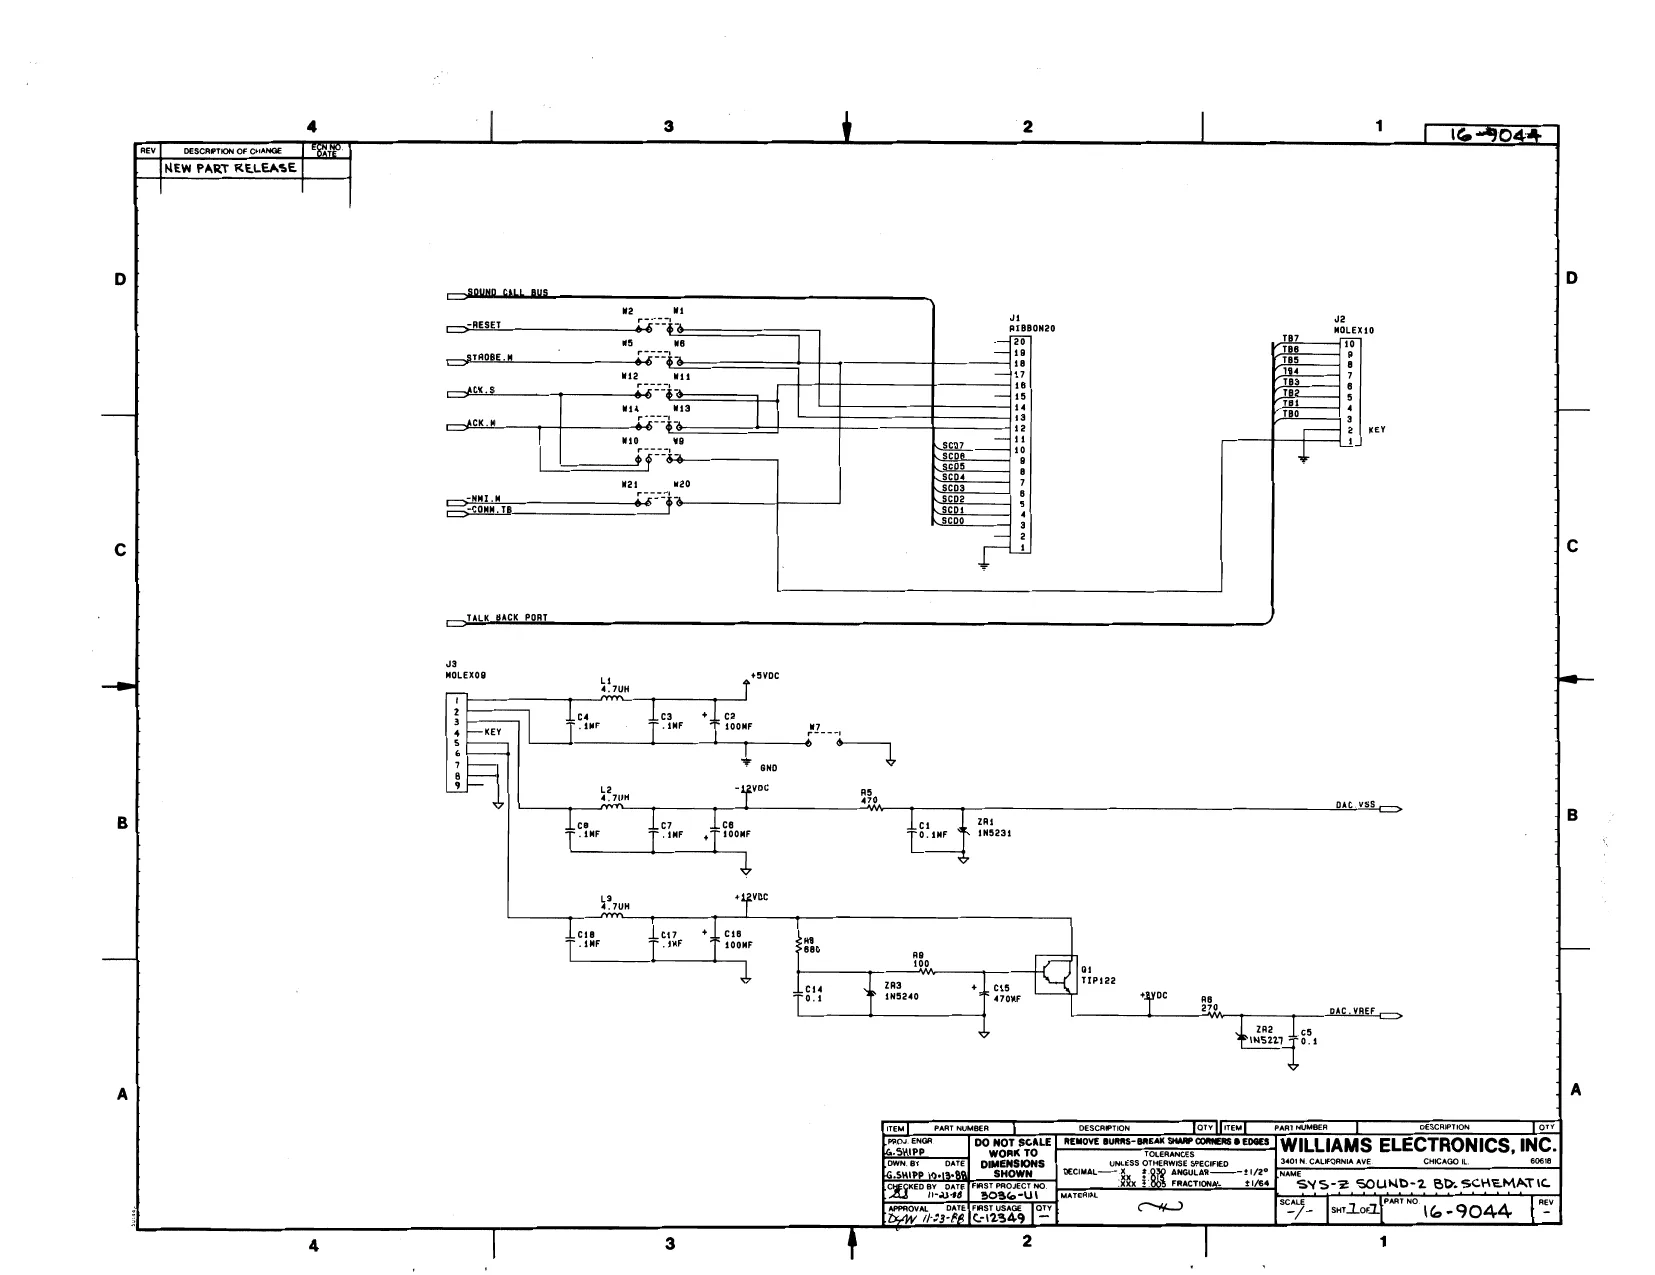
This page is a drawing, shown as the original scan.
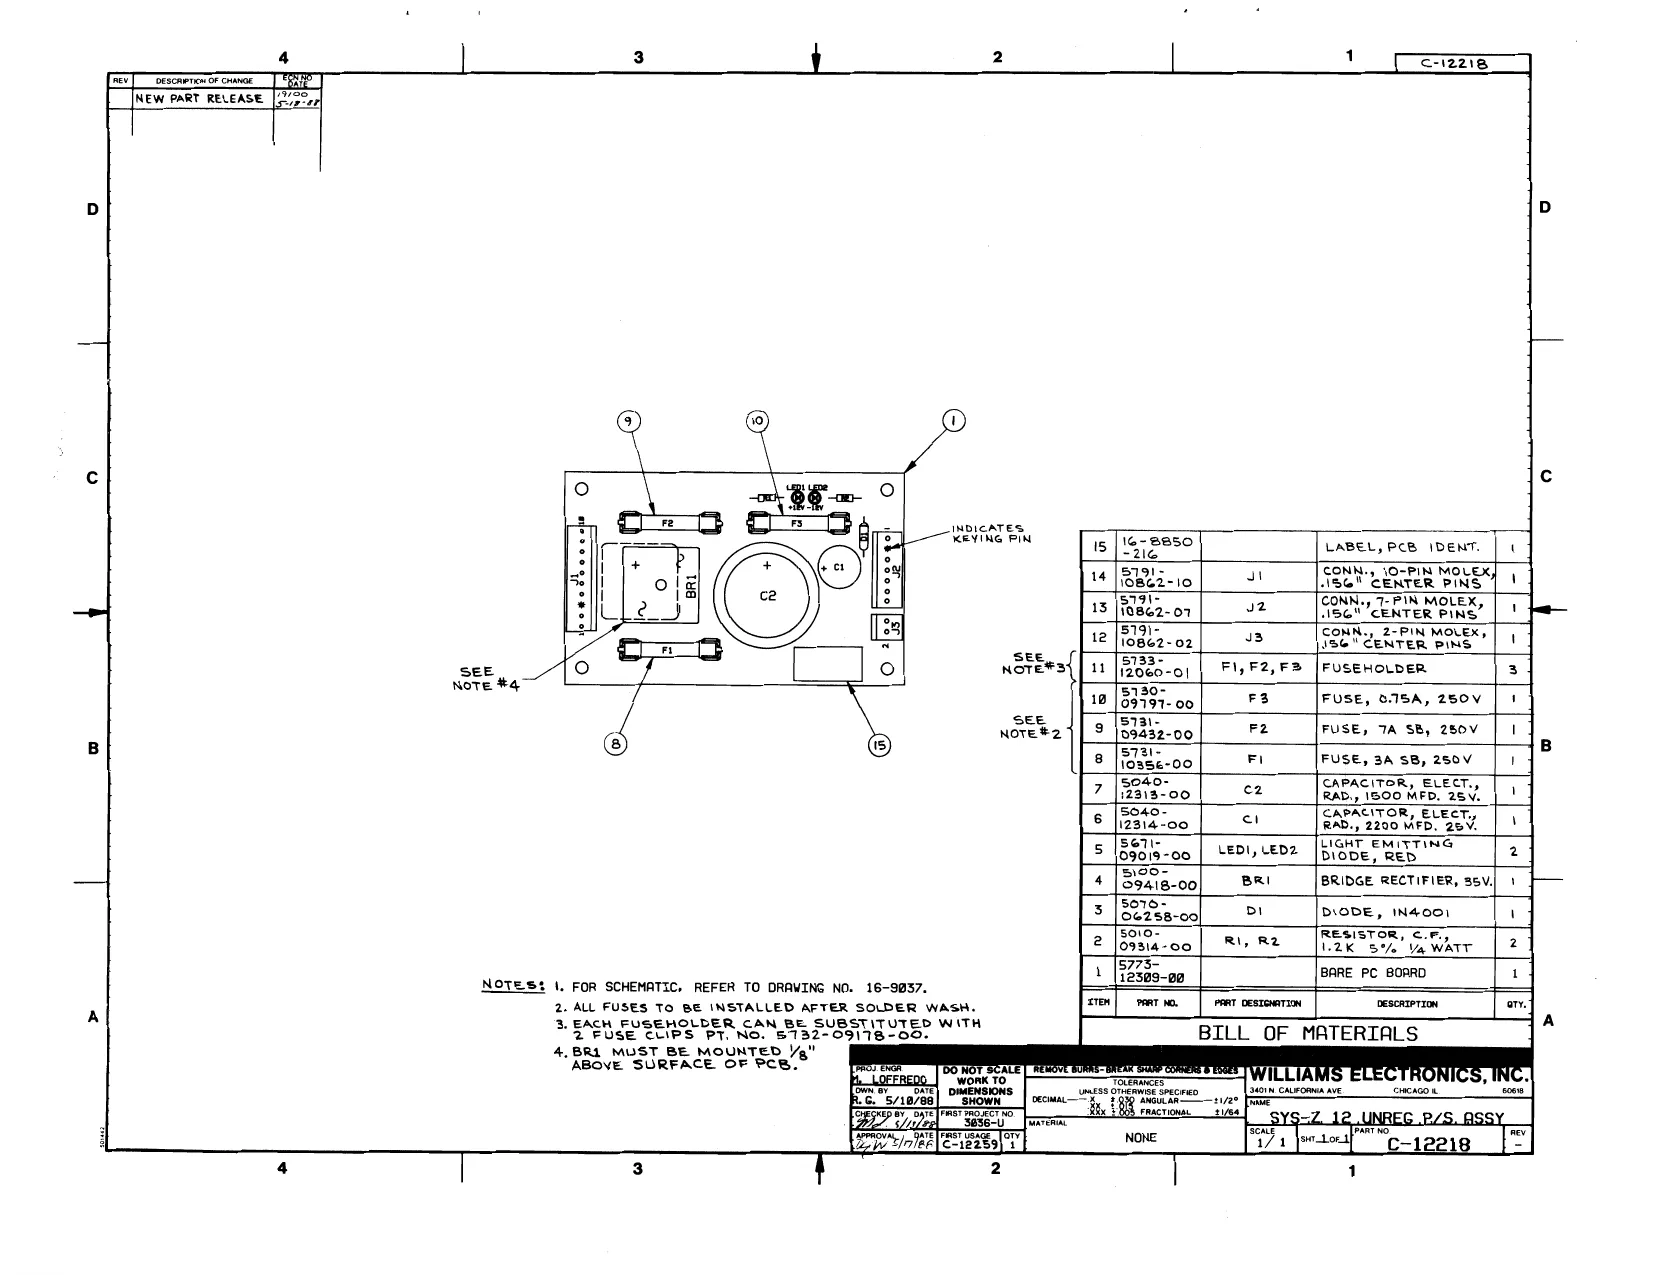
This page is a drawing, shown as the original scan.
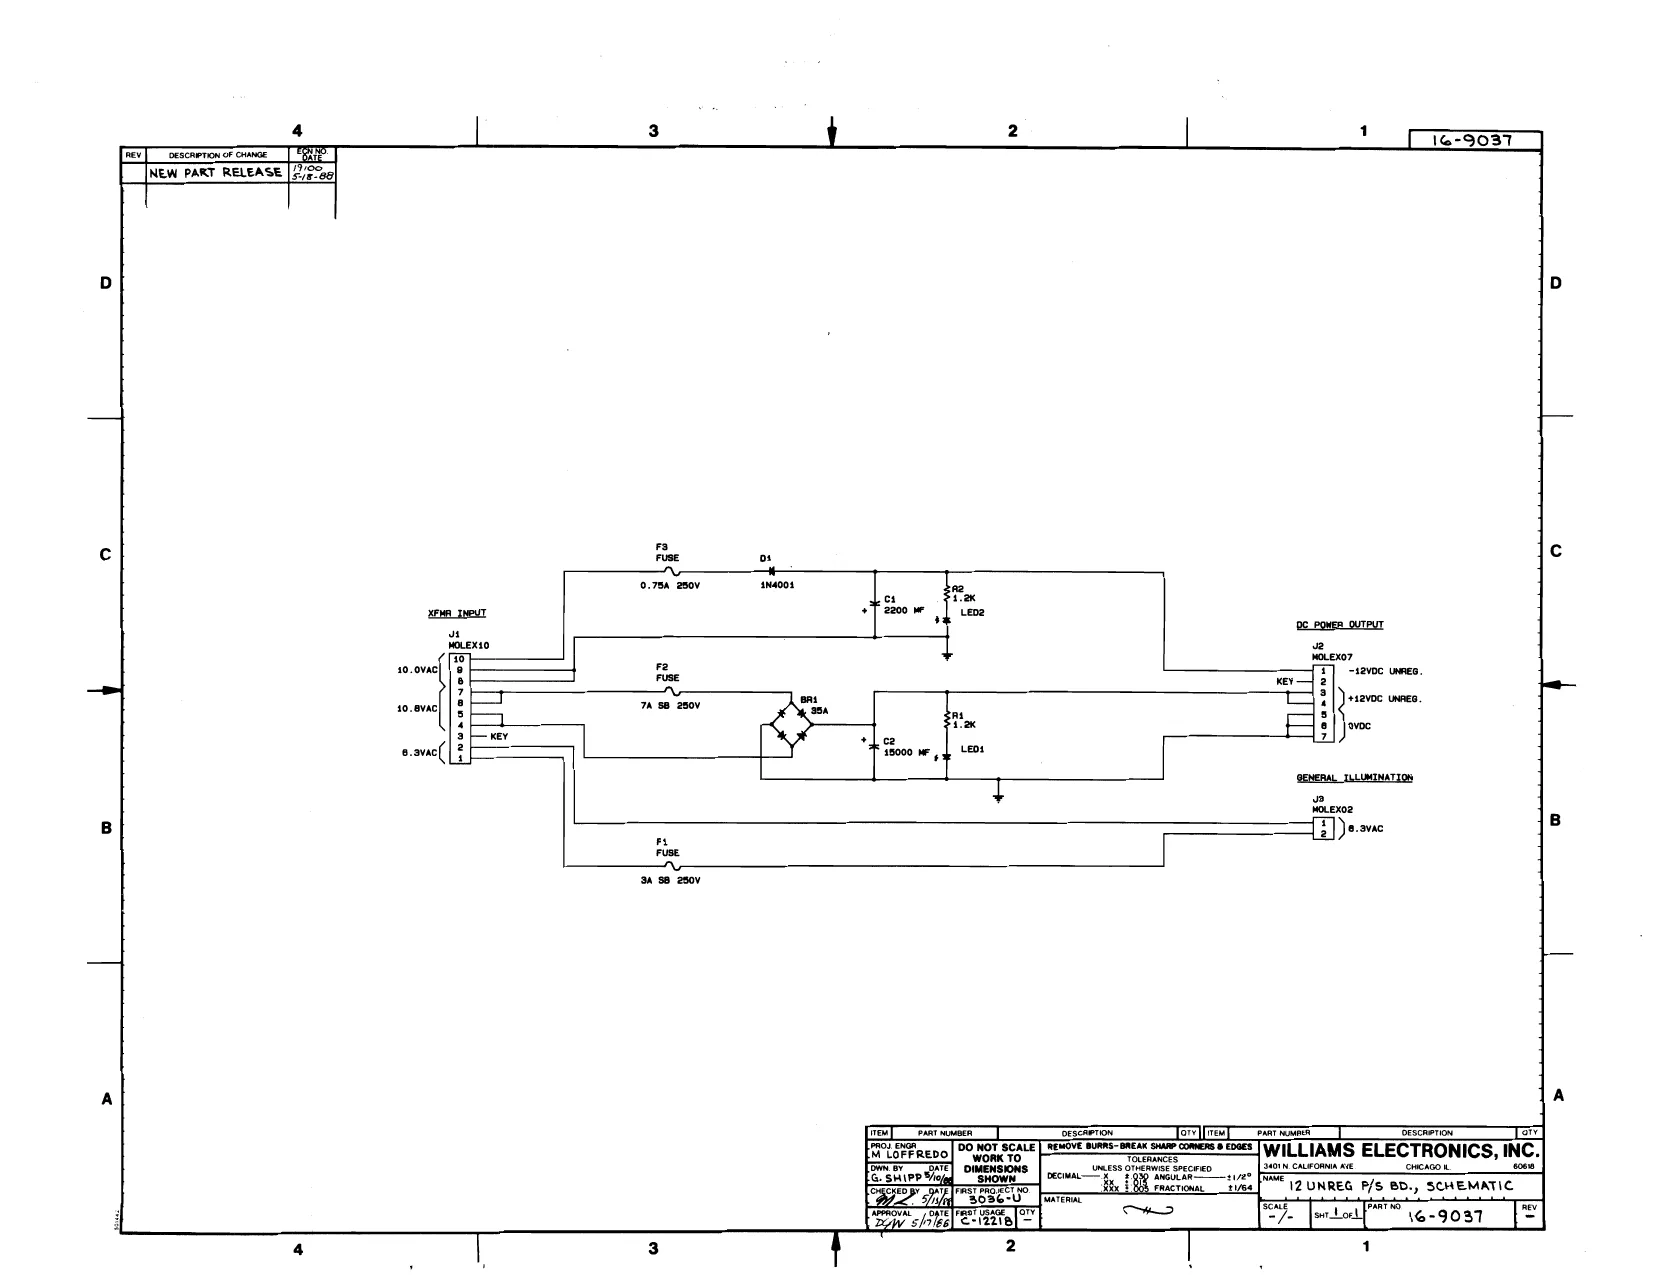
This page is a drawing, shown as the original scan.
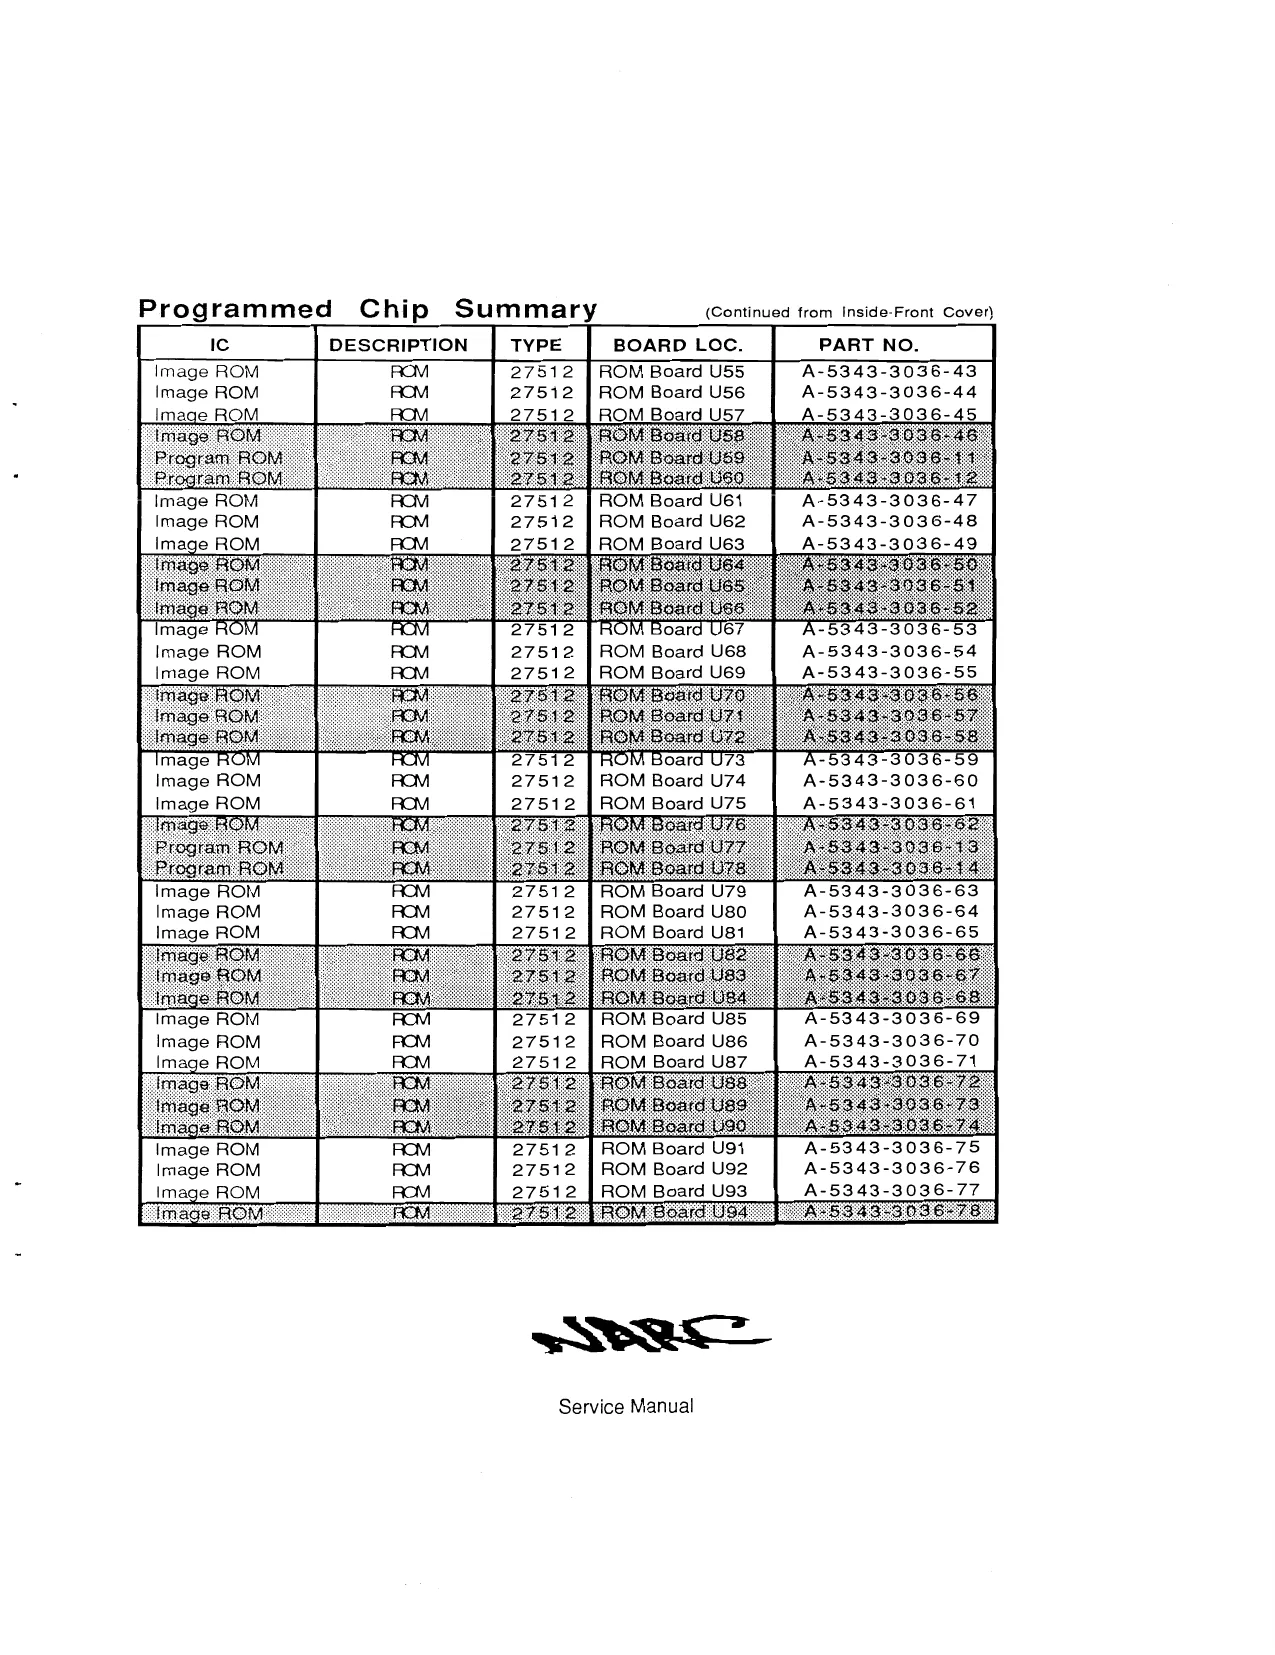
This page is a drawing, shown as the original scan.
This page is a drawing, shown as the original scan.