Pigout Service Manual
Pig Out: Dine Like a Swine! (rev 2?) (Leland Corporation, 1990) · Document · 28 pages · 29 sections · original scan
This page carries no recoverable text. It is a drawing or a photograph. See the original scan.
Your Responsibility for Maintenance
It is the owner's responsibility to make sure that the specified maintenance is performed. The Troubleshooting Section of this manual provides details on these maintenance requirements. Also included in the Troubleshooting Section is information regarding other requirements for games operated under severe playing conditions.
Machine Information
Purchase Date:
Distributor:
Game Serial Numbers
Program: (see lower left corner of bookkeeping main menu screen)
Main Board:
Sub Board:
Cabinet:
© 1990 The Leland Corporation. All rights reserved. PIG OUT™ is a 2 trademark of the Leland Corporation.
Introduction
Welcome io the growing number of value conscious people who operate Leland Corporation products. We are proud of the advanced engineering and quality of each product we build.
Please take a few moments to read through this manual. It has been designed to acquaint you with the features of your new "PIG OUT™" game and to help you make the most profit from this machine.
When it comes to service, remember that your Authorized Leland Distributor knows your game best and is dedicated to your complete satisfaction. He can provide quality parts, service, and any other assistance you may require.
The Leland Corporation
Please leave this owner's manual in the game at the time of resale. The next owner will also need this important information.
Ail information and specifications in this manual are current at the time of printing. However, because of The Leland Corporation’s policy of continual product Improvement, we reserve the right to make changes at any time without notice.
Non-Leland Replacement Parts Notice
The Leland Corporation recommends the use of genuine Leland Corporation parts when replacing any malfunctioning component or assembly in this game. For safety and reliability, The Leland Corporation does not recommend or authorize any substitution parts or modifications of Leland equipment. Such alterations may adversely affect game play or cause serious injury, and will void your warranty. Unauthorized parts and/or modifications may also void FCC compliance.
FCC Warning
This equipment generates, uses, and can radiate radio frequency energy and if not installed in accordance with the Owner's Manual, may cause interference to radio communications. This game has been tested and found to comply with the limits for a Class “A' computing device pursuant to subpart "B" of part 15 of the FCC rules, wihich are designed to provide reasonable protection against such interference when operated in a commercial environment. Operation of this equipment in a residential area is likely to cause interference, in which case the user, at his own expense, will be responsible to correct the interference.
PIG OUT! Table of Contents
General Game Information Game Concept Features Assembly Instructions Maintenance and Upkeep
Troubleshooting A Note About Power Our Service Department Troubleshooting Flow Chart Mechanical Coin Counters
Bookkeeping and Diagnostics
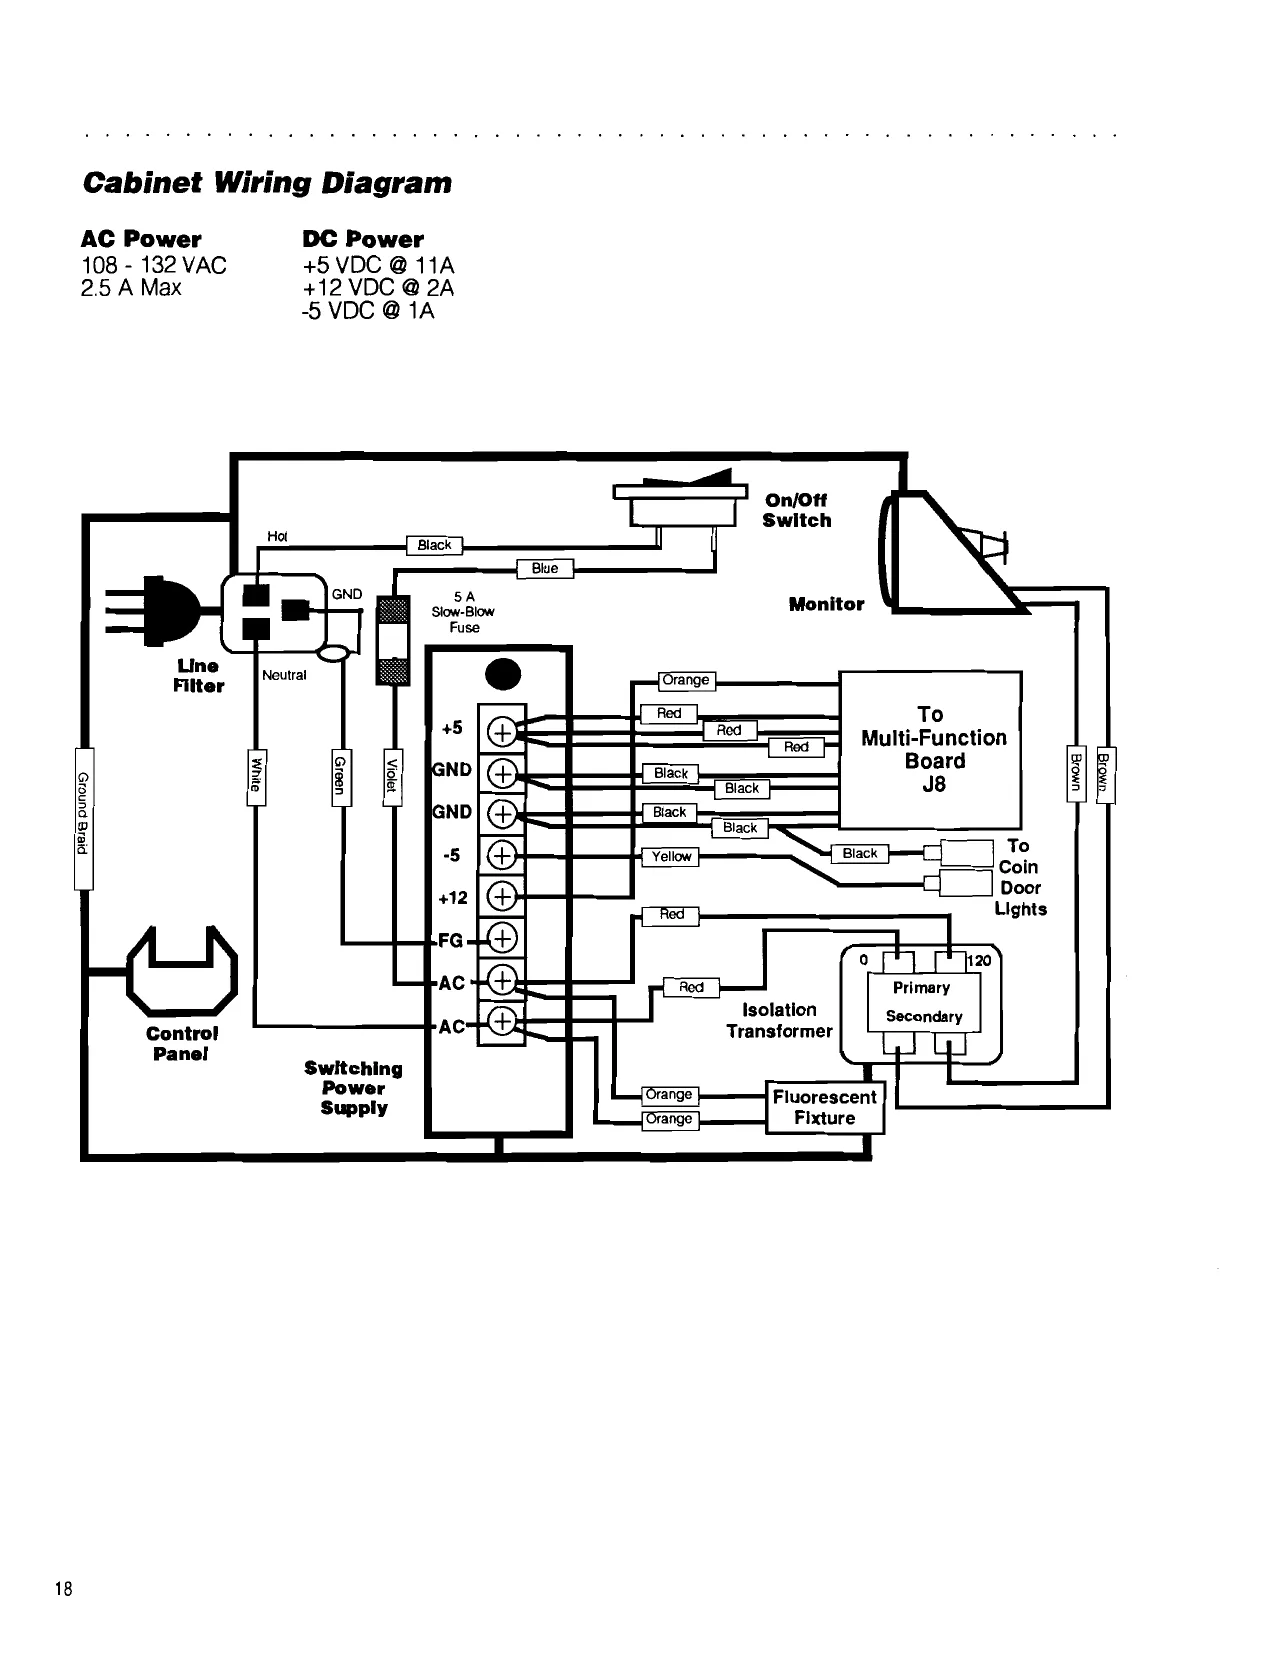
Wiring Diagrams Cabinet Wiring Diagram Player Control Wiring Diagram Coin, Video, Power Wiring Diagram Audio Wiring Diagram
Board Layouts
Illustrated Parts List
Warranty Information Page
ono
PIG OUT Game Concept
Cast no pearls before these swine. Because from the moment they break loose from Al’s Butcher Shop, these jolly hogs will have players glued to their controls as they gobble their way to ham hock happiness!
Through food warehouses and giant freezers, meatball restaurants and parking garages, this prodigious pack of porkers run amuck against scrolling backdrops of the city in their action-packed search for fattening goodies to wolf down.
And speaking of wolves, watch out! Because they're lurking everywhere— behind laundry, fire escapes and cola machines— just waiting for the chance to pounce. As if being pursued by Al the Butcher wasn't enough, one false step and it's off to hog heaven!
Fun for players of all ages, PIG OUT! lets players choose their favorite pig from the “Calorie Gallery”. Then, it’s a wild swine stampede through an unsuspecting city as they try to stuff their snouts with as many goodies as they can grab.
Each playful porker is guided through the adventures by a joystick, a “Jump" button, and a "Throw" button. Snorting gracefully, the pigs somersault with the "Jump" button to avoid pitfalls and hazards. The “Throw" button unleashes a soupcan, a bowling ball, or a boomerang to ward off pursuers (watch out for the “return, however)!
Up to three players can share the fun by joining in at any point in the action through our innovative "Coin Add" feature, making PIG OUT! a favorite with players young and old for years to come.
Features Information
Three sets of player controls and three ‘Join’ buttons beckon new players to join the game at any point. Individual scores are kept for each player. New players can enter their initials and have their outstanding scores appear on the Calorie Gallery.
Extensive game statistics track all major aspects of the pigs’ individual and group performances vs. time and number of games. Time per credit and “lifetimes* are plotted in the form of bar graphs for quick comparison.
Menu-driven game setup screens make it easy to adjust the three factors that determine the level of game difficulty: a) the number of ‘pig lives" that each player begins with; b) how many soup cans a player gets when he joins the fray; c) a "difficulty" setting. All can be tailored to suit the game to a particular location perfectly!
Normal operating checks are made easy with complete diagnostic screens. All player controls and both coin mechanisms are easily tested.
Some of the features game players will enjoy incude:
- 21 screens of action and adventure to keep players’ interest high. ¢ Adjustable difficulty level controls the rate at which adversaries (usually wolves) confront the pigs. Other adversaries include: bear traps, alligator, ducks, security guard, flowerpot-wielding old ladies, bats, construction worker, painter, and of course, Al the Butcher. e Pigs will go faster when they consume chocolate. ¢ "Super S" can make a pig temporarily invulnerable. Coins that appear can be traded for cans at the soda machine.
- Grabbing a "2X" doubles additions to your score. ¢ Pick up soup cans, bowling balls, and boomerangs to toss at wolves, other players-- anybody! If you're quick on the "Throw" button (and you pick the right target), watch your opponents’ drop their groceries! © Gather all the jelly jars and advance to the next round of fun!
Assembly Instructions
1, Remove ail parts from the shipping containers and check them for damage. Notify your distributor (and the shipper) immediately if you find any parts broken.
- Lift the monitor plexi and clean or dust any debris that may have settled on the monitor during shipping. This would also be a good time to gently wipe down the inside of the monitor plexi as well. Use only a soft, dry cloth to wipe the plexi to prevent scratching.
To lift the monitor plexi, reach through the upper coin mech door and an inner panel opening to unlatch the player control panel. Latch locations are shown below. Swing the panel as shown, then remove the plexi panel retaining strips around the outside edge of the plexi. Re-assemble in the reverse order.
- Plug the game in and verify proper operation by going through the built-in diagnostic screens (see page 13). Check coin mechanism operation by feeding each one with a few coins.
- This is also a good time to check your coins-per-credit and difficulty settings. "Pig Out’ is shipped with most adjustments set in the middle of their range. Access to flourescent bulb is
an by removing the top plexi
retainer screws and retainer. Lift plexi straight up and out. Re-assemble in reverse order.
For control access reach through coin door, unlatch both sides, swing control panel up and forward. Power supply and main circuit boards located inside, behind lockable rear panel.
Panel latch
Panel hinge
Inner panel Panel latch opening
Maintenance and Upkeep
Maintaining your PIG OUT! game is of utmost importance in order to enjoy good, steady earnings. A dirty cabinet, sticky coin mech, or poorly adjusted player controls are all suspect when a significant drop in revenue is noticed.
The following are recommended procedures to follow when servicing your machine:
Every Collection— Make sure that the cabinet and especially the control panel and glass are clean and free of gum, grease, and dirt.
Play the game. Check the joysticks and buttons for proper adjustment and response (see the buttons and controls test in the Diagnostics sections).
Clean and adjust the monitor to insure that the picture is ‘rich’ and inviting.
Once a Month— Check the inside of the cabinet for dirt and dust. HINT: Carry a portable “Dustbuster”-type vacuum.
Confirm proper adjustment of game volume, brightness, and contrast controls.
Use diagnostic screens to help you adjust color or horizontal/vertical size and position if required.
Check the screen corners for "rainbows" or color “fringing.” This can indicate a need for degaussing.
Look for proper fluorescent lamp operation. The reduced brightness caused by one inoperative bulb is highly noticeable. Also, check coin slot lamps.
At first these steps may seem annoying or excessive, but when viewed with respect to the income generated by a clean, well-maintained machine (as opposed to income lost by a dirty, “trashed” game), the benefit of spending a few extra minutes will be seen as a wise investment.
Troubleshooting
A Note About Power
DC Power
The microprocessor in this machine operates most efficiently when the power supply is providing a steady +5.00 VDC to 5.05 VDC. When checking the DC power, always put your leads across the +5 VDC test points on the top board (NOT at the power supply, DC input connector or any IC) and be sure that the +5 volt supply is between +5.00 VDC and +5.05 VDC. Also, be sure that there is less than .005 volts AC riding on the +5 voit line. If you do find AC on the DC line, inspect the filter capacitor or the rectifier on the power supply. Low voltage and AC on the DC lines are the main causes of the following problems:
© “Garbage” on the monitor screen © Computer freeze-up © Coin or coin meter malfunction ¢ Avariety of seemingly unrelated problems
AC Power
Connect this game only to a grounded three-wire outlet which provides between 108 and 132 volts AC. If you have only a two-wire outlet, we recommend that you hire a licenséd electrician to instali a grounded outlet. This will reduce the possibility of a player receiving a shock. The possibility exists that players may receive an electrical shock if this system is not properly grounded.
Our Service Department
For parts, service, and technical information, first contact your authorized Leland Corporation Distributor. if additional technical aid is required, please contact the Leland Corporation Customer Service Department at (619) 562-7000, Monday through Friday, 8:00 a.m. to 5:00 p.m. Pacific Time.
To provide you with the quickest possible response to your questions, please have the following information ready when you Call:
- Your game name and serial number
- Any reference materials and a list of observations
Troubleshooting Flow Chart
Don't Touch That Switch!
Before you reach for the power switch, take a look at the game. Open it up and check for loose wires, bad connections, or burned spots. Also look for spilled fluids or signs of vandalism. These quick checks could save you a lot of time.
Once you've eliminated the obvious, it’s time to do some detective work.
Never take anything for granted. This is easy to do if you're in ahurry. Locating a broken wire or loose connection at the beginning could save you many expensive hours looking in the wrong place.
Coin Up
Listen for Sounds.
Check for Closed Switches on Coin Door & Control Panel. Also Check for Loose ICs/Bent Pins. No Brightness
Check Monitor Power, Fuses & Connectors. Check Picture Tube for Damage. Brightness-- No Video
Soe ‘A Note About
Power" Page 9
Troubleshooting Tips
General Troubleshooting
Monitor screen filled with “garbage’—
- Check power supply voltages.
- Check closed switches on the control panel or coin door.
- Look for loose connections, loose ICs, or bent pins on the board.
- Measure the voltage on Pins 3, 4, 5, 6, & 7 on Connector P-4. If the voltage is less than +5 VDC, suspect U114 or U119.
No sound—
¢ Check for loose connections. ¢ Low +12 VDC supply. ¢ Bad speaker or volume pot.
No control or function switches (includes coin switches)—
¢ Check all connections (especially ground). ¢ Check wire continuity between board and switch. © Look for closed or broken switches. © Check the input buffers (see “Buffers” below).
Monitor Troubleshooting
No picture—
© Check all power connections. ¢ Check monitor fuses. © Check all video connections for continuity.
Sync problems—
¢ Check sync and ground connections (see wiring diagrams on Pages 18 - 20). © Check sync polarity.
- Check the video output buffer.
Buffers An input or output (I/O) buffer is the component that connects the actual game computer to the outside world. It is for that reason that it is the part most likely to fail. Check the following list when attempting to isolate possible problems.
Troubleshooting Tips (cont'd)
M = Main Board VO = Multi-Function Board
| Problem Area | Component | PCB Location |
| Video (Color or Sync) | 7405 or 74S05 | M-U24 |
Player Controls and/or 150Q resistor pack See wiring diagrams for
| Coin Controls | or 74LS257 | specific switch |
| Audio (Bad Channel) | 7524 or 7533 | 1/0-U46 (ch 0) |
through U51 (ch 5) or /0-U64
TDA 2002 M-U122
About Mechanical Coin Counters
We have not installed mechanical coin counters on this game for the following reasons:
- The bookkeeping program for this game is extremely accurate and includes not only the number of coins dropped and the dollars earned, but also keeps track of the number of tests and coins in a given period. (See “Bookkeeping” in the Diagnostics Section.)
© Mechanical coin counters can produce an inductive “kick” that could damage Circuit board components, checkerboard video being the most common problem. Should the checkerboard video problem occur, observe the “NMI not" signal on the master 280 chip (pin 17). If a low output is observed, try replacing U114 (74LS08) and/or U119 (74LS257).
If your situation required mechanical coin counters, please use the follow diagram. (Diodes may be 1N4001 to 1N4004.) +5 VOC terminal ‘on witching P46 power supply
Pea
ae 12 =
Service Select Button
Cash Door
Service Switch Location
(MAIN MENU ‘SELECT FUNCTION WITH LEFT JUMP BUTTON
ENTER FUNCTION WITH LEFT THROW BUTTON
STATISTICS, GAME DURATION STATISTICS, RESTART THE GAME ‘CANCEL CHANGES AND RESTART GAME
BOOKKEEPING ‘SELECT FUNCTION WITH LEFT JUMP. BUTTON
LIFETIME PERIOD CONS COINS DOLLARS
| COINS DROPPED - MECH L | ‘000 | 000 | $000 |
| COINS DROPPED - MECH R. | 000 | $000 | |
| TOTAL COINS DROPPED | 000 | 000 | $0.00 |
TOTAL CREDITS GIVEN: MECH L 000 ~MECH R000 RESET COIN MECHL DOLLARS COLLECTED RESET COIN MECH A DOLLARS COLLECTED
‘SET COINS/TOKENS PER DOLLAR: 4COINSPER DOLLAR COIN MECH L 4COINS PER DOLLAR COIN MECH R
RETURN TO MAIN MENU Bookkeeping and Diagnostics To enter the Bookkeeping and Diagnostics Sections:
- Press and hold the service button (located inside the front door— see figure at left)
- Press the center "Join" button ¢ Release both buttons
The Main Menu will appear on the screen. Follow the instructions on this menu to select and enter the desired function. All screens contain instructions for using them on the top or bottom-most lines.
Bookkeeping
The Bookkeeping function is your game accountant. It records the lifetime earnings of your game and allows you to keep track of weekly, monthly, or location earnings by using the resettable “Period” totals.
This function does not affect the number of coins per credit. (See “Game Set-up" for further informa- 13 tion.)
DIAGNOSTICS, ‘SELECT FUNCTION WITH LEFT JUMP BUTTON ENTER FUNCTION WITH LEFT THROW BUTTON
BUTTONS AND CONTROLS TEST
PROCESSOR MEMORY TEST
VIDED ALIGNMENT TEST ‘AUDIO SUBSYSTEM TEST ‘VIEW BACKGROUND SCREENS.
‘RETURN TO MAIN MENU.
PLAYER MIDOLE JOIN BUTTO!
PLAYER MIDDLE THROW BUTTON PLAYER RIGHT JOIN BUTTON PLAYER RIGHT THROW BUTTON PLAYER LEFT JOIN BUTTON PLAYER LEFT THROW BUTTON PLAYER MIDDLE JOYSTICK: LEFT ‘oOWN PLAYER RIGHT JOYSTICK: up. LEFT DOWN PLAYER LEFT JOYSTICK: up LEFT Down MECH RIGHT COIN SWITCH ‘SERVICE BUTTON
TESTING MASTER AOM MASTER ROM G00
LEFT THROW BUTTON EXITS TESTING
BUTTON AND CONTROL TEST
PLEASE PRESS THE FOLLOWING BUTTONS. IN OPE!
PLAYER MIDOLE JUMP BUTTON OPEN PLAYER RIGHT JUMP BUTTON OPEN
PLAYER LEFT JUMP BUTTON OPEN
OPEN MECH LEFT COIN SWITCH OPEN OPEN
PRESS SERVICE OR LEFT THROW BUTTON TWICE TO ExT
‘TESTING ORAM ‘SCRATCH RAM TESTED ‘SCRATCH RAM GOOD
COLOR RAM TESTED
‘COLOR RAM GOOD Diagnostics Menu
Cailing up the Diagnostics menu will open a very complete and easy-touse set of tests to make adjusting, troubleshooting, and servicing your machine quick and simple.
You will notice that the diagnostics section has a sub-menu of its own.
Buttons and Controls Test
This test provides a quick examination of the condition of all player buttons and controls.
As each item is tested, its change of status is shown on the screen. Any blinking or intermittant screen indications mean that switch cleaning or replacement is required.
Processor Memory Test
The erasable programmable read only memory (EPROM) and random access memory (RAM) ICs are storage areas for the actual game guidelines and are accessed by the microprocessor. The percentage of field failures in these areas is very low, but when problems do arise they can be difficult to track down. This processor memory test samples the action of the microprocessor and notes any malfunctions.
Video Alignment Screens
The picture on the video monitor is the most important and most neglected part of any game. It has been proven that a dirty, misaligned, or unfocused screen is the biggest cause for reduced collections— players will simply walk away if the game is not operating properly.
Making the effort to go through the following adjustment screens can make a big difference in revenues. Use all three screens to adjust your picture and then go to the Background Screens section to make the game look “rich.” "x" Indicates corner of screen
Cross Hatch Screen Use the cross hatch screen to adjust focus, alignment, size, and contrast. Wavy horizontal lines denote misadjusted contrast. The screen's background should be black and the lines solid white _ The four "x" marks will be in the screen corners when vertical and horizontal size and position adjust- | ments are Correct. CI If the crosshatch squares are rectangular, use the size controls ta make them square, then the position adjustments to put the “x's in the Indicates misadjusted contrast corners.
Diagnostics Red and Green Screen RED AND GREEN TEST Adjust screen control so that the green color bar shows faintly on level number 1. Use the red cutoff control to adjust the red color bar to the same intensity.
01234567
BLUE AND MISCELLANEOUS
0123
‘AUDIO SUBSYSTEM TEST PRESS LEFT THROW BUTTON TO END ‘AUDIO PROMS OK ‘AUDIO RAM OK
COMMUNICATIONS TEST PASSES grr 4c TEST (FADING TONES) ~~ 6 fest cycles en DAC TEST (2SEC TON INTERACTION TEST (6 TONE PULSES) CHANNEL) STOPS test cycles
Music TEST (PIG OUT THEME)
‘VIEW BACKGROUND SCREENS PRESS LEFT JUMP BUTTON FOR NEXT SCREEN PRESS LEFT THROW BUTTON TO EXIT ‘APPROXIMATELY 50 STATIC AND SCROLLING SCREENS WILL SEQUENCE PAST. PC BOARD NOMENCLATURE WILL BE INDICATED FOR THE EPROM BEING TESTED. Blue and Miscellaneous Screens
Use the blue cutoff control to make the gray color bar look gray. Adjust the red and green drive controls slightly, if necessary, to make the white color bar appear white.
Audio Subsystem Test
The sounds are the second most
Background Screens
In this test, the background screens are shown while the EPROMS containing the information for these screens are displayed at the right side of the screen. This test is not only helpful when looking for glitches, but may also be viewed as a visual test of the colors and picture clarity after the Video Alignment test has been completed.
GAME SET UP
‘SELECT FUNCTION WITH LEFT JUMP BUTTON
ENTER FUNCTION WITH LEFT THROW BUTTON
+++0 COIN SETS FREEPLAY +++ ‘COIN MEGH LEFT 1 COIN FOR 1 CREDIT ‘COIN MECH RIGHT
- COIN FOR 1 CREDIT
ATTRACT MODE SOUND... . . . .YES NUMBER OF CANS FOR JOIN. . DIFFICULTY LEVEL... 2... 4 AUMBER OF LIVES TO START WITH... =. . RETURN TO MAIN MENU.
GAME STATISTICS ‘SELECT FUNCTION WITH LEFT JUMP BUTTON
[START] [JOIN] {CONT}
| ) | a | 0 |
| o | 0 | 0 |
| 0 | 0 | 0 |
{ST-vOIN) TOTAL GAMES PLAYED fy ROUNDS PLAYED ° GAMES WITH CONTINUE o ‘MULT-PLAYER GAMES MULTI-PLYR CREDITS
RESET GAME STATISTICS
ERASE CALORIE GALLERY ON EXIT - NO
RETURN TO MAIN MENU
GAME DURATION STATISTICS ‘SELECT FUNCTION WITH LEFT JUMP BUTTON
{fie Pen CREDIT] AVERAGE TIME 00:00 oqo-o58 0 E
Bar Graphs
TOTALUVES: 0
ANG LIFETIME ; 0:00
RESET GAME STATISTICS,
Game Set-up
This section is vital to the condition of your cashbox. when used in conjunction with the Bookkeeping section of the Diagnostics package, the Game Set-up function will keep your game on the top of your earners list. The coins-per-credit settings range from 1 coin/1 credit to 20 coins/20 credits. You may wish to set the two coin mechanisms differently, i.e., 1 coin/1 credit on one mech and 4 coins/5 credits on the other. Sometimes a little experimentation can pay off with improved collections. The play time-per-credit function sets the time in 30 second increments.
Game Statistics
This section lets you know how well you've done in setting your game for maximum earning power.
Game Duration Statistics
Piay duration is the time that any number of players were playing This screen will indicate to you how well the game is earning-- if the game difficuity is too high/too low-- so that you can adjust play level for maximum earning strength at a particular location. The bar graphs offer a convenient visual presentation of the information gathered by the microprocessor so that you can make your adjustments quickly and easily.
This page is a drawing, shown as the original scan.
Player Control Wiring
Sd
pieog Od OL
Od pleog Od OL
wr preog Od OL POPS P51
Gray
Yellow/Black
Red/Black
Yellow
Violet Blue
Green
Black
POP6 Pé1
Brown
Yellow/Black
Red/Black
Yellow
Violet
Blue
Green
Black
Black
Orange Yellow/Black
Red/Black Yellow Violet
Blue
Green Player 1 Join Player 1 Throw Player 1 Jump Player 1 Right Player 1 Left Player 1 Down Player 1 Up Ground
Player 2 Join
Player 2 Throw
Player 2 Jump Player 2 Right Player 2 Left Player 2 Down
Player 2 Up Ground
Ground
Player 3 Join
Player 3 Throw
Player 3 Jump Player 3 Right Player 3 Left Player 3 Down
Player 3 Up
bd pueog Od OL
ld pieog Od OL
er pueog Dd OL
Video, Power Wiring
POP4 Service Switch
Coin Switch 2
Red OO
BlueWhite Coin Switch 1
To Monitor POP1 3 Video (Blue) 8 x Blue Video (Green) of ° Green Video (Red) -
Red g a o
Black Ground
White Video Sync Pos. To Monitor Gray Video Sync Neg.
Pous
Orange — +12VDC
Black —— Ground Black -— Ground Black — Ground To Power Supply
Black — Ground
| Red | —— | +5 VDC |
| Red | —— | +5 VDC |
| Red | —— | +5 VDC |
Audio Wiring
+ +
White/Red
White/Black SPK2
Gray bydS OL
Male Molex Connectors Typical Pin-Out
See main board layout for board connector locations bt
This page reads as a drawing: its text was drawn rather than typeset, and comes out in fragments. See the original scan.
Lo g ou z fe] i
2329 =T 5 > " 5 [=
_ a td +O m a ‘he ~ . 5 = ve £ :
A ey E} Ie : i
; We We . LW LI: | é 5 3 FI an
[e) o a if a i Ae) zl
- Es . 2 : Fy : Ls L a . 3 : 4° , FI _ _ — o _ 2 _ S
- 7 ER r=
A
a S e . s
Hlustrated Parts List
lamp fixture, fluroescent -909-00000-00 marquee plexi B-202-00003-00
marquee graphics B-603-00017-00
marquee retainer. B-405-00009-00 speakers C-701-00000-00 speaker grill B-423-00008-00
25° monitor C-980-00036-00
monitor plexi B-201-00004-00
control pane'/ monitor trim B-429-00003-00
button, w/switch, white C-703-00010-00
control panel B-107-00007-00
control panel graphics B-604-00023-00
coin door & mechanism C-980-00002-00
main cabinet graphics (right) B-601-00022-00
main cabinet graphics (‘eft) B-6C1-00021-00
main cabinet assembly B-101-00008-00 joystick digital, red C-741-00002-00
Illustrated Parts List (cont'd)
rocker switch C-707-00000-00
power supply assembly A-101-00004-00
switching power supply C-980-00035-00
isolation transformer C-710-00001-00
ac line filter C-905-00000-00
ac power cord -550-00001-00 ~~,
Other Parts power supply gnd harness A-301-00020-00 frame gnd harness A-301-00090-00
monitor gnd harness A-301-00027-00 A-301-00078-00
ac power harness A-301-00086-00 A-301-00079-00
dc power harness A-301-00087-00 A-301-00080-00 control panel harness player 1
control panel harness player 2
contro! panel harness player 3 fuse, slow-blow, 5 amp C-901-00000-00
fuse clip D-461-00000-00
sound harness A-301-00040-00
power I/O exp harness A-301-00042-00
main harness A-301-00085-00
video harness A-301-00088-00 main circuit boards A-201-00021-00
The Leland Corporation Warranty
The Leland Corporation warrants that whenever the power supply and/or the printed circuit boards and/or all parts contained therein are furnished with its product, that such part or parts will be free from all defects in materials and workmanship for a period of sixty (60) days from the date of shipment. The Leland Corporation's warranty of above parts is subject to the normal use and service of its product. No other products or paris thereof are warranted. if the products described in this manual fail to conform to this warranty, The Leland Corporation's sole liability shall be, as mutually agreed, to replace or repair such products which are returned to The Leland Corporation during stated warranty period, provided:
A. The Leland Corporation is notified in writing upon discovery by the buyer that said products are defective.
B. The defective product or part is returned pre-paid to The Leland Corporation's plant with a Leland Corp. Returned Merchandise Authorization (RMA) number clearly visible on the outside of the package.
C. The Leland Corporation's examination of the returned product(s) or part(s) determines, to our satisfaction, that the alleged defects existed and were not caused by accident, misuse, neglect, alteration, improper repair, installation, or testing.
The Leland Corporation is not responsible for bent pins on ICs not installed by our employees. In no event shall The Leland Corporation be liable for loss of profits, loss of use, or incidental or consequential damages.
EXCEPT FOR THIS WARRANTY, THE LELAND CORPORATION DISCLAIMS ALL OTHER WARRANTIES, EXPRESSED OR IM- PLIED, INCLUDING THE IMPLIED WARRANTIES OF MER- CHANTABILITY AND FITNESS FOR A PARTICULAR PURPOSE, AND ALL OTHER OBLIGATIONS OR LIABILITIES ON THE LE- LAND CORPORATION'S BEHALF, AND IT NEITHER ASSUMES NOR AUTHORIZES ANY OTHER PERSON TO ASSUME FOR THE LELAND CORPORATION ANY OTHER LIABILITIES IN CONNEC- TION WITH THE SALE OF PRODUCTS MANUFACTURED BY THE LELAND CORPORATION.
The Leland Corporation 1841 Friendship Drive EI Cajon, CA 92020 (619) 562-7000
This page carries no recoverable text. It is a drawing or a photograph. See the original scan.
The Leland Corporation
1841 Friendship Dr. EI Cajon, CA 92020
619-562-7000 * FAX 619-562-9468