SNK Neo-Geo MV2F-MV4F Service Manual
Neo-Geo MV-2F · Neo-Geo MV-4F (SNK, 1990) · Service Manual · 22 pages · 26 sections · original scan
NNO MV2F /MV4F
CONTENTS
INTRODUCTION *ttetttrtereereerecceseeeeeeeceeesereenenssssscscenee )
tilMv 2 1 — 1. COMPONENTS ++++eeessneeeeeseneceeeeeseneepeneneeeneneeseee 3 1-2. HARNESS CONNECTION--
1-3, ASSEMBLY-
1-4. WIRING DIAGRAM (2]Mv-4 2—1. COMPONENTS s++reeeseeeeeeenseeeeeeeneeeereeneneeeeenseeeee G se eeeeeeee 4
- HARNESS CONNECTION e+eseeeeeceeceecesceeeesenesnseenen
- ASSEMBLY +++-++ woe
- WIRING DIAGRAM “8
SETTING THE SOFT CARTRIDGES
BEFORE SETTING ++++seeseecccenccccccceccceccececeneee Perens)
SETTING CARTRIDGES ++++++++ee+ses eceeeeenececeenee seen [3] 3-1.
3-2.
B—B. POWER ON srsteseeeeseeerereneseesnceerececseseceeccsesensal() 3—4. UNUSED SLOTS -s+eeeeeeeeeeeeeeteeceeeeeeeseeeeeeeeseeeeeee 1 [4] INCOME DATA KEEPING SYSTEM ([5]TEST MODE 5 MODE SETTING+ 0012 ee
—2. STARTING «+
—3. MAIN MENU -4. HARDWARE TEST ste eeneneeeeeeeerenseeeesenseeesesensssewenl ys —5. SETTING THE HARDWARE DIP sttstssererseeeeeeeeeerereren] 5 —6. SETTING THE SOFTWARE DIP
~— 1, BOOKKEEPING:+
=3; aoannnnnn SETTING THE CODE NUMBER
5 SETTING THE CALENDAR ++
[GE] MA INT EN ANC E cosccccccccccecesecscccsnccscccscosce Dl) [CT] MA 1 N HA RN E'S Sorccececescesececcccccsrsccscsocsos: 21
INTRODUCTION
Welcome to the NEO-GEO MULTI VIDEO SYSTEM. This system can hold two (MV-2) or four (MV-4) different NEO-GEO games in one cabinet, which enables you to save space and maximize your income. Only one compact set of P.C. boards with 2/4 slots for different games are required in one cabinet. The game cartridges can be easily inserted or removed from the slots. This is one of the remarkable advantages of our MVS. Please read this service manual carefully before starting to use the MVS and keep it at your side for further reference.
CAUTION
QUse the logic probe for examination of the circuit on the IC boards. Testers cannot be used for this purpose. (To set up the MVS, avoid the following places: *Where leaks or dew from moisture may be caused *Humid places like indoor swimming pools and showers *Where direct heat strikes or in the hot air *Near ignitable or volatile chemicals and other dangerous articles *Near emergency exits or fire extinguishers *Inclined places or near vibrating places *Dusty places (Keep the temperature between 5 and 40 . (Do not put heavy objects on top of the PCBs. QDo not transport the cabinet with the cartridges inserted in the main PCB. QUse AC95V to ACIO5V for the power supply and do not use other devices from the same power source. QConnect the ground wire to the cabinet's ground terminal and the cabinet should be grounded. QThe 56 pin main connector is a different one from JAMMA 56 pin and should be used with connection to the MVS cabinet.
- MV -2
1-1, COMPONENTS
MVS consists of 2 P.C. boards. MV2-eeee% Main programming, character display MV-LED---Credit indicator
1-2. HARNESS CONNECTION
CREDIT DISPLAY PCB (7 SEGMENT)
efe, MV=-LED ol T
\L3PIN HARNESS
1-3, ASSEMBLY
SOFT CARTRIDGE
PCB COVER
MEMORY CARD GUIDE
HEADPHONE JACK
MEMORY CARD CONNECTOR
HEADPHDNE JACK
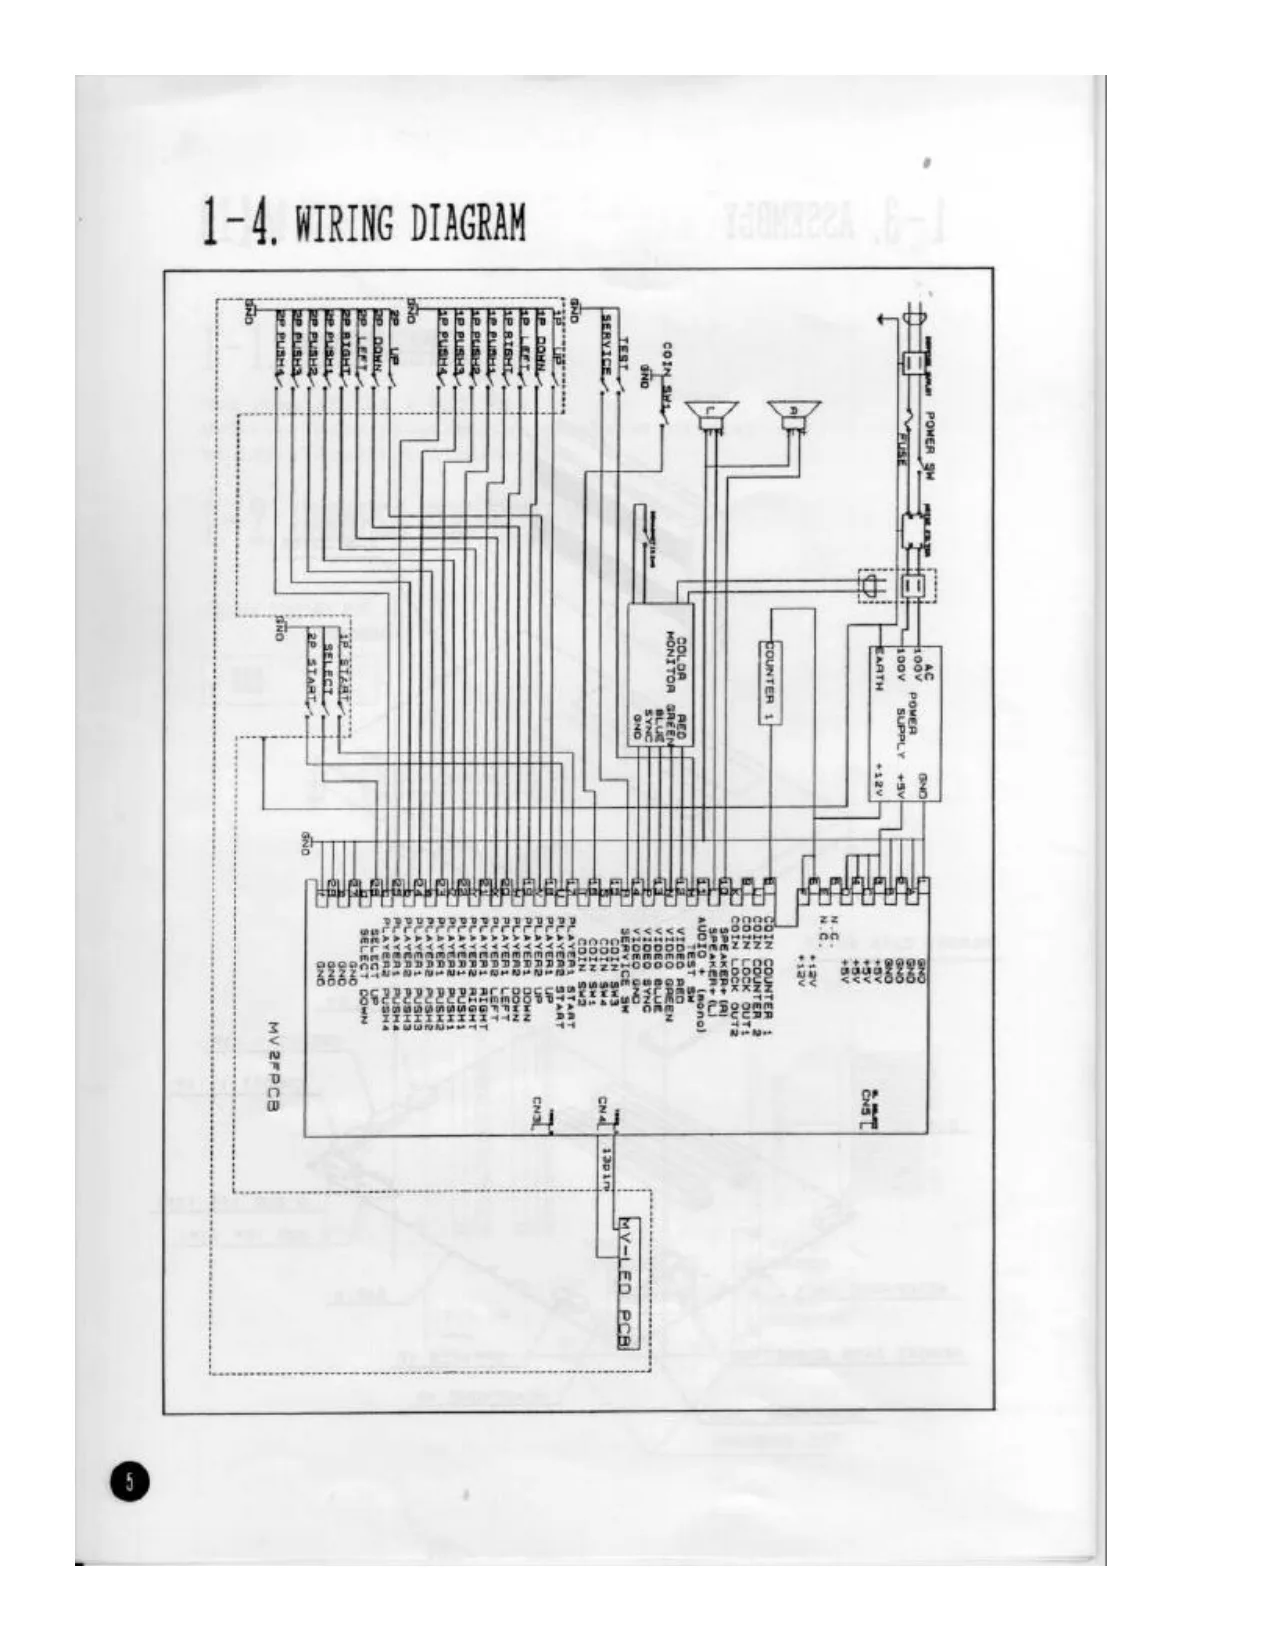
This page is a drawing, shown as the original scan.
- MV -4
2-1, COMPONENTS
MVS consists of the following P.C. boards. MV4eeeeee Main programming, character display SLOT4----Switching game cartridges MV-LED--+-Credit indicator
2-2, HARNESS CONNECTION
MV4 and SLOT4 fit together without harnesses. Connection to other boards is as follows;
CREDIT DISPLAY (7 SEGMENT)
MV-LED
13 PIN
MV4F
YOIDANNOO NIV
SPEAKER VOLUME 5 HEADPHONE 0 youre
2-3, ASSEMBLY
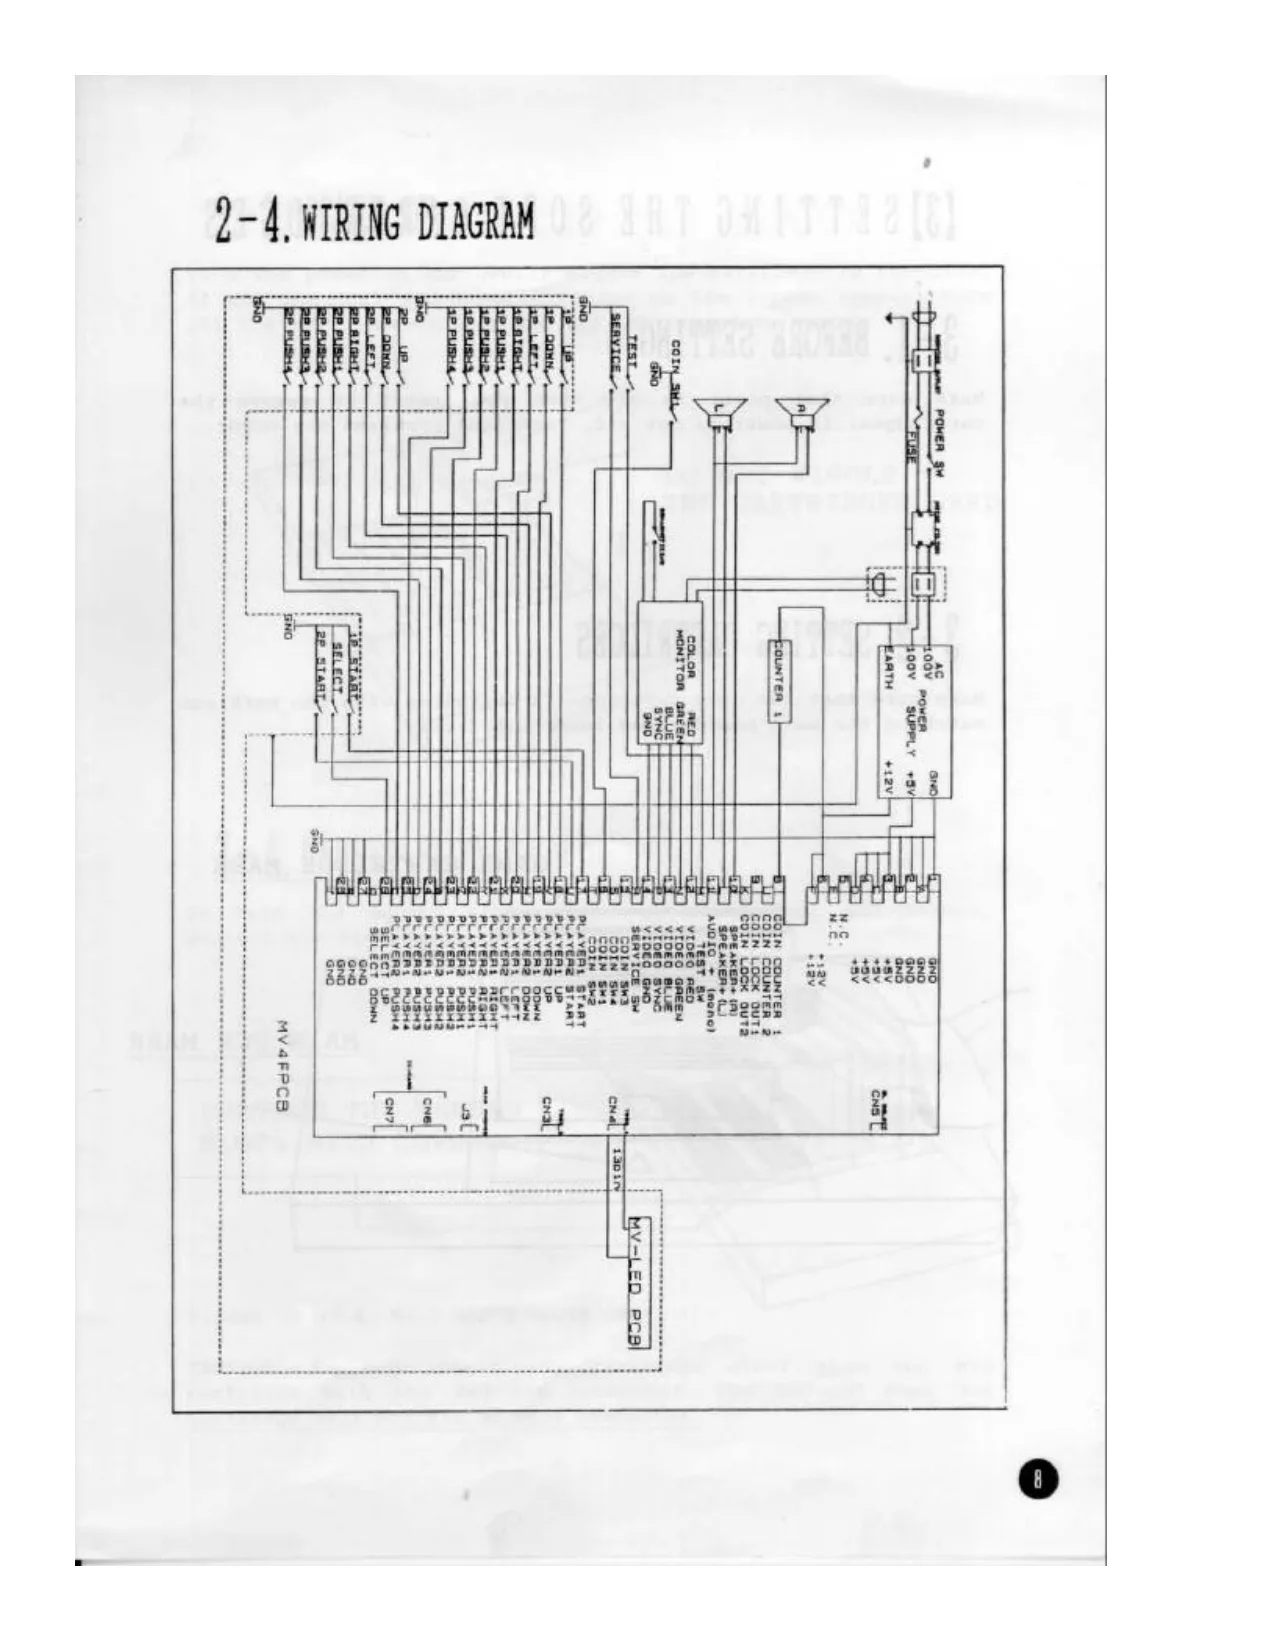
This page is a drawing, shown as the original scan.
(3)SETTING THE SORT CARTRIDGES
3-1, BEFORE SETTING
Make sure that power is off when you insert or remove the cartridges. If power is not off, technical problems may occur.
3-) SEDTING CARTRIDGES
Make sure that the game cartridge is installed with the markings matching the main board, then insert it firmly.
GAME CARTRIDGE MARK
MAIN PCB MARK Sa
a ee
3-3. POWER ON
Turn the power on and gently wiggle the cartridge in the slot. If any abnormal sounds or graphics on the screen appear, turn off the power immediately and try the procedure again.
DO NOT WIGGLE THE CARTRIDGES HARD
3-4 UNUSED SLOTS
To keep the unused slots from collecting dust and things, protect the slots with the cover provided.
' PROTECT THE UNUSED SLOTS WITH COVERS.
FIGURE OF MV-4, MV-2 HAS 2 SLOTS ONLY.
’
- INCOME DATA KEBPING SYSTEM
The MVS can keep income data of a maximum 8 games even when the power is off or the game cartridges are removed from the PCB.
For example: 2 games, A & B are being used on the MVS. If new game titles C & D are used to replace A & B, the previous data for A & B will remain.
MEMORY DATA A B Clo} ee
® MVS ®
When the game cartridges, once removed, are set again later, new data will be added to the previous data.
When more than 8 games are used, the oldest game's data will be deleted from the memory to input data for newest game. In the Fig.C, if new games I & J are used to replace any games, the data for the oldest game, A & B, will be deleted.
© =] |) | YS) |
(H)TEST MODE
5-1, MODE SEPING
The MVS enables dip settings on the monitor screen instead of the dipswitch settings on the PCBs of other systems. Bookkeeping is also possible on the screen. Read further for each operation.
5-2, STARTING
Press the test switch inside the cabinet.
5-3. MAIN: MENU
@ use the joystick to move the cursor on the screen and press the “A" button to confirm mode. Press "C” button to return to MAIN MENU the previous menu.
DHARDWARE TEST: | _-=. ~For cabinet switches, monitor
- adjustment, EL board test. SETTING UP THE HARD DIP— + __ z ; Displays main PCB dipswitch SBITING UP THR SOPT DIP—-+-—;_ setting credit and difficulty BOOK KREPING———____|__. Displays income totalization SETTING UP THE CODE NUMBER. SETTING UP THE CALENDAR —_|
RXIT- “., For memory card and code number setting rs Setting time and date
; Return to the game screen
5-4, HARDWARE TEST
HARDWARE TEST
——————— ead
pyr LUR WHITE + Cross Hatch
@ Press the 1 player start button
@For adjusting color on the screen
@& press the 1 player start button
@ "1" stands for “on" and "0" for “off" of the dipswitch.
@ Check if the no. of LED! is the same as the credit display. Disregard the display of LED2.
SOUND TEST SOUND OFF RIGHT LEFT CENTER
MEMORY CARD TEST
3% INSERT MEMORY CARD
a
BACKUP CLEAR
OK=PUSH A, B,C BUTTON
eee ee @ press the 1 player start button
@ Move the joystick up and down to select type of the sound. RIGHT---right speaker is louder. LEFT. left speaker is louder. CENTER--in stereo
@ Press the | player start button
@ You can check if the memory card works properly by inserting it into the memory card slot.
erased.
@ press the 1 player start button
@ You can clear previous data (income data, etc.) by pressing A, B & C buttons at the same time.
SETTING UP THE CALENDAR
CURRENT TIME 17/ 2/90 SAT
19:30:41
THE TIME TO BE SRT UP
A BUTTON, JOYSTICK=SRLECT 17/ 2/90 19:30:41
a
RETURN TO CROSS HATCH
@ Press 1P button to start
@ The time and date have already been set from the factory. If needed, you can change the numbers indicated in red color. ("A" button to increase, “B" button to decrease.) Press "D" button to confirm setting.
}-5, SETTING THE HARDWARE DIP
HARD DIP SETTING
SETTING UP THE HARD DIP
COMMUNICATION ...000.. OFF FREE PLAY 5 - OFF COIN SWITCH =. me ne STOP MODE OFF (@ Present status of the dipswitch is displayed.
SETTING MODE---Test Mode / Game Mode CONTROLLER: ++++Mah-jong Controller / Normal Controller COMMUNICATION-+-Communication plays FREE PLAY-+++++ Game start without inserting coins. STOP MODE--+---+- Function to pause game
)-6, SETTING THE SOFTWARE DIP
SETTING UP THE SOFT DIP
DSETTING UP THE CABINET — SLOT1 NAM-1$75 SLOT2 BASEBALL STARS SLOTS MAHJONG SLOT4 TOP PLAYERS GOLF —
SLOTS MAGICIAN LORD Veh Se
+ SETTING UP THE CABINET BES apts a ree
‘SETTING UP THE CABINET DCOIN RATE ICOIN=JCREDIT GAME SELECT ONGYSWHRNGCREDETED (ANYTIME)
DEMO SOUND SBTPUPEINEBACHSCAME (“#1 TROUT)
Str ha sae +
SETTING UP THE SOFT DIP
Fn
CONTINUR © -3time (WI THOUTHPREB) DEMO SOUND YBS (#K0) HOW TO PLAY YES (#NO). DIFFICULTY LEVEL 4 BONUS RATE SBCOND BONUS (vEVERT+NO) ‘BONUS 100000/200000
HERO 3
ee
- & cabinet setting
} Software setting
@ Move the cursor to "CABINET SETTING" and press "A" button.
@ Use the joystick to move the cursor
@ Press for each setting.
On "FREE PLAY", selection button works without credits. (Change mode with “A" button) GAB START COMPULSION SOM8(“#ITHOUT]——17" Setting the time limit for game selection. (Increase time with "A" button, decrease with "B") “WITHOUT” is selected, no sound foc any game. (Change mode with “A" button)
"Cc" button to return to the previous menu. Move cursor to the game you wish to set and press "A" button. @ The screen shows example for
@ With or
@ Press NAM-1975. Some of the menu differs aoe in other games. Setting the number of CONTINUE PLAYS. without demo sound. With or without “HOW TO PLAY" screen. Setting difficulty of the game. The higher the number, the more difficult the game. "Cc" button to confirm the setting and the SOFT DIP SETTING menu will appear again. Press “C" button once more to get to the
Main menu. rs)
)- 7, BOOKKEEPING
BOOK KEEPING
> CABINBT/COIN Geet
SLOT NAMI975.
SLOT2 BASEBALL STARS SLOT3 TOP PLAYERS GOLF SLOT4 MAHJONG SLOTS MAGICIAN LORD
CABINET/COIN
CABINBT/COIN
FRB/17 FEB/16 FRB/15 FRB/14 | 08844 FRB/13 FSB/12 | 05699
CABINET/COIN b2 | ~@ Move the cursor to "BOOKKEEPING" ae and press “A" button. +} Total income of the cabinet + Total plays, continue plays of the cabinet. i Total plays, continue plays for each title.
G@ Move the cursor to “CABINET/COIN" and press "A" button.
@ Weekly income chart.
Disregard the P2 column.
@ Press "A" button
Income for the first 6 months of the year.
+
Se SS CABLNET/COIN i ee Jou | 47244 aE) moa | 44422 ES Sue | 56633 Oo] 47 a of #8 wov | 72399 oO] 12 bec | ss699 oO] 24 ae eee + CABINET /PLAY —cneraY PLAY | CowT, | AV, TIME FEB/IT | 22 3 | 5:20 ree/16 | 44 6 | 6:20 PRo/15 | 66 ae rav/ia | 88 oo [8:20 PeB/13 | 23 2 | 9:20 ur s | 4:20 Pee/it | 1 te [| 8:20
+ RS Sa CABINBT/PLAY PLAY | cont, | AV, TIMR Jan | 47244 33363 | 5:20 Fea | 44424 35543 war | $6634 37773 | 7: aPR | 63a4q 39983 | 8: way | 7239 33232 | 9: won [sseaq 1ssi9 | 4: Ses ee @ press "A" button
Income for the second 6 months of the year.
@ Press "C" button to return. Move the cursor to "CABINET/PLAY" and press “A” button.
@ press "A" button
@ Press "A" button
+ SETTING UP THE CODE NUMBER CABINBT/PLAY PLAY | CONT. Jub | 4224q 33363 MiG [44424 35543 SaP | 56634 S7TTS oct 39983 vov | 77394 33232 pac | 55694 15519
ee AE) a CODE NUMBER SETTING
2408 D BUTTON: SRT CODB NUMBER WILL BE SET INTO MEMORY CARD WHEN INSERTED
DURING THIS MODE, eee eee G@ Press "A" button
@ Retrieve the bookkeeping information for each title in the same way as “CABINET/COIN” and "CABINET/PLAY".
@ Press "C" button twice to return to the Main menu. Move the cursor to “CODE NUMBER” and press “A“ button.
cg Move the cursor with the joystick. To change numbers, press "A" button to increase and "B" to decrease. The code number is set by pressing "p" button.
5-9, SETTING THE CALENDAR
To set the calendar, refer to 5-4, HARDWARE TEST.
- M A | N ib E N A N ( E Please note the following:
QVoltage of the power supply should be A/C between 95 and 105.
*If several cabinets were connected to the outlet on the backside of the cabinet.
QWhen you turn the power on and the MVS will not work, check the status of the outlet, power supply and fuses. QKeep the Main PCB away from dust and other objects, it may cause a breakdown or damage to the PCB.
®If you cannot correct any malfunctions that may be occurring, contact the selling agency of the MVS for assistance. @Do not try to repair the PCBs at users' side. Electric testers might damage the IC because of their internal voltage. @When you send the defective PCBs to the agency, please mention the malfunction that is occurring. @Be careful to pack them firmly for shipment.
[T]MAIN HARNESS
SOLDER SIDE PIN # PART SIDE
GND la |i GND
GND B (2 GND
+5V IC |3 +5V
+5V ID |4 +5V
E {5
+12V F |6 +12V KEY H |7 KEY COIN COUNTER 2 lJ |8 | COIN COUNTER 1 COIN LOCK OuT2 {kK |3 | COIN LOCK OUTIL SPEAKER+ (L) L [10 SPEAKER+ (R) TEST SWITCH IM |i 1 AUDIO + (mono) VIDEO GREEN IN |L2 VIDEO RED
VIDEO SYNC P (13 VIDEO BLUE
SERVICE SW R |l4 VIDEO GND COIN SW4 (PLAYER) |S [15] COLN SWS (PLAYERI) COIN SW2 (PLAYER2) |T |1 6] COLIN SW1 (PLAYERI| START 2 lu |. 7 START 3 PLAYER2 UP lv j.8] PLAYERI UP
PLAYER2 DOWN lw jt9} PLAYERI DOWN
PLAYER2 LEFT x j20] PLAYERi LEFT
PLAYER2 RIGHT y j2i] PLAYER RIGHT
PLAYER2 PUSHL Zz |22| PLAYERI1 PUSH1
PLAYER2 PUSH2 a |23| PLAYERI PUSH2
PLAYER2 PUSH3 b j24[ PLAYERL PUSH3
PLAYER2 PUSH4 ec [25] PLAYERI PUSH4
SELECT DOWN d [26 SELECT UP
GND e |27| GND
GND fF [28 GND