Off Road Thunder 39in
Offroad Thunder (Midway Games, 2000) · Manual · 148 pages · 99 sections · original scan
DECEMBER 1999 DD MIDWAY semooat it
Sit-In, Dedicated 39” Video Game
@. Operation Manual c€
@Setup @Operation @Audits @Wiring @Servicing @Troubleshooting @Parts
Midway Games Inc., 3401 North California Avenue, Chicago, Illinois 60618-5899 USA
QUICK-START LINKING GUIDE
NOTICE: Before completing installation, verify that each cabinet has a separate and unique |D. Otherwise the link won't function. For further information, see Linked-Play Adjustments Menu in Chapter Three of this manual.
NOTICE: To link three or four cabinets, you must use an Ethernet hub.
}1. SET UP THE LINKS
Switch off power to all cabinets. Remove cabinet access doors and linking cables. Check cabinet linking cables. One end of each linking cable must attach to the Arcade Computer's network interface jack. ]2. To link two cabinets: If you're only linking two cabinets, use one coupler. You don’t need a hub. (You'll find a coupler in a Manila envelope inside the cashbox.)
]3. To link three or more cabinets: You need to add a hub to your network. Place the hub near the rear of the cabinets. Connect all linking cables. When you use a hub, don’t use any couplers. ]4. Turn on cabinet power.
ADJUST GAME OPTIONS
- Find the diagnostic switches behind each cabinet’s coin door. Press and hold each cabinet’s TEST MODE button to enter the Menu System.
- From each cabinet’s Operator Menu, select the Adjustments Menu.
- From each cabinet’s Adjustments Menu, select the Linked Play Adjustments Menu.
- LINKED PLAY. At each cabinet, set the LINKED PLAY option to YES.
- UNIT ID. Each cabinet must have a unique unit ID. Set the option UNIT ID to a separate number for each cabinet.
- EXIT the menu system.
RESTART ALL CABINETS. After the machines reinitialize, they'll operate in Linked Mode. TEST THE SYSTEM. Test the network by playing a Linked Mode game on all linked machines.
DECLARATION OF CONFORMITY
MIDWAY GAMES, INC.
3401 N. CALIFORNIA AVE. CHICAGO, IL 60618 U.S.A.
WE, HEREBY DECLARE UNDER SOLE RESPONSIBILITY THAT
THE MODEL: "OFFROAD THUNDER"39": 230241, 20341, 20441, 20741, 20941, 21041, 21141, 21241, 21341 21441, 21841, 21941, 22041, 22141, 22241, 22341, 27241
TO WHICH THIS DECLARATION RELATES IS IN CONFORMITY WITH THE FOLLOWING EUROPEAN PRODUCT SAFETY DIRECTIVES:
ELECTROMAGNETIC COMPATIBILITY DIRECTIVE
(89/336/EEC AND AMENDMENTS 91/C162/08, 92/31/EEC,93/68/EEC)
ELECTRICAL EQUIPMENT DESIGNED FOR USE WITHIN
CERTAIN VOLTAGE LIMITS DIRECTIVE (73/336/EEC AND AMENDMENTS 88/C168/02, 92/C210/01, 93/68/EEC,94/C 199/03, 95/C214/02)
AS IS VERIFIED BY COMPLIANCE WITH THE FOLLOWING STANDARDS:
EN55014: 1993 EN61000-4-2: 1995 IEC 801-3: 1984 (EN61000-4-3) EN61000-4-4; 1995 EN61000-4-5: 1995 EN335-1: 1995 IEC 335-2-82 (DRAFT)
Date issued: OCTOBER 27, 1999
CORPORATE V.P. OF QUALITY
-iv-
SETUP
NOTICE: This manual is subject to change without notice. Midway reserves the right to make improvements in equipment function, design, or components as progress in engineering or manufacturing methods warrant.
Fill out and mail in the Game Information Card. Include the game serial number from the label on the rear of the cabinet. For your records, write the game serial number in the manual. SERIAL NUMBER
Setup 1-1
SAFETY INSTRUCTIONS
The following safety instructions apply to operators and service personnel. Read these instructions before preparing your game for play. Other safety instructions appear throughout this manual.
DEFINITIONS OF SAFETY TERMS
Setup 1-2
PRODUCT SPECIFICATIONS Operating Requirements Location Electrical Power Domestic 120VAC @ 60Hz 4.0 Amps Foreign 230VAC @ 50Hz 2.0 Amps Japan 100VAC @ 50Hz 4.0 Amps
Cabinet Statistics Shipping Dimensions Cabinet Section Control Section
| Width | 58"(147cm) | 41” (104 cm) |
| Depth | 36” (91 cm) | 33” (83.8 cm) |
| Height | 79"(201cm) | 42” (107 cm) |
Equipment Characteristics Video Monitor Medium Resolution RGB 39” (99 cm) CRT
Game Characteristics Player Variables 1 to 4 players per game (with linking) Choice of vehicle and course High Score Recognition Temperature 32°F to 100°F (0°C to 38°C)
Shipping Dimensions Universal Pedestal Width 22.0" (55.8 cm) Depth 36.0” (91.4 cm) Height 51.0” (130 cm)
Audio System Digital Stereo Sound Two 5.5” (14 cm) and Two 6.5” (16.5 cm) Speakers
Operator Variables Coinage, Game Options, Difficulty, Force, Volume, Audits, Statistics
Setup 1-3 Humidity Not to exceed 95% relative
Shipping Weight
Cabinet, 475 Ibs (215 kg) Control Section, 300 Ibs (137 kg) Universal Pedestal, 125 Ibs (57 kg)
Currency Acceptors 1 Coin Mechanism, Coin Counter Dollar Bill Validator Ready Electronic Coin Acceptor Ready
Diagnostics Automatic Power-Up Self-Test Manual, Multi-Level Menu System
PRODUCT CONFIGURATION
¢ Standalone Units Each game is ready to play right out of the box. You can use the game menu system to set player variables in advance. Or you can leave these choices to players.
e Linked Units Linking allows players to compete against each other (on one course). Operator menus are the same as in stand-alone games. Crossover couplers and linking cables to connect two games are factory installed. You can interconnect up to four games. To do this, use the optional Hub Linking Kit.
GAME SETUP
]1. | Remove and set aside items from shipping containers. You'll find casters, levelers, and mounting hardware packed with the pedestal. Inspect the exterior of the cabinet for any signs of damage.
]2. | Remove the keys from the steering wheel. Unlock and open the coin, cash box, and rear doors. You'll find electrical cords and spare parts in the cash box.
Setup 1-4
(18.
[]9. Unlock and remove the monitor cabinet’s rear door. Inspect the cabinet interior for damage. Check major assemblies to assure secure mounting. Assure that nothing blocks fan airflow.
Replace and lock the monitor cabinet’s rear door. Locate the casters. Notice that two of the swivel casters have red dots on their bases. These two are special-purpose, high-compliance casters. Tilt the dash cabinet. Install the two casters with red dots at the rear of the dash cabinet. Each caster mounts to a group of threaded studs. Tighten caster-mounting nuts firmly.
Tilt the dash cabinet. Install two swivel casters without dots at the front of the dash cabinet. Each caster mounts to a group of threaded studs. Tighten caster-mounting nuts firmly.
The pedestal uses three casters. Tilt the pedestal. Install a swivel caster on the front studs. Install locking casters on the rear studs. Tighten caster-mounting nuts firmly.
Stand the dash cabinet upright and make certain it is stable. Move the game to its intended location. Level the cabinet. We've designed this game for use only in a fixed position. Assure that final leg leveler adjustments raise the swivel casters off the floor. Distribute weight equally on each cabinet corner. Tighten the leveler nuts.
Location of Pedestal Assembly Mounting Holes
To protect seat pedestal mounting rails during shipment, the factory bolts them inside the dash cabinet. Remove the 1/4-20 hex-head bolts that secure the rails. Slide the rails partway out of the bottom-front cabinet opening. (See the nearby diagram for proper placement.)
Fasten down the rails in this new position. Firmly tighten the rail bolts, but don’t torque them down. Slide the seat pedestal onto the rails. Vertically position the rails. Remove the seat pedestal. Tighten the rail bolts with a wrench.
Setup 1-5
NOTICE: When you mate the cabinets, take care to avoid pinching wires!
10.
11.
12.
13.
14.
15.
(116.
(117. Roll the seat pedestal near the dash cabinet. Leave enough space to attach the wiring harness. Mate each seat pedestal cable connector with its cabinet cable connector. Press connectors firmly to seat contacts. Align the seat pedestal opening with the rail ends. Slide the seat pedestal forward onto the extended mounting rails. Align holes. Attach the seat pedestal using 1/4-20, tamper-resistant screws and large flat washers. You'll find a T27 wrench with the spare parts. Use it to tighten these screws firmly.
Fasten the cabinet joining brackets to the monitor cabinet. Align the dash and monitor cabinets. Carefully slide the dash cabinet between the cabinet joining brackets. When the cabinets are flush, attach the cabinet joining brackets to the dash cabinet. Attach the wiring harness. Mate each dash cable connector with its monitor cabinet cable connector. Press connectors firmly to seat contacts.
You can install an extra padlock to secure the rear door. You'll find a hasp in the spare parts bag. Remove the two lock bracket nuts from inside the cabinet, above the rear doorway. Slide the hasp onto the bolts. Now the hasp should protrude from the hole in the cabinet back. Reinstall the nuts.
Modify the lock plate at the top of the rear door. Remove the bolts and nuts from the lock plate. Rotate the plate so that the slot will be above the door. Reinstall and tighten bolts and nuts.
The power cord is with the spare parts. Remove and save four screws from the line cord cover at the cabinet rear. Match the holes on the IEC plug with the prongs in the receptacle. Push the plug firmly to seat the line cord. Hold the cord flat against the cabinet and reinstall the cover plate. (Point the indentation downward, so that the cord exits toward the cabinet bottom.)
Refer to the cabinet wiring diagram (elsewhere in this manual). Check to see that cable connectors are correctly secured. Inspect for damaged connectors. Don’t force connectors. Most connectors are keyed to prevent reversed connections. Before you plug the line cord into an A.C. outlet, verify that game electronics are set to correct local A.C. line voltage.
Setup 1-6
18.
19.
20.
21.
22.
23.
24.
25.
26. Line Cord Installation
Plug the game into a grounded (3-terminal) AC wall outlet. Switch on the game at the on/off switch. (This switch is on the cabinet roof. Face the cabinet’s back. Find the on/off switch to your right.) The game will power up and begin self-diagnostics. If diagnostics find no errors, the game enters its Attract Mode of operation. (Attract Mode includes scenes and sounds from typical races, player's scores, messages, etc.) Unlock and open the coin door. Locate the control switches. Press TEST MODE to enter the Menu System.
Select “DISK TESTS” at the Diagnostics Menu. Run all the tests in order to verify correct drive operation. Select “SWITCH TESTS” at the Diagnostics Menu. Check to be sure that all control switches work.
Select “SOUND TESTS’ at the Diagnostics Menu. Verify operation of each speaker. Select “FORCE FEEDBACK TESTS” at the Diagnostics Menu. Verify the presence of steering resistance.
Select “CALIBRATE CONTROLS’ at the Main Menu. Set steering and throttle limits for maximum accuracy. Select “START THE GAME” at the Main Menu. The system should enter Attract Mode. Open the coin door and press the SERVICE CREDITS button to allow game play. Press the START button to begin play. Listen to the audio while playing the game. Note sound irregularities (phase problems, no low frequencies, mono audio from stereo speakers, etc.). If necessary, check the wiring harness for internal shorts or strapped connections.
Change the volume and make adjustments as necessary. Close and lock all open doors. Tighten the leveler nuts. Engage the caster locks.
Setup 1-7
LINKED OPERATION
Equipment Requirements Linked Mode permits players to compete between networked cabinets in real time. The linking program is player selectable, so that each cabinet serves player needs.
To achieve linked operation, you must connect cabinets. The factory installs one linking cable in each cabinet.
Link Two Cabinets with a Coupler
e TO LINK TWO CABINETS, use a crossover coupler. All cabinets contain a crossover coupler to connect two cabinets together. Use only one coupler between each pair of cabinets. Passive electronics limit the cable length and number of cabinets that you can link. Most operations attach linked cabinets, but you can separate cabinets by up to 25 feet. You can add linked pairs as necessary.
Network Hub
Link Up to Four Cabinets with a Hub
e TOLINK MORE THAN TWO CABINETS, use a network hub. The network hub’s active circuits allow you to use more and longer cables. Notice that the hub replaces the coupler between cabinets. Each hub can connect several cabinets. The hub’s active electronics permits use of larger networks. Most operations attach linked cabinets, but you can separate cabinets by up to 300 feet. You can add linked cabinets as necessary.
NOTICE: You can't link more than four Offroad Thunder cabinets.
Setup 1-8
Networking Pointers
Protect exposed wiring from player foot traffic, cleaning crews, service personnel, etc. Use approved conduit or wire channels to support cables. Network modular connectors don't include strain relief.
Keep cables away from heat, moisture and electromagnetic fields. (Avoid neon signs, fluorescent fixtures, two-way radios, cordless telephones, power circuits, speaker wiring, etc.).
Universal RJ-45 modular plugs aren't numbered or coded. Clearly mark cabinet network connections. Otherwise, someone could confuse them with computer or telephone circuits.
The factory supplies network cables with the cabinets. These cables will reach the hub in networks of four or fewer cabinets.
Use only Category 5, twisted pair cable.
If you want to monitor network activity, you can locate the hub remotely. You can use long cables, if they satisfy these requirements: (1) Cables must not exceed a length of 328 feet or 100 meters. (2) Cables must be Category 3 (or higher), 100 ohm, unshielded, twisted pair, communications-grade wiring. (3) You must not use standard telephone cables.
Network Wiring Setup
NOTICE: Don't use crossover couplers in a hub installation. Otherwise, your network won't operate properly.
Raise the leg levelers. Roll the cabinets to their destination. Lower the leg levelers. Verify game operation. Make necessary repairs or adjustments before making changes to the cabinets.
Shut down all machines.
Place the hub near the center of the linked cabinet array.
You'll find a linking cable coiled up inside each cabinet. Cut the cable tie. Locate the cable’s free end. Uncoil enough cable to reach the hub through the rear box of the cabinet.
Check the other end of the cable. It should attach to an Arcade Computer network jack. You'll find this jack in the middle cabinet box. Recoil and retie the remainder of the cable. Repeat the cable connection steps at the other cabinets.
Plug the cabinet linking cables into any of the jacks on the hub rear panel. Plug the hub’s AC power adapter into its jack on the hub.
- Set the hub front panel switches to the LNK (link) position.
- Retract excess cable into the cabinet coils so that the cables don't touch the floor. Retracting the cable keeps it away from cabinet wheels during relocation.
- Connect the AC Adapter and line cords to AC power. Turn on each of the cabinets. Examine the screens of all cabinets.
]13. Restart all machines.
Setup 1-9
1.
oa Pw
> 14.
15.
16. The cabinets will begin the Power-On Self Test. If the test doesn’t find any errors, each cabinet enters its Attract Mode automatically.
Start up linked cabinets and ensure that each cabinet's player controls affect the same vehicle on all screens. The CPU and hub LEDS will indicate communication activity between the two cabinets.
Close and lock the coin doors. Reinstall and lock the rear cabinet doors. Lower all leg levelers until wheels lift off of the floor. Then level the cabinets.
Software Setup
Unlock the coin doors of all cabinets.
Find the diagnostic switches behind each cabinet’s coin door. Press and hold each cabinet’s TEST MODE button to enter the Menu System.
From each cabinet’s Operator Menu, select the Adjustments Menu. From each cabinet’s Adjustments Menu, select the Linked Play Adjustments Menu.
LINKED PLAY. At each cabinet, set the LINKED PLAY option to YES. UNIT ID. Each cabinet must have a unique unit ID. Set the option UNIT ID to a separate number for each cabinet.
EXIT the menu system.
RESTART ALL CABINETS. After the machines reinitialize, they'll operate in Linked Mode. TEST THE SYSTEM. Test the network by playing a Linked Mode game on all linked machines.
Setup 1-10
NOTICE: The term VGM refers to the video game machine.
OPERATION
GAME OPERATION
STARTING UP Whenever you turn on the machine or restore power, the system executes boot ROM code. The boot ROM contains self-diagnostic tests. These tests automatically verify and report the condition of the CPU and other hardware. If the hardware fails a test, the system displays an error message.
Having passed power-up tests, the system enters Attract Mode. Attract Mode consists of typical game scenes and sounds, alternating with high scores. Attract Mode continues until game play commences. Players insert currency or tokens to start the game. Each player selects a truck and a course. Play begins after a countdown period. The game will progress until players quit or exhaust their playtime. At Game- Over Mode, players may choose to begin again. If players choose not to continue, then the system returns to Attract Mode.
ARCADE COMPUTER This game uses an Arcade Computer to control its functions. The Arcade Computer is a customized personal computer. Housing the Arcade Computer is a PC-like case. Inside, you'll recognize the motherboard, plug-in cards, modular power supply, disk drives, etc. Despite these familiar features, Midway optimized this computer specifically for this game. The Arcade Computer design permits improved upgradability and service access without sacrificing ruggedness or reliability.
PLAYER CONTROLS
e ACCELERATOR. The accelerator pedal controls vehicle speed and acceleration.
e BRAKE. The brake pedal stops the vehicle, just like a real brake.
e GEARSHIFT. The gearshift lever controls the amount of engine torque that reaches the wheels. The player may choose manual or automatic shift operation. Manual shift operation requires the player to upshift while accelerating and downshift while decelerating. (This shift has no reverse gear.) Players select automatic or manual shift trucks before racing. Manual shift trucks allow skilled drivers more control and faster starts.
e NITRO BUTTON. The NITRO button is on the end of the shift lever. If the nitro feature is active, pressing NITRO adds a power burst. (The button illuminates when nitro is available.)
e START BUTTON. The START button allows a player to begin or continue play, select courses and trucks, etc.
e STEERING WHEEL. The steering wheel aims the vehicle and provides course condition feedback.
e SLAM CAM. The red SLAM CAM button displays the cockpit view. The viewpoint is from the driver's seat inside the truck.
e CRASH CAM. The orange CRASH CAM button provides a close-up, aerial view of the course. The viewpoint is from above and behind the truck. A truck camera would see this view.
e CHOPPER CAM. The yellow CHOPPER CAM button provides a distant aerial view of the course. The viewpoint is from above and behind the truck. A tracking helichopper camera would see this view.
Operation 2-2
NITRO BUTTON —
PEEDOMETER / __ <] = PEED SHIFTEI TSCHOMETEL 7
TART BUTTON
a © pac
HOOP CA
| y STEERING WHEEL
CHOPPER. CAM PUSHEUTTON. (hEL) PUSHBUTTON (YELL
PASH CAM PUSHBUTTON (ORANGE
Player Panel Controls
OPERATOR CONTROLS
CABINET CONTROLS
DIP Switches on the MagicBus™ Board set some system variables. These DIP switches are for factory use only. Keep them set at their default value, all off. You can adjust game variables, check bookkeeping totals and perform diagnostics with diagnostic control switches.
The Monitor Remote Control Board allows you to adjust the video display for optimum viewing.
The Cabinet POWER Switch turns off the game, but does not reset game variables.
The Computer POWER Switch turns off the computer. It is on the Arcade Computer. During service procedures, leave this switch ON. Use the main cabinet power switch to control the power.
DIAGNOSTIC CONTROL SWITCHES
The SERVICE CREDITS Button allots credits without changing the game's bookkeeping total. The Menu System occasionally assigns a function to SERVICE CREDITS. Check screen directions for these additional functions.
The TEST MODE Button causes the game to enter the menu system. To access the Menu System, press and hold TEST MODE until the Main Menu appears. Within the menu system, check screen directions for additional TEST MODE functions.
VOLUME DOWN and VOLUME UP Buttons set game sound levels. To make minor volume changes, press either button briefly. To make major changes, press and hold a button. In the menu system, VOLUME UP moves the item highlight bar up the menu. VOLUME DOWN moves the item highlight bar downward.
NOTICE: The Attract Mode volume level is separate from the Game Mode volume level. For greater profits, raise volume levels to add realism and draw attention to this game.
Operation 2-3
Operator Control Switch Locations
GAME FEATURES
GAME RULES
INSTRUCTIONS Play instructions appear on the left and right sides of the video monitor. ONE PLAYER The player inserts currency or tokens to start the game. Next, the player chooses a truck and course and presses the START button. The game displays individual statistics periodically, during and after the race. Additional game information appears on screen as needed.
PLAYER CHOICES The player can drive any truck on any course. Each truck handles and performs differently. Players learn which trucks are best for a given course and driving style. Press one of the CAM buttons to select more trucks.
CONTROLLING A TRUCK The steering wheel, brake and accelerator control the truck. As in real trucks, the steering wheel directs the truck. The brake slows or stops the truck, and the accelerator sets speed. A NITRO button on the gearshift provides an extra burst of power. NITRO flashes to indicate nitro availability. Players must collect nitro icons along a course by steering directly under the icons. A gauge meters the amount of stored nitro.
INDICATORS Across the top of the screen, numeric indicators display truck statistics: A ghost image in the upper-left screen corner indicates shift type, manual or automatic. A meter in the top-left screen corner displays engine RPM. A top-right gauge measures remaining nitro fuel. At the screen’s top-center, a digital clock times the current lap in seconds. As appropriate, the screen also flashes CHECKPOINT.
Operation 2-4
DISPLAYS The player’s vehicle appears at the center of the screen. The numbers floating above some vehicles indicate that other humans control them. (These are linked players.) The Arcade Computer controls trucks without numbers. At the bottom of the screen, another instrument displays relative positions of nearby trucks. The right side of the screen provides race statistics... e Position per number of trucks (for example, “1 1°] 12”) e The number of cars ahead of the player (9 cars ahead”) e A\lap timer for each lap (“0:2:00”) GAME ACTION Action begins after the “three-two-one” countdown. The announcer hollers “Go!” To continue play, the player must drive past each checkpoint within the time limit. To decrease time between checkpoints, players must avoid fixed obstacles and other trucks. Ramps allow players to advance more quickly, collect hovering nitro icons, or avoid obstacles. (Red nitro icons contain more fuel than blue nitro icons.)
Players can change their view of the action by pressing the view buttons. These buttons are on the left side of the control panel. Game sounds include announcer comments, engine noise, and other effects. SCORING Players who set a speed record may enter their initials in the High Score Table. After a player completes a certain number of courses, he can choose additional courses. (Adjustments determine the number.)
HEAD-TO-HEAD RACING
Networked cabinets offer players linked, head-to-head racing competition. Each player begins the courseselection process. A join-in message alerts subsequent players to the possibility of a linked race. If players don't begin their selection process before this message disappears, their races don't link. (Unlinked players compete in independent races, as usual.) Players may use the solo feature to decline a link.
If other players begin selection during the join-in message, the cabinets communicate over the network. Each additional cabinet sends out its own packet containing a unique unit ID. In return, each cabinet receives data from active cabinets. A "waiting" message indicates that other players are still selecting race options. Eventually, the last player finishes selecting or the waiting period ends. At this point, all linked players see the start screen simultaneously.
Latecomers can't participate in an ongoing linked race. They can begin an independent race. The link automatically terminates when the game is over. Players can then set up another link.
MAINTENANCE
¢ Cabinet and Seat Use plastic-safe, non-abrasive cleaners to avoid damage. Apply cleaner to a clean cloth or sponge. Use this to wipe the seat or cabinet. Don’t apply cleaner directly to the artwork or cabinet!
e Player Controls Use plastic-safe non-abrasive cleaners to avoid damage. Apply cleaner to a clean cloth or sponge. Use this to wipe the player controls. Don’t apply the cleaner directly to the controls!
e Viewing Glass To clean the glass, you don’t need to switch off power to the game. Apply a mild glass cleaner to a clean cloth or sponge. Use this to wipe the viewing glass. Don’t apply the cleaner directly to the glass! Liquid could drip down into switch or motor circuits and cause erratic game operation.
Operation 2-5
NOTES
Operation 2-6
DIAGNOSTIC, AUDIT & ADJUSTMENT MENU SYSTEM
NOTICE: information in this manual is subject to change without notice. Midway reserves th right to make improvements in equipment function as pI ints.
Diagnostic, Audit & Adjustment Menu System 3-1
MENU SYSTEM
WHAT IS THE MENU SYSTEM? The game’s Menu System is a series of auditing, game adjustment and diagnostic screens. You can easily access and apply these screens to optimize game performance. For instance... e Use game audits screens to assess game performance. e Use adjustment screens to help you to customize game performance. For instance, you can restore factory default game settings. You can also calibrate player controls for accuracy. e Use diagnostic screens to verify proper equipment operation.
ACTIVATING THE MENU SYSTEM Open the coin door. Find the TEST MODE switch inside. Press TEST MODE to invoke the Menu System. The game system responds by exiting Game Mode and entering Diagnostic Mode. The system runs a brief self-test, and then displays the Operator Menu. The Operator Menu is the opening screen of the Menu System.
Game audits, adjustments and diagnostics are line items on the Operator Menu. Selecting an item opens its submenu. Every submenu presents various options that you may act upon.
© MIDWAY
DIAGNOSTICS MENU
AUDITS MENU
ADJUSTMENTS MENU
UTILITIES MENU
VOLUME ADJUSTMENT
CALIBRATE STEERING
OFF ROAD THUNDER 1999 Midway Home Entertainment Inc. All rights reserved. OFF ROAD THUNDER is a trademark of Midway Home Entertainment Inc. MIDWAY is a trademark of Midway Games Inc.
Press TEST to execute this command
OPERATOR MENU
Diagnostic, Audit & Adjustment Menu System 3-2
MENU LAYOUT Menus differ, but related information tends to occupy the same screen locations.
e The block at the top, center of each screen displays the current menu title.
e Data (menu items, video signals, statistics, reports, etc.) appears in the center of the screen.
e Game-operation information appears at the top-center of the screen, between logos.
e Messages (explanations, control functions, revision levels) display at the bottom of the screen.
MENU NAVIGATION CONTROLS Highlight a menu line item with the middle two diagnostic buttons inside the coin door. (Press VOLUME UP or VOLUME DOWN.) Select the option with the TEST MODE button. You can only select one highlighted item at a time. To return the game to play, first highlight START THE GAME. Then press TEST MODE. (This is the only menu that allows you to exit the Menu System.)
EQUIVALENT MENU NAVIGATION CONTROLS. In most cases, certain player panel buttons duplicate the functions of the diagnostic buttons. You may find menu navigation easier with the player panel buttons. Here are the player panel functions within the Menu System...
Player Panel Button Function Equivalent Diagnostic Switch
NITRO Select a menu item (None)
CHOPPER CAM Select a menu item TEST MODE eEnter Change Mode CRASH CAM Move down the menu VOLUME DOWN
SLAM CAM Move up the menu VOLUME UP
Various functions, including.... START eTo bottom of Operator Menu SERVICE CREDITS (for some functions) «Back to Operator Menu Cancel
Diagnostic, Audit & Adjustment Menu System 3-3
Operator Menu (continued) Diagnostics Menu
DIAGNOSTICS
Select DIAGNOSTICS MENU at the Operator Menu. The Diagnostics Menu helps you to verify the electrical and electronic condition of the game.
Highlight a line item with the middle two diagnostic buttons inside the coin door. Select the option with the TEST MODE button.
© MIDWAY
SWITCH TEST
LAMP TEST
MONITOR PATTERNS MENU
SOUND TEST
RETURN TO PREVIOUS MENU
Press TEST to return to previous menu
DIAGNOSTICS MENU
Diagnostic, Audit & Adjustment Menu System 3-4
Operator Menu (continued) Diagnostics Menu (continued) Switch Test Menu
SWITCH TEST
Select SWITCH TEST at the Diagnostics Menu. Use the Switch Test to verify crossed wires, intermittent conditions, and stuck switches.
Operate the switch and watch the screen display. After completing tests, press TEST MODE three times to return to the Diagnostics Menu.
</ DMIDWAY
Press TEST 3 times to return to previous menu
SWITCH TEST SCREEN
BUTTON TESTS check player and Diagnostic switches, such as CREDIT, TEST and SLAM CAM. Activate each button, and the screen indicator changes state. (Gray means off and green means on.) Release the button and the indicator returns to its previous state. A single indication on the screen should exactly duplicate each button change.
THE WHEEL TEST indicates the steering wheel position with a moving bar on a graph. The screen also displays a wheel position number. This number varies between zero (full left) and 255 (full right). THE GAS TEST indicates the gas pedal position with a moving bar on a graph. The screen also displays a pedal position number. This number varies between zero (full back) and 255 (full forward).
THE BRAKE TEST indicates the brake pedal position with a moving bar on a graph. The screen also displays a pedal position number. This number varies between zero (full back) and 255 (full forward).
Diagnostic, Audit & Adjustment Menu System 3-5
Operator Menu (continued) Diagnostics Menu (continued) Lamp Test Menu
LAMP TEST
Select LAMP TEST at the Diagnostics Menu. The Lamp Test allows you to check operation of game lamps. Use the test to check for burned-out bulbs, faulty lamp wiring, etc.
Highlight a test with the middle two diagnostic buttons inside the coin door. Select the option with the TEST MODE button. Pressing TEST MODE also lights the selected lamp.
MIDWAY
LEADER UPPER ON
LEADER LOWER ON SLAM CAM ON t AM ON -PER CAM ON
START ON
NITRO
TACHOME TER
SPEEDOMETER
ALL LIGHTS » RETURN TO PREVIOUS MENU
Press TEST to return to previous menu
LAMP TEST SCREEN
Lamp tests indicate the condition of game lamps. These include lamps in the control panel and overhead linking sign or optional header. (Unless your cabinet has header lights, the Leader Upper and Leader Lower tests have no effect.) For most tests, select a lamp name from the menu. Press TEST MODE (or CHOPPER CAM) to turn on the selected lamp. Press TEST MODE again to toggle the lamp off. The Tachometer and Speedometer tests operate slightly differently. These tests lights one LED for each press of TEST MODE. Press START, SLAM CAM or CRASH CAM to exit. Select ALL LIGHTS to switch on all controlled lamps simultaneously.
After completing tests, select RETURN TO PREVIOUS MENU. This action closes the Lamp Test Menu and reopens the Diagnostics Menu.
Diagnostic, Audit & Adjustment Menu System 3-6
Operator Menu (continued) Diagnostics Menu (continued) Monitor Patterns Menu
MONITOR PATTERNS TEST
Select MONITOR PATTERNS at the Diagnostics Menu. The Monitor Patterns routine provides test screens to verify monitor performance or make adjustments.
Highlight a test with the middle two diagnostic buttons inside the coin door. Select the option with the TEST MODE button.
NOTICE: Use an_ industrial-grade degaussing coil before attempting monitor adjustments.
MIDWAY
COLOR BAR
HAT
BLUE
GREEN
WHITE
BLACI
5@~% GRAY
Sy GRAY
» RETURN TO PREVIOUS MENU
Press TEST to return to previous menu
MONITOR PATTERNS MENU
Color Bars paint colored stripes on the screen. Use the color bars to help you to check or adjust monitor brightness and contrast. The color bars also expose defects in horizontal linearity. Each color bar consists of 16 intensity levels. On a properly adjusted monitor, the top 15 of these levels are visible. Each bar should appear sharp, clear, and distinct from bars on either side. Incorrect adjustment can cause missing detail at the top or bottom of a bar. Bent bars indicate horizontal linearity flaws, such as pie crust,
Diagnostic, Audit & Adjustment Menu System 3-7
pincushion or barrel distortion. (Correct color bar colors, left to right: Green, Red, Blue, Black, White, Yellow, Magenta, Cyan.) Set controls as follows: 1. Adjust BRIGHTNESS and CONTRAST to minimum. 2. Turn up BRIGHTNESS. until the pixels in the black stripe begin to glow (turn dark gray). 3. Bring up the CONTRAST control until you can see 15 bars. Then increase the contrast until you can’t distinguish a difference between the top two bars.
Crosshatch Patterns consist of an on-screen grid and a series of dots. Crosshatch Patterns help you to check or adjust several monitor parameters: These parameters include convergence, linearity, active viewing area and dynamic focus. The grid and the dots should be all white in color, with no fringes or parallel images. The lines should be straight and the dots round. For more detail on these adjustments, consult service literature from the monitor manufacturer.
Color Screen tests fill the screen with 100% of the chosen color at normal intensity. The Color Screen tests help you to check or adjust monitor intensity, black level, blanking and color purity. Each screen should be absolutely uniform from top to bottom and side to side. No retrace lines or noise should be visible. Color Screens may not hold their uniformity if the monitor degaussing circuit is defective.
If tests indicate a need for adjustment, use controls on the Monitor Remote Adjustment Board. You can make other adjustments from the back of the monitor.
White, Gray, and Black Screens fill the screen with black, gray or white at various intensities. These monochrome screens help you to check or adjust monitor convergence, purity, contrast and intensity. These screens also simplify black level and color gun control settings. The screens should be uniform with no color tints or distortion. No retrace lines or noise should be visible.
If tests indicate a need for adjustment, use controls on the Monitor Remote Adjustment Board.
Diagnostic, Audit & Adjustment Menu System 3-8
Operator Menu (continued) Diagnostics Menu (continued) Sound Test Menu
SOUND TEST
Select SOUND TEST at the Diagnostics Menu. The Sound Test verifies the operation of the sound hardware and speakers. Use the Sound Test to find crossed connections, incorrect phase, rattles, vibration, distortion, etc. The Sound Test screen reports information, but doesn’t permit changes.
Increase the master volume level before beginning this test.
Highlight a test with the middle two diagnostic buttons inside the coin door. Select the option with the TEST MODE button. Selecting also activates a sound tone. The tone continues to play until you once again press TEST MODE.
/ D MIDWAY
BEEP FRONT SPEAKER BEEP RIGHT SPEAKER RETURN TO PREVIOUS MENU
Press TEST to return to previous menu
SOUND TEST SCREEN
After choosing a speaker name, listen to the audio tone from that speaker. Only the specified speaker should produce sound. The other speakers should remain silent.
To exit the Sound Test Menu, highlight RETURN TO PREVIOUS MENU. Then press TEST MODE.
Diagnostic, Audit & Adjustment Menu System 3-9
Operator Menu (continued) Audits Menu
AUDITS MENU
Select AUDITS MENU at the Operator Menu. The Audits Menu permits you to review game play statistics. Additional menus provide detailed reports for each player position on game starts, ends, cabinet abuse, fault conditions, etc.
Highlight a line item with the middle two diagnostic buttons inside the coin door. Select the option with the TEST MODE button.
MIDWAY
RI TICAL AUDITS
STEM AL
PLAYER AL
AUDITS BY TRACK
AUDITS BY TRUCK
» RETURN TO PREVIOUS MENU
Press TEST to return to previous menu
GAME AUDITS MENU
Use the auditing information to help you to keep records of the game’s popularity and earnings. You may also analyze favorite tracks, most frequently used vehicles, and other statistics. These screens report information, but don’t permit changes.
Examine and record all game audit values before doing service or making repairs on this game.
NOTICE: Take care when clearing audit information. You can’t restore cleared data. If your audit data is important to you, back it up before proceeding. Use the OPTION SAVE AUDITS TO FLOPPY DISK on the Utilities Menu. To clear audits, use the Utilities Menu.
Diagnostic, Audit & Adjustment Menu System 3-10
Operator Menu (continued) Audits Menu (continued) Critical Audits Menu
CRITICAL AUDITS
Select CRITICAL AUDITS at the Audits Menu. The Critical Audits Menu reports general information about coin counts and game use. This menu reports information, but doesn’t permit changes.
© MIDWAY
CRITICAL AUDITS
CREDITS
PARTIAL CREDITS
BONUS CREDITS
GAME IN PROGRESS DURING LAST SHUTDOWN: NO
TIME SINCE LAST POWER-ON: 2 DAYS, 20:36:35
Press TEST or CREDIT to return to previous menu
CRITICAL AUDITS MENU
CREDITS and PARTIAL CREDITS permit you to assess currency collection. The other items present information on game operation.
BONUS CREDITS. A running total of bonus credits that the video game awarded to players.
GAME IN PROGRESS DURING LAST SHUTDOWN. Was the machine in Game-Play Mode when it entered Diagnostic Mode? This function answers the question.
TIME SINCE LAST POWER-ON. This function measures the period between power-ups. The clock starts counting whenever you switch off the video game machine.
Diagnostic, Audit & Adjustment Menu System 3-11
Operator Menu (continued) Audits Menu (continued) System Audits
SYSTEM AUDITS
Select SYSTEM AUDITS at the Audits Menu. The System Audits Menu reports general information about coin counts and game use. Coin Audits is a read-only screen.
To exit, press TEST MODE.
MIDWAY
SYSTEM AUDITS POWER ON TIME RACE TIME LINKED RACE TIME POWER ON TIME SINCE LAST RESET RACE TIME SINCE LAST RESET NUMBER OF RESETS NUMBER OF WATCHDOG RESETS NUMBER OF GAMES SINCE WATCHDOG RESET NUMBER OF GAMES SINCE PREVIOUS WATCHDOG RESET NUMBER OF DEMOS SINCE LAST GAME NUMBER OF LOST PLAYERS DURING A RACE NUMBER OF LOST LINKS DURING A RACE NUMBER OF RE-LINKS NUMBER FOR OUT OF SYNC GAMES LEFT COIN COUNT RIGHT COIN COUNT FOURTH COIN CO! BILL COUNT SERVICE CREDITS FREE CREDITS eooocececec coo CCCOCOf SS
Press TEST or CREDIT to return to previous menu
SYSTEM AUDITS MENU
The System Audits Menu reports total quantities of coins, bills or credits collected by each active device. The menu does not calculate the value of the collected currency.
This menu reports information, but does not permit you to make changes. To reset the coin, bill, and credit counters to zero, use the Clear Audits menu.
We recommend that you examine and record audit information before you make changes. Once you’ve cleared the counters, you can’t retrieve the previous data from the system.
THE COIN COUNT AND BILL COUNT items help you to assess currency collection. The other items present information on game operation.
RESET, LINK, AND SYNC statistics are measures of the game software’s ability to recover from conditions that adversely affect game play.
Diagnostic, Audit & Adjustment Menu System 3-12
Operator Menu (continued) Audits Menu (continued) Player Audits Menu
PLAYER AUDITS
Select PLAYER AUDITS at the Audits Menu. The Player Audits Menu displays additional information about player statistics and ability. This information assists you in understanding game use and profitability. Player Audits is a read-only screen.
© DMIDWAY
MANUAL
Press TEST or CREDIT to return to previous menu
PLAYER AUDITS MENU
GAMES PLAYED. Total number of games that players played on this machine.
CONTINUES. Total number of games on this machine that players paid to continue. FREE GAMES WON remains at zero if you turn off the bonus and award options. Refer to the General
Adjustments Menu for the bonus and award options settings. STARTS. Number of games that players started.
FREE GAMES “%. Proportion of games that were free, expressed as a percentage. TIME EXPIRES. Number of times that time expired before a player completed the game.
DID NOT FINISH. Number of incomplete games. FINISHES. Number of completed games.
TWO, THREE AND FOUR-PLAYER RACES remain at zero if no other games are linked to this one.
Diagnostic, Audit & Adjustment Menu System 3-13
Operator Menu (continued) Audits Menu (continued) Track Audits Menu
TRACK AUDITS
Select TRACK AUDITS at the Audits Menu. The Track Audits Menu includes specific information about player choices and ability. This is a read-only menu.
© MIDWAY
TRACK AUDITS
PAGE
a a a a a MANUAL a
TRUCK SELECTED WINNER Hyena 0 0 Outlaw General Thrasher Silver Streak Snake Eyes Chieftan Bad Omen Nitro Ninja sat Dust Devil Stinger eccoecoecocCCo
ise VOL+ o Est to view next page; U CREDIT to re n to previous menu
TYPICAL TRACK AUDITS MENU
These audits cover several screen pages. The name of the track appears at the top of the page. Press the VOLUME UP or VOLUME DOWN buttons to move through these pages.
Diagnostic, Audit & Adjustment Menu System 3-14
Operator Menu (continued) Audits Menu (continued) Truck Audits Menu
TRUCK AUDITS
Select TRUCK AUDITS at the Audits Menu. The Truck Audits Menu gives you specific information about player choices and ability. This is a read-only menu.
Menu software includes several pages of audits. The name of the vehicle appears at the top of each menu page. Press the VOLUME UP or VOLUME DOWN buttons to navigate through these pages.
/ D MIDWAY
AUDITS
@:80: @:88:
ise VOL+ o {EST to view next page; U CREDIT to re n to previous menu
TYPICAL AUDITS BY TRUCK SCREEN
Diagnostic, Audit & Adjustment Menu System 3-15
Operator Menu (continued) Adjustments Menu
ADJUSTMENTS MENU
Select ADJUSTMENTS MENU at the Operator Menu. The Adjustments Menu allows you to set game and player variables. Use these screens to optimize game performance and earnings.
Highlight an option with the middle two diagnostic buttons inside the coin door. Select the option with the TEST MODE button.
© MIDWAY
GENERAL ADJUSTMENTS MENU
LINKED —-PLAY ADJUSTMENTS MENU
TRACK DIFFICULTY ADJUSTMENTS MENU
PRICING MENU
VOLUME ADJUSTMENT
FORCE FEEDBACK ADJUSTMENT
CALIBRATE STEERING, GAS AND BRAKE
SET TIME AND DATE
RETURN TO PREVIOUS MENU
Press TEST to return to previous menu
ADJUSTMENTS MENU
Diagnostic, Audit & Adjustment Menu System 3-16
Operator Menu (continued) Adjustments Menu (continued) General Adjustments Menu
GENERAL ADJUSTMENTS MENU
Select GENERAL ADJUSTMENTS MENU at the Adjustments Menu. At the General Adjustments Menu, you set the cabinet type, game display and measurement system. General Adjustments Menu options also control the cost and type of play. Highlight an option with the middle two diagnostic buttons inside the coin door. Press TEST MODE to enter Change Mode. Use the diagnostic switches to change the variable. Then press TEST MODE to save changes and exit the variable.
MIDWAY
| FREE | PLAY | OFF | |||
| FREE | RACE | FOR | YES | ||
| FREE | ICE | FOR | 1ST | ¢LINKED> | 2 PLAYERS |
SHOW MILES R HOUR YES ADULT MODE ON RETURN TO PREVIOUS
Press TEST to retu to previous menu
GENERAL ADJUSTMENTS MENU
FREE PLAY determines whether the game accepts money for play, or allows operation without charge. For free play, turn this option on. For paid play, turn this option off (the factory default).
FREE RACE FOR 1°" permits a free game for players who finish in first place. To award a free race toa first-place finisher, turn this option on. To eliminate the free race award, turn this option off. The factory default is on.
FREE RACE FOR 1°" (LINKED). This feature awards a free game to the first place finisher among human players. The feature only operates when a minimum number of players join in. To award a free race to a first-place finisher, turn this option on. To eliminate the free race award, turn this option off. Available settings include 2, 3 or 4 players, or off. The factory default setting is off.
Diagnostic, Audit & Adjustment Menu System 3-17
SHOW MILES PER HOUR sets the measurement system for display on game screens. To display speed in kilometers per hour, turn SHOW MILES PER HOUR off. To display speed in miles per hour, turn SHOW MILES PER HOUR on (the factory default).
ADULT MODE. When you enable Adult Mode, the glamorous cheerleaders appear in bikinis. When you disable Adult Mode, the cheerleaders appear in more conservative attire. The default setting is on.
Diagnostic, Audit & Adjustment Menu System 3-18
Operator Menu (continued) Adjustments Menu (continued) Linked-Play Adjustments Menu
LINKED PLAY ADJUSTMENTS MENU
Select LINKED PLAY ADJUSTMENTS MENU at the Adjustments Menu. The Linked Play Adjustments Menu allows you to set the game cabinet network identity. After you cable the linked cabinets, use this menu to set up linked play.
Highlight an option with the middle two diagnostic buttons inside the coin door. Press TEST MODE to enter Change Mode. Use the diagnostic switches to change the variable. Then press TEST MODE to save changes and exit the variable.
FREE PLAY LINKED PLAY ENABLED UNIT ID (1-4): 4 MIDWAY
LINKED—-PLAY ADJUSTMENTS MENU
LINKED PLAY ON UNIT ID ¢€1-—4) UNIT #1 » RETURN TO PREVIOUS MENU
Press TEST to retu revious menu
LINKED-PLAY ADJUSTMENTS MENU
Before proceeding, bring up the Linked Play Adjustments Menu on all linked cabinets. LINKED PLAY. After you link a cabinet to other games, turn on LINKED PLAY. Now game electronics can communicate with other cabinets. To prohibit linked play, turn off the feature. The factory default is off.
UNIT ID determines the game’s address. Each linked game must have a unique number. Never use the same address for two cabinets. Sequence isn’t important. The factory default ID is 1. REINITIALIZE. After selecting the ID, exit the Menu System. Shut down each linked cabinet for one minute. (Leave the computers switched on.) Then restore power to all cabinets. The cabinets should initialize in Linked Mode. Verify linked operation by playing some linked games.
Diagnostic, Audit & Adjustment Menu System 3-19
Operator Menu (continued) Adjustments Menu (continued) Track Difficulty Adjustments Menu
TRACK DIFFICULTY ADJUSTMENTS MENU
Select TRACK DIFFICULTY ADJUSTMENTS MENU at the Adjustments Menu. From the Track Difficulty Adjustments Menu, you set how much skill players need to complete races.
Highlight an option with the middle two diagnostic buttons inside the coin door. Press TEST MODE to enter Change Mode. Use the diagnostic switches to change the variable. Then press TEST MODE to save changes and exit the variable.
MIDWAY
LIMIT FREE CE 15% BONUS START TIME @ sec. ONUS CHECKPOINT TIME @ sec.
ADJUST TRACK DIFFICULTIES MENU
RETURN TO PREVIOUS MENU
Press TEST to return to revious menu
TRACK DIFFICULTY ADJUSTMENTS MENU
LIMIT FREE RACES TO (LFRT) is the award cutoff point. LFRT prevents expert players from monopolizing a cabinet. The range is 1 to 100%. The factory default is 10%.
BONUS START TIME. You can use this feature to award several seconds of extra time to starting players. The factory default is zero seconds.
BONUS CHECKPOINT TIME. Use this feature to award several seconds of extra time as players pass checkpoints. The factory default is zero seconds.
ADJUST TRACK DIFFICULTIES MENU allows you to modify the level of challenge that each track poses.
Diagnostic, Audit & Adjustment Menu System 3-20
Operator Menu (continued) Adjustments Menu (continued) Track Difficulty Adjustments Menu (continued) Adjust Track Difficulties Menu
ADJUST TRACK DIFFICULTIES MENU
Select ADJUST TRACK DIFFICULTIES MENU at the Track Difficulty Adjustments Menu. From the Adjust Track Difficulties Menu, you modify the level of challenge that each track poses. You can also increase or reduce starting and checkpoint bonus time. Difficulty and bonus default values are all zero.
Highlight an option with the middle two diagnostic buttons inside the coin door. Press TEST MODE to enter Change Mode. Use the diagnostic switches to change the variable. Press TEST MODE to save changes and exit the variable. Or press TEST CREDITS to cancel changes and exit the variable.
You'll notice that each option line has three columns of figures to change. The program lets you edit each column in turn. First you modify BASE DIFFICULTY, then START BONUS, and last, CHECKPOINT BONUS.
© D MIDWAY
B ste CHECKPOINT TRACK c NAME
Tunnel Vision Over ‘N’ Under Air Time High Octane Carnie of Chaos Cliffhanger Double Barrel Alpine Air Tunnel Vision Mirror Over ‘N’ Under Mirror Airtime Mirror High Octane Mirror Carnie of Chaos Mirror Cliffhanger Mirror Double Barrel Mirror Alpine Air Mirror
Press TEST to return to previous menu
ADJUST TRACK DIFFICULTIES MENU
Diagnostic, Audit & Adjustment Menu System 3-21
Operator Menu (continued) Adjustments Menu (continued) Pricing Menu
PRICING MENU
Select PRICING MENU at the Adjustments Menu. The Pricing Menu contains options for selecting standard and custom currency combinations. The factory default is USA1.
Highlight an option with the middle two diagnostic buttons inside the coin door. Press TEST MODE to enter Change Mode. Use the diagnostic switches to change the variable. Then press TEST MODE to save changes and exit the variable. Turning on Free Play disables Pricing Menu settings.
MIDWAY
SELECT CUSTOM PRICING CURRENT PRICING: USA 3
SELECT ST DARD PRI<¢ G EFT_UNIT g T UNI RESET TO FAULTS
RETURN TO PREVIOUS MENU
MIN UNITS
COIN OIN
Press TEST to return to previous menu
PRICING MENU
SELECT CUSTOM PRICING allows you to set coin and credit options manually. Use this option to create your own pricing schemes. This menu permits changes to default values.
SELECT STANDARD PRICING allows you to select from several ready-made price schemes This menu permits changes to default values.
RESET TO DEFAULTS returns the price settings to factory default values. This menu permits changing all current values at once.
Diagnostic, Audit & Adjustment Menu System 3-22
Operator Menu (continued) Adjustments Menu (continued) Pricing Menu (continued) Select Custom Pricing Menu
SELECT CUSTOM PRICING MENU
Choose SELECT CUSTOM PRICING at the Pricing Menu. The Select Custom Pricing Menu permits you to program and use your own pricing table. You can save several pricing schemes and chose between them as desired.
Highlight an option with the middle two diagnostic buttons inside the coin door. Press TEST MODE to enter Change Mode. Use the diagnostic switches to change the variable. Then press TEST MODE to save changes and exit the variable.
MIDWAY
CUSTOM PRICING [=]
MIN UNITS
COINS PER BILL
SHOW CREDIT FR¢
LEFT COIN RIGHT col 1] 1] a 7] L)
@ L]
@
@
L)
F
i] 1] @ a L]
L ENCY
RETURN TO PREVIOUS MENU
Press TEST to return to previous menu
TYPICAL SELECT CUSTOM PRICING MENU
The Custom Pricing Menu employs the same terms that appear on the Current Pricing Table. See the table below for definitions of these terms.
Diagnostic, Audit & Adjustment Menu System 3-23
PRICING MENU TERMS SCREEN TERM DISCUSSION
Slot Units; Cyber-currency. This adjustment assigns a number of “units” to each coin mechanism Bill Validator (DBV) or bill acceptor. For instance, if a quarter buys 1 unit, then $1 buys 4 units. (See Coins Units per Bill.) You insert a coin into a 1-unit coin acceptor. The system, due to its programming, knows that your coin is worth one unit. Units per Credit How many units equal one credit. (Units buy credit, the price of one game.) Units per Bonus Units awarded when a player earns a bonus. Minimum Units Until this many units accumulate, the system awards no credits. Credits to Start Number of games a player must purchase to begin play. Credits to Continue Number of games a player must purchase to resume play. Max Credits Limits the number of credits that the game will accept. Coins per Bill How many coins one bill is worth.
BASIC CUSTOM PRICING. Custom pricing creates an imaginary currency exchange. In this currency exchange, the coins of the realm are “units.” Think of units as a type of cyber-currency, useful only within the game software. By inserting coins, you purchase units.
Since units are only negotiable within game software, the system stores your units for you. When the system receives enough units, it buys a game for you. The price of a game is one “credit.” You can think of credits as a second form of cyber-currency.
Even though you’ve now bought one game, you may not be able to begin playing. In many pricing schemes, you must buy two or more credits to begin play. The idea here is something like a minimum order of goods at a store. That is, the operator can “shrink-wrap” two or more games in a package. You can’t play unless you buy the entire package.
1 / 25¢ COIN; 1 CREDIT TO START. In a simple, quarter pricing scheme, the player inserts one coin to buy one unit. The system exchanges that unit for one credit. If CREDITS TO START contains the value one, then play commences. A dollar bill buys four units.
| Left Slot Units | Validator Units | Units / Credit | Credits to Start | Coins / Bill |
| 4 | 4 | 4 | 1 | 4 |
e1 / 3 X 25¢; 2 CREDITS TO START. Again, assuming quarter slots, here’s one way to implement 75¢ pricing... In this scheme, each coin that the player inserts buys one unit. The system exchanges three units for one credit. CREDITS TO START contains the value two. To play, the player must pay for two credits. In this scheme, a dollar buys four units.
| Left Slot Units | Validator Units | Units / Credit | Credits to Start | Coins / Bill |
| 1 | 4 | 3 | 2 | 4 |
e2 / 1 COIN; 6 CREDITS TO START. Now let’s consider a more unusual pricing scheme. Here, the player can buy two units with one coin. The system exchanges each of these units for one credit. Notice that CREDITS TO START contains the value six. To play, the player must insert two more coins to pay for six credits. Also notice that if the player pays with a bill, the system throws in an extra unit.
| Left Slot Units | Validator Units | Units / Credit | Credits to Start | Coins / Bill |
| 2 | 9 | 1 | 6 | 4 |
Diagnostic, Audit & Adjustment Menu System 3-24
Operator Menu (continued) Adjustments Menu (continued) Pricing Menu (continued) Select Standard Pricing Continent Menu
SELECT STANDARD PRICING CONTINENT MENU
Choose SELECT STANDARD PRICING at the Pricing Menu. The Select Standard Pricing Continent Menu allows you to choose the continent that you are operating in.
Highlight a line item with the middle two diagnostic buttons inside the coin door. Select the option with the TEST MODE button.
MIDWAY
NORTH AMERICA
SOUTH AMERICA
EUROPE AZH
EUF
AUSTRALIA
RETURN TO PREVIOUS MENU
Press TEST to return to previous menu
STANDARD PRICING MENU
Diagnostic, Audit & Adjustment Menu System 3-25
Operator Menu (continued) Adjustments Menu (continued) Pricing Menu (continued) Select Standard Pricing Continent Menu Select Standard Pricing Country for North America Menu
SELECT STANDARD PRICING COUNTRY FOR NORTH AMERICA MENU
Choose a continent (NORTH AMERICA, for example) at the Select Standard Pricing Continent Menu. The Select Standard Pricing Country for North America Menu contains options for selecting standard currency combinations. You may use standard pricing schemes as-is, or customize them.
Highlight a line item with the middle two diagnostic buttons inside the coin door. Select the option with the TEST MODE button.
MIDWAY
CANADA
» RETURN TO PREVIOUS MENU
Press TEST to return to previous menu
TYPICAL SELECT STANDARD PRICING FOR NORTH AMERICA MENU
Diagnostic, Audit & Adjustment Menu System 3-26
Operator Menu (continued) Adjustments Menu (continued) Pricing Menu (continued) Select Standard Pricing Continent Menu (continued) Select Standard Pricing Country for North America Menu (cont’d) Select Standard Pricing Table for USA Menu (cont’d)
SELECT STANDARD PRICING MENU
Suppose that you want to set U.S. pricing. Choose USA at the menu entitled Select Standard Pricing Country for North America. This menu contains options for selecting standard U.S. currency combinations.
Highlight an option with the middle two diagnostic buttons inside the coin door. Press TEST MODE to enter Change Mode. Use the diagnostic switches to change the variable. Then press TEST MODE to save changes and exit the variable.
MIDWAY
| SELECT STANDARD PRICING TABLE for USA CURRENT PRICING: USA 3
Se NTS 1
USA ECA
RETURN TO PREVIOUS MENU
TYPICAL VIEW CURRENT PRICING DISPLAY
Diagnostic, Audit & Adjustment Menu System 3-27
STANDARD PRICING TABLE
| NAME | START | CONTINUE | CREDITSICOIN | COIN’ | [COIN2 | [COINS [ COIN4 | BILL | ||
| ANTILLES | 2 | 2 | 1/25¢, 4G | 25¢ | 1G | ||
| ‘AUSTRALIA 1 | 2 | 2 | 1/3X20¢, 2/S7.00 | 20¢ | $1.00 | ||
| AUSTRALIA 2 | 2 | 2 | 1/5X20¢, 1/$1.00 | 20¢ | $1.00 | ||
| AUSTRIA 1 | 2 | 2 | 4/5Sch, 210Sch | 5Sch_ | 10 Sch | |||
| AUSTRIA 2 | 2 | 2 | 4/2X5Sch, 3/2X10Sch | 5Sch__| | 10 Sch | ||
| BELGIUM 1 | 2 | 2 | 7720BF | 20BF | 20BF | |||
| BELGIUM 2 | 2 | 2 | 3/20BF | 208F | 20BF | |||
| BELGIUM 3 | 2 | 2 | 2120BF | 20BF | 20BF | |||
| BELGIUM ECA | 2 | 2 | 1/20BF | soBr_ | 208F | SBF | |||
| CANADA 1 | 2 | 2 | 172x25¢, 3781 | 25¢ | 25¢ | ||
| CANADA 2 | 2 | 2 | 1/2x 25¢,3/$1 | 25¢ | $1.00 | ||
| CANADA 3 | 2 | 2 | 3/ $1.00, 6 / | $2.00 | $1.00 | $2.00 | ||
| CANADA ECA | 2 | 2 | 1/2x 25¢,3/$1 | 25¢ | $1.00 | $2.00 | ||
| DENMARK | 2 | 2z | S/SDKr, 7ODKr | SDKr__| | 10DKr | ||
| FINLAND | 2 | 2 | a/Fmk_ | iFmk___| | 5Fmk | ||
| FRANCE 1 | 2 | 2 | 2ISFr, 5/10Fr | SFr | 10Fr | ||
| FRANCE 2 | 2 | 1 | 2I5Fr, 4/10Fr | SFr | 10Fr | ||
| FRANCE 3 | 2 | 1 | 115Fr, 3/10Fr | SFr | 10Fr | ||
| FRANCE 4 | 2 | 1 | 15Fr, 210Fr | SFr | 10Fr | ||
| FRANCE 5 | 2 | 1 | 2I5Fr, 5/10Fr, 11/2 X 10Fr | SFr | 10Fr | ||
| FRANCE 6 | 2 | 1 | 2ISFr, 4/10Fr, 9/2 X 10Fr | SFr | 10Fr | ||
| FRANCE 7 | 2 | 1 | 415Fr, 3/10Fr, 7/2 X 10Fr | SFr | 10Fr | ||
| FRANCE 8 | 2 | 1 | 15Fr, 2/10F r, 5/2 X 10Fr | SFr | 10Fr | ||
| FRANCE 9 | 2 | 1 | 113 X 4Fr, 2/5Fr | 1Fr | SFr | ||
| FRANCE 10 | 2 | 1 | 1/2 X 4Fr, 3/5Fr | 1Fr | SFr | ||
| FRANCE 11 | 2 | 1 | 413 X 4Fr, 2/5Fr, 5/2 X SFr | 1Fr | SFr | ||
| FRANCE 12 | 2 | 1 | 1/2 X 1Fr, 3/5Fr, 7/2 X SFr | 4Fr | SFr | ||
| FRANCE ECA 1 | 7 | 7 | 2ISFr, S/10Fr | Fr | SFr | 10Fr | 20Fr |
| FRANCE ECA 2 | 1 | 1 | 2I5Fr, 4/10Fr | 1Fr | SFr | 10Fr | 20Fr |
| FRANCE ECA 3 | 1 | 1 | 1/5Fr, 3/10Fr | 1Fr | SFr | 10Fr | 20Fr |
| FRANCE ECA 4 | 1 | 1 | 115Fr, 210Fr | 1Fr | SFr | 10Fr | 20Fr |
| FRANCE ECA 5 | 1 | 1 | 2ISFr, 5/10Fr, 11/2 X 10Fr | 1Fr | SFr | 10Fr | 20Fr |
| FRANCE ECA 6 | 1 | 1 | 2ISFr, 4/10Fr, 9/2 X 10Fr | 1Fr | SFr | 10Fr | 20Fr |
| FRANCE ECA 7 | 1 | 1 | 45Fr, 3/10Fr, 7/2 X 10Fr | 1Fr | SFr | 10Fr | 20Fr |
| FRANCE ECA 8 | 1 | 1 | 1/5Fr, 2/10Fr, 5/2 X 10Fr | 1Fr | SFr | 10Fr | 20Fr |
| FRANCE ECA 9 | 1 | 1 | 113 X Fr, 2/5Fr | 1Fr | SFr | 10Fr | 20Fr |
| FRANCE ECA10 | 1 | 1 | 1/2 X 4Fr, 3/5Fr | 1Fr | SFr | 10Fr | 20Fr | |
| FRANCE ECA11 | | 1 | 1 | 4113 X 4Fr, 2/5Fr, 5/10Fr | 1Fr | SFr | 10Fr | 20Fr |
| FRANCE ECA12 | 1 | 1 | 1/2 X 4Fr, 3/5Fr, 7 0Fr | 1Fr | SFr | 10Fr | 20Fr | |
| FRANCE ECA13__ | 4 | 1 | 4/M0F r, 2/20Fr, 4/30Fr | 4Fr | Ser | 10Fr | 20Fr | |
| FREE PLAY | = | = | = | None | [None [| None | None | None | ||
| GERMANY 7 | 2 | 2 | 771DM, 6/5DM | DM | SDM | ||
| GERMANY 2 | 2 | 1 | 4/1DM, 7/5DM | 1DM | 5DM | ||
| GERMANY 3 | 2 | 1 | 4/1DM, 8/5DM | 1DM | 5DM | ||
| GERMANY 4 | 2 | 1 | 1/1DM, 5/5DM | 1DM | 5DM | ||
| GERMANY 5 | 2 | 1 | 4/1DM, 6/5DM | 1DM | 5DM | ||
| GERMANY ECA1 | 2 | 2 | 1/1DM, 2/2DM, 6/5DM | 1DM | 20M | 5DM | ||
| GERMANY ECA2 | 2 | 1 | 1/1DM, 2/2DM, 6/5DM | 1DM | 2DM | 5DM | ||
| GERMANY ECA3 | 1 | 1 | 1/1DM, 2/2DM, 6/5DM | 1DM | 2DM | 50M | ||
| HUNGARY | 2 | 2 | T2X10Ft, 3/2X20Ft | 70Ft | 20Ft | ||
| TTALY | 2 | 2 | 1/500LIt | Boout | S00Lit | |||
| JAPAN 1 | 2 | 2 | 1100Yen | 100 | 100 | ||
| JAPAN 2 | 2 | 2 | 2/400Yen | 100 | 100 | ||
| NETHERLANDS | 2 | 2 | TAFT, 372.5HFI | THFI | 25HFI | |||
| NEW ZEALAND 1 | 1 | 1 | 181 | 37 | $2 | |||
| NEW ZEALAND 2_ | 1 | 1 | 2181 | St | $2 | |||
| NORWAY | 2 | 2 | 3ISNKr, 6IONKr | SNKr__[_40NKr | |||
| SPAIN 1 | 2 | 2 | 1/100Pta, 6/500Pta | T00Pta_| | S00Pta | ||
| SPAIN 2 | 2 | 2 | 1/100Pta, 5/500Pta | 100Pta_| | s00Pta | ||
| SWEDEN, | 2 | 2 | TX1SKr, 25SKr | iSKr_| | 58Kr | ||
| SWITZERLAND 1 | 2 | 2 | 1/ASFr, 6/5SFr | SFr | | 5SFr | |||
| SWITZERLAND 2 | 2 | 2 | 1/1SFr, 7/SSFr | 1SFr | | SSFr | |||
| SWITZERLAND 3_| | 2 | 2 | 1/1SFr, 8/5SFr | 1sFr__ | | 5SFr |
(Table continues on next page)
Diagnostic, Audit & Adjustment Menu System 3-28
STANDARD PRICING TABLE, continued
NAME START CONTINUE | CREDITS/COIN COIN 1 COIN 2 COIN 3 COIN4 BILL UKECA 1 1 1 1/50p, 3/£1.00 £1.00 50p 20p 10p £2.00 UK ECA 2 1 1 1/50p, 2/£1.00 £1.00 50p 20p 10p £2.00 UKECA3 1 1 1730p, 2/50p, 5/£1.00 £1.00 ‘S0p 20p 40p £2.00 UK4 1 1 1/50p, 3/£1.00 £1.00 50p UK5 1 1 1/50p, 2/£1.00 £1.00 50p UK ECA6. 1 1 1/30p, 2/50p, 4/£1.00 £1.00 50p 20p 40p £2.00 UK ECA 7. bi 1 3/£1.00 £1.00 50p 20p 10p £2.00 UK ECA 8 1 1 1/50p, 2/£1.00, 4/£2.00 £1.00 50p 20p 10p £2.00
| USA1 2 2 1/25¢ | 25¢ 25¢ | $1.00 |
| USA2 r 4 1 1/25¢ | 25¢ 25¢ | $1.00 |
| USA3 1 1 1/25¢ | 25¢ 25¢ | $1.00 |
| USA4 1 1 1/50¢, 3/$1.00 | 25¢ 25¢ | $1.00 |
| USAS 2 1 1/50¢, 4/$1.00 | 25¢ 25¢ | $1.00 |
| USA6 1 1 1/50¢ | 25¢ 25¢ | $1.00 |
| USA7 1 1 1/50¢, 3/$1.00 | 25¢ 25¢ | $1.00 |
| USA8 2 2 1/50¢, 4/$1.00 | 25¢ 25¢ | $1.00 |
| USA9 3 2 1/25¢, 4/$1.00 | 25¢ 25¢ | $1.00 |
| USA10 3 3 1/25¢, 4/$1.00 | 25¢ 25¢ | $1.00 |
| USA11 4 2 1/25¢, 4/$1.00 | 25¢ 25¢ | $1.00 |
| USA12 4 3 1/25¢, 4/$1.00 | 25¢ 25¢ | $1.00 |
| USA13 4 4 1/25¢, 4/$1.00 | 25¢ 25¢ | $1.00 |
USA ECA 3 3 1/25¢, 4/$1.00 $1.00 25¢ 10¢ O5¢ $1.00
Diagnostic, Audit & Adjustment Menu System 3-29
Operator Menu (continued) Adjustments Menu (continued) Volume Adjustment Menu
VOLUME ADJUSTMENT MENU
Select VOLUME ADJUSTMENT at the Adjustments Menu. (You can also access this menu from the Operator Menu.) The Volume Adjustment Menu allows you to adjust relative sound volume levels.
Highlight an option with the middle two diagnostic buttons inside the coin door. Press TEST MODE to enter Change Mode. Use the diagnostic switches to change the variable. Then press TEST MODE to save changes and exit the variable.
MIDWAY
MASTER VOLUME — i d| 4
ATTRACT VOLUME — ] 48
MINIMUM VOLUME —_ | 20
SOUND SAMPLE MUSIC 1
» RETURN TO PREVIOUS MENU
Press TEST to return to previous menu
VOLUME ADJUSTMENT MENU
NOTICE: The Master Volume setting affects all other volume adjustments. You can still alter Attract sounds in relation to normal game sound. For example, suppose that you set Attract Mode volume to 50%. Then Attract Mode sounds are half as loud as normal game sounds.
NOTICE: Check the Master Volume setting before testing. Increase Master Volume to fully test speakers. Restore Master Volume to its previous level before returning to Game-Over Mode.
Diagnostic, Audit & Adjustment Menu System 3-30
MASTER VOLUME sets the overall volume level during game play. This value simultaneously affects all other sound settings. The range is 1 to 100%. The factory default is 60%.
ATTRACT VOLUME adjusts the Attract Mode sound level only when you turn on Attract Mode. The Attract Mode sound level is independent of game audio levels. The Attract Volume range is 1 to 100%. The factory default is 50%.
MINIMUM VOLUME sets the quietest sound level during game play. The range is 1 to 100%. The factory default is 20%.
To exit the Volume Adjustment Menu, highlight RETURN TO PREVIOUS MENU. Then press TEST MODE.
Diagnostic, Audit & Adjustment Menu System 3-31
Operator Menu (continued) Adjustments Menu (continued) Force Feedback Adjustment Menu
FORCE FEEDBACK ADJUSTMENT
Select FORCE FEEDBACK ADJUSTMENT MENU at the Adjustments Menu. The Force Feedback Adjustment Menu allows you to alter the intensity of steering wheel feedback.
Highlight an option with the middle two diagnostic buttons inside the coin door. Press TEST MODE to enter Change Mode. Use the diagnostic switches to change the variable. Then press TEST MODE to save changes and exit the variable.
© MIDWAY
INTENSITY — |
Press TEST to return to previous menu
FORCE FEEDBACK ADJUSTMENT MENU
THE INTENSITY ADJUSTMENT ranges from 0% (minimum) to 100% (maximum). The factory default setting is 60%. If players have superior upper body strength, apply greater force. Younger players may be more comfortable with smaller force settings.
THE FORCE FEEDBACK CENTER TEST checks operation of steering wheel motor drive circuits. Select this option and move the steering wheel to any position. As soon as you release the wheel, it must automatically return to its center position. If it doesn’t, then the vehicle won't respond properly.
Diagnostic, Audit & Adjustment Menu System 3-32
Operator Menu (continued) Adjustments Menu (continued) Calibrate Steering, Gas and Brake Menu
CALIBRATE STEERING, GAS AND BRAKE
Select CALIBRATE STEERING, GAS AND BRAKE at the Adjustments Menu. (You can also access this menu from the Operator Menu.) This option allows you to set steering and throttle mechanisms for optimum control during game play. Poorly calibrated player controls can reduce profits.
NOTICE: Before calibrating player control switches, make needed repairs to the game. If you plan to move the game, move it before calibrating player control switches.
To set up each calibration procedure, follow screen directions. Press TEST MODE to begin the procedure.
MIDWAY
= PRESS TEST TO BEGIN CALIBRATION OR CREDIT TO EXIT.
MOVE STEE h WHEEL CENTER AND GF ES TEST ELEASE CONT INUE .
MOVE ST >, Gas Y THE IF FULL . Ss T CCEPT.
WHEEL
LEFT
STEERING, GAS AND BRAKE CALIBRATION SCREEN
The steering wheel, brake and gas pedal couple to potentiometers. These potentiometers output DC voltages between zero and five volts. Game electronics digitize this analog output into an eight-bit (256value), numeric stream. Watch the numbers on the calibration screen. These numbers vary to indicate a control’s position within that control's range of motion. For instance, steering straight ahead produces a number halfway between the left and right steering limits. To accurately simulate steering, numbers must change sequentially. Diagnostic, Audit & Adjustment Menu System 3-33
Operator Menu (continued) Adjustments Menu (continued) Set Time and Date Menu
SET THE TIME AND DATE
Select SET TIME AND DATE at the Adjustments Menu. The Set Time and Date Menu provides the current date and time for the game. This screen also allows clock adjustments for time zone changes and seasonal time changes.
Highlight an option with the middle two diagnostic buttons inside the coin door. Press TEST MODE to enter Change Mode. Use the diagnostic switches to change the variable. Then press TEST MODE to save changes and exit the variable.
MIDWAY
HOUR 8 pm MINUTES @1 SECONDS 46 MONTH Jun TE 3 YEAR 1999
» RETURN TO PREVIOUS MENU
8:61:46 pm, Thu, Jun 3,
Press TEST to return to previous menu
SET TIME AND DATE MENU
The clock assists in providing accurate game statistics. It doesn’t affect game operation. When the circuit board isn’t receiving external power, the clock runs until the battery fails.
Diagnostic, Audit & Adjustment Menu System 3-34
Operator Menu (continued) Utilities Menu
UTILITIES MENU
Select UTILITIES MENU at the Operator Menu. The Game Utilities Menu permits you to clear game credits, player statistics, and game audits. Here, you restore game settings to factory defaults or save audit data. A confirmation screen appears before you finalize changes.
Highlight an option with the middle two diagnostic buttons inside the coin door. Press TEST MODE to enter Change Mode. Use the diagnostic switches to change the variable. Then press TEST MODE to save changes and exit the variable.
©) MIDWAY
CLEAR CREDITS
RESET OPERATOR SETTINGS
RESET HIGH SCORES AND SPLIT TIMES
RESET AUDIT STATS
FULL FACTORY RESTORE
SAVE AUDITS TO FLOPPY DISK
RETURN TO PREVIOUS MENU
Press TEST to return to previous menu
UTILITIES MENU
CLEAR CREDITS zeros all credit variables.
RESET OPERATOR SETTINGS returns Adjustments Menu variables to factory default values.
RESET HIGH SCORES AND SPLIT TIMES overwrites the player high scores with factory default data.
RESET AUDIT STATS zeros track and truck audit values.
FULL FACTORY RESTORE resets all variables above to factory default values. A confirmation screen appears before you finalize changes.
Diagnostic, Audit & Adjustment Menu System 3-35
SAVE AUDITS TO FLOPPY DISK allows you to copy game data to a disk. Comparing audit data over time demonstrates the effect of game variable changes on profits. Use a formatted, 1.44MB high-density diskette. The floppy drive is in the CPU cabinet.
NOTICE: Be careful when clearing audit information. Once you clear data, you can’t restore it. Use the Save Audits to Floppy Disk option to save data for analysis. To clear audit registers, use the Reset or Full Factory Restore functions.
MIDWAY
SET OPERATE SETTINGS
ET HIGH SCOR AND SPLIT TIME
ET AUDIT ST
» FULL FACTORY RE
AVE AUDITS TO
RETURN TO PREVI
Use VOL- and YOL+ to select; TEST to accept; CREDIT to cancel
A CONFIRMATION SCREEN APPEARS BEFORE YOU FINALIZE CHANGES
Diagnostic, Audit & Adjustment Menu System 3-36
Operator Menu (continued) Volume Adjustment Menu
VOLUME ADJUSTMENT MENU
Select VOLUME ADJUSTMENT at the Operator Menu. (You can also access this menu from the Adjustments Menu.) The Volume Adjustment Menu allows you to adjust relative sound loudness levels. Highlight an option with the middle two diagnostic buttons inside the coin door. Press TEST MODE to enter Change Mode. Use the diagnostic switches to change the variable. Then press TEST MODE to save changes and exit the variable.
MIDWAY
MASTER VOLUME — | 40
ATTRACT VOLUME — ] 46
MINIMUM VOLUME = | 2@
SOUND SAMPLE MUSIC 1
>» RETURN TO PREVIOUS MENU
Press TEST to return to previous menu
VOLUME ADJUSTMENT MENU
NOTICE: The Master Volume setting affects all other volume adjustments. You can still alter Attract sounds in relation to normal game sound. For example, suppose that you set Attract Mode volume to 50%. Then Attract Mode sounds are half as loud as normal game sounds.
NOTICE: Check the Master Volume setting before testing. Increase Master Volume to fully test speakers. Restore Master Volume to its previous level before returning to Game-Over Mode.
MASTER VOLUME sets the overall volume level during game play. This value simultaneously affects all other sound settings. The range is 1 to 100%. The factory default is 60%.
Diagnostic, Audit & Adjustment Menu System 3-37
ATTRACT VOLUME adjusts the Attract Mode sound level only when you turn on Attract Mode. The Attract Mode sound level is independent of game audio levels. The Attract Volume range is 1 to 100%. The factory default is 50%.
MINIMUM VOLUME sets the quietest sound level during game play. The range is 1 to 100%. The factory default is 20%.
To exit the Volume Adjustment Menu, highlight RETURN TO PREVIOUS MENU. Then press TEST MODE.
Diagnostic, Audit & Adjustment Menu System 3-38
Operator Menu (continued) Calibrate Steering, Gas and Brake Menu
CALIBRATE STEERING, GAS AND BRAKE
Select CALIBRATE STEERING, GAS AND BRAKE at the Operator Menu. (You can also access this menu from the Adjustments Menu.) This option allows you to set steering and throttle mechanisms for optimum control during game play. Poorly calibrated player controls can reduce profits.
NOTICE: Before calibrating player control switches, make needed repairs to the game. If you plan to move the game, move it before calibrating player control switches.
To set up each calibration procedure, follow screen directions. Press TEST MODE to begin the procedure.
MIDWAY
= PRESS TEST TO BEGIN CALIBRATION OR CREDIT TO EXIT. MOVE ERING WHEEL TO _ CENTER IND E
THROUC sT TO ACK
STEERING, GAS AND BRAKE CALIBRATION SCREEN
The steering wheel, brake and gas pedal couple to potentiometers. These potentiometers output DC voltages between zero and five volts. Game electronics digitize this analog output into an eight-bit (256value), numeric stream.
Watch the numbers on the calibration screen. These numbers vary to indicate a control’s position within that control's range of motion. For instance, steering straight ahead produces a number halfway between the left and right steering limits. To accurately simulate steering, numbers must change sequentially.
Diagnostic, Audit & Adjustment Menu System 3-39
NOTES
Diagnostic, Audit & Adjustment Menu System 3-40
WIRING & CIRCUIT INFORMATION
NOTICE: The term VGM refers to the video game machine.
Wiring & Circuit Information 4-1
Harness Connector Prefixes
Connector Location Example Arcade Computer 1P1
Magic Bus Interface Board 3P1 Fluorescent Lamp 4P1 Power Supply 5P1 Video Monitor 6P1 Wheel Driver Board 7P1 Coin Door Area 8P1 BB12 Audio Board 9P1 LED Interconnect Board Cabinet Optional Overhead Marquee Dashboard Gas Pedal & Brake Upper Speakers Seat Speaker Dash LED Board Subwoofer Driver Board
NOTICE: Look for the connector prefix on wiring diagrams. The prefix shows you where you'll find the connector.
Wiring & Circuit Information 4-2
This page is a drawing, shown as the original scan.
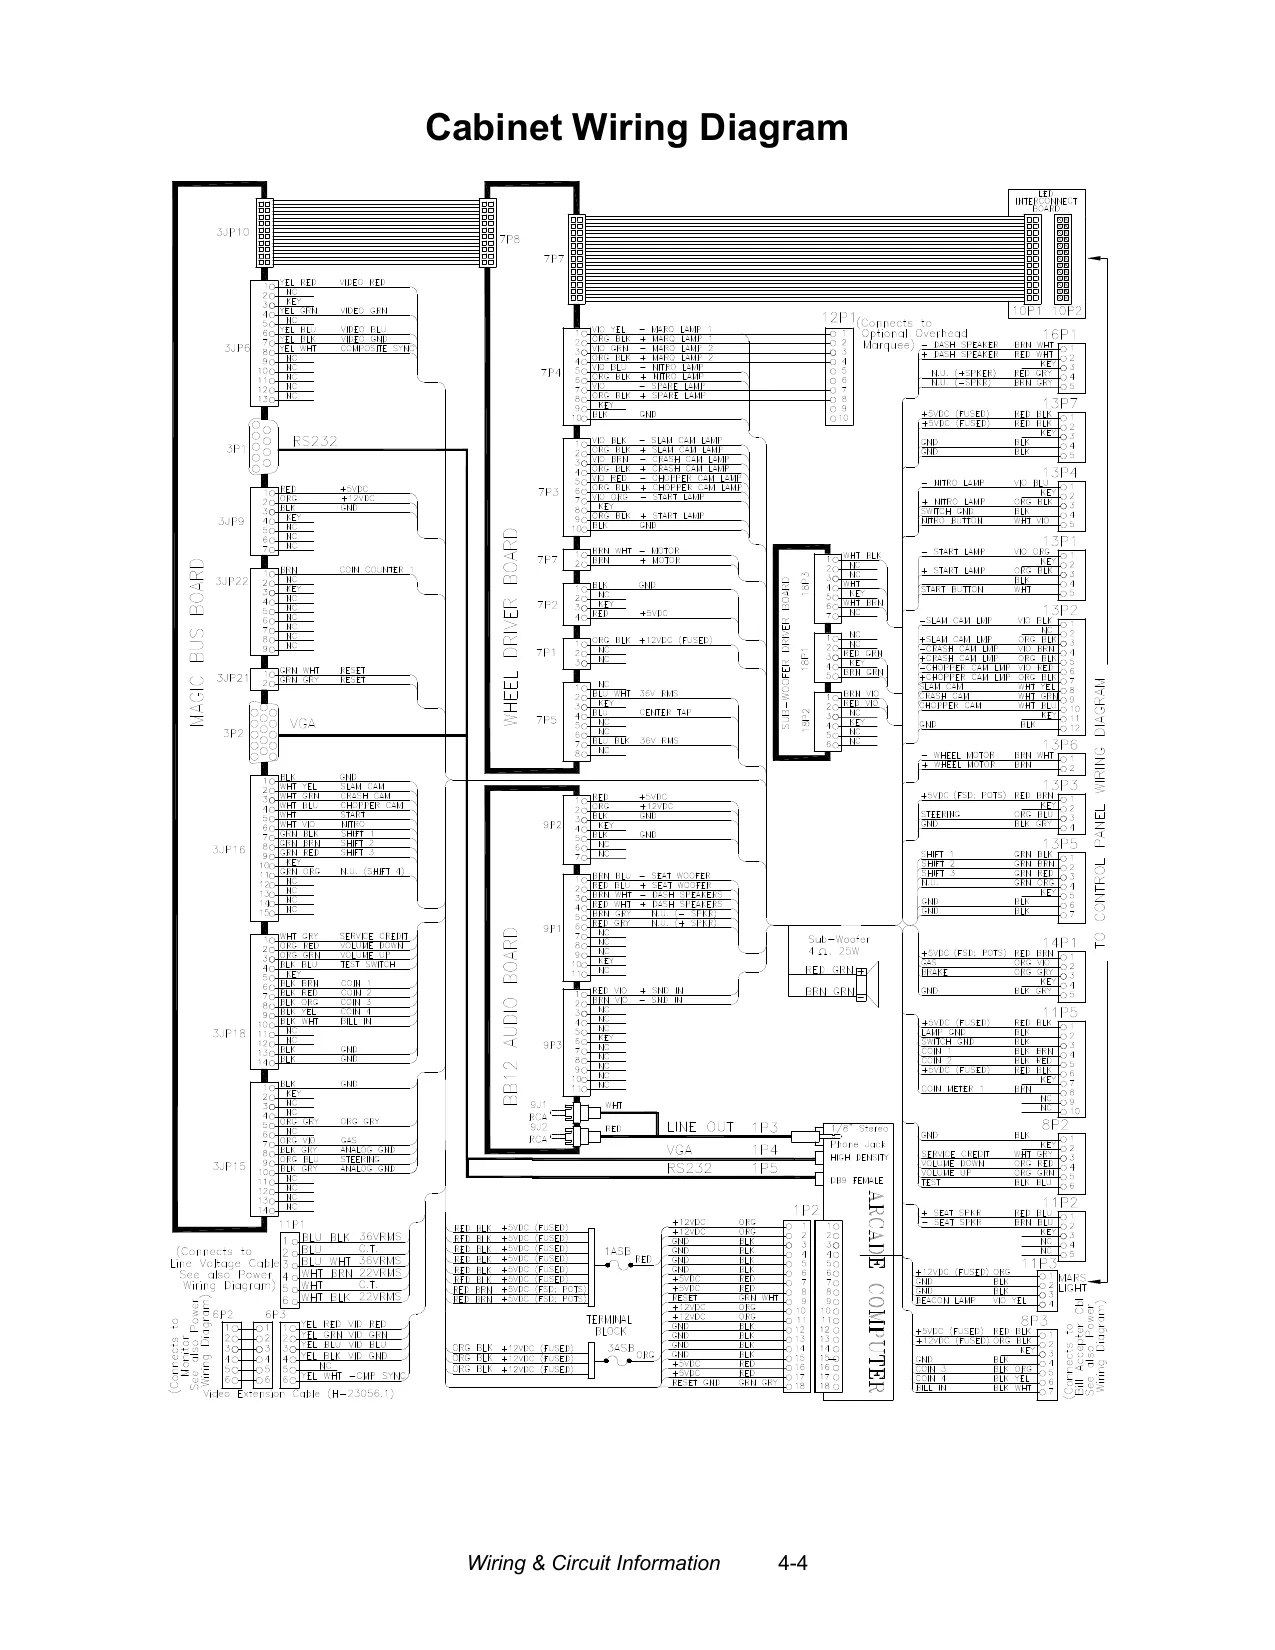
This page is a drawing, shown as the original scan.
Player Panel Wiring Diagram
EMBL
tart Lamp 24
PAL GRN BL SHIFT EAT SPEAKER ANL NER HIE SPLE. H— A RED HIE
| i | REP vb | ce | |
| +|'He | u | ART | 2. |
| FLL | im | Senne | a |
| > PELE | i | = | Te |
il pep Et [oh ven [* P|) REET MD eto i LEP _E-TENSON SPLE. PT FED ELK +5v1 —
| FED BLK +541 | | | | A |
qu
| - | —_ | EL | |
| - | a | = | |
| Ee 1 | IL | we | tay |
eay~
TUL PIP PLE a wep TVIVE bY TE fan _ Mars Lish= Sional wl \ RG +12 i LE Ligh= Driver PLA Grant} Z
| ; | + | REL | |
| ru | Te | a | BL fT) ROTATING |
| uo | e | MAPS LIGHT |
| LPL
Wiring & Circuit Information 4-5
Computer Motherboard Assembly 20-10554
MOTHERBOARD CONNECTOR AND JUMPER STATUS
(NOTES FOR TABLE ON FOLLOWING PAGE)
NOTICE: The term VGM refers to the video game machine.
NOTES: . GM doesn't require jumper or telephone connection. VGM doesn't require jumper. VGM uses proprietary network for game linking. VGM doesn’t require connections. VGM has no ATAPI devices (CD ROMs). VGM doesn't require jumper. Tamper-detection security feature isn’t installed. Connect processor module fan to this jack. Computer may become unreliable if processor overheats. Connect processor module to this jack. 242-pin socket accepts single microprocessor modules. VGM doesn’t require connections. Case cooling fans connect directly to power supply. VGM doesn’t require connections. VGM doesn’t use SCSI devices (Hard Drives). Connect reset cable from Filter Board to this jack. VGM doesn’t use front-panel devices.
- Jumper must be set over pins 1 & 2 for this VGM. VGM won't run with incorrect or missing jumper. SL PNAAPWONSR
Replacement Motherboards may not include this jumper. Refer to Parts to order extra shunt jumpers.
Wiring & Circuit Information 4-6
Motherboard Connector and Jumper Status Table
Designation Location Function Meaning Setting Default
J1A1
(Note 1) Lower Right Near Board Expansion Slot Wake On Ring Not Used In This VGM (No Telephone) Open 1&2
J1E1
(Note 2) Lower Center Near Board Expansion Slot Wake On LAN Not Used In This VGM (No PC LAN) Open
J1F2
(Note 3) Lower Center Near Board Expansion Slot CD Audio Input Circuit Not Used In This VGM (No CD Player) Open
J2F1
(Note 3) Lower Center Near Board Expansion Slot CD Data Input Circuit Not Used In This VGM (No CD Player) Open
J2F2
(Note 1) Lower Center Near Board Expansion Slot Telephony Input Circuit Not Used In This VGM (No Telephone) Open
J2F3
(Note 3) Lower Center Near Board Expansion Slot Auxiliary Input Circuit Not Used In This VGM (No Aux Devices) Open
J3F1
(Note 4) Middle Center Near CPU And Fan Chassis Intrusion Circuit Not Used In This VGM (No Intrusion) Open 1&2
J3F2
(Note 5) Middle Center Near CPU And Fan Processor Fan Circuit Two Speed Fan For Processor Cooling Open 1,2,&3
J4J1
(Note 6) Center Left Module With Fan Assembly System Micro- Processor System Micro- Processor Open Filled
J4M1
(Note 7) Center Left Near CPU Module Processor Fan Circuit Controlled Fan For Processor Cooling Open 1,2,&3
J7M1
(Note 7) Upper Left Near Power & Floppy Jacks Case Fan Circuit Controlled Fan For Hard Disk Drive Cooling Open 1,2,&3
J8J1
(Note 8) Upper Left Between Hard & Floppy Jacks SCSI Drive Indicator Not Used In This VGM (No SCSI Drives) Open 1&2
J8FR
(Note 9) Upper Center Near Hard Disk Drive Jacks Front Panel Devices Only Reset Pins Are Used In This VGM Open 1&2
J8A1
(Note 10) Upper Right Near Battery And Speaker Configuration Select Starts System Setup Routine or Operation
Wiring & Circuit Information 4-7 Open 1&2 2&3
Network Interface Board Assembly 20-10550
Network Interface LED Indicator Table
Designation Location Function Meaning
| LED 1 | Left Center | Link Verify | Off | Not In Use |
(LNK) Under Jack Indicator (No Game Link) On Normal Operation Blinking Link Fault (Note 1)
| Right Center | Activity | Off | Not In Use |
| Under Jack | Indicator | (No Data) |
On Receiving Data (Note 2) Blinking Normal Operation
Notes:
- Intermittent cable or hub problems may cause blinking. Blinking must be continuous during linked operation.
- Blinks during data packet exchange. Blinking may appear continuous during heavy network activity.
Wiring & Circuit Information 4-8
Video Graphics Board Assembly 20-10551
Yo. 2S UUuL
Video Graphics Connector And Jumper Table
Designation Location Function Meaning Setting Default J1 Left Center Video Graphic Open
| (DB-15 on | Signal | Information | 1-15 | |
| (Note 1) | Bracket) | Output | To Interface | |
| J2-J7 | None | -- | Not Used | Open |
(Note 2)
| JP2 | Not Used | Open |
(Note 2)
Notes:
- Connects to Interface Board through shielded cable. Doesn't connect directly to monitor.
- Manufacturer option connectors and jumpers. Not required for this VGM.
Wiring & Circuit Information 4-9
Audio Amplifier Board Assembly 04-12529.1
BB12 Audio Amplifier LED Indicator Table
Meaning
Designation Location Function
LED 1 Upper Center Fault Off Normal (CR1) Near C3 Indicator Operation On Locked Up (Note 1) Blinking Overload (Note 2)
Lower Center Fault Off Normal
Near U2 & U6 Indicator Operation On Locked Up (Note 1) Blinking Overload (Note 2)
NOTES:
- Active output protection circuit. Attempt to reset circuit by clearing fault and removing power.
- Intermittent audio overload or overheating may cause blinking. LED should flash only during startup.
Wiring & Circuit Information 4-10
ss filters
rth Haigh Pa:
batterwe
Fe is epewt 290 He
e aed arger
ACA gate Audio Amplifier Board Schematic, 1/4 a
-———_| ____» es
augagg STUFF CZQ MZTH & *O' OWN RESISTOR
in a s t+
a a eG > a , t.is TT we
||| E
BIAS
Bras
Wiring & Circuit Information 4-11
Audio Amplifier Board Schematic, 2/4
+ + {II
Wiring & Circuit Information 4-12
Audio Amplifier Board Schematic, 3/4
N ete Pe ae te
a
uw TATS*HEATSING
gt phe 38
Wiring & Circuit Information 4-13
Audio Amplifier Board Schematic, 4/4
GH
| ~ | an | °° | ‘ |
| 2 | t | =o | e |
| ° | we | < | |
| x | 4 | eo | |
| = | 2ce | & | |
| z | #2. i.8 | ® |
: zm 5 OES
| * | a | | | o |
Qa
Q z
oa
wt
mal
« a3 ®
= oO ic)
au a »
uw
‘ Ls ere¥
Layout Not
Proce near U2
Wiring & Circuit Information 4-14
MagicBus™ Interface Board Assembly 04-12697.3
MagicBus™ Interface Board Switches
Designation Location Function Positions Meaning
S1-7 Right Center Near USB / UART 2 UART Mode D19 -D26 Mode Selector (Offroad VGMs) USB Mode
Right Center Near | Host Watchdog Watchdog
D19 -D26 Reset Enabled
Watchdog Disabled
Notes:
- Bank 1, Switch 7 should be off for Offroad Thunder. This switch selects USB or UART mode. USB mode is for factory testing only, and is not supported. Leave this switch in the off position.
- Bank 1, switches 1 through 6 have no assigned function. Leave these switches off.
- Bank 2, switch 1 through 8 have no assigned function. Leave these switches off.
Wiring & Circuit Information 4-15
MagicBus™ Board LED Indicator Table, 1/2
| LED # | Location | Function | Color | State | Meaning |
| LED 28 | Left Center, Near | Off | No +12V |
Fuse F2 &
| +12V Power | Connector JP12 | Indicator | Red | On | +12V Present |
for Output
Lamps Blinking Intermittent +12V
| LED 27 | Off | No +5V | |||
| +5V Power for | Right, Near DIP | Indicator | Red | On | +5V Present |
Analog Fuse F1
Inputs Blinking Intermittent +5V LED 10 Off Not In Use
| Communi- | Right Center, Near | Indicator | Red | On | Communication |
| cation | DIP Switch S1 | Error |
Blinking Normal Operation
| LED 9 | Off | Not In Use | |||
| EEPROM | Right Center, Near | Indicator | Red | On | EEPROM not |
DIP Switch S1 responding Blinking Normal Operation
LED 8 Off Not In Use
| Security | Right Center, Near | Indicator | Red | On | Security error |
DIP Switch S1 Blinking Normal Operation
LED7 Off Not In Use
| MagicBus | Right Center, Near | Indicator | Red | On | MagicBus Reset |
Reset DIP Switch S1
Blinking Normal Operation
LED6 Off Faulty MagicBus
Board
| MagicBus | Right Center, Near | Indicator | Green | On | Faulty MagicBus |
| Program | DIP Switch S1 | Board | |||
| Running | Blinking | Normal Operation | |||
| LED 5 | Off | Not In Use | |||
| UART / USB | Right Center, Near | Indicator | Green | On | Faulty MagicBus |
| Mode | DIP Switch S1 | Board |
Blinking With 4 & 3: UART; Individually: USB
Wiring & Circuit Information 4-16
MagicBus™ Board LED Indicator Table, 2/2
LED 4 Off Not In Use
| UART / USB | Right Center, Near | Indicator | Green | On | Faulty MagicBus |
Mode DIP Switch S1 Board Blinking With 5 & 3: UART; Individually: USB LED 3 Not In Use
| UART / USB | Right Center, Near | Indicator | Faulty MagicBus |
Mode DIP Switch S1 Board Blinking With 5 & 4: UART; Individually: USB
LED 1 Off No Power
| Power to | Center, Near | Indicator | On | Power Present |
MagicBus™ Fuse F2 Board Blinking Intermittent Power
MagicBus™ Interface Connector & Jumper Table
| Jumper | Location | Function | Meaning | Setting | Default | |
| JP1 | Upper Right | Blue | High Impedance | Open | CJ |
Between Video Low Impedance 1&2
| (Note 1) | JP4 and JP2 | Impedance | High Impedance | 2&3 |
| JP2 | Upper Right | Green | High Impedance | Open |
| JP1 & JP3 | Impedance | High Impedance | 2&3 | |
| JP3 | Upper Right | Red | High Impedance | Open |
| (Note 3) | JP2 & JP5S | Impedance | High Impedance | 2&3 |
| JP4 | Upper Right | Video | Positive Sync | Open |
| Near | Sync | Negative Sync | 1&2 | |
| (Note 3) | JP1 & JP2 | Polarity | Positive Sync | 2&3 |
Wiring & Circuit Information 4-17
Wheel Driver Board Assembly 04-12770.1
Wheel Driver Board Led Indicator Table
Designation Location Function Color State Meaning
LED 1 Right Center, Near Indicator Red Off Not In Use C5 & P2 On Normal Operation Blinking Power Fault (Note 1)
Notes:
- LED 1 monitors regulated power supply voltage source. Must be on continuously. Flash or blinking indicates intermittent connection, power problem, circuit fault, etc.
Wiring & Circuit Information 4-18
Wheel Driver Board Schematic, 1/8
ae
ze
e
| La <— | = | .- | ~ | ab |
| 3 | . | 38 | ||
| : | Z | zo | ||
| 7 | 3 | De | ||
| <t | ~ | 5 | ||
| an | gn | ten | oa | |
| 3 | EE | sue. | zo |
re
Wiring & Circuit Information 4-19
Wheel Driver Board Schematic, 2/8 a
cota yr
¥z
ete yr
3 tered
core Vr
ahr
Wr
Wie
Wr
or
QI g| WV rr
Wiring & Circuit Information 4-20 Changed C31 fram 100pf to Z200pf
s/ig/39
Wheel Driver Board Schematic, 3/8
Wiring & Circuit Information 4-21
Wiring & Circuit Information 4-22 Stutt 990, 853 for Cruas'n mode Wheel Driver Board Schematic, 4/8
LAYOUT NOTE: DGND has been Ripped to GND for ease of using previaus layout
The Nets on OGND should only connect to GND at one poant.
CHOSENe THIS
Wheel Driver Board Schematic, 5/8
WERE 4-8 nae aX
wes PNT
RESTSTOR
Be"
oa =| << i oc = a]
me
x > 7583 = ae
oa u = a
Wiring & Circuit Information 4-23
Wheel Driver Board Schematic, 6/8
mee.
Lamp Driver Dutputs
uinzoca
Wiring & Circuit Information 4-24
Wheel Driver Board Schematic, 7/8
x 2x TTY VA Ter maT TEST ae TATTT EY x ances |
x ¥. ¥, x, ¥. ¥. x.
n 4-25
anue aood een Wheel Driver Board Schematic, 8/8
FR Auxilary peripheral connectar
Wiring & Circuit Information 4-26
SERVICING
NOTICE: The term VGM refers to the video game machine.
NOTICE: Avoid damage to electronics! Turn off VGM power before servicing circuit boards or any electronic assembly. Never “hot plug” circuit boards.
LN
Servicing 5-1
DISASSEMBLY & REASSEMBLY This chapter includes summarized procedures for disassembling and reassembling VGM components. Only qualified service personnel should repair VGM equipment. The following product guidelines apply to all video game operators and service personnel. Notes, cautions and warnings appear throughout this manual where they apply. Study the Safety pages before beginning service.
« Arcade Computer
Switch off power to the VGM. Open ate pre
and remove the rear door. The
Arcade Computer is behind this door. To expose Arcade Computer circuitry, loosen four metal thumbscrews. Don't
remove the screws. These screws ili
reside at the top and bottom corners v
of the case. Slide off the back of the I~
computer. For most computer service, br you must also separate the Player ° we ea
Panel Cabinet and Monitor Cabinet.
« Audio Amplifier Board Switch off power to the VGM. Unlock and raise the top door of the Player Panel Cabinet. Note the orientation of the connector and other cables. Extract the harnesses from the board connectors. Remove mounting screws and washers from the Audio Board. Lift the board off its mounting posts. Handle the board by a heatsink. If you aren’t reinstalling the board, store it in an anti-static bag and protective container.
- Battery
A battery on the CPU Board retains data in memory during power disruptions. This battery is a 3-volt, lithium button cell. Switch off power to the VGM. Separate the Player Panel Cabinet and Monitor Cabinet. Unlock and raise the top door of the Player Panel Cabinet. The Arcade Computer is under this door. Remove the back of the Arcade Computer. The battery resides toward the edge of the Servicing 5-2
motherboard, near the daughter board sockets. Carefully pry up the battery retaining lever. Then grasp the battery edges and remove the device. Set the battery aside.
Coin Counter Meter replacement requires vault removal. Switch off power to the VGM. Unlock and open the coin door and cashbox door. Find the meter behind the bottom of the cashbox door. Remove the cashbox.
Remove two mounting screws at the bottom (front) of the vault assembly. Reach through the cash door. You'll find two mounting screws at the back of the vault. Remove these. Access the four remaining vault screws from the inside-back of the cabinet. Remove these four screws. Slide the vault out of the cabinet.
Locate the meter wires under the vault. Disconnect wiring at the connector. Remove two mounting screws from the front of the meter. Remove the meter. Assure that the replacement meter has a diode across its terminals. This diode protects driver circuits from the meter’s inductive kick. Install the new meter. Log the new meter count.
Coin Mechanism Switch off power to the VGM. Unlock the coin door and swing it open. To clean or replace a coin mechanism, unlatch and remove it. After reinstallation, assure that the mechanism seats fully in its bracket. Close and lock the release latch. Then close the door. Enter the Menu System to change the coin mechanism setup. Test known good and bad coins to verify operation.
CPU Board The CPU Board is part of the Arcade Computer. Switch off power to the VGM. Separate the Player Panel ees Cabinet and Monitor Cabinet. Unlock co and raise the top door of the Player casas Panel Cabinet. The Arcade Computer aunt! is under this door. Find the four metal thumbscrews at the top and bottom eu tt —Eae m corners of the computer case. To "™" "EE expose the CPU Board, loosen, but srasasoana don’t remove these screws. Slide off sososse Han, DSK DRE
the back of the computer. Disconnect ange Yen
the floppy disk power and data cables at the disk drive. Remove the floppy drive mounting bracket. Lift the bracket and floppy drive out of the cabinet. Set these aside for reassembly. Remove the CPU Board esac power cables at the CPU Board. ce Remove the circuit board retention bars. Remove the Video card, Network card, and DC Filter board. Disconnect the hard drive power and data cables at the disk drive. Remove CPU Board mounting screws. Lift the circuit board out of the cabinet and set it aside for reassembly. Use anti-static packaging from new parts to store boards that you won't reinstall.
Servicing 5-3
Dashboard and Steering Mechanism
Switch off power to the VGM. Separate the Player Panel Cabinet and Monitor Cabinet. Unlock and raise the top door of the Player Panel Cabinet. Disconnect the wiring harnesses from the dashboard. Support the steering wheel. Remove one screw from each corner of the instrument cluster. Remove the support. Carefully set the dash assembly on your workbench.
Inspect the motor, pulleys, and belt. If the belt is broken or shows signs of wear, replace it. Locate the two nuts on each side of the motor mounting bracket. Loosen all four bracket nuts. Rotate the tension adjustment bolt as necessary. Tighten this bolt until the belt is taut. Then restore correct tension by loosening the bolt one full turn. Tighten the motor bracket nuts.
DIMMs (Dual In-Line Memory Modules)
DIMM circuits contain the computer read-write memory for this VGM. Switch off power to the VGM. Separate the Player Panel Cabinet and Monitor Cabinet. Unlock and raise the top door of the Player Panel Cabinet. Remove the back of the Arcade Computer. Unplug the ribbon cable from the floppy drive. Leave the other end of the cable attached to the CPU Board. Unscrew and remove the circuit board retention bars. Remove the floppy drive mounting bracket. Remove the floppy drive. Note DIMM positions. Press out on the locking retainer on each side of the DIMM. The DIMM should partially or completely pop out of its socket. Lift the DIMM from its socket. Handle the DIMM only by its edges.
To reinstall memory circuits, orient the DIMM over its socket. Make sure that you've positioned the keying holes and notch properly. Push the DIMM board into its socket, so that the board snaps into place under the locking retainer on each side of the socket. Be sure that the retainers mate tightly with DIMM board notches. Don’t attempt to force a DIMM into its socket.
Servicing DiH Bch
Ho cbIeT—
td
5-4
Dollar Bill Validator (Use MARS AE2451-U3E, UL-recognized currency changer) You can install dollar bill validators in VGMs manufactured with the additional wiring connector. Other currency acceptors will also work with this connector.
Switch off power to the VGM and unplug the AC line cord. Unlock the coin door and swing it open. Read the coin door label for additional information.
Remove nuts, spacers, and the cover plate from the door. before mounting the validator, change switch settings or make adjustments. If the manufacturer supplied an adapter plate, place it over the door cutout. Install spacers on threaded studs. Then align the validator mounting holes with the studs. Seat the validator in the door opening. Install the nuts and tighten them.
Attach the ground wire (green with yellow stripe) lug to the door ground stud. The stud is beside the hinge. Mate the wiring harnesses and press them together to fully seat connectors. Route wires away from the door edges and hinge. Inspect the bill chute for proper alignment. Set the dollar bill validator to produce 50ms output pulse widths, 1 pulse per dollar. This setting avoids counting errors. To remove a validator for service or replacement, reverse these steps.
Plug in the line cord and turn on the VGM. From the Menu System, change the mechanism setup and pricing. Then test known good and bad bills to verify proper operation. Close and lock the coin door.
Fans The Arcade Computer incorporates several fans. Two fans reside at the bottom of the Arcade Computer enclosure. The power supply includes one fan. Inside the microprocessor cartridge is another small fan. |
Switch off power to the VGM. Separate the Player Panel Cabinet and Monitor Cabinet. Unlock and raise the top door of the Player Panel Cabinet. Remove the
| back | of | the | Arcade |
Computer. MUTE FANS AT THE BOTTOM vF OF THE ENCLOSURE. Disconnect the fan’s power harness. Remove the fan mounting screws. Note the fan orientation. Each fan has an arrow molded into its
| plastic | case | to | indicate |
airflow direction. Slide the | fan out of its mounting 4
| bracket. | Be | certain | to |
reinstall the fan in the proper direction to assure airflow over circuitry. Lc FAN EVEL
Fan chile — [8 | ~ POSELF TAPPING SORE
POWER SUPPLY FAN. The power supply contains no user-serviceable parts. Never open the power supply.
Servicing 5-5
MOTHEFEO2FL INTEL SE 1obx=) MICROPROCESSOR _ FAN.
| Unscrew and | remove the | ‘ | | |
| circuit board retention bars. | || | = | |
| Remove | the | floppy | drive |
mounting bracket. Unplug the I : ribbon cable from the floppy tyt drive. Remove the floppy drive. Disconnect the fan’s power harness. Remove the microprocessor cartridge. r be I
| Squeeze the plastic end tabs | Meter tl | | | |||||
| on | the | fan | side | of the | 4 | ' | ‘| |
| x | ' | m | — | if | |||
| cartridge. While squeezing, | \_isthiuid. eared | HEAT <INh | me |
carefully pry the fan assembly away from the heatsink. If the 25SEMBLY fan is bad, replace the entire
| fan assembly with a new one. | Sal | ol |
Reassemble the cartridge and insert it into the computer. Then reconnect fan power.
Floppy Disk Drive Switch off power to the VGM. Separate the Player Panel Cabinet and Monitor Cabinet. Unlock and raise the top door of the Player Panel Cabinet. Remove the back of the Arcade Computer. Disconnect the DC power cable from the floppy drive Unplug the ribbon cable from the floppy drive. Leave the other end of the cable attached to the CPU Board. Unscrew and remove the circuit board retention bars. Remove the drive bracket mounting hardware. Remove the bracket. Remove the drive mounting screws. Lift the drive off the mounting bracket. Save the mounting screws for reuse in future floppy drive installations. When returning a floppy drive to your distributor, pack it in an anti-static bag. REINSTALLATION. Mount the floppy drive in its bracket. Install the drive mounting screws. Reinstall the bracket and drive in the Arcade Computer enclosure. Connect the drive’s ribbon and power cables.
Front Housing OPENING THE DOOR AND HOUSING. Switch off power to the VGM. Unlock the front cabinet door and swing it open. Release the latches at the corners under the front housing. Gently pull out on the bottom of the formed front housing and swing it towards the control section. Remove the free end of the prop rod from the retainer at the left side of the monitor shelf. Swing the rod up until it rests in the rod bracket on the lower right side of the front housing. Lower the housing until the prop rod supports the housing’s weight. CLOSING THE DOOR AND HOUSING. Snap the rod into the retainer. Close the housing. Engage latches and snap them shut. Close the front cabinet door
Pedal Assembly Switch off power to the VGM. Unlock and raise the top door of the Player Panel Cabinet. Disconnect the pedal cable from the wiring harness. Disconnect the safety ground from the pedal frame. Adjust the seat to the maximum rear position. Remove four outer mounting screws from the front perimeter of the pedal plate. Pull the pedal toward the seat until it clears the opening. Then lift it up and away from the cabinet.
Servicing 5-6
Gear Shift Switch off power to the VGM. Unlock and raise the top door of the Player Panel Cabinet. Disconnect the two cables from the back of the shifter. At the front of the shifter, remove shift plate mounting screws. Lift the shifter up and out of the player panel.
Hard Disk Drive
Switch off power to the VGM. Separate the Player Panel Cabinet and Monitor Cabinet. Unlock and raise the top door of the Player Panel Cabinet. Remove the back of the Arcade Computer. Disconnect the DC power cable from the hard drive. Unplug the ribbon cable from the hard drive. Leave the other end of the cable attached to the CPU Board. Remove the drive mounting screws. (Don’t remove the drive-mounting bracket.) Lift the drive out of the cabinet. Save the mounting screws for reuse in future hard drive installations. When returning a hard drive to your distributor, pack it in an anti-static bag. Box the drive in approved shipping container 08-8068. REINSTALLATION. Before mounting the hard drive in its bracket, install the drive mounting screws. To avoid damage during installation, mount the hard drive in the brackets before connecting cables.
After a driver plays one game, the new drive copies data from other linked VGMs. Important! The data won't copy if players are actively driving. Files transfer only when all VGMs return to Attract Mode.
MagicBus™ Interface Board Switch off power to the VGM. Unlock and raise the top door of the Player Panel Cabinet. Extract the harnesses from the board connectors. Remove mounting screws and washers from the MagicBus Board. Remove the MagicBus Board. Lift the board off its mounting posts. During reinstallation, tighten the screws: Start at the board’s center and work toward the outer edge. If you aren't reinstalling the board, store it in an anti-static bag and protective container.
Marquee Switch off power to the VGM. Open the front, monitor cabinet door. To replace the marquee, you must completely remove the front housing from the monitor cabinet. Then you can access the Servicing 5-7
marquee, and remove it from the bezel. Take the glass and artwork out of the front housing. Clean the glass before reinstalling it. Install the bracket and tighten screws. Replace the front housing on the monitor cabinet. Tighten mounting screws. Don’t use excess force.
Mars Light Driver Board Switch off power to the VGM. Unlock and remove the rear door of the Monitor Cabinet. Note the orientation of the connector and the other cables. Extract the harnesses from the board connectors. Remove mounting screws and washers from the Mars Light Driver Board. Lift the board off its mounting posts. Handle the board by the edges. If you aren't reinstalling the board, store it in an antistatic bag and protective container.
Microprocessor This VGM's microprocessor is in a postcard-size cartridge that also includes cache RAM. The cartridge is inside the Arcade Computer, near the DIMM sockets. Switch off power to the VGM. Separate the Player Panel Cabinet and Monitor Cabinet. Unlock and raise the top door of the Player Panel Cabinet. Remove the back of the Arcade Computer. Unplug the ribbon cable from the floppy drive. Leave the other end of the cable attached to the CPU Board. Unscrew and remove the circuit board retention bars. Remove the floppy drive mounting bracket. Remove the floppy drive. Disconnect the microprocessor fan power harness. Spread the locking retainers on each side of the microprocessor cartridge. Pull the cartridge out of its socket. Take care not to touch the copper traces on the socket.
To reinstall a microprocessor cartridge, orient the cartridge over its socket. Make sure that you’ve positioned the keying notch properly. Push the microprocessor cartridge into its socket, so that the cartridge snaps into place under the locking retainer on each side of the socket. Be sure that the retainers mate tightly with cartridge notches. Don’t attempt to force a cartridge into its socket. Reconnect the microprocessor fan harness.
Monitor
The monitor is very heavy and difficult to balance. Removing the monitor is a two-person task. Don’t attempt to remove it by yourself. Switch off power to the VGM. Open the front cabinet door. Disconnect the fluorescent light assembly connector and all monitor cables. Remove the front housing hinge screws and set the housing aside. Remove the monitor bezel and both barrier panels. Remove the four flange nuts securing the monitor's mounting brackets to its mounting panel. Pull the monitor carefully from the cabinet and set in a safe place. The monitor remote adjustment board is behind the front door with the rest of the electronics. Clean the face of the CRT before reinstalling the barrier panels and the monitor bezel. The monitor is a medium resolution type. Other monitors may look as if you can use them for replacements. Yet the screens of different monitor types curve differently. Only medium resolution monitors fit correctly against the monitor bezel. Other monitor styles won't seal properly, and also won't synchronize.
Servicing 5-8
Network Interface Board Switch off power to the VGM. Unlock and raise the top door of the Player Panel Cabinet. Remove the back of the Arcade Computer. Note the orientation of the cables. Loosen the header-mounting screw. Disconnect the network cables from the board header connectors. Remove the circuit board retention bars. Remove the board. As you remove the board, handle it only by its edges. Don’t touch the copper traces! If you aren't reinstalling the board, store it in an anti-static bag and protective container.
Power Filter Board Switch off power to the VGM. Unlock and raise the top door of the Player Panel Cabinet. Remove the back of the Arcade Computer. Loosen the header-mounting screw. Disconnect the cables from the board header connector. Remove the circuit board retention bars. Remove the board. As you remove the board, handle it only by its edges. Don’t touch the copper traces! Use anti-static bags and protective containers to store the board if you won't reinstall it.
Power Supply Switch off power to the VGM. Disconnect the line cord. Unlock and raise the top door of the Player Panel Cabinet. Remove the back of the Arcade Computer. Unplug the IEC AC power cord. Inside the Arcade Computer, disconnect DC power cables. These connect to the hard drive, motherboard and other peripherals. Remove four mounting screws from the outside of the Arcade Computer enclosure. Lift the power supply out of the cabinet. Before reinstalling the power supply, check the line voltage switch setting.
Speakers This VGM has four speakers. One woofer is behind a grille at the back of the driver's seat. Smaller, full range speakers are behind the front of the Player Panel. Below these full-range speakers is one more woofer. Switch off power to the VGM.
PEAKE 4 OHM 25) —
PIPPON CABLE 28 PIN . CEE PETEIL DPAvN RIBBON CABLE y an FER Bosre FEVVITE FEA OEE PETAL previ HEEL PRED post En — ANE COMP. rt IP TEN EE DESL DR VIN A . EE ET=IL Phill
- our Ter FUSE BLOCK 2x34 — Precrer
TERHINIEL ELOCK—
PELE — Fi
2 SEL EE PETSIL Drv
cOUPLTER SHELF
EE PPLE ATION CHET
Servicing 5-9
ACCESSING THE SEAT WOOFER. Remove mounting screws and set the speaker grille aside. Don’t use excess force when removing or tightening mounting screws threaded into plastic. Avoid speaker damage by removing the upper mounting screws first. Replace these top screws last. ACCESSING A PLAYER PANEL CABINET SPEAKER. Unlock and raise the top door of the Player Panel Cabinet. Remove mounting screws from the rear of the speaker.
SPEAKER REMOVAL. Assure proper polarity by marking each speaker wire (“+” or “Gnd”). Remove the speaker from the enclosure and disconnect the wire lugs.
Sub-Woofer Driver Board Switch off power to the VGM. Separate the Player Panel Cabinet and Monitor Cabinet. Unlock and raise the top door of the Player Panel Cabinet. Note the orientation of the connector and the other cables. Extract the harnesses from the board connectors. Remove mounting screws and washers from the Sub-Woofer Driver Board. Lift the board off its mounting posts. Handle the board by a heatsink. If you aren’t reinstalling the board, store it in an anti-static bag and protective container. The board has two 0.5A, 250-volt fuses. Check these with an ohmmeter. Replace bad fuses only with the identical type.
A.C. Power Chassis Switch off power to the VGM. Unlock and remove the rear door of the Monitor Cabinet. Note the orientation of the connector and the other cables. Disconnect A.C. Power Chassis harness connectors. Remove mounting hardware from the chassis. Lift the chassis out of the cabinet.
Video Board Switch off power to the VGM. Separate the Player Panel Cabinet and Monitor Cabinet. Unlock and raise the top door of the Player Panel Cabinet. Remove the back of the Arcade Computer. Loosen the header-mounting screw. Disconnect the video cable from the board header connector. Remove the circuit board retention bars. Remove the board. As you remove the board, handle it only by its edges. Don’t touch the copper traces! Use anti-static bags and protective containers to store the board if you won't reinstall it.
Viewing Glass Switch off power to the game. Open the front cabinet door. To replace the viewing glass, you must completely remove the front housing from the monitor cabinet. Lift the glass out of the front housing. Clean the glass before reinstalling it. Install the bracket and tighten screws. Replace the front housing on the monitor cabinet. Tighten mounting screws. Don’t use excess force.
Wheel Driver Board Switch off power to the VGM. Separate the Player Panel Cabinet and Monitor Cabinet. Unlock and raise the top door of the Player Panel Cabinet. Note the orientation of the connector and the other cables. Extract the harnesses from the board connectors. Leave the other end of the ribbon cable connected to the MagicBus Board. Remove four mounting screws and washers from the Wheel Driver Board. Lift the board off its mounting posts. Handle the board by the heatsink. If you aren’t reinstalling the board, store it in an anti-static bag and protective container.
Servicing 5-10
TROUBLESHOOTING
NOTICE: The term VGM refers to the video game machine.
IK
Before servicing electronics, turn off AC power to the VGM. Wait for capacitors to discharge. Before touching or handling electronic assemblies, discharge static electricity on your body. To discharge this static, begin by connecting the line cord to a grounded outlet. Don’t turn on the VGM! Next, touch the safety ground stud of the power supply chassis. Store electronic assemblies in an anti-static area. Use anti-static bags to store or transport VGM circuit boards. Transport the hard drive in its shipping container. Don’t remove or connect electronic assemblies when cabinet power is on. Otherwise, you'll damage electronic assemblies and void the VGM warranty. After you complete maintenance or service, replace ground wires, shields, safety covers, etc. Install and tighten ground and mounting screws.
Troubleshooting 6-1
Coin Mechanism and Pricing Troubleshooting Table
SYMPTOM CAUSE REQUIRED ACTION
« VGM (video game machine) accepts currency or tokens, but number of credits per coin or bill is incorrect. Improper settings at From Adjustments Menu, choose PRICING MENU. Verify that units and credits are set Pricing Menu correctly.
- Check that cabinet wiring is correct for this Faulty wiring VGM. Assure that coin meter and coin switches connect properly to control input wires. Incorrect pulse width on bill validators Consult bill validator manufacturer's literature. Adjust pulse width on validator to /ong setting. Retest validator operation.
« VGM won't accept currency or tokens.
¢ —VGM won't start. Improper currency Unlock and open cash door. Empty cash box. Inspect revenue for counterfeit currency. Check vault. Remove any items that block path from mechanism.
« Audio and video are present. Faulty coin mechanism PON Unlock and open coin door. Check each mechanism for proper mounting. Remove mechanism. Clear currency path. Reinstall mechanism and latch it. Enter Menu System by pressing and holding TEST MODE switch inside coin door. From Diagnostics Menu, choose SWITCH TEST. Use tests to confirm operation of coin switches.
Tilted coin mechanism or VGM Verify that mechanism is level after doors close. Repair or replace coin door if it is bent or damaged. If necessary, adjust cabinet leg levelers to keep mechanisms vertical. ¢ Coin indicators don't light Burned-out bulb Burned-out bulbs may appear white or darkened. Check continuity with DVM. Replace burned-out bulb with same type. Open fuse circuit Yay Check fuse continuity with DVM. If fuse is blown, replace fuse with same type. If fuse isn’t blown, check wiring.
Typical Coin Mechanism Mounting
Troubleshooting 6-2
VGM Startup Troubleshooting Table
SYMPTOM CAUSE REQUIRED ACTION
doesn't start.
non-functional.
« No audio
¢ No illumination
- No video display « VGM appears completely
- VGM (video game machine) | Power problem Check that VGM power switch is on. Inspect computer to see if fans are turning. /f not: ls computer power supply connected to its power cable? Is computer power supply turned on? Plug VGM into AC power outlet. Verify presence of AC line voltage.
Improper line voltage switch setting Turn off VGM power. Unplug AC line cord. Check line voltage switch. If necessary, set it to agree with local AC line voltage. Retest VGM.
Open fuse yn Turn off VGM power. Examine AC fuse at rear of VGM, on AC cord plug plate. Replace faulty fuses with identically rated parts. Turn on VGM power. If fuse opens again, check AC wiring harness and connectors.
Faulty wiring
nN Remove line cord. Test line cord, power plug, and IEC connector for breaks or damage. Verify continuity of each wire in cord. Install cord at power chassis. Press connector firmly to seat it. Check computer cord in same manner. Assure that cabinet wiring harness connectors fully seat in corresponding power supply and board connectors. Inspect wiring for breaks or damage. Arcade computer problem Turn off power for one minute and turn VGM on again. Power On Self-Test checks electronics. Screen may report errors. If video circuits don’t operate properly, computer produces series of beeps. (See Error Message Troubleshooting Table.)
enn
Location of Power Supply and Line Cord
Troubleshooting 6-3
VGM Startup Troubleshooting Table, continued
SYMPTOM CAUSE REQUIRED ACTION
« VGM (video game machine) appears non-functional.
«Currency acceptor price indicator is illuminated. Power problem Inspect circuit boards under low-light conditions. LEDs glow if processor circuits receive voltage. Fan should be turning. These indications prove presence of DC from power supply. Still, voltages or signals may not be normal. Computer has no internal LEDs. Turn on VGM power. Using 20-volt DC setting on digital voltmeter, measure DC voltages at power connector pins. (Power supply voltage isn’t adjustable.) Using 2-volt AC setting on digital voltmeter, measure same DC voltages as above. Any reading here indicates that supply voltages are unstable and may contain ripple or noise. Turn off VGM power. Assure that wiring harness connectors attach and fully seat onto mating board connectors. Verify that harness connects to computer. Verify that circuit board jumpers are set as intended. Check DIP switch settings. 2.
3.
Faulty wiring
Improper jumper or DIP switch settings
Faulty circuit boards or arcade computer 2. Run power-up self-test sequence. Note errors or failures during tests. Compare LEDs with LED indicator status charts. Note discrepancies. Turn off computer. Wait for hard disk to stop spinning. Leave VGM power on. Loosen computer case thumbscrews and lift off cover. Turn computer power on. Listen for beeping sounds. Compare beeps with Error Message Troubleshooting Table.
PRICE
Front View of Coin Door INDICATOT
5 —TKEJECT FLA MoTHEFRo=FP ne, SEN b =
f i i
O-< Pook ELEFcH ks bs
ut
by Heer ay una a pemier . i i Lee
i ir Interior View of Electronics
Troubleshooting 6-4
VGM Startup Troubleshooting Table, continued
SYMPTOM CAUSE REQUIRED ACTION
- Unlock and open coin door. Check each
| * | VGM (video game machine) | Faulty coin | Currency acceptor to assure proper mounting. |
doesn’t start. mechanism Verify that each release latch is closed and locked. Does mechanism accept and reject
| ¢ | VGM accepts currency or | currency correctly? Test mechanism with good |
tokens. and bad coins.
- Inspect to see if external acceptor indicators
| e | Audio and video are present. | (Pricing, Flashing Arrows, etc.) are lit. |
- Verify that each acceptor operates properly by placing it in working VGM. Replace bad parts.
- Enter Menu System by pressing and holding Faulty switches TEST MODE switch inside coin door. From Diagnostics Menu, choose SWITCH TEST. Use tests to confirm operation of each switch in VGM.
- Assure that no loose parts or wires are caught in switch contacts.
- Check for continuity in each suspect switch connection (Common to Normally Open or Common to Normally Closed).
- Replace faulty switches (bent levers, broken actuators, etc.).
- Assure that no wires are caught in hinges, Faulty wiring latches or switch contacts.
- Check wiring continuity from circuit board connectors to acceptors.
SS price inpeet Io —REJECT FLAP
Interior View of Coin Door and Cash Door
Troubleshooting 6-5
Audio Troubleshooting Table
SYMPTOM CAUSE REQUIRED ACTION
- No audio
e Video is present
« VGM (video game machine) appears to operate normally Improper volume setting Enter Menu System by pressing and holding TEST MODE switch. From Operator (Main) Menu, choose VOLUME MENU. Check that Attract Music is on (enabled). Verify that all volume levels are set well above zero. If necessary, change levels to make VGM audible.
Faulty wiring Turn off VGM power. Assure that wiring harness connectors attach and fully seat onto mating board connectors. Verify that harness connects to computer. Check audio cable connectors in same way. Faulty or obstructed speaker Remove grilles and inspect speakers. Free speaker cones, terminals, mounting screws and magnets of loose parts or wires. Faulty Audio Board Verify proper operation of Audio Board by placing it in working VGM.
¢ — Constant low hum from all speakers. Faulty wiring Check that cabinet wiring is correct for this VGM. Verify that cabinet wiring provides separate wires (not common return) for each speaker. Check connection of all cabinet ground wires.
Faulty Audio Board Run power-up self-test sequence. Note errors that VGM finds during tests. Verify that BB12 Audio Board operates by placing it in working VGM. If problem persists: Check regulator U5; capacitors C1, C2, C3, C14 and C30. Replace bad parts.
Faulty power supply Using 2 Volt AC setting on digital voltmeter, measure voltages at speaker terminals. Any reading indicates unstable supply that may contain ripple or noise.
«Audio is distorted, muffled or has missing frequencies. Faulty or improper speaker Turn off VGM power. Remove grilles and check speakers. Assure that speakers are full range (100 to 10,000 Hz response) and rated for at least 20 watts. Woofers must be rated for at least 40 watts. Verify proper speaker operation by connecting speaker in question to working VGM.
Faulty wiring Multiple-speaker installations: | Check for reversed wires at one speaker. Weak low frequencies and thin or hollow sound quality is symptom of incorrectly phased speakers. Sound tests may not detect this condition, but you can hear it during Game Mode.
¢ Dead sound channel Faulty speaker From Diagnostics Menu, choose SOUND TEST. Recheck speakers with audio signals provided by test. Verify proper speaker operation by connecting speaker in question to working VGM.
Faulty circuit board Run power-up self-test sequence. Note errors that VGM finds during tests. Compare circuit board LEDs with LED indicator status charts.
Faulty wiring Verify that cabinet wiring is correct. Assure that all speakers connect to audio wires. Audio cable must be fully seated in Computer Line Output Jack. Check for broken or shorted wires.
Troubleshooting 6-6
Error Message Troubleshooting Table
Power-On Self-Test Beep Codes Audio beeps only. Video may or may not be present. See notes.
VGM. MESSAGE MEANING REQUIRED ACTION
| No beep | No system power | Check power supply and cables |
| 1 continuous beep | Partial system power | Check power supply and cables |
| 1 short beep | Normal start; no errors | Check other VGM components |
| 2 short beeps | Processor problem | Check processor/fan module |
| 3 short beeps | Graphics initialization problem | Check Video Board, cables |
| 4 short beeps | Processor problem | Check processor/fan module |
| 5 short beeps | Insufficient system memory | Check DIMM circuit modules. |
| 6 short beeps | Peripheral problem | Check other VGM components |
Notes «The audio buzzer that generates 1 kHz beeps is in the computer, inside the VGM (video game machine). If you have difficulty hearing beep codes, remove the rear cabinet door and computer cover.
« Arcade Computer circuit boards resemble those in personal computers. Yet Midway engineers reprogrammed the boards for application in this VGM. Power-On Self-Test codes are unique to the Arcade Computer in this
e — Wiring or peripheral circuit problems may not trigger on-screen error messages. You may discover difficulties during Menu System diagnostic or calibration procedures.
¢ For help with unresolved error messages, call your authorized distributor.
NOTICE: Don't attempt to move computer circuit boards into alternate slots. Midway assigned boards to specific slots. The custom operating system won't recognize improperly placed boards, even though they function normally.
MOTHERBOARD —
- PATTEI
ZZEF
Troubleshooting 6-7 Location of Beeper in Arcade Computer
Link Troubleshooting Table
game machines) together SYMPTOM CAUSE REQUIRED ACTION
Don't extend linking cables that come with VGM.
| «Can't connect VGMs (video | Faulty wiring | Install | required | crossover | between | VGM |
cabinets. Each coupler connects two cabinets (one pair). Don’t use standard telephone type couplers or wiring to link cabinets. Use only 10Base-T, Ethernet-type, Category 5, twisted-pair wiring for VGM data.
Improper linking Use required network hub for your local network. Hub Link Kit permits up to four cabinet
other players in linking operation
« VGM functions normally by itself hardware connections. Cabinet array completion requires basic kit brackets and spacers. Record any error messages that occur during
- —VGM doesn't recognize Improper settings self-test.
| From | Operator | (Main) | Menu, | choose |
Adjustments Menu. Then select Linked Play Adjustments Menu. Assure that you've set LINKED PLAY to ON. Be sure that each VGM has unique ID number. Power problem If hub is in use, verify that power is applied. AC adapter wires are thin and easily damaged.
Faulty wiring (3 or more cabinets) Inspect hub indicator lights. Each active port
| should | have illuminated | indicator. | If cable |
connects, and that position has no lit indicator, check for cable continuity from hub to cabinet. Assure that no loose wires catch in hinges, doors, or under cabinet. Verify that linking cable connects to Network Board at each VGM's computer. Verify that each linking cable operates properly by placing it in working VGM.
« Some VGMs in group link properly, while others don’t Improper hub switch setting Assure that switches on hub are set correctly
| according | to | Hub | Link | Kit | instructions. |
(Networked cabinets don't require couplers. Hub has electronic crossover.) Inspect hub indicator lights for link activity. See manufacturer's literature for diagnostics.
Wrong software version Verify that all linked cabinets use same software
| version. | Otherwise, | linked | cabinets | won't |
recognize each other. Contact your distributor.
Faulty wiring (2 cabinets) Insert crossover connections between coupled cabinets. Standard couplers appear identical to devices supplied with cabinets, but don’t include internal crossover. Verify that each linking crossover coupler operates properly by placing it in working link between two cabinets.
Faulty wiring (3 or more cabinets) You used additional crossover connector and cable to extend VGM or hub link connection. Two crossovers cancel and cause same problem as no link crossover. Connect cables directly to hub. Don’t use crossover coupler and hub together in single network. Separate communications wiring from other wiring. Wires that must cross should cross at right angles to limit noise pickup.
Troubleshooting 6-8
Player Control Troubleshooting Table
SYMPTOM CAUSE REQUIRED ACTION
e Intermittent or completely non-functional player controls
« VGM (video game machine) starts normally. Faulty switches or lamps. Enter Menu System by pressing and holding TEST MODE switch inside coin door. From Diagnostic Menu, choose SWITCH TEST. Run tests to confirm switch operation.
- Check for loose parts or wires caught in switch contacts.
- Check continuity at each switch connection (Common to Normally Open or Common to Normally Closed).
- Verify that control operates properly by placing it in working VGM.
- Verify that dashboard switch light bulbs are type specified in parts listing. Other types light, but may produce too much heat. Eventually excess heat may cause switches to bind. Faulty switch wiring 1. Check for wires caught in door hinges, latches, or switch contacts.
- Verify that harness connectors are attached and fully seated.
- Assure that control switches connect properly to control input wires.
- Check that cabinet wiring is correct for this VGM. e Steering pulls to one side Faulty Wheel Driver Board Find power amp on Wheel Driver Board's large heatsink. Test and replace bad part or board.
How to Adjust Belt Tightness
Troubleshooting 6-9
Player Control Troubleshooting Table, continued
SYMPTOM CAUSE REQUIRED ACTION
Sloppy, unpredictable or ineffective steering
Video appears on screen
VGM (video game machine) starts normally Blocked or faulty fan With VGM power on, check airflow near each computer fan. Case cooling fans are intake fans. Power supply fan is exhaust fan. Assure that nothing blocks airflow.
Faulty mechanical parts Turn off VGM power. Open dashboard. Support steering wheel and remove outer mounting screws. Remove metal shield (if your VGM has one) over motor. Inspect for faulty or worn belts, bearings, couplings, gears, etc.
Faulty Wheel Driver Board Inspect Wheel Driver Board under low-light conditions. LEDs glow if motor driver circuits receive AC power from transformer. (Voltages or signals may or may not be normal.) Examine fuses and cables on Wheel Driver
| Board. | Replace | bad | fuses. | Using | digital |
voltmeter, verify AC voltage between each fuse
| holder | and | ground. | You | should | measure |
approximately 25V. See Wiring Diagram. Using 20 VAC setting on digital voltmeter, measure DC voltage at motor. Don’t move steering wheel, drive belt, or motor while making
| this | measurement. | Any | reading _ indicates |
unstable supply that may contain ripple or noise. Verify proper operation of Wheel Driver Board by placing it in working VGM.
Loose or worn drive belt Turn off VGM power. Open dashboard. Support steering wheel and remove outer mounting screws. Remove metal shield (if your VGM has one) over motor. Inspect for faulty or worn belts, bearings, couplings, gears, etc. If drive belt isn’t worn or damaged, check its
Steering aims vehicle as expected feedback tightness.
| From | Diagnostics | Menu, | choose | FORCE |
« No wheel feedback Improperly set FEEDBACK ADJUSTMENT. Set feedback to match player requirements. Maximum force may be too extreme for very young or inexperienced customers.
Faulty circuit Examine fuses and cables on Wheel Driver Board. Check cables and wiring between computer, interface, driver and motor. Check resistance of motor series resistors Replace bad parts.
Faulty motor Turn off VGM power. Open dashboard. Support steering wheel and remove outer mounting screws. Remove metal shield (if your VGM has one) over motor. Unscrew caps. Inspect motor brushes. Replace worn parts.
Troubleshooting 6-10
Player Panel Controls
—POTENTIOMETEL \ POT=PRACKET
= * SET SCRE
| 4 | ae | TOOTHED | STEERING |
POLLE
| “¥ | ; | TENSION BRACKET | ||
| BRUSH CaP— | 94 | F | oS | I |
| . | é | 1 | , | TOOTHED BELT |
MOTOR PRUSH— I Sf
| BRUSH | HOLDER | [ | | | _ | ||
| TOOTHED DRIVE | fe | Ie | > | a | ||
| POLLE | ; | . | al | i | SZ | \\ |
| ~ | / | | | ||||
| MOTOR BR&CKET—~ | as | ms | law, | | | ||
| { | / | / |
TENSION AL T u— {
| TEERING | WHEEL— | | {/ |
Steering Components
Troubleshooting 6-11
Video Troubleshooting Table
SYMPTOM CAUSE REQUIRED ACTION
«Monitor appears non- Power problem functional
e Audio is present Verify connection of AC Power to video monitor. Inspect CRT neck in dim light. Glowing filament near CRT base proves that some monitor circuits receive power. Still, voltages or signals may not be normal.
- —VGM (video game machine) | Faulty wiring controls operate normally Turn off VGM power. Verify that video signal and Remote Adjustment Board connectors seat properly on Video Monitor Board. Assure that video cables connect to circuit boards and computer. Assure that no wires are caught on chassis or mounting brackets. Improper monitor adjustments Check that BRIGHTNESS (intensity) and CONTRAST are set above their minimum levels.
Faulty monitor circuitry Examine AC line fuse on Video Monitor Board. If fuse is faulty, replace it with identical fuse. If fuse is good: Verify that video monitor operates correctly by placing it in working VGM. If monitor is bad: Check monitor power supply. lf power supply is good: Check monitor horizontal output transistor and related circuitry.
F rl J Ay NECK BOAR ASSEMBL
MAIN VIDEO BOSRL MEL
REMOTE 4bo0 STHENT BOARD ASSEMBL’
Typical Cutaway Rear View
Troubleshooting 6-12
Video Troubleshooting Table, continued
SYMPTOM CAUSE REQUIRED ACTION
« Game doesn't appear
«No audio
«¢ Power-up self-test runs Floppy disk in drive Check floppy drive for diskette. If you find disk, eject it. Leave VGM (video game machine) power on. Turn off computer. Wait for hard disk to stop spinning. Turn on computer.
Faulty wiring Loosen computer case lid thumbscrews and lift off cover. Assure that hard drive ribbon cable connector is fully seated into mating connector on motherboard. Check hard drive power cable.
Improper components Verify that hard disk drive is correct for this VGM. Label on drive records manufacturer name, assembly number and program version. Verify that circuit boards are correct for this VGM. Label on each board records manufacturer name, assembly number and hardware version.
Hard drive problems Turn computer on. Immediately look under hard drive. Hard Drive Activity LED flashes if drive is operating properly. Allow software to load normally. Note and record any error messages that occur during self-test. Remove hard drive and install it in working VGM. If symptom recurs there, hard drive is faulty. Replace it.
« Blotches of color appear on screen Picture tube aperture mask is magnetized Remove diskettes from room. Demagnetize monitor with external degaussing coil. Take care not to magnetize neighboring VGMs. Monitor may be on or off for this procedure.
¢ White areas in center of screen appear tinged with color
- Object edges have fringe of one or more colors Picture tube purity or static convergence is out of alignment Turn on VGM. Press and hold TEST MODE to enter Menu System. At Operator (Main) Menu, select Diagnostic Menu. Then select Monitor Patterns Menu. Run through Crosshatch, Red, Green and Blue screens to find clearest display of problem. Display screen with greatest problem. Display Crosshatch Screen. Locate purity and static convergence ring magnets on back of monitor neck. Watch screen in mirror. Adjust magnets to minimize problem. Follow instructions from monitor manufacturer. Display Crosshatch Screen. Touch up adjustments while watching screen in mirror.
Troubleshooting 6-13
Video Troubleshooting Table, continued
SYMPTOM CAUSE REQUIRED ACTION
White areas at screen edges appear tinged with color
Dots at screen edges appear ovoid or cylindrical Picture tube dynamic convergence is out of alignment Have service bureau dynamically reconverge monitor. This procedure requires removing and repositioning yoke. Service bureau must follow instructions from monitor manufacturer.
Video tears or rolls, or has black bar down middle of screen Faulty wiring
| Check | connectors | and | cables | for | wiring |
continuity. Video cables connect computer to circuit boards, and then to video monitor. Assure connection of all cabinet ground wires, especially at video monitor chassis.
Faulty monitor circuitry Verify that video monitor operates correctly by connecting it to working VGM. Assure that video monitor is correct type for this VGM. Video monitors with wrong resolution can’t lock syne.
Improper sync signals Check to see if Video Board puts out type of sync that your monitor requires. Verify that jumpers are set correctly for monitor. If necessary, add or remove video sync jumper at MagicBus Board jumper block JP4. With no pins connected (or pins 2 and 3 connected), board outputs positive sync. With pins 1 and 2 connected, board outputs negative sync. Electromagnetic fields
| Move | cabinet | far | away | from | machines, |
appliances, or VGMs (video game machines). Missing colors Faulty wiring
| Check | connectors | and | cables | for | wiring |
continuity from circuit boards to video monitor. Faulty monitor color drive circuitry Verify that video monitor operates correctly by connecting it to working VGM.
One color is dimmer or brighter than others
Whites appear tinted everywhere on screen Maladjusted color bias pots Pens
ao Turn on VGM. Enter Monitor Patterns Menu. Watch Color Bars screen in mirror. Adjust three bias pots for best colors. (Most monitor neck boards include these pots.) Also check White Screen. Touch up controls. If whites still seem tinted, have service bureau rejuvenate picture tube.
Picture is dim or faded Maladjusted BRIGHTNESS pot or subnormal picture tube emission Watch Color Bars screen. Adjust BRIGHTNESS. and CONTRAST pots for greatest number of grays. You'll find these pots on Monitor Remote Control Board, behind coin door. If pots have no effect, have service bureau rejuvenate picture tube.
Picture is too narrow Maladjusted WIDTH pot Enter Monitor Patterns Menu. Watch Crosshatch Screen while adjusting WIDTH pot for best picture. You'll find this pot on Monitor Remote Control Board, behind coin door.
Troubleshooting 6-14
Video Troubleshooting Table, continued
SYMPTOM CAUSE REQUIRED ACTION
¢ — Picture is too short Maladjusted HEIGHT pot or damaged vertical circuit Enter Monitor Patterns Menu. Watch Crosshatch Screen while adjusting HEIGHT pot for best picture. You'll find this pot on Monitor Remote Control Board, behind coin door.
- __ If pot has no effect, service vertical output circuit. Enter Monitor Patterns Menu. Watch Crosshatch ¢ Picture seems shifted to one | Maladjusted Screen while adjusting HORIZONTAL POSITION side HORIZONTAL pot for best picture. You'll find this pot on Monitor POSITION pot Remote Control Board, behind coin door.
- Substitute working yoke. ¢ Keystone-shaped picture Shorted turns in yoke | 2. Have service bureau converge monitor.
- Retest monitor.
Software Update
Troubleshooting Table
SYMPTOM CAUSE REQUIRED ACTION
« Update didn’t work
« After update procedure, screen reports lower than latest version You skipped steps or performed them out Return update components to kit, reinstall original parts in cabinet, and try process again. of sequence. You connected linked | 1. Network communication circuits may have VGMs to cabinet prevented full update. Turn off power to all being updated. connected cabinets.
- Perform update on one cabinet at time. If power is off, you need not disconnect linking cables. Installation error may | 1. Inspect for bent or broken pins. have damaged 2. If you have another kit, try it. device. 3.__ Ask your distributor to check your floppy disk.
NOTICE: Someday, software updates for your VGM (video game machine) might become available. These upgrades may improve your VGM’s performance or add new features. Such upgrades tend to appear sometime after factory first releases a VGM. Contact your distributor for information about updates.
Troubleshooting 6-15
Miscellaneous Problem Troubleshooting Table
SYMPTOM CAUSE REQUIRED ACTION
or non-functional
« VGM (video game machine) starts and plays normally ¢ Marquee lamp is intermittent | Faulty fluorescent tube Remove fluorescent tube from its sockets. If you find cracks or darkened ends, install new lamp. Clean tube. Check continuity of both fluorescent tube filaments. Verify that fluorescent tube operates by placing it in working VGM. Faulty lamp fixture Verify that lamp pins make good connection with socket contacts. Faulty wiring Measure fluorescent lamp AC voltages. Check wiring and connector continuity from AC power chassis to lamp assembly.
« VGM operates normally Obstructed fan Check bottom and rear of cabinet for blocked airflow. Move VGM away from sources of heat.
screen *® Cabinet becomes warm after Turn off VGM power. Remove dust from vent several hours of use holes with high-power vacuum cleaner. Faulty wiring Check fan wiring and connectors.
Faulty fan Check operation of all fans.
Check any assembly (RAM, ROM, Battery, etc.) « Error messages appear on Faulty hardware identified in error messages. Call your authorized distributor for help with unresolved screen messages.
Fan Location and Mounting
Troubleshooting 6-16
PARTS
For safety and reliability, don’t substitute parts or modify Midway products. Substitute parts or modifications may void the game’s EMC directive or FCC type acceptance.
NOTICE: The term VGM refers to the video game machine.
Parts 7-1
Cabinet Front View
Parts 7-2
Cabinet Rear View
20-10546-4 MARS LIGHT. SHER — 4108-01193-10B 2SSEMPL ‘ TAMPER PESISTANT lf - | al __01-13996 TOP VENT, LOUVEREL
__ 5642-14632-00 N/OFF SWITCH
5675-15773-00 MEDICOM RESOL TION IDES MONITOE _ 03-9599 PLESTIC. CLF
Boakb SET
__01-10714 LINECORL EI | p LINE EE L-CORD CHART
___ 20-9420 FAN Gurl
4108-01193-10B 1 | 4 — TANIPER RESISTANT
20-10354 WEL cesTER __08-8010 LEVEL 4D. STE Fest FB SSEMPLY__ EE PETSIL PRawIN
Front Access Door Assembly A-23055
01-8989 alm _ 01-7264 AM-UPPER DOOR LOCK™ ane PLATE=LOCK RETAINEI
PART OF =o SEMEL
4108-01115-06 _ Ms # % i AML
/ 20-10475 AM LOCK KE
- 11-1361.1 D-FRONT I
Parts 7-3
Cabinet Joining Details
Parts 7-4
Casters and Levelers
Parts 7-5
Rear Door Assembly A-23058
Parts 7-6
ints + IBHStN 4007
00-S0000-L0z¥
_od £ IBHoT)) Ls T4 HH -I g00-Z£000-00/ 1 ial — SS 0-02010-0207 fan00__
. £9620 7 HO ALAS ° Toad BZ34_ 9126-02 Ax ViSreLe ei NIFH AAAYS
6101-70 wayovda YAMOT__ Z1¥901-v0 WTO LOL ‘ 108-80 > Bu IH BHo> 3H s,
= He aH- H-61ZL0-e01y . Wand a La TTAIHS La. ANTLSISAN 1B. Nowe AHN] Noor: Monitor Bezel Assembly A-23361
‘00-ze000-00/7 H -V/ xed
80-00110-0z0» — od al zoee-ye ane ‘LHOM Noo: b-evsor-oz
vesrio OL-£6LL0-8017 a3 amor | | | Fosve-te TaNr 33 _ — Bua Bro ze96-£0 Bos r3H bs oh « 1 ANTUSIS3 BAN | 80-00110-0z0%
aN eed Weuad 3a “ 4 J Bio Ci f +,
7 3iL ANBOSBHO Td ‘ a AHOIT z-0v901-¥0
7-7 Parts
Padlock
Parts 7-8
Coin Door Assembly
(See Coin Door Application Table for Assembly Number)
Parts 7-9
Pushbutton Assembly
20-9663-XX 20-10129-5
Parts 7-10
Dash Assembly A-23365 (Assembled)
Parts 7-11
Dash Assembly A-23365 (Exploded)
Parts 7-12
Optional Bill Validator
(MARS AE 2451-U3E)
Parts 7-13
Dash Cabinet Assembly A-23357
5555-16223-00 PESKER 4 OHM
west 5795-15667-20 — ASsEMBL RIBBON CSPLE. 75 PIN EE DETSIL DRANIN
4-10652-1 HEP o tee UD WOOFER BOSRE Al — 45SEMBL FERGIE Go EE PETAIL PRANIN
HEEL PPE batt = oSEMELY — SAME COMP. TEL EE DETAIL DRAWING. EE DETAIL bReWINe
01-15107
- "ou Tet 5733-15139-00 PreckET FUSE BLOCK AS 1
5827-15144-00 |
TERMINEL BLOCK
5555-16059-00 PEAKE! — FEF | AUDIO. BOAR ASSEMBLY —— EE PETEIL EPs
I
11-1366 MIPCTER SHELF
TREN FORME! EE PPL ATION CHSET,
Parts 7-14
Seat and Pedestal Assembly A-23231
Parts 7-15
Throttle Assembly 20-10135
Parts 7-16
Fluorescent Lamp Assembly A-22506
Parts 7-17
Arcade Computer Assembly 04-12758.3
PROCESSOR EE PETAIL bRAVIN=
04-12651 FILTER Cah bh — SSSEMPL
F est 20-10552 ARD POWER SUPPL 20-10550 EMPL NETAORK INTER F°E—— a
20-10554 MOTHER BO2RE] — — Faro bis DRE INTEL SEMoby= SSSEMPL
0412687 rae — of : 5795-15344-12 ‘ HERP DK DEE a‘ it FIEEOD q
\_ 20-10555
Parts 7-18
This page reads as a drawing: its text was drawn rather than typeset, and comes out in fragments. See the original scan.
Arcade Computer Cables
NOTICE: DC power cables are part of the power supply. You can’t replace these cables individually.
Parts 7-20
Arcade Computer Electronic Components
NOTICE: Many stock computers use a motherboard that resembles this one. Still, a standard motherboard won't function correctly in this video game machine. Operation in this VGM also requires a custom operating system.
NOTICE: Before attempting to use other than factory authorized parts, ask your distributor for information. Other DIMM and processor modules may be equivalent or superior to those illustrated here. Yet Midway hasn't verified performance with alternate components.
NOTICE: Celeron and Slot 1 are registered trademarks of Intel.
Parts 7-21
Computer Motherboard Assembly 20-10554
SE EECISC SEE EL EECECELEEELES ra
| = | Oo | l | A | EEE |
| Ml | if | af | c+ |
=] "po | Nee IPOOROOOE CT) i t ye
t Ty tw
IM “ Fan
1 1 it I i
1 a 7 LI i
& a | = TI
| | | Eel | | laaeall | , |
Field Replaceable Parts
Component Description Board Location Part Number
| Dual Inline Memory Module | 64MB SDRAM DIMM | BANK 0-1-2 | 20-10557 |
| Memory Backup | 3-Volt Lithium Battery | B | 5882-16135-00 |
| Processor Assembly | Celeron Processor | J4J1 | 20-10607 |
| Processor Cooling | Fan with Bracket | FAN | 20-10549 |
| Shunt Jumper. | BIOS Startup Configuration | J8A1 | 5882-13046-00 |
Parts 7-22
Network Interface Card Assembly 20-10550
Field Replaceable Parts
Component Description Board Location Instruction ROM Not required in this game Part Number
Parts 7-23
Video Graphics Card Assembly 20-10551
Field Replaceable Parts
Component Description Board Location Graphics Mode Select Not required in this game Part Number
Parts 7-24
Filter Card Assembly 04-12651
Field Replaceable Parts
Component Description Board Location Part Number
EMI Filter 2200 pF Dual Capacitor F1-F5 5060-15633-00 EMI Filter Ferrite Bead Inductor L1-L5 5556-14181-00
Parts 7-25
BB12 Audio Amp Board Assembly 04-12529.1
Field Replaceable Parts
Component Description Board Location Part Number
| Audio Amplifier | LM3403 Quad Amplifier | U1-U2 | 5370-15163-00 |
| Audio Output | TDA1560Q Power Amplifier | U3 | 5370-15984-00 |
| Audio Output | TDA7375 Power Amplifier | U4 | 5370-15833-00 |
| Voltage Regulator | +5VDC, 5% Fixed Regulator | US | 5250-13302-00 |
None Not required in this game U6 -
Parts 7-26
Sub-Woofer Driver Board Assembly 04-11128-1
Field Replaceable Parts Component Description Board Location Part Number
| Amplifier , Power | IC, TDA 2030AV, 18W. | U1 | 5370-13419-00 |
Fuse 5 x 20mm, T2,.5A/250V F1,F2 5731-14532-00
| Preamplifier | TLO84 Op Amp | U2 | 5370-12730-00 |
| Regulator, Voltage | 78L05, 5VDC | Qi | 5250-13302-00 |
| Regulator, Voltage | 79L05, -5VDC | Q2 | 5250-13303-00 |
Parts 7-27
MagicBus™ Interface Board Assembly 04-12697.3
Field Replaceable Parts
| Component | Description | Board Location | Part Number |
| Crystal | 6 MHz | Y2 | 5520-16004-00 |
| Diode | 1N270 | D11-15, D17-25, D28 | 5070-16229-00 |
| Diode | 1N5817, 1A | D2 | 5070-09266-00 |
| Fuse | 5 x 20mm, 2ASB | F1 | 5735-13853-00 |
| Jumper | 2-Pin | JP1, JP2, JP3, JP4 | 5791-13045-00 |
| Transistor | 2N2369 NPN | Qi | 5190-15997-00 |
| Transistor | 2N3904 NPN | Q5-Q6 | 5160-14035-00 |
| Transistor | ULN2064 NPN | Q3-Q4 | 5160-14035-00 |
Parts 7-28
Wheel Driver Board Assembly 04-12770.1
Field Replaceable Parts
| Component | Description | Board Location | Part Number |
| 7 | TO-92 Device | Q4 | Not Used |
| Darlington | 2N6427 NPN | Qi | 5162-08976-00 |
| Diode | Fast FE6B-35nS | D2, D3 | 5070-16272-00 |
| Driver, Power | LM12 Op Amplifier | U5 | 5370-14069-00 |
| Fuse | 0.63AFB, 250V, 5x20mm | F3 | 5731-15627-00 |
| Fuse | 4ASB, 125V, 5x20mm | F1, F2 | 5731-14094-00 |
| Pre-Driver | ULN2064B IC | U1, U2 | 5370-12602-00 |
| Rectifier, Bridge | 100V, 6A, SIP | BR1 | 5100-13945-01 |
| Regulator, Voltage | 78L15, 15VDC, TO-92 | Q2 | 5250-15624-00 |
| Regulator, Voltage | 79L15, -15VDC, TO-92 | Q3 | 5250-15625-00 |
Parts 7-29
Speedometer Board Assembly 04-12759.1
Field Replaceable Parts
| Component | Description | Board Location | Part Number |
| LED | Green, Bright | LED1-6 | 5671-16256-00 |
| LED | Orange, Bright | LED7 - 10 | 5671-15953-00 |
| LED | Red, Bright | LED11 - 13 | 5671-15954-00 |
Mars Light Board Assembly A-23209
LEI
T
Field Replaceable Parts
| Component | Description | Board Location | Part Number |
| Fuse | 5 x 20mm T2.5A/250V | FA | 5731-14532-00 |
| Transistor | TIP36C, PNP | Qt | 5191-12179-00 |
Parts 7-30
Electronic Cable Assemblies
SERIAL COMMUNICATIONS CABLE (NULL MODEM DB-9F TO DB-9F)
20-10532
VIDEO COMMUNICATIONS CABLE (SHIELDED DB-15F TO DB-15M)
5797-13171-00
Parts 7-31
Electronic Cable Assemblies
i ily GO HiTE Pal Ey RIGHT [| res | i, Pel Ss LEFT Sc
AUDIO AMPLIFIER CABLE (SHIELDED, MINIATURE STEREO PHONE PLUG TO PHONO PLUGS)
04-12578-2
COMPUTER RESET CABLE (2-PIN PLUG TO LOCKING, 2-PIN PLUG)
04-12657
Parts 7-32
Line Cord Application Table
Part Number
Country France : Germany Cy Italy Cy Japan Cy Spain . UK Cy USA .
TYPICAL LINE CORD
Parts 7-33
Coin Door Application Table
ELECTROMECHANICAL COIN DOOR ASSEMBLIES Part Number
| x | wo | So | < | re) | |
| = | = | N | * | o | |
| 3} | 3 | 3} | = | o | |
| r=) | S | r=) | S | x | |
| s | Ss | Ss | oS | S | |
| wn | a | a | oS | o | |
| bY | Y | bY | + | oO | |
| Country | oO | oO | oO | a | oO |
| o | ) | ° | ° |
France : Germany Ty Italy Ty Japan Cy Spain Cy UK Cy USA, DBV Ready .
Transformer Application Table
POWER TRANSFORMER ASSEMBLIES Part Number
5610-14927-00 5610-14926-01 5610-15275-00
Line Power 120 VAC 60 HZ . 230 VAC 50HZ . 100 VAC 50HZ .
TYPICAL POWER TRANSFORMER ASSEMBLY
Parts 7-34
This page carries no recoverable text. It is a drawing or a photograph. See the original scan.
WARNINGS & NOTICES
e Use only Midway authorized components and parts. Failure to do so will void your warranty and may result in incorrect or unsafe operation. Substitute parts or modifications may void the EMC directive or FCC type acceptance.
« Federal copyright, trademark and patent laws protect this game. Unauthorized modifications may be illegal under Federal law. The modification ban also applies to Midway game logos, designs, publications and assemblies. Moreover, facsimiles of Midway equipment (or any feature thereof) may be illegal under federal law, regardless of whether or not such facsimiles are manufactured with Midway Games Inc. components.
If anyone in your family has experienced symptoms linked to an epileptic condition (e.g., seizures or loss of awareness), consult your physician before using video games.
Parents should observe their children while they play video games. If you or your child experience the following symptoms: dizziness, altered vision, eye or muscle twitching, involuntary movements, loss of awareness, disorientation, or convulsions, discontinue use immediately and consult your physician.
NOTICE This video game machine was tested. It complies with limits for a Class A digital device, under FCC Rules, Part 15. These limits provide reasonable protection against harmful interference when the equipment operates in a commercial environment. This equipment generates, uses and can radiate radio frequency energy. If not installed and used according to the instruction manual, this equipment may cause harmful interference to radio communications. Operation of this equipment in a residential area is likely to cause harmful interference. If interference occurs, the user must correct it at his own expense.
NOTICE When Midway Games Inc. ships a game, it complies with FCC regulations. Your FCC label is proof of compliance. Legal repercussions to the owner or distributor may result if the label is missing or damaged. If your game does not contain an FCC compliance label, call Midway Games Inc. immediately.
NOTICE You may not reproduce any part of this publication by mechanical, photographic, or electronic means. You may not prepare phonograph recordings of this document. You may not transmit this publication or otherwise copy it for public or private use, without permission from the publisher.
COPYRIGHT & TRADEMARK NOTICE Entire contents of this manual copyright ©1999 Midway Games Inc. All rights reserved. Midway® and Offroad Thunder™ are trademarks of Midway Games Inc.
FOR SERVICE Call your authorized Midway Games distributor.
MIDWAY GAMES INC. 3401 N. CALIFORNIA AVE. CHICAGO, ILLINOIS 60618-5899 USA