Vampire Night Deluxe
Vampire Night (VPN3 Ver. B) (Sega / Namco, 2001) · Manual · 84 pages · 46 sections · original scan
| enss| 27100S06 ‘ON Hed AlAaSIOAYd GAMOTIOS AYV TIVANVW SIHL NI LNO LAS STIVLSG SHL LVHL SAILVYSdWI SI LI GNV ‘SSWIL TIV Lv ALSAVS YSWOLSNS NIVLNIVW OL YOLVHSdO SHL JO ALMIGISNOdS3Y SHI SI 1] IWANVIN SYOLVYAdO Xd LHSIN AuIdINVA OIWSEU
This page carries no recoverable text. It is a drawing or a photograph. See the original scan.
MIAGICGATE isa copyrighted anti-copying technology created by Sony Corp. This MAGIC GATE mark does not necessarily imply compatibility with other products bearing the “MAGICGATE” trademark.
MIAGICGATE is a trademark of Sony Corporation.
Le présent document vous informe que ce produit peut étre soumis a la législation de contrdle des exportations nationales. Vous étes tenu(e) en permanence de vous conformer entiérement aux exigences d'une telle législation ainsi que de toute autre juridiction en relation avec ce produit.
MAGICGATE est une technique de protection de copyright créée par Sony Corporation. MIAGICGATE ne veut pas nécessairement dire qu’il y a une compatibilité avec d’autres produits portant la marque commerciale “MAGICGATE”.
MAGICGATE est une marque commerciale de Sony Corporation.
The CD-ROM supplied with the machine must not be copied, modified, publicly distributed, or used for purposes other than operation of the machine. The contents of the CD-ROM is protected by copyright. Infringements of copyright law may be subject to criminal penalties.
Do not use the supplied CD-ROM with other machines, or use other media formats. This may result in machine failure.
Contents
OPERATORS MANUAL 00... cece cece ec eeeeeeeeeseeeesececesceeeseeneaeesesenseceesesensnssesiseesinensenensessinenseseeeeee 1
GENERAL SAFETY CONSIDERATIONS... ALLGEMEINE SICHERHEITSHINWEISE .. GENERELLE SIKKERHEDSOVERVEJELSER ............csctsceeees ese eeeeeeeeseseeeceneeeeneenenseneesenteeeeeeee 10 CONSIDERACIONES GENERALES DE SEGURIDAD.
CONSIGNES GENERALES DE SECURITE . E=ETAZH FENIKH2 AZ@AAEIAD o.oo. eee ccc cee cee cee ee cee ceeeeeeeceeceeeeseessesaeceesesesaeeseseseessesseneeeess CONSIDERAZIONI GENERAL! SULLA SICUREZZA . VANLIGE SIKKERHETSTILTAK ...
ALGEMENE VEILIGHEIDSOVERWEGINGEN
AVISOS DE PERIGO 0000....eccecsccecc cece cee cess eeeseeeceeeecesescesesesiseesicensisesetesensnseteasensesenteseteeeeseeeseee 24 ALLMANNA SAKERHETSBEAKTANDEN . YLEISET TURVALLISUUNAKOKODAT ”
- SPECIFICATIONS 2.0... cc csscccesces esses cee eeeceeeseeeeseesesceeeeeesesecsesisesacenseeeiseeeessusessessesessessesisensesenses 30
- HOW TO PLAY
- MOVING THE MACHINE
- INSTALLATION 5-1 Removing the Header Assy .............:. cece eeececeeeseeeececeeeeeeeceeeeeeesseesseeseeieeseeteneeieeseeees 5-2 Fitting the Gun Cabinet to the Monitor Cabinet 5-3 Adjusting the Level Adjusters 5-3 Fitting the CD ROM oo... cece cceeeeeeeeceeeeesceeeeeeseseceseeseeseseseessesterseseeneneeeeeeeeee 6 ADJUSTMENTS
6-1 Adjustment Switches . 6-2 Test Mode ooo... eee eee ececeecececseeeeeeeesseaeeeececenensisecacececeeeetsisasenenenenesisaceceteeeeeesetessneess
6-2-1 Coin Options .... 6-2-2 Game Options . 6-2-3 I/O Test :
6-2-3-1 Gur Initialize oe ee eee ccc cece ee eeeeeeeeeeeeecenenececeeneaeasansneteneeseeenseseteneceneeeeeets 47
6-2-3-2 Switch Test
6-2-4 Monitor Test.. -
6-2-5 Sound Test 2... cece c es eeecececeeseeeeeeeeeesescecscsnensicecacececeeeeseeesesssenenenssatecaceneeeesets
6-2-6 ADS Data (Book Keeping) 6-2-6-1 Game Report 6-2-6-2 Game Histogram 0.0.0... ceece cece ee eceeeeeseeeeceeeeeeceeneeseeseceeseseceeeeseeseeeeesseentereeseeee 56 6-2-6-3 ADS Initialize 2. eee eee eee ee ee eeeeece cece ce sereeeaeseenenenensiteneneneeseeateceteeeneaees 57
6-2-7 Others eee cece ec eee ee cs eeeeeeeeeeeeeeeeeeeeeensesecacececeseesisasenenenenenensiteseteceeeeteretesenersne 58
. MAINTENANCE
7-1 Cleaning the Camera Window Covers ... 7-2 Replacing the Fluorescent Tube or Starter. 7-3 Replacing the Camera ASSY ........0..cccccccceeeeceeeeeseseseeceeeseeesceseeeesesseseeeesetisseeeeseeeeeneeee 7-4 Replacing the Sensor 0.0.20... cece cece esc ceeeseeeeceeeesceeeeseeseeeeseseceeeeeseeseeesesecseeeeeseseneeeese 7-5 Removing th Switch Panel Assy ............0ccececccecees cece cceeeeeeececeeesesseaseeeseeseseeeeneeeeeteeee 7-6 Replacing the Start Switches .. 7-7 Replacing the Gun Assemblies. 7-7-1 Removing the Gun Covers ............ccccceceeecceceseseeceeeeeececeeeeeeeeseseeseeneteeeeneeeeeeeeneetes 68 7-7-2. Separating the Gun Body .0.......... cece eee ceeneeeeeceeeeeseeseeneeececeeeeeseeeeeveseeneeeeetee 69 7-7-3. Replacing the Trigger Switch . 7-7-4 Replacing the Gun Cable 7-8 Replacing the RAYS PCB...
8-1 Monitor Cabinet
8-2 Service Bracket and Mains-In Assembly . 8-3 Gun Cabinet
8-4 Camera ASSY o.....eeccceccceccee cece eeceeeeeeseseececeesessecseeeecesecaeeeeecesecaeeessesecaseeeseseceseneeeeseeeeenes 78 8-5 Play Panel ASSY .0.........cceccecece ce eeeeeeeeeseeceeceseeeeceeeeeseeesceseeeeececeseeesesieaseeeseeseseeneneeeeeteeee 79 8-6 Gun Assembly ...........ececececcccceeeeeeeceeeeescsceceeecececeeeseececseeeesceseeeesessceseteeseseceneesseseceeeeeeeees 80 8-7 Header Assembly . SCHEMATIC.
GB) No part of this publication may be reproduced by any mechanical, photographic or electronic process, or in the form of phonographic recording, nor may it be stored in a retrieval system, transmitted or otherwise copied for private use, without permission from NAMCO EUROPE LIMITED.
While the information contained in this manual is given in good faith and was accurate at the time of printing, NAMCO EUROPE LIMITED reserve the right to make changes and alterations without notice.
This equipment has been manufactured in accordance with European Directives, and has been tested and complies with the directives 89/336/EEC and 72/23/EEC by the application of EN55014-1, EN55014-2 and EN60335-2-82 standards and as such bears the CE marking. Any changes or modifications to this equipment must be in accordance with the European Directives. Any unauthorised changes to this equipment may contravene such directives
Under some conditions of extreme external interference, e.g. radio transmissions, electrostatic discharge or mains born transients, some degradation of performance may occur. However the equipment will recover normal performance once the source of interference has ceased or been removed. Following abnormally high surges on the mains supply, the video monitor may need to be manually reset by turning the equipment OFF and back ON If the game processor resets due to an interruption of the mains voltage, any credits established will be lost.
This equipment is not a machine as defined by the machinery directive 89/392/EEC.
SAFETY WARNING
In order to use this equipment safely, be sure to read this Operators Manual carefully before installation, adjustment or use of this equipment. Whenever the owner of this equipment entrusts dis-assembly, installation, adjustment or routine maintenance to another person, the owner should ensure that that person read the appropriate precautions and relevant sections of this manual before starting work. In order that no accidents occur when the equipment is in operation, strictly follow the notes on safety as described below. This manual along with the Installation Manual (where applicable) form an integral part of the equipment and must be available to the operating or service personnel at all times. This equipment is for indoor use only and should only be used for the purpose intended. Namco Europe Ltd. bears no responsibility for accidents, injury or damage resulting from unauthorized changes to, or improper use of this equipment.
SAFETY NOTES
The following safety notes are used throughout this manual. Familiarize yourself with each of these notes and it's meaning before installing, servicing or making adjustments to this equipment.
GENERAL SAFETY CONSIDERATIONS
Only operate this equipment after checking that it has been installed correctly and in accordance with this manual.
Parts of this equipment move during game play, so there are places where the distance between the stationary section and moveable section changes. There are warning notices to keep hands and feet clear of moving parts, however if the operator feels that a person is in any danger, he should warn that person accordingly.
The warning notices must always be kept in good condition and replaced if worn, so that customers can read them clearly.
Installation, service, adjustment or routine maintenance should be carried out by suitably qualified persons only.
For continued protection against fire hazard, replace fuses with the same type and rating. The use of other fuses or material is prohibited.
The power supply inside the monitor will remain hot and have areas of high voltage even though the equipment has been tuned OFF, and there is the possibility of burns or electric shock. Be careful not to touch these areas.
To prevent possible electric shock due to failure, this equipment MUST be fitted with a securely connected EARTHED plug.
If at any time the mains lead becomes damaged, it must be replaced immediately.
Do not turn the power switch ON until the equipment has ben installed correctly. ObPB BB BBB BB
Before connecting the machine to the mains supply, ensure that the equipment is set for the correct voltage and that the correct fuse are fitted.
(— NOTES ON INSTALLATION >)
NEVER turn the power to the machine ON until installation has been completed.
equipment is connected to the mains with a securely connected earthed plug.
So that customers are not injured by the movement of the equipment, ensure that there is at least 500mm seperation between other equipment or walls. Z\ _ Morder to prevent possible electric shocks, be sure that the
In order to avoid damage to the equipment due to mis-operation, ensure that the voltage of the mains supply is 230volts AC. ot < PLAYZONE:
Ne w
(— > MOVING THE EQUIPMENT
A This equipment is fitted with castors to make it easier to move. Take care when moving the equipment on an inclined surface.
A The Header Assembly has a forward centre of gravity, so it is important that at least two people are used to fit or remove the Header Assembly.
A The fitting position of the Header Assembly is high and it is important that a means or reaching the height safely, without stretching, is available. (e.g. Steps, Step Stool, etc.)
A The overall height of the equipment , with the Header Assembly fitted, is 2230mm. Take care of any overhead obstructions. (e.g. Light Fittings, Electric Cables etc). Ne w
~\ ( REMOVING AND REPLACING PARTS
Adjustments or maintenance on this equipment should be carried out by suitably qualified personnel only.
Do not make any alteration to this equipment without prior approval. Doing so could cause unforeseeable danger.
Only parts specified by Namco Europe Ltd. should be used when replacing parts. (Including screws)
Ensure that the power to the equipment is turned OFF before commencing any maintenance work. (Trouble shooting, repairs etc.)
If performing work not described in this manual, contact your distributor for instructions, as no responsibility will be accepted for damage or injury.
Parts of the Power Supply and Monitor remain hot and carry high voltage even after switching OFF and could cause burns or electric shock. Take care not to touch these parts accidentally.
Make sure that the equipment is switched OFF before connecting or disconnecting any plugs or connectors.
When removing the mains connector from the equipment, or the mains plug from the wall outlet, always grasp the plug and not the cable. Ne w > PP BP BBP
Dieses Dokument darf in keiner Weise vervielfaltigt werden. Jegliche Tonaufnahmen sowie die Speicherung auf Datentrager (Suchsysteme), die Weitergabe oder sonstiges Kopieren fur den gewerblichen und privaten Gebrauch sind untersagt und bedirfen der vorherigen Genehmigung durch NAMCO EUROPE LIMITED
Die Informationen in diesem Handbuch entsprechen den Tatsachen bei Drucklegung. NAMCO EUROPE LIMITED behalt sich jedoch das Recht zu Anderungen ohne vorherige Bekanntgabe vor.
Dieses Gerat tragt das CE-Zeichen und wurde gemaf den EU-Richtlinien produziert. Es erfillt die Richtlinien 89/336/EEC und 72/23/EEC und Standards EN 55014-1, EN55014-2 und EN60335-2-82 (s. Deckblatt des Handbuches). Alle Veranderungen an diesem Gerat missen in Uber-einstimmung mit den EU-Richtlinien erfolgen. Nicht genehmigte Veranderungen an diesem Gerat verstoRen gegen diese Richtlinien
Extreme auRere Stérungen, wie z.B. durch Radiobetrieb, elektrostatische Entladung oder zeitweilige Netzschwankungen kénnen zu einer Leistungsminderung flhren. Sobald diese Faktoren jedoch ausgeschaltet oder beseitigt worden sind, erreicht das Gerat seine normale Leistung.
Achtung! Falls der Spielprozessor auf Grund von Netzunterbrechungen oder Abnahme der Netzspannung aussetzt, kann es zum Verlust von Spielkrediten kommen
Dieses GerAt fallt nicht unter die Maschinen-Richtlinie 89/3927EEC.
SICHERHEITSHINWEISE
Um einen ordnungsgemaen Betrieb dieses Geraites zu gewahrleisten, muf vor Aufstellung, Inbetriebnahme und Gebrauch das Handbuch sorgfaltig gelesen werden. Sobald der Besitzer dieses Gerates die Demontage, Aufstellung, Inbetriebnahme oder den Service einer anderen Person ibertragt, muf er sicherstellen, da& diese Person vor Arbeitsbeginn die nétigen Sicherheits-hinweise und die dazugehdrigen Kapitel des Handbuches liest und versteht. Um jegliche Unfalle wahrend des Betriebes zu vermeiden, mussen obige Hinweise strikt befolgt werden. Dieses Handbuch sowie das spezielle Gerate-Handbuch (wenn vorhanden) gehéren zum Gerat und miissen dem Betreiber und Wartungspersonal stets zugainglich sein. Dieses Gerat ist ausschlieBlich fur den gewerblichen Gebrauch in geschlossenen Raumen bestimmt und darf nur dort betrieben werden. NAMCO LTD. iibernimmt keinerlei Haftung fir Unfalle, Verletzungen oder Beschadigungen, die auf nicht genehmigte Veranderungen oder unsachgemaBen Betrieb des Gerates zuriickzufuhren sind
SICHERHEITSHINWEISE
Folgende Sicherheitsbegriffe werden im gesamten Handbuch benutzt. Machen Sie sich daher bitte vor Inbetriebnahme, Wartun: und Durchfiihrung von Einstellungen am Gerat mit diesen Warnhinweisen vertraut. WARNUNG /\ WARNUNG bezeichnet eine Gefahrenquelle fir Leib und Leben. Erscheint dieser Warnhinweis,darf ers! weitergearbeitet werden, wenn die entsprechenden Erklarungen vollstandig verstanden und befolgt wurden.
VORSICHT ©) VORSICHT bezeichnet eine Gefahrenquelle fir die Beschadigung des Gerates. Erscheint dieser Warnhinweis darf erst weitergearbeitet werden, wenn die entsprechenden Erkldrungen volistandig verstanden und befolg! wurden.
ALLGEMEINE SICHERHEITSHINWEISE
Das Gerat darf nur betrieben werden, nachdem es vorschriftsmé aufgestellt wurde. ig und in Ubereinstimmung mit dem Handbuch
Das Gerat bewegt sich wahrend des Spielbetriebes, somit verandert sich der Abstand zwischen feststehenden und beweglichen Teilen. Warnschilder verweisen darauf, fiir Hande und FiiRe einen gebiilhrenden Sicherheits-abstand einzuhalten. Sobald eine Person in Gefahr ist, mu& der Betreiber sie warnen.
Die Warnschilder miissen in gutem Zustand sein und ersetzt werden, wenn sie nicht mehr gut lesbar sind.
Bei Auftreten eines Fehlers oder Problems mufs das Gerat sofort abgeschaltet werden und darf erst nach fachgerechter Behebung des Fehlers wieder in Betrieb genommen werden.
Aufstellung, Service, Einstellungen und Wartung diirfen nur von qualifiziertem Fachpersonal durchgefiihrt werden.
Zur Vermeidung von Feuer, defekte Sicherungen nur durch vorgeschriebene Sicherungen ersetzen. Die Verwendung von andersartigen Sicherungen oder unterschiedlichem Material ist untersagt.
Das Netzteil im Monitor bleibt nach Ausschalten des Gerdates noch heif und fiihrt weiterhin Hochspannung. Daher besteht die Gefahr von Verbrennungen und Elektroschlagen. Diese Bereiche diirfen nicht beriihrt werden. Zur Vermeidung von Elektroschlagen muB dieses Gerait mit einem ordnungsgemak geerdeten Netzstecker versehen sein.
Bei Beschadigungen des Netzteiles mu dieses umgehend ersetzt werden. Gerat erst nach abgeschlossener Aufstellung einschalten. Vor Einstecken des Netzsteckers bitte sicherstellen, da& Netzspannung und Geratespannung Ubereinstimmen, und die vorgeschrieben Sicherungen verwendet wurden.
OBB BB BB BB B B&B
0)
Ne HINWEISE Ist das GerAt fiir einem Aufstellplatz mit glattem Fu®boden colle
HINWEISE Zu Reparaturzwecken am Netzteil und den CPU-Komponenten HINWEISE ZUR AUFSTELLUNG
NIEMALS das Gerat abgeschlossen ist. inschalten bevor die Aufstellung vdllig
Zur Vermeidung von Elektroschocks muf das Gerat mit einem ordnungsgemaf geerdetem Netzstecker an die Stromversorgung angeschlossen werden.
Zur Vermeidung von Beschadigungen durch Fehibetrieb am Gerat sicherstellen, da die Netzspannung 230 Volt betragt.
bestimmt, missen die Standbeine mit Gummiplattchen unterlegt werden, damit das Gerat fest steht und nicht auf dem Boden hin- und herrutscht.
muf die Riickseite des Gerates mindestens 50 cm von anderen Geraten und der Wand entfernt sein.
Zum leichteren Transport ist das Gerat mit Rollen ausgeriistet. Daher besondere Vorsicht auf abschiissigem Boden.
Der Schwerpunkt des Aufsatzes liegt sehr weit vorn. Daher werden fiir den Ab- und Aufbau des Aufsatzes mindestens 2 Personen bendtigt.
Der Aufsatz wird in groBer Héhe montiert. Daher mu8 aus Sicherheitsgriinden eine Steighilfte, wie z.B. eine Leiter, ein Tritt oder dhnliches, verwendet werden.
Die Gesamthihe des Gerates betragt 2,23 m. Daher Vorsicht bei tiefer hangenden Beleuchtungskérpern.
\
(poe > BRP BP BEB AUS- UND EINBAU VON KOMPONENTEN UND TEILEN
Aufstellungen,Service, Einstellung und Wartung diirfen nur von dafiir qualifiziertem Fachpersonal durchgefiihrt werden.
Es diirfen keinerlei Veranderungen ohne vorherige Genehmigung am Gerat vorgenommen werden. Zuwiderhandlungen stellen eine Gefahrenquelle dar.
Fiir die Repartur diirfen nur Originalersatzteile (incl. Schrauben) von NAMCO EUROPE Ltd. verwendet werden.
Vor Begin aller Wartungsarbeiten (Fehlersuche, Reparaturen etc.) mu der Netzstecker gezogen werden.
Bei Arbeiten, die nicht in diesem Handbuch beschrieben werden, muf vorher der Handler zu Rate gezogen werden, da sonst keinerlei Haftung bei Beschadigungen und Verletzungen ibernommen wird.
Teile des Netzteiles und Bilschirmes bleiben nach Abschalten noch hei und fiihren Hochspannung. Dies kann zu Verbrennungen oder einem Elektroschlag fiihren. Diese Teile diirfen nicht absichtlich beriihrt werden.
Vor der Montage oder dem Entfernen von Steckverbindungen und Steckern mufi das Gerat ausgeschaltet werden.
Bei Ziehen des Gerditesteckers oder des Netzsteckers aus der Wandsteckdose stets den Stecker und nicht das Kabel greifen. S
Denne udgivelse ma ikke reproduceres af nogen som helst mekanisk, fotografisk eller elektrornisk proces eller i form af indspilning, den ma heller ikke lagres i et eftersegningssystem transmitteres eller kopieres til nogen form for offentlig benyttelse uden tilladelse fra Namco Europe Limited.
Da informationerne i denne manual er givet med god tro og var korrekt pa udskivningstidspunktet, forbeholder Namco Europe Limited sig retten til, at foretage eendringer og forandringer uden varsel.
Denne maskine er frernstillet i overensstemmelse med Det Europaeiske faellesskabs direktiver og er blevet testet og fuldendt med direktiverne 89/336/EEC og 72/23/EEC standarder (se manualens forside) og som sadan baerer CE meerket. Enhver form for zendring eller modiflkation af denne maskine skal vzere i overensstemmelse med Det Europaeiske faellesskabs direktiver.
| tilfeelde af forbigaende ekstreme eksterne forstyrrelser, sd som radio udsendelser, elektronisk afgivelse eller forstyrrelser pa ledningsnettet, kan nedbrydning forekomme. Maskinen vil dog kare normalt sa snart forstyrrelsen opharer eller bliver fjernet.
Bemzerk:- Hvis spilleprocessoren resetter p.g.a. en forstyrrelse eller reduktion af hovedstrammen kan de etabledrede kreditter ga tabt.
Dette spil er ikke en maskine defineret af maskin direktivet 89/392/EEC -
SIKKERHEDS ADVARSEL
For at betjene denne maskine sikkert, Izes da denne brugemanual grundigt far installation, justering eller brug af maskinen Nar som helst ejeren af denne maskine overlader demontering, installation, justeringer eller daglig vedligehold til en anden person, skal ejeren sikre sig at denne person lesser de sikkerhedsregler og relevante punkter i denne manual far arbejdet begynder. For at undga ulykker nor maskinen er i gang, falg naje de sikkerhedsregler der er beskrevet herunder. Denne manual sammen med installations manualen er en ulaselig del af udstyret og skal altid vaere til raidighed for det arbejdende og servicerende personale. Denne maskine er kun til indendgrs brug og bar kun bruges til det beregnede formal. Namco Ltd. beerer intet ansvar for ulykker eller skader som er et resultat af uautoriserede aendringer eller fejlagtig brug af denne rnaskine.
SIKKERHEDSREGLER
De falgende sikkerhedsregler er brugt helt igennem denne manual. Gar dig bekendt med hver enkelt af dem og meningen heraf for installering, servicering eller justering af denne maskine.
ikke forbi et ADVARSEL A Advarsel betegner en episode der kan resultere i skader eller dod. Begiv di: advarselsskilt for de indikerede betingelser er fuldstzendig forstaet. FORSIGTIG (1) _ Forslgtig betegner en episode der kan resultere i adelaeggelse af maskinen. Begiv dig ikke forbi et advarselsskit far de indikerede betingeser er fuldsteendig forstaet.
GENERELLE SIKKERHEDSOVERVEJELSER
Betjen kun maskinen efter at have tjekket, at den er korrekt installeret og er i overensstemmelse med manualen.
Dele af denne maskine er i bevaegelse nar den kerer sa der er steder hvor afstanden mellem den stationzere og den bevaegende sektion zendrer sig. Der er advarselsskilt om, at holde hander og fodder vaek fra de bevaegelige dele, dog skal lederen straks advare en person han faler der er i fare.
Advarselsskiltene skal altid vere i god stand og erstattes hvis de er slidt, sa kunden tydeligt kan lase dem.
Hvis der er en fejl eller et problem med maskinen skal betjening straks stoppes, og problemet afhjzelpes for yderligere brug.
Installations service, justeringer eller daglig vedligehold ber kun udfores af en kvalificeret person.
For fortsat beskyttelse mod brandfare, sikres at hoved sikringerne kun erstattes med samme type kapacitet. Brug af anden kapacitet eller materiale er forbudt.
Stromforsyningen inde 1 monitoren vil forblive varin og have omrader med hej spending selvom maskinen har veeret slukket og der er fare for brandskader eller elektrisk stod. Pas pa med at rore disse omrader.
For at undga elektrisk sted p.g.a. en fejl skal denne maskine vere forbundet med et sikkert jordstik.
Hvis hoved ledningerne pa noget tidspunkt bliver beskadiget skal de strakt erstattes.
Taend ikke for strommen for maskinen er korrekt installeret. OBPBPB BP BB BBE BB
For tilslutning af maskinen til hovedstrammen sikres, at maskinen er indstillet til den rette spaending
OP BB
BEM/ERK: — Hvis denne maskine placeres pa et poleret gulv, anbefales det at
BEM/ERK: — For at fa adgang til stramforsyningen og CPU justeringer sikres, at PUNKTER OM INSTALLATION
Tend aldrig for strommen til maskinen for installering er fuldfort.
For at undga mulige elektriske sted sikres, at maskinen er forbundet til hovedstrammen med sikkert monterede jordstik.
For at kunder ikke kommer til skade ved spillets bevaegelser sikres, at der er mindst 50cm afstand til andre maskiner og vaegge.
For at undga skader pa maskinen p.g.a. fejlbetjening sikres, at speendingen pa hovedstrammen er 230 volt AC
ligge gummimatter under justeringsfedderne for at undga at maskinen glider pa gulvet.
bagsiden af hoved kabinettet star adskilt fra andre maskiner eller veeggen med mindst 50cm.
> bP EP BB Maskinen er smurt med olie for at gore den lettere bevegelig. Pas pa nar maskinen flyttes pa en skra overflade.
Hoved sektionens forreste center er meget tung, det er derfor vigtigt, at mindst 2 personer benyttes til at montere el. flytte hoved sektionen.
Monterins hajden af hoved sektionen er meget hgj og det er vigtigt, at have hjzlpemidler til at na sikkert uden at skulle strakke sig. (fek.s. trapper, trappestole el. lign.).
Den fulde hgjde af hoved sektionen er 2.23m. Pas pa ovre forhindringer f.eks. lys inventar
bP BP BP EP BBE AT FJERNE OG UDSKIFTE SEKTIONER OG DELE.
Justeringer eller vedligehold af denne maskine ber kun udfores af kvalificeret personale.
Skift ikke noget pa maskinen uden godkendelse, det kan fore til uforudset fare.
Der bor kun bruges dele specificeret af Namco Europe Limited nar der skiftes eller repareres dele (inklusiv skruer).
Sorg for, at strammen til maskinen er slukket for der foretages nogen form for arbejde (fejlfinding, reparation etc.)
Hvis der foretages arbejde der ikke er beskrevet i denne manual, kontakt da din leverandor for at fa kyndig vejledning, da intet ansvar vil blive accepteret ved skader.
Dele af stromforsyningen og monitoren forbliver varme eller baerer hoj spending selv efter maskinen er slukket, det kan fare til forbraendinger eller elektriske sted. Pas pa ikke at rare disse dele ved et uheld.
Lag meerke til at maskinen er slukket for samlinger eller stik tages ud eller szttes i.
Nar hovedsamlingen fjernes fra maskinen eller hovedstikket fjernes fra vaeggen, tag da altid ved stikket, ikke ledningen.
© No se permite la reproduccién total ni parcial de esta publicacién por ningtin medio mecanico, fotografico o electrénico, grabaciones fonograficas, ni su almacenamiento informatico, su transmisién o su copia, ya sea para uso pubblico o privado, sin permiso de NAMCO EUROPE LIMITED.
Si bien la informaci6n contenida en este manual se da de buena fe y es correcta en el momento de su impresion, NAMCO EUROPE LIMITED se reserva el derecho de hacer cambios y alteraciones sin previo aviso. Esta maquina ha sido fabricada seguin las directrices de la Comunidad Europea, ha sido probada, y se ajusta a las directrices 89/336/EEC y 72/23/EEC, mediante la aplicacién de los estandares EN65014, EN65104 y EN60335-2-82 (véase cubierta del manual) y por ende lleva el sello de la C.E. Cualquier cambio 0 modificacién que se haga a esta maquina ha de ajustarse a las. directrices de la Comunidad Europea. Cualquier cambio no autorizado hecho al producto pudiera contravenir estas directrices.
Bajo ciertas condiciones de extrema interferencia externa, p. ej. transmisiones de radio, descargas electrostaticas u oscilaciones de la red eléctrica puede tener lugar un descenso del rendimiento. No obstante, la maquina recuperara su rendimiento normal una vez que la fuente de interferencias sea retirada 0 cese de producirlas.
Nota: Si el procesador de juegos se reinicializa a causa de caidas o interrupciones en la alimentacién eléctrica, se perderan todos los créditos.
Este juego no se ajusta a la definicion de maquina de la Normativa de Maquinaria 89/392/EEC
AVISOS DE SEGURIDAD.
Para utilizar esta maquina con seguridad, lea cuidadosamente este Manual de Operador antes de proceder a la instalacién, ajuste 0 uso de esta maquina Cada vez que el propietario de esta maquina confie a terceros su desmontaje, instalacién, ajuste o mantenimiento rutinario debera asegurarse de que tales personas lean las precauciones adecuadas y las secciones relevantes de este manual antes de comenzar su trabajo. Para que no ocurra accidente alguno mientras la maquina se encuentre en funcionamiento, siga estrictamente las notas de seguridad tal como mas adelante se describen Este manual, junto con el Manual de Instalacién (cuando proceda), forma parte integral del equipo y debe estar a disposicién del personal de mantenimiento y operacién en todo momento. Esta maquina es Unicamente para ser usada en interiores, y solo debe usarse para aquello para lo que ha sido creada. Namco Ltd. queda exenta de cualquier responsabilidad por accidentes, heridas 0 dafios causados por cambios no autorizados o uso indebido de esta maquina.
NOTAS DE SEGURIDAD.
En este manual se usan las notas siguientes. Familiaricese con cada una de ellas y su significado antes de instalar, revisar, o hacer ajustes en esta maquina AVISO. A\ Aviso sefiala un riesgo que puede ocasionar lesiones 0 la muerte. Tras ver esta nota, no. continue hasta entender completamente y cumplir las condiciones exigidas. PRECAUCION (0) Precaucién sefiala un riesgo que puede ocasionar dafios a la maquina. Tras ver esta nota, no continue hasta entender completamente y cumplir las condiciones exigidas. (fs. >» am»
CONSIDERACIONES GENERALES DE SEGURIDAD.
Opere sélo con esta maquina tras comprobar que ha sido instalada correctamente y de acuerdo con este manual.
Algunas partes de esta maquina se mueven durante el juego; por tanto, hay lugares en que la distancia entre las secciones méviles y estaticas cambia. Existen notas de aviso indicando que se mantengan manos y pies alejados de las partes méviles. No obstante, si el operador cree que cualquier persona se encuentra en peligro, debe advertir de ello a dicha persona.
Las notas de aviso deben mantenerse siempre en buen estado y reemplazarse si estuvieran desgastadas para que los usuarios puedan leerlas con claridad.
Si hubiera algun error o problema con la maquina, debe interrumpirse su operacién inmediatamente, y subsanar el problema antes de volver a usarla.
Las rev cual nes de instalacién, los ajustes, y el mantenimiento rutinario deberan Ilevarse a cabo solo por personal ido.
Para asegurar una continua proteccién contra riesgo de incendios, asegtirese de que los fusibles eléctricos sean reemplazados solamente por otros del mismo tipo y especificaciones. El uso de otros fusibles o material esta prohibido.
La fuente de alimentacién del monitor se mantiene caliente, y tiene zonas de alto voltaje incluso cuando la maquina ha sido desconectada, existiendo el riesgo de quemaduras y descargas eléctricas. Tenga cuidado de no tocar estas zonas.
Para evitar posibles descargas eléctricas por cortes, esta maquina debe estar provista de un enchufe debidamente conectado, con TOMA DE TIERRA.
Si en cualquier momento el cable de alimentacion se dafiara, debera ser reemplazado inmediatamente.
No encienda el interruptor de la maquina hasta que ésta haya sido correctamente instalada.
Antes de enchufar la maquina a la red eléctrica, asegtirese de que la maquina esta preparada para el voltaje correcto, y de que se usan los fusibles adecuados. OPP EP BP PBB RE BBE
\
Oo BPE BB
Notas : Si el lugar donde se instalara la maquina tiene un piso pulido, se
Notas : Para acceder a las unidades de Fuente de Alimentacién y CPU, NOTAS DE INSTALACION.
JAMAS ENCIENDA la maquina antes de haber completado la instalacion.
Para evitar posibles descargas eléctricas, aseguirese de que la maquina esta conectada a la red con un enchufe provisto de toma de tierra.
Para que los usuarios no sufran lesiones debido al movimiento del juego, aseglirese de que hay al menos 500 mm de separacién entre éste y otras maquinas 0 las paredes.
Para evitar dafios a la maquina causados por operacién incorrecta, aseglirese de que el voltaje de la red es de 230 voltios, corriente alterna
recomienda colocar tacos de goma bajo los ajustadores de nivel para evitar que la maquina se deslice por el suelo.
aseglirese de que la parte trasera del mueble principal esta separada de muros u otras maquinas al menos 500 mm.
El juego tiene ruedecitas para hacer mas facil su traslado. Tenga cuidado al mover la maquina en una superficie inclinada.
La Unidad de Igualacion tiene el centro de gravedad desplazado hacia adelante. Es importante que su montaje y desmontaje se haga por al menos dos personas.
La posicién de la Unidad de Igualacion es bastante alta, y es importante que haya un medio de alcanzar su altura con seguridad, sin estirarse (p. ej. una escalera, un taburete, etc.)
La altura total de la Unidad principal es de 2.23mm. Tenga cuidado de que no haya obstaculos p. ej. luces. > bP BP
RETIRAR Y REEMPLAZAR PARTES Y UNIDADES.
Las revisiones de instalaci6n, los ajustes, y el mantenimiento rutinario deberan llevarse a cabo sdlo por personal cualificado.
No realice alteraciones en esta maquina sin aprobacién previa. De hacerlo asi, pueden causar peligros imprevisibles.
S6lo deben usarse las partes especificadas por Namco Europe Ltd. para reparaciones o reemplazos (incluidos los tornillos).
Asegtirese de que la maquina esta desconectada antes de comenzar cualquier trabajo de mantenimiento (reparaciones, resolucién de problemas, etc.)
Al realizar trabajos no descritos en este manual, péngase en contacto con su distribuidor para recibir instrucciones. Se declina cualquier responsabilidad por dafios o lesiones
Hay partes de la fuente de alimentacion y del monitor que se mantienen calientes o almacenan alto voltaje incluso tras desconectar la maquina, y pueden producir quemaduras o descargas eléctricas. Tenga cuidado de no tocar accidentalmente estas partes.
Asegtirese de que la maquina esta apagada antes de conectar o desconectar cualquier enchufe o conector. PP BBPBPB BP B&
Al retirar el conector principal de la maquina, o la clavija de alimentacién del enchufe de la red, agarre siempre la clavija y no el cable. ~)
wy,
@B Aucun élément de cette publication ne sera reproduit, ni par procédé mécanique, photographique ou électronique, ni par un moyen d'enregistement phonographique. Ces informations ne seront ni stockées grace a un procédé de récupération, ni transmises ou autrement copiées pour un usage publique ou privé, sans l’autorisation de NAMCO EUROPE LIMITED.
Malgré le fait que les informations contenues dans ce manuel soient données de bonne foi et étaient actualisées au moment de leur impression, NAMCO EUROPE LIMITED se réserve le droit de procéder a des changements ou a des modifications sans avis préliminaire.
Ce jeu a été fabriqué en respect des normes de la Communauté Européenne, aprés avoir été testé il répond aux normes 89/ 336/EEC et 72/23/EEC, en application des standards EN55014, EN55104 et EN60335-2-82 (voir la couverture du manuel), et comme tel il comporte i'autocollant de conformité avec les normes de la Communauté Européenne. Tout changement non autorisé sur ce produit pourrait contrevenir a ces normes.
Sous certaines conditions extrémes d'interférence exteme, par example des transmissions radio, des décharges électrostatiques ou bien de interférences passageéres sur le réseau, certaines dégradations ou anomalies peuvent se produire. Le jeu retrouvera cependant son état normal de fonctionnement lorsque la cause de ces anomalies aura cessé ou se trouvera déplacée.
Ce jeu n’est pas une machine, telle que définie par la norme sur les machines 89/392/EEC.
MESURES DE SECURITE
Afin dtiiser ce jeu en toute sécurité, bien lire ce manuel dutiisation avant de procéder a son installation, son réglage ou son exploitation. Si le propriétaire de ce jeu en confie la démontage, installation, le réglage ou la maintenance habituelle A une autre personne, il devra s’assurer que cette personne ait lu les conseils d'utilisation et les passages du manuel se rapportant a ce theme, avant qu'elle ne commence son travail Afin d’éviter tout accident pendant la durée d’exploitation de ce jeu, se conformer strictment aux conseils de sécurité décrits a la suite. Ce manuel ainsi que le manuel d'installation du jeu (la ou nécessaire) font partie des éléments nécessaires a I'installation de la machine et doivent étre mis a la disposition de l'utilisateur et du personnel de maintenance a tout moment. Ce jeu est uniquement destiné a un usage intérieur et devra étre utilisé comme tel. Namco Ltd. ne sera aucunement tenu responsable en cas d’accidents, de blessure ou de dommage quelconque résultant de modifications non autorisées ou d'usage impropre du jeu
REMARQUES SUR LA SECURITE
Les termes de sécurité détaillés a la suite seront utilisés tout au long de la lecture de ce manuel. II convient de vous familiariser aves chacun de ces termes ainsi que leur signification avant de procéder a installation, a la maintenace ou au réglage du jeu.
AVERTISSEMENT/)\ Ce terme annonce un danger qui pourrait éventuellement avoir des conséquences dommageables ou mortelles. Ne pas passer oltre ce signal jusqu’a ce que les conditions indiquées soient entiérement comprises et effectuées. ATTENTION — (#)_Ce terme indique qu'un danger menace la machine. Ne pas passer oltre ce signal jusqu’a ce que les conditions indiquées soient entiérement comprises et effectuées.
CONSIGNES GENERALES DE SECURITE
Allumer l'appareil seulement aprés avoir vérifié qu’il a été correctement installé, et que les instructions du manuel ont été respectées.
Certaines piéces du jeu bougent quand jeu est en fonctionment, il y a donc des endroits ou la distance entre la zone stationnaire et la zone en mouvement change. Il existe des notes de mise en garde pour les mains et pieds sur les piéces en mouvement. Cependant si l’opérateur pense qu’une personne court un danger, il doit 'en avel
Les notes de mise en garde doivent constamment demeurer en bon état et étre remplacées en cas de disparition, afin que le client puisse les lire clairement.
S’il y una erreur ou un probléme avec la machine, l'utilisation doit étre immédiatement interrompue et le probléme résolu avant toute nouvelle utilisation.
Liinstallation, le service, le réglage, ou la maintenance doivent étre effectués uniquement par les personnes qualifiées.
Afin d’éviter un éventuel incendie, s’assurer que les fusibles soient remplacés par le méme type de fusibles et au bon voltage. L’utilisation d’autres sortes de fusibles ou autres matériels est interdite.
Lalimentation a l’intérieur du moniteur reste chaude et comporte des zones de haute tension méme si la machine est éteinte. Il existe donc un risque de brulure ou d’électrocution. Attention a ne pas toucher ces endroits.
Pour prévenir une éventuelle électrocution due a un défaut matériel, ce jeu DOIT étre muni d’une prise de TERRE connectée en toute sécurité
Si a tout moment les fils électriques sont endommaggés, il faut les remplacer immédiatment
Ne pas mettre le jeu en mode de fonctionnement avant qu’il n’ait été correctement installé.
Avant de connecter la machine au réseau, s'assurer que la machine est installée sous la bonne tension et que les fusibles correspondent. OPP BBBBBPBE BB
Oo F&F BB B&
NE JAMAIS mettre le jeu en marche avant que l’installation ne soit = Afin de prévenir une éventuelle électrocution, s’assurer que la J]
complétement effectuée.
machine est connectée au réseau avec une prise de terre reliée selon les normes de sécurité. —
Afin que les clients ne soient pas blessés par les mouvements du jeu, s’assurer qu’il existe au moins 500 mm de séparation aves les ] autres jeux ou les murs.
Afin d’éviter que la machine ne soit abimée suite 4 une mauvaise ¥ opération, s’assurer que la tension sur le réseau principal soit de 230 Puavzone volts AC.
recommandé de poser des tampons feutrés sous les vérins pour éviter que le jeu ne glisse sur le sol
> EP EP B&B Le jeu est foumi avec des roulettes pour une meilleure mobilité. Prendre garde quand la machine est déplacée sur une surface inclinée.
Le centre de gravité de la partie supérieure du jeu est situé sur l’avant, il est donc indispensable que deux personnes au moins soient employées pour installer ou déplacer la partie supérieure.
stallation de la partie supérieure du jeu s’effectue en hauteur, il est donc important d’utiliser un élevateur quelconque pour en effectuer le montage.
La hauteur totale de l’'assemblage principal est de 2230 mm, prendre garde aux encombrements de la partie supérieure (ex : illuminations du bandeau).
PP BBP BP BBB DEPLACER ET REMPLACER LES UNITES ET LES PIECES DETACHEES.
Linstallation, le service, le réglage, ou la maintenance doivent étre effectués uniquement par les personnes qualifiées.
Ne pas apporter de modifications sur cette machine sans autorisation préalable, faute de quoi cela pourrait entrainer un danger.
Seules les piéces détachées Namco Europe Ltd. doivent étre utilsées pour le remplacement ou la réparation de piéces (y compris les vis)
S’assurer que l’interrupteur soit sor OFF avant de commencer tout travail de maintenance (localisation d'une panne, réparations, etc.)
Si dans ce manuel il manque une information pour réaliser un quelconque travail, contacter votre distributeur, car aucune responsabilité ne sera acceptée en cas de domage ou de blessure.
Les piéces de |’alimentation et du moniteur restent chaudes, a tension élévée méme lorsque la machine est hors tension, elle pourrait occasionner des brilures ou des électrocutions. Attention de ne pas toucher ces endroits accidentellement.
S’assurer que la machine soit hors tension avant de brancher ou débrancher toute prise ou connecteur.
Lorsque l’on manipule la prise au réseau de la machine, ou lorsque les prises principales doivent étre débranchées, saisir toujours la prise, et non le cable.
Kavéva pépog autiig tng EkdSoons Sev yNopei va avanapaxGei LE ONOLOSHNOTE LNXAVIKO .PWTOYPAGIKS h NAEKTPOVIKO LEGO , T} HE HOPOT, wvntixig nXoypagnong Kal oUTE va anoOnKeuTei we enavopewtikd GUOTHUA , va LeTAdobeE! 1 va avtIypagei yia SnLdaIA H LStwTUKy XPH}ON , xwpig ty ddeia Tag NAMCO EUROPE LIMITED.
Ka@dg autéc ot nAnpoopies ce auté To eyXelpidio éxouv 5o8ei He KAA ioTH Kat aKpIBdg THY dpa THE TUNWONG , N ETaIpeia NAMCO EUROPE LIMITED kpatdet to dikaiwpa va Kavet onoteddrnote addayés Xwpig etSonoinan.
Ta unxaviyata xouv Kataokeuaatei cUUpwva Ue Tous dpoug tg Eupnaikiis KolvotnTaG , Kat XoUV EAEYXBEl CL uVa Le TOUS VoHOUS 89/336/EOK kat 72/23/EOK ve Thy aitnan tev EN55014 , EN55104 kai EN60335-2-82 oravrapts (Sec uMpoaTa ato eyxeipidio) kat 6a EXouV To CE ofa . OnoiadHnote aAAayi} } HeTaTpoMT} Ge UTS To ENXAVNHA NpENE! va Eivat cULwva UE Tous dpous tng EupwNaikii KowvdTnTaG, Onoteddinote adAayés xwpig Ade1a ve auTé to Npoidv uopei va NapaBei autos Tous 6pous.
Ee Kdrioles MepinTdaEIg UNEPBOAIKIIG EEWTEPIKIG aPEUBOANS .T.X. PAdlOgwviKEs HETAdSOEIG , NeKTpOOTATIKES WETABOAES fh apOdIKES euBorgs , untopei va napouciactouy Kdnoleg ABASTHTES OTV NapoUGiaaN . MaVvTwg To UNXavnUG Ba EnaVEABEL THY PUDLOAOYLKT napouciaan £ dcov n ry THs NapeUBoAg otapaTioet FH anopaKpUVeet
Enpeiwon : Eav yivet reset otov processor Tou uNXavijHaTog KaTa TH Siapketa tHS KUPLag NapOXNG , MOvTOL MoU éXouV KepSnGEi pNopei va xa8ouv.
Auto To naixvidt Sev eivat unXavnya drwe npoodiopiZerat and tous dpoug Mnxavnvatwv 89/392/EOK .
OAHFIES AZOAAEIAE
Tia my aopaAn Xpron TOU LNXavFjLAToS , NPENEt va SiaBaveIg To eyXeIpib10 XPHaNG NPooEKTIKA NpLV THY EYKATaOTaGN ,ToNOBETHON Hh Xpron Tou WNXavraTos. Onotedinote 0 W1oK THINS GUTOU TOU ENXAvF|LATOS {NTAEL AN6 KérIO1o MPSowNo va eyKaTAOTHGEI , Va Kdvet OMOLaBrNOTE aAAAYT Hh EheyXo poutivag oto unXavnua , Mpénet va eivat ciyoupog 6Tt Exel StaBaoet Ig OdNYieg aUTOU Tou eyXEIptdiou MLV va apxioet va douaevet Nog anoguyry onoioudrinote atuxr\WaTog Kata THY AetToUpyia TOU UNXavF|LATOS , aUOTHPLg akOAoUBoUVTal ot dyes AopAAELAG énwg divovtat napaKétw Auté To eyxeipid1o Ge cUVSUAOUE LE To eyXeIpid10 eyKaTdoTaaNG (Sntou dtaTiBETal) anoTEAEi Eva CAOKANPULEVO LPOG TwV NapoXdv kal npénet va eivat SiaGéoipo ya Thy Aettoupyia Kat To G4US0A ontoadrjnote oTtyLN. Auté To UNXAvnya efvat yia Xprjon USvo Ge EowTEPIKS XHpO Kal Ba TIPENEL va XPNOILOTIOLeITAL USvO yia ToUG ASYoUS Ya ToUG oNO{oUG kaTaokeudotmKe H eraipeia diy Hd Sev pépet Kapia evedvn ya atUXrHATa , MANYés r KaTACTPOpEs TOU LNOpEl va MPOKANBoWV aNd aAAayés xwpic ABe1a oe H e1oaywyeic auToU TOU UNXavFwatos.
ZHMEINZEIE AZ@AAEIAS,
Ot axddouses onpetmoets aoParciag XoNoonoloUvTal LEW aUTOL ToU eYXEIpLBIoU . AtaBace auTEg NpogEKTIKG yia va yivet KaTavonté To VéNHa Tous MpLV Thy EYKaTAoTAGN , GéPBIG 1 ONOLAdyMOTE adAayy Yivet OTO ENXavNLA.
MIPOEIAONOIHEH =H mposiSonoinan agopa kivuvo o onoiog ynopsi va civai Adyos @avarou . Na nv Mpoxwproei Ge onoladinore Kivnon Exp! aUTOI o1 6pol yivouv KaTavonToi.
MPOZOXH (0) H npoox apopa Kivduvo 0 onolog pnopel va NpoKaAgoel MPOBANUA TO LNXavNHG . Na uv TPoXwprgetg Ge oMoLGdyMoTE Kivnon UEXpt aUTOI ot 6pot Yivouv KaTavontol.
ESETAZH PENIKHE AZOAAEIAE
Agou éxe1 katavonBei auTé To eyXeipidio , Wévo TéTe va AEIToUpYHGE! To NXavNHA H Va Yiver EdeyXos ep daov éxer vive! eykaréataon. >
Mépn Tou wnxavipatos peTaKvouvral KaTa THY SidpKela evdg MaIXvidION , ETO! GoTE va UMAPXOUV HEPN érOU Nn aNéoTaoN HETAEG Tou Hépous aTéBpeEVONG Kal TéTIoU KivnaNg va Nope; va GAA Ze! . YNapXouV MpoeiSonoN}oEIG va cival Ta Xépia Kal Ta NdBia paKpId ané Ta wépn mou KivouvTal, Sys o BioKTFTHS Mpéne! va EAgyXel CAV KATIOIOG KIVBUVEUE! Va TOV E1SoTTOIH|GE! Kal Va TOV amopapiver . >
Or mpoeiSononjaeig mpéne! va wEvouv KaBapé Kal GE KAN KaTAOTAON GoTE o MEAATHG va Tig SiaBAze1 KaBapé.
Eav umapxet Ad8og Ff mpéBANHa He To WNXAvNuG , n AcIToupyia Mpéne! va CTaPATae! ayEows Kal Va diopAdveTal To AGBOG MpIV omoladinote GAAn Xpron.
Eykaréoraan , wetarpom fl EeyXoc pourivas pmopsi va yivetar ydvo and efous1odoTnyéva Groua.
Tia ouvexi mpootagia ané gwrid , mpéne! 01 aopaAcies va avTIKaBIoTOUVTaL HE id1oU TUTIOU -H XpHaN GAAwV aopaAEIaV A avrixeipévev anayopederal.
To Tpopodoriké oto eowrEpiKé Tou yNXaviiNATOG Oa TapayEive! ZeoTs Kal UM&PXoUV NEPIOXés HE UIPNAF Téon Map’dAo TOU To mnxavqpa Sev SouAcdel , kal UNGpxXe! N MIBavéTHTa NAEKTPIKOU GOK . Npogoxt Va UNV akoupMHoEIG auTEs TIg MEpIoXés.
Tia thy anopuy# NAEKTpIKd@V GOK Adyo BAGBng , To WNXavqya MPENE! va éxe1 npwTa evwOei pe yeiwon.
Eav Kérroia ory KataoTpadei n KUpIA NapoX: , Mpénel va avTiKaTacTaBEi auEows.
Na pny avéwer ro pnxdvnya (46; Gi U6) Exp! va Exe! eyKaTacTade! Gword Kal MAApwC.
Now my napoxt pevdpatog oto uNXavnya , va eigat atyoupos 6t1 Ta Uidijiia Kal ddeg ot aopaAcies eivat owoTd evwpéva KaL Tonodetpéva. OBPBPBP BP BB BBE
~\
be B&B
0)
Ne ZHMEIOSH: — Edv To ndtwya oto onoio eivat TonoBetnHEVO To UNXavnua ZHMEIOZEIS FIA THN ETKATAZTAZH
Tia thy anopuyn nAeKtpiKdv ooK npénel To UNXavnHG va ExeI yewwOsi.
Tia thy anopuyh KivSuvou o¢ Kanolov naikth , Mpénel To HNXavqG va £Xe1 andéctaon TouAdxiotov 5008E and GAO HNXavNUG H ToIXo.
Tia THY anopuyr BAGBNG TO LNXavna Adyo AGBog Aettoupyiag , TIpénel n Mapoxy} Va eivat 230UiaH
yAvotpdel.eivat KAAS Va pret &va KOLHATI HoKETaG ya anopuyn Hetakivnons Tou ENXavHHATos ev dpa AétToUpyiag Tou.
ZHMEIOSH: — Pia THY EUKOAN TMpdoBaon aTHY Kupiws NapoXy 1 To MS Mpémet 1 niow népta Tou -NXAVHATOG va aTEXEl TOUAGXLOTOV 500EE ané Tov ToiXxo 1 AAO ENXaVvnG.
To unxavnua eival epodiacpévo pe KapouAla yia THY EUKOAN HETaKivnaH Tou.
To endvw pépos Tou pnXavipatos éXe1 emIMAgov Bapog yiauTS xpEldZovTal Suo yia THY HETapopA.
H kegaAf (kanaki) Tou UNXaviHATOS sival MOAY WNAS Kal ylaUTS xXpElaZETaI MPoGoX! GTHY ToTOBETHGH Tou , Va ENV XTUTHOEI H KaTaCTpAgE:.
To GUVOAIKé Upos THs KE@aArg cival 223028 . dpévtice va yNv XTUTIHOE! Ge AdyTIES K.A.T.
ANMOMAKPYNEH KAI ANTIKATAZTAZH MEPON - ANTAAAAKTIKON
Eykatdoraon , Hetatpomi fh EAeyXog pouTivas yTopsi va yiveral wovo ané eEouTIOdoTHHEVa GTOHG .
Asv npénei va yivovrai petatponés ota ynxavijpata wpig éyKpion . Mropei va TpoKAN@ei anpéBAenTos kivduvos.
Mévo pépn rou dieuxprvigovrai ané Thv etaipeia diy ” hii@ uTopowv va Xpnaiponoinéouv yia avtikaTaotaan f emdi6p6won. (ouumepiAayBavovre kal o1 BidEs)
Na sivai ciyoupa KAcioTé To peta nplv onoladrnoTe SouAIa GTO yNXavNuG.
Edv vive karro1a SouAsid oro uNXavna Xwpig va SieuKpIVviceTai TO EyXEIpIdIO , va EMIKOIV!VHOEIG HE TOV avrimpéoumo yia odnyies yiati Kapia cu@ivn dev spoupE yla KaTaoTpOpéEs A PAGBEG.
Mépn Tou Tpopodorikou f Tou HéviTop Napapévouv Zeord Fh EXoUV UWNAH TdoN aKOpA Kal taV OBIE! TO HNXavnHa Kar popouv va MpoKAAgcoUY KaIpIHO H AcKTpOOSK.riaUTS Sev MpénEl va EpXovTal ge enapH HE xépia.
To ynxdvnua npénet va sival oBnoTé Kata Thy oUVdEon H anocuvdean MpiZag Hh KovEKTOpa.
Karé Thy arnopaKpuvon Twv KeVTpIKGV KOVEKTOP amd To HNXavNHA H THg KUpiag MpiZag , MpénEI va TIGVOUHE To TAGOTIKS HEPOG Kal 6X! TO KAADBIO. bP BB BBP BP BB
@ Nessuna parte di questa pubblicazione pud essere riprodotta con processo meccanico, fotografico o lettronico, né sotto forma di registrazione fonografica, nd pud essere memorizzata in un sistema di salvataggio, trasmessa o in altro modo copiata per uso pubblico 0 privato, senza l’autorizzazione di NAMCO EUROPE LIMITED.
Le informazioni contnute in questo manuale sono state date in buona fede ed erano accurate al momento della pubblicazione. Tuttavia NAMCO EUROPE LIMITED, si riserva il diritto di apporre cabiamenti e variazioni senza alcun preavviso. Questo apparecchio é stato costruito in conformita alle Direttive della Comunita Europea, ed é stato provato e soddisfa le Direttive 89/336/EEC e 72/23/EEC per 'applicazione degli standards delle norme EN55014, EN55104 e EN60335-2-82 (vedi fronte del manuale), e per questo porta il marchio CE. Qualsiasi cambiamento 0 modifica di questo apparecchio deve essere in conformita con le Direttive della Comunita Europea
In caso di condizioni di estrema interferenza dall’esterno, per esempio trasmissioni radio, scariche elettrostatiche o transitori sulla linea, pud verificarsi un decadimento delle prestazioni. Comunque l'apparecchio ritornera al rendimento normale quando la sorgente dell,interferenza avra cessato di emettere o sara stata rimossa.
Nota bene: se il processore del gioco “resetta” a causa di una interruzione o diminuzione del voltaggio di linea, un eventuale credito, gid concesso, pud essere annullato.
Questo goco non é una macchina cosi come viene definita dalla Direttiva Macchine 89/392/EEC.
AVVERTENZE PER LA SICUEZZA
Allo scopo di usare questo apparecchio in sicurezza, leggere questo Manuale dell’operatore attentamente prima dell'installazione, regolazione o uso di questa macchina Tutte le volte che il proprietario di questo apparecchio affida lo smontaggio, l'installazione, la regolazione o la manutenzione ordinaria ad un’altra persona, il proprietario stesso deve assicurarsi che quella persona legga le precauzioni necessarie e i paragrafi importanti di questo manuale prima di iniziare a lavorare. Perché non succeda alcun incidente quando la macchina é operante, seguire rigorosamente le note sulla sicurezza come specificato piu avanti. Questo manuale insieme con il manuale di installazione (dove si pud applicare) forma una parte integrante dell'apparechio e deve essere disponibile sempre al personale operante e di servizio Quest macchina deve essere usata solo in interni e deve essere usata solo per gli scopi per cui é progettata. Namco Europe Ltd non si assume responsabilita per incidenti, ferite o damni risultanti da cambiamenti non autorizzati o da uso improprio della machina.
Le seguenti note sulla sicurezza sono usate dal principio alla fine di questo manuale. Valutare attentamente ciascuna di queste note ed il loro significato prima di installare, fare assistenza o regolazioni su questa macchina.
CONSIDERAZIONI GENERALI SULLA SICUREZZA
Mettere in funzione l’apparecchio solo dopo aver controllato che l’installazione sia stata effettuata correttamente ed in conformita alle istruzioni del manuale.
Parti di questa macchina si muovono durante il gioco, quindi ci sono posti dove le distanze tra la parte fissa e quella mobile cambiano. Ci sono awvisi “Warning” di tenere mani e piedi lontani dalle parti mobili, comunque se Poperatore crede che una persona sia in un qualche pericolo, deve awisare quella persona. Gli avvisi “Warning” devono sempre essere conservati in buone condizioni e sostituti se consumati, cosicche il cliente li possa leggere chiaramente.
Se vi sono errori o problemi con la machina, si deve interrompere il funzionamento immediatamente e risolvere il problema prima di ogni ulteriore uso.
L’installazione, ’'assistenza, le regolazioni e la manuzenzione ordinaria devono essere eseguite solo da persone jonee e qualificate.
Per una protezione costante contro il rischio di fuoco, assicurarsi che i fusibili sulle alimentazioni siano solo sostituiti con lo stesso tipo e caratteristiche. L’uso di altri fusibili o mate! proibito.
L’alimentatore all’i spenta, c’é quin iterno del monitor rimane caldo ed ha zone di alto voltaggio anche se la macchina é stata ja possibilita di bruciature o scosse elettriche. Fare attenzione a non toccare queste zone.
Per prevenire possibili scosse elettriche dovute a difetti, quest macchina DEVE essere installata con un connettore sicuramente MESSO A TERRA.
In caso il cavo di alimentazione di rete risultasse danneggiato deve essere sostituito immedatamente.
Non accendere la macchina finché la stessa non é stata installata completamente e correttamente. OPP BPBBPBBPBP BB
Prima di collegare la macchina alla rete, assicurarsi che la macchina sia preparata per il voltaggio corretto e che siano inseriti i fusibili adatti.
Oo FP FP -
NON ACCENDERE MAI la macchina finché Vinstallazione non é
stata completata. ;
Allo scopo di prevenire possibili scosse elettriche, la macchina deve essere obbligatoriamente collegata alla rete con un connettore messo a terra con connessioni sicure.
Perché i clienti non siano feriti dal movimento del gioco,
assicurarsi che ci siano almeno 500mm di distanza rispetto alle altre macchine o rispetto al muro.
Per evitare danni alla macchina durante la messa in opera, assicurarsi che il voltaggio della rete sia 230 volts AC.
e si raccomanda di sistemare dei cuscinetti di gomma sotto i piedini di livellamento per prevenire lo sciovolament della macchina sul pavimento.
> EP Be Il gioco é fornito di ruote per rendere piil facile il suo spostamento. Fare attenzione quando si muove la macchina su una superficie inclinata.
La testata ha il baricentro spostato in avanti, é percid importante che ci siano almeno 2 persone per montare o smontare la testata stessa.
La posizione di fissaggio della testata é molto alta, ed é importante che ci sia un mezzo disponibile per raggiungere tale altezza in sicurezza e senza allungamenti. (Ad esempio scalini, scale portatili etc.)
Ualtezza totale della parte principale é 2230mm, fare attenzione ad eventuali ostacoli sopra la testata ovvero ad eventuali installazioni di luci.
>BP BBB PBB RIMOZIONE E SOSTITUZIONE DI GRUPPI E PARTI STACCATE
Liinstallazione, l’assistenza, le regolazioni e la manuzenzione ordinaria devono essere eseguite solo da persone idonee e qualificate.
Non apporre alcuna modifica alla macchina senza autorizzazione preventiva. II fare questo pud causare un pericolo non prevedibile.
Quando si rimpiazza o si riparano delle parti (incluse le viti) si possono usare solo parti approvate dalla Namco Europe Ltd.
Assicurarsi che la macchina sia SPENTA prima di incominciare qualsiasi lavoro di manutenzione (guasti, riparazioni etc.)
Se state per iniziare un lavoro non descritto in questo manuale, contattate il vostro distributore per instruzioni poiché non si accetta alcuna responsabilita per danni o ferite.
Parti dell’alimentatore e del monitor rimangono caldi o portano alta tensione anche dopo aver spento Papparecchiatura e possono causare bruciature o scosse elettriche. Attenzione a non toccare queste parti accidentalmente.
Assicurarsi che la machina abbia l’interruttore nella posizione OFF prima di inserire o disinserire qualsiasi connettore o spina.
Quando vengono rimossi i connettori principali dalla macchina oppure la spina dell’alimentazione dalla parete bisogna sempre afferrare il connettore e non il cavo. w,
@
Ingen del av denne utgivelsen ma reproduseres av noen mekaniske, fotografiske elle elektroniske prosesser, eller i form av fotografiske opptak, og ikke kan det lagres i et gjenvinnbart system, sendt eler kopiert for offentlig eller privat bruk, uten tillatelse fra NAMCO EUROPE LIMITED.
Da informasjonen i denne manualen er gitt i god tru og var korrekt da den ble utgitt, tillegger NAMCO EUROP LIMITED seg retten til a lage forandringer uten varsel.
Denne maskinen er produsert i samsvar med direktiver framsatt av det Europeiske samfunn. Maskinen er testet og samsvarer med direktivene 89/336/EEC og 72/23/eec med anvendelse av EN55014, EN55104 og EN60335-2-82 standarder (se i begynnelsen av manualen), og derfor beerer CE merket. Hvilken som helst forandring eller modifisering ma skje etter direktivene satt av det Europeiske samfunn. Uautoriserte forandringer pa dette produktet, kan motstride disse direktivene.
Under noen forhold av ekstreme ytre forstyrrelser, f.eks radio sendere, elektronisk utladning eller transiente spenninger, kan man tegne med noe senket ytelse. Men maskinen vil oppna normal ytelse nar kilden til forstyrrelsene oppharer eller er fysisk fjernet.
Merk:- Hvis spillets prosessor resettes p.g.a et Kutt eller reduksjon av hovedspenningen kan oppsparte kreditt pa spillet forsvinne.
Dette spillet er ikke en maskin som er definert ved Maskin direktivet 89/392/EEC.
Sikkerhets advarsel.
For a bruke denne maskinen uten noe form for fare, serg for a lese denne manualen noye far installasjon, justeringer eller bruk av maskinen. Nar eieren av denne maskinen overlater avmontering, installasjon, justering eller rutine vedlikehold til en annen person, skal eieren forsikre seg om at denne personen leser de passende forsiktighetsreglene og relevante deler av manualen for han starter pa arbeidet For a forhindre at ulykker inntreffer nar maskinen er i drift, falg strengt teksten om sikkethet som beskrevet nedenfor. Denne manualen sammen med installasjons manualen (hvor det er anvendelig) er en intrigert del av utstyret og ma vere tilgjengelig for drift- og servispersonell til alle tider. Denne maskinen er bare for innendars bruk og skal bare benyttes etter mente hensikter. Namco Ltd. bzerer intet ansvar ved ulykker, kvestelse eller skade som falge av uautoriserte forandringer, eller for uriktig buk av maskinen.
Sikkerhets beskjeder.
Felgende sikkerhets punkter er brukt ut denne manualen. Gjor deg kjent med disse punktene og deres mening for installasjon, service eller du utforer noen innstillinger pa denne maskinen
ADVARSEL _/)\ Advarsel inneberrer en risiko som kan fare til kvestelse eller dod. Ikke fortsett utover advarslen for den er ordentlig forstatt og mottiltak er igangsatt.
FORSIKTIG (1) Forsiktig innebeerer en risiko som kan medfore skade pa maskinen. Ikke fortsett utover advarslen far den er ordentlig forstatt og mottiltak er igangsatt.
VANLIGE SIKKERHETSTILTAK
Bruk bare denne maskinen etter 4 ha kontrollert at den er korrekt installert ifolge manualen.
Deler av denne maskinen er i bevegelse under spill, det er derfor plasser hvor avstanden mellom de stillestaende deler og bevegelige deler forandres. Det er plassert skilt med advarsel for 4 holde hender og fetter borte fra bevegelige deler, men uansett skal operatoren varsle vedkommende hvis han foler at han er i noen form for fare.
Advarsel skiltene ma bestandig holdes i skikket stand og eventuelt byttes ut hvis det oppstar skade pa dem, slik at kunden uten vanskelighet kan lese dem.
Hvis det er en feil eller et problem med maskinen, ma den straks settes ut av funksjon. Og ma under ingen omstendigheter startes for problemet er rettet pa.
Installasjon, service, justering eller rutine vedlikehold skal bare utfores av kvalifiserte personer.
For fortsatt beskyttelse mot brann, forsikre deg at hoved sikringen bare byttes ut med en av samme type og verdi. Bruk av andre sikringer eller materiale er forbudt.
Stromforsyningen inne i monitoren vill vzere varm og ha omrader med hey spenning selv om maskinen har blitt slatt av. og det er muligheter for skader og elektriske sjokk. Vzer forsiktig sa du ikke berorer disse omradene.
For & forhindre mulige elektriske sjokk grunnet funksjonsfeil, ma denne maskinen vere ordentlig jordet.
Hvis ledningen til hoved stromforsyningen skades ma den straks bytes ut.
Ikke sla pa maskinen for den er korrekt installert.
For du kopler maskinen til stramnettet, forsikre deg om at maskinen innstilt for den korrekte spenningen og de riktige sikringene benyttes. OBPBPPB PBB BBE BB
© » BB»)
\ MERKNADER: Hvis plassen hvor spillet skal plasseres har polerte gulv anbefales
MERKNADER: For a fa adgang til stramforsyningen og CPU-kott, forsikre deg om MERKNADER VED INSTALLASJON
Sla ALDRI pa maskinens str@mforsyning for installasjonen er fullfert.
For a forhindre eventuelle elektriske sjokk, forsikre deg om at maskinen er koplet til et stramnett med ordentlig jording
For a forhindre at kundene blir skadet av spillets bevegelige deler. forsikre deg om at det er minst 500mm avstand mellom andre maskiner eller vegger.
For a fothindre skade pa maskinen p.g.a. feil bruk, srg for at spenningen til hoved stramforsyningen er 230Volt AC.
det at du benytter gummi sko under niva justeringene, for forhindre at maskinen kan fiytte pa seg
at bakparten av hoved kabinettet er skilt fra vegger eller andre maskiner med minst 500mm.
> PEP BB Spillet har montert hjul for 4 gjore det letter a flytte pa. Hver forsiktig nar det skal flyttes pa en hellende overflate.
Hoved enheten i spillet har tyngdepunktet i fronten, sa det er viktig at minst 2 personer blir brukt til a montere eller flytte denne enheten.
Monterings posisjonen til hoved enheten er veldig hey, og det er viktig at denne hayden nas sikkert, uten at man ma strekke seg. Benytt deg av hjelpemiddel. (f.eks sto, krakk, gardintrapp osv)
Den totale hayden pa hoved enheten er 230mm. veer forsiktig med heye hindringer som f.eks lysror.
> BP EP EB BP PBB FJERNE OG UTSKIFTE ENHETER OG DELER.
Installasjon, service, justering eller rutine vedlikehold skal bare utfores av kvalifiserte personer.
Ikke lag noen forandringer pa denne maskinen uten godkjenning. Dette kan medfore uforutsette farer.
Bare deler spesifisert av Namco Europe Ltd. skal benyttes ved utskifting eller reparasjon av deler (dette gjelder ogsa skruer).
Forsikre deg om at strommen er slatt av for du pabegynner noe som helst vedlikeholdsarbeid (feilsoking, reparasjon osv.)
Hvis du utforer arbeid som ikke er beskrevet i denne manualen, ta kontakt med din distributor for instruksjon da ikke noe ansvar vill bli akseptert for skade pa maskin eller pa personer.
Deler av stromforsyningen og monitoren er fortsatt varm eller baerer haye spenninger selv etter strommen er slat av og kan forsake skader eller elektriske sjokk. Forsikre deg om at du ikke berorer disse delene.
Forsikre deg om at maskinen er slatt av for du kopler sammen eller tar fra hverandre plugger eller koplinger.
Nar du fjerner hoved koplingene fra maskinen, eller hoved pluggen fra stopselet, ta bestandig tak i pluggen og ikke ledningen. /
@D Niets uit deze publikatie mag worden gereproduceerd door enig mechanisch, fotografisch of electronisch proces, of in de vorm van een fonografische opname, noch mag het opgeslagen worden in een retrieval systeem, doorgezonden of anderszins gekopieerd voor publiek of privégebruik, zonder toestemming van Namco Europe Limited.
Ofschoon de informatie in deze handleiding in goed vertrouwen is gegeven en nauwkeurig was ten tijde van het drukken, houdt Namco zich het recht voor om veranderingen en aanpassingen te maken zonder bericht.
Deze machine is geproduceerd volgens Richtliinen van de Europese Gemeenschap, en is getest en is in overeenstemming met de Richtliinen 89/336/EEC en 72/23/EEC door de toepassing van de standaards EN55014, EN55104 en EN60335-2-82 (zie voorin de handleiding) en draagt als zodanig het CE-merk. Enige veranderingen of aanpassingen aan deze machine dienen in overeenstemming te zijn met de Richtlijnen van de Europese Gemeenschap. Enige ongeauthoriseerde veranderingen aan dit produkt kunnen in strijd zijn met deze Richtlijnen.
Onder sommige omstandigheden van extreme externe storingen, bijy. radiotransmissies, electrostatische ontladingen of pieken op het net, kan prestatieteruggang optreden. De machine zal echter normaal presteren zodra de storingsbron gestopt of verwijderd is.
Let op: - als de spelprocessor reset a.g.v. een onderbreking of vermindering van de netstroom, dan kunnen opgebouwde credits verloren gaan
Dit spel is niet een machine zoals omschreven in de Machinery Directive 89/392/EEC.
Veiligheidsopmerkingen Om deze machine veilig te kunnen gebruiken, dient vé6r installatie, aanpassing of gebruik van deze machine, de Bedieningshandleiding Zorgvuldig gelezen te worden Telkens wanneer de eigenaar van deze machine de demontage, installatie, aanpassing of routine-onderhoud toevertrouwd aan een andere persoon, dient de eigenaar er voor te zorgen dat deze persoon de juiste voorzorgsmaatregelen en relevante gedeeltes uit de handleiding lest voordat hij begint. Om er voor te zorgen dat geen ongelukken gebeuren als de machine gebruikt wordt, dienen onderstaande veiligheidsaanwijzingen Zorgvuldig opgevolgd te worden. Deze handleiding maakt samen met de installatiehandleiding (waar van toepassing) een integral deel uit van de apparatuur en moet te allen tijde ter beschikking staan van exploitatie- en onderhoudspersoneel. Deze machine is alleen bedoeld voor gebruik binnenshuis en dient alleen gebruikt te worden voor bedoelde doeleinden. Namco Ltd. is niet verantwoordelijk voor ongelukken, letsel of schade die voortkomt uit ongeoorloofde veranderingen aan of onjuist gebruik van deze machine
heidsopmerkingen
De volgende veiligheidsopmerkingen worden overal in deze handleiding gebruikt. Maak uzelf vertrouwd met deze opmerkingen en hun betekenis véér installatie, het plegen van onderhoud of het aanbrengen van aanpassingen aan deze machine. WAARSCHUWING /\_ Waarschuwing geeft een gevaar aan dat zou kunnen resulteren in letsel of de dood. Ga niet verder dan een waarschuwingsopmerking totdat de aangegeven omstandigheden volledig begrepen zijn en hieraan voldaan is. VOORZICHTIG — (#)_Voorzichtig geeft een gevaar aan dat zou kunnen resulteren in schade aan de machine. Ga niet verder dan een voorzichtigheidsopmerking totdat de aangegeven omstandigheden volledig begrepen zijn en hieraan voldaan is
ALGEMENE VEILIGHEIDSOVERWEGINGEN
Stel deze machine alleen in gebruik nadat gecontroleerd is of de machine correct en overeenkomstig de handleiding is geinstalleerd.
Gedeeltes van deze machine bewegen tijdens het spel, waardoor er plaatsen zijn waar de afstand tussen het stilstaande gedeelte en de bewegende sectie verandert. Er zijn waarschuwingsstickers om handen en voeten van bewegende delen af te houden; als de exploitant echter van mening is dat iemand in gevaar is, dan dient hij deze persoon dienovereenkomstig te waarschuwen.
De waarschuwingsstickers dienen altijd in goede staat te worden gehouden en vervangen indien versleten, zodat de klant ze goed kan lezen.
Als zich een fout of probleem voordoet met de machine, dan dient de machine onmiddellijk stopgezet en het probleem verholpen te worden voordat de machine verder gebruikt wordt.
Installatie, service, aanpassingen of routine-onderhoud dient alleen uitgevoerd te worden door hierin bekwame personen.
Om blijvende bescherming tegen brandgevaar te garanderen, dient ervoor gezorgd te worden dat de netzekeringen alleen vervangen worden door zekeringen van hetzelfde type en dezelfde sterkte. het gebruik van andere zekeringen of ander materiaal is verboden.
De voeding in de monitor blijft warm en er kunnen componenten electrisch geladen blijven ondanks dat de machine UlTgeschakeld is, waardoor er brandwonden of electrischee schokken kunnen worden opgelopen. Ben voorzichting en raak deze delen niet aan.
Om mogelijke electrische schokken a.g.v. storingen te voorkomen, MOET deze machine voorzien zijn van een goed vastzittende aardstekker.
Mocht het netsnoer op enig moment beschadigd worden, dan moet deze onmiddellijk vervangen worden.
Zet de machine niet AAN totdat deze correct is geinstalleerd.
Voordat de machine op het lichtnet wordt aangesloten, dient gecontroleerd te worden of de machine op het correcte voltage staat afgesteld en of de correcte zekeringen zijn aangebracht. OPP EP BP BPBBPRE BB
va
a A
A
A
©
OPMERKING: Als de machine op een gladde ondergrond wordt gebruikt, is het Opmerkingen aangaande Installatie
Sluit de machine nooit aan op de stroomtoevoer totdat de installatie is voltooid.
Om mogelijke electrische schokken te voorkomen, dient ervoor gezorgd te worden dat de machine middels een goed vastzittende aardstekker op het lichtnet is aangesloten.
Om ervoor te zorgen dat klanten niet gewond raken door de beweging van het spel, dient ervoor gezorgd te worden dat er minimaal 500mm. ruimte is tussen andere machines of muren.
Om schade aan de machine door verkeerd gebruik te voorkomen, dient ervoor gezorgd te worden dat het voltage van het lichtnet 230volts AC bedraagt
raadzaam rubber matjes onder de stelpootjes te bevestigen om te voorkomen dat de machine over de vioer gaat glijden.
OPMERKING: Om toegang te krijgen tot de voeding- en de CPU-assemblies, dient ervoor gezorgd te worden dat de achterkant van het kabinet minimaal 500mm verwijderd is van de muur of andere machines.
Het spel is voorzien van wieltjes, waardoor het gemakkelijker is om te verplaatsen. Wees voorzichtig als de machine op een hellend viak gereden wordt.
Het zwaartepunt van de Header Assembly ligt aan diens voorkant, waardoor het belangrijk is dat minimaal 2 personen de Header Assembly aanbrengen of verwijderen. De Header Assembly moet op een hoge positie geplaatst worden en het is dus belangrijk dat deze hoogte veilig kan worden bereikt zonder veel te strekken. (bijv. middels een trap of een kruk)
De hoogte van het hoofdgedeelte is 2230mm: kijk dus uit voor obstakels zoals lampen.
> BP BP Be B
> & Verwijderen en vervangen van Assemblies en onderdelen
Installatie, service, aanpassingen of routine-onderhoud dient alleen uitgevoerd te worden door hierin bekwame personen.
Maak geen veranderingen aan deze machine zonder goedkeuring vooraf. Dit kan onvoorzien gevaar opleveren.
Alleen onderdelen die door Namco Europe Ltd. zijn gespecificeerd dienen gebruikt te worden bij het vervangen of repareren van onderdelen (incl. schroeven).
Zorg ervoor dat de machine UlTgeschakeld is voordat er enig onderhoudswerk wordt verricht (troubleshooting, reparaties etc.)
Bij het verrichten van werkzaamheden die niet in deze handleiding staan beschreven, dient voor instructies altijd contact opgenomen te worden met de verdeler aangezien geen verantwoording wordt genomen voor schade of letsel.
Delen van de voeding en de monitor blijven warm of behouden hoogspanning zelfs nadat de machine UlTgeschakeld is en zouden verbrandingen of electrische schokken kunnen veroorzaken. Ben voorzichting en raak deze delen niet per ongeluk aan.
Zorg ervoor dat de machine is UlTgeschakeld voordat pluggen of connectors ingestoken of uitgetrokken worden.
Als het netsnoer uit de machine of uit het stopcontact verwijderd wordt, dient altijd de stekker vastgepakt te worden en niet het snoer.
®) Nenhuma parte desta publicaco poder ser reproduzida por processos mecanograficos, fotograficos, electrénicos ou ainda sob a forma de gravacdo sonora nem to pouco podera ser gravada através de sistemas informaticos transmissiveis ou de outra forma copiados para uso publico ou privado sem autorizacdo expressa da NAMCO EUROPA LIMITADA.
A informagao contida neste manual foi fornecida de boa fé, sendo rigorosa na altura da sua publicagao. ANAMCO EUROPA LIMITADA, reserva-se 0 direito de proceder a mudangas e alteracdes sem qualquer aviso prévio Esta maquina foi fabricada de acordo com as Directivas Comunitarias Europeias e tem sido testada em conformidade com as seguintes Directivas: 89/336/EEC e 72/23/EEC através dos requerimentos normativos, EN55014, EN55104 e EN60335-2-82 (ver capa frontal do manual) e como tal sustenta o cettificado de marca de CE. Quaisqueres alteragdes ou modificagées efectuadas nesta maquina deverdo ser em conformidade com as Directivas da Comunidade Europeia. Quaisquer alteragdes nao autorizadas a este equipamento poderdo infrigir tais Directivas.
O funcionamento normal desta maquina, podera ser afectado debaixo de algumas condicées extremas de interferéncias externas tais como; transmissées via radio, descargas electroestaticas e passagens de corrente na rede de alimentacao. Contudo o seu funcionamento normal sera restabelecido logo que a fonte de interferéncias tenha cessado ou tenha sido neutralizada
Nota :- Se 0 processador de jogo for inicializado devido a uma interrup¢ao ou quebra da corrente principal, quaisqueres creditos obtidos poderdo desaparecer.
Este jogo por si sé nao contitui uma maquina tal como defenido pelas Directivas de Maquinaria de 89/392/EEC8.
AVISOS DE SEGURANCA Afim de usar esta maquina com seguranga, certifique-se que lé este manual de operador atentamente antes de proceder 4 montagem e afinagdo ou uso da mesma. Sempre que o proprietario desta maquina confiar a desmontagem, instalagdo, afinago ou manutengao preventiva da mesma a outra pessoa, devera este assegurar - se que a pessoa em questao Ié as precaugdes apropriadas e capitulos relevantes deste manual antes de iniciar o trabalho. Afim de evitar qualquer tipo de acidente quando a maquina estiver em funcionamento, devera seguir rigorosamente os procedimentos de seguranca descritos abaixo Este manual juntamente com o manual de instalac4o (aonde aplicavel), contituem parte integrante do equipamento e deverao estar sempre disponiveis ao operador e pessoal tecnico de assisténcia. Esta maquina destina-se a ser operada em espagos interiores apenas e a sua utlizago deve circunscrever-se somente aos ins previstos. ANamco Ltd. declina qualquer responsabilidade por acidentes, ferimentos ou danos resultantes de modificagdes nao autorizadas ou uso indevido desta maquina
AVISOS DE SEGURANCGA
Os seguintes avisos de seguranga s4o usados através de todo o manual. Familarize-se com cada um destes avisos e respectivos significados antes de instalar, assistir ou efectuar qualquer afinagdo nesta maquina
PERIGO /\ Perigo revela uma situagao anormal que podera resultar em ferimentos ou morte. Nao avance para além de um aviso de Perigo sem que todas as condigées indicadas estejam completamente esclarecidas e resolvidas.
CAUTELA (0) Cautela revela uma situagdo anormal que podera resultar em danos materiais para a maquina. Nao avance para além de um aviso de Cautela sem que todas as condiges indicadas estejam completamente esclarecidas e resolvidas. (3 2ae
AVISOS DE PERIGO
Esta maquina so devera ser colocada em funcionamento apos ter sido verificado que se encontra instalada correctamente e de acordo com o manual de instrugées.
Algumas partes componentes desta maquina movem-se durante a acco de jogo, porconseguinte existem lugares aonde a distancia entre a seccdo fixa e mével altera-se. Existem avisos para manter as maos e os pés afastados da zona de perigo mével, contudo caso o operador se aperceba de alguma pessoa em perigo, devera avisar a mesma em conformidade.
Os avisos de perigo devem ser sempre mantidos em boas condigées de leitura de forma a permitir uma leitura clara por parte do utilizador, caso se encontrem danificados deverdo ser substituidos.
Caso esta maquina manifeste algum erro ou problema durante o seu funcionamento, devera ser imediatamente parada até que o problema em questo seja rectificado.
A montagem, assisténcia e afinagées ou manutengdo de rotina desta maquina, deverao ser somente executadas por tecnicos ou pessoas devidamente qualificadas para o efeito.
Afim de garantir uma protecdo anti - fogo permanente nesta maquina, certifique-se que os fusiveis de protecdo séo sempre substituidos por fusiveis de igual valor ou calibre aos de origem. O uso de outro tipo de fusiveis ou material é proibido.
A fonte de alimentacao do monitor encontrar-se-a quente, tendo zonas de alta voltagem, mesmo apés a maquina ter sido desligada. Deste facto podera resultar a ocurréncia de queimaduras ou choques electricos. Seja cuidadoso para evitar contacto com estas zonas.
Esta maquina deve estar sempre equipada com uma ficha com circuito de proteccdo a Terra, afim de evitar possiveis choques electricos, caso surga uma falha no sistema.
Se a qualquer altura o cabo de alimentagdo principal ficar danificado, devera ser imediatamente substituido.
Nao ligar a maquina sem que esta tenha sido correctamente instalada.
Antes de ligar a maquina a tomada da rede de alimentacdo principal, certifique-se de que a maquina esta preparada para a voltagem correspondente e de que também se encontra protegida com os fusiveis apropriados. OPP EP BP BPBPBREP BB
© PP BB )
NOTAS : Se esta maquina estiver colocada sobre um chdao polido,
NOTAS : Quando precisar de aceder a fonte de alimentagdo e as placas
NOTAS SOBRE A INSTALAGAO
NUNCA ligar a maquina sem que a instalacdo esteja completamente finalizada.
Afim de evitar possiveis choques electricos, certifique-se que a maquina esta ligada a rede de alimentacao com uma ficha protegida com circuito de terra.
Afim de evitar ferimentos pessoais nos clientes, provocados pelo J movimento da maquina, certifique-se que existe pelo menos 500mm de separacdo entre outras maquinas ou paredes.
Afim de evitar danos_na maquina causados por falhas de i operacao, certifique-se que a voltagem da rede de alimentacao +2 ee | principal é de 230volt AC. Nhs) muavzone
tecomenda-se a utilizagdo de tapetes de borracha debaixo dos pés niveladores, afim de prevenir a maquina de deslizar no chao.
(CPU), certifique-se que a parte trazeira do mével central esta separada da parede ou de outras maquinas pelo menos 500mm afim de ganhar espaco de manobra
> EP Be B Esta maquina esta equipada com rodas afim de facilitar a sua deslocagdo tenha cuidado ao mover a maquina num plano inclinado.
O bloco Superior (Cabega) tem o centro de gravidade para a frente, porconseguinte 6 importante que pelo menos sejam utilizadas duas pessoas para montar ou desmontar este Bloco Superior.
A posicao do bloco superior quando montado na maquina é muito alta. Torna-se importante ter meios seguros de alcance, tais como; escadotes ou escadas afim de evitar riscos desnecessarios.
Aaltura total do bloco principal, 6 de 230mm, tenha cuidado com qualquer tipo de obstrugées existentes em altura como por exemplo; calhas electricas ou candeiros.
~
Va bP BP BBB BE B&
SUBSTITUIGAO E MONTAGEM DE PEGAS
A montagem, assisténcia e afinagées ou manutengdo de rotina desta maquina, deverao ser somente executadas por tecnicos ou pessoas devidamente qualificadas para o efeito.
Nao faga qualquer tipo de alteragao prévia nesta maquina sem aprovacao pré provocar danos e perigos imprevisiveis. Se tal acontecer podera
A substituicdo ou reparacdo de pegas devera ser feita apenas com pecas de origem ou especificadas pela “Namco Europa Ltd.” (incluindo parafusos)
Certifique-se que a maquina se encontra desligada sempre que iniciar qualquer tipo de trabalho de manutengao. (identifacdo de avarias, reparacao etc.)
Caso esteja a efectuar um trabalho nao descrito neste manual, certifique-se que contacta o seu distribuidor para obter instrugdes, caso contrario ndo serao aceites responsabilidades por danos causados ou ferimentos.
Algumas zonas da fonte de alimentagao e do monitor ficam quentes e transportam correntes de alta voltagem, mesmo depois de a maquina ter sido desligada, podendo causar queimaduras e choques electricos. Tome cuidado para néo tocar acidentalmente estas zonas.
Certifique-se que a maquina esta desligada antes de ligar ou desligar qualquer tipo de fichas ou jungées.
Quando desligar a ficha principal da maquina ou a ficha do cabo de alimentaco das tomadas da parede, devera sempre agarrar na ficha e nunca puxar pelo cabo da mesma.
S Ingen del av denna publikation far reproduceras, varken fotografiskt, elektroniskt eller i nagon form av |judinspelning. Det far inte heller lagras i nagot atervinningssystem, dversandas eller pa annat satt kopieras for offentlig eller privat anvandning, utan tillstand fran NAMCO EUROPE LIMITED.
Eftersom informationen i denna manual lamnas ut i god tro och var korrekt nar den trycktes, reserverar sig NAMCO EUROPE LIMITED for andringar.
Denna maskin har tillverkats enligt direktiv fran europeiska unionen, ar testad och uppfyller direktiven enligt 89/336EEC och 72/23/EEC med tillampning av EN55014, EN55104 och EN60335-2-82 standard (se manualens framsida) och bar darmed ocksa CE-market. Varje forandring eller modifiering av denna maskin maste ske i 6verens-stammelse med EU-direktiven. En férandring i denna produkt, som inte ar auktoriserad, kan strida mot dessa direktiv.
Under vissa omsténdigheter nar det galler extrema externa stérningar, t ex radiosandningar, elektrostatiska urladdningar eller natburna strémstémingar, kan resultera i en nagot nedsatt funktion. Maskinen kommer dock att aterga till normal funktion, sa shart stérningen har upphért eller avigsnats
OBS! Om spelprocessorn startar om till fljd av ett avbrott eller reducering av stro6mmen kan registrerade krediter ga férlorade.
Detta spel ar inte en maskin enligt definitionen i Maskindirektivet 89/392/EEC SAKERHETS VARNING
For att maskinen ska kunna anvandas pa ett sdkert satt, ska manualen lasas noggrant fére installation, anvandning eller justering. Om Agaren till maskinen anfortror nagon annan person att montera isar, installera, justera maskinen eller utféra rutinunderhall, ska agaren férsakra sig om att denna person laser om forsiktighetsatgarder och tillampliga delar av denna manual innan arbetet pabérjas. For att forhindra att nagon olycka hander nar maskinen 4r igang, maste sdkerhetspunkterna beskrivna nedan foljas strikt. Denna manual tillsammans med installationsmanualen (nar tillmpligt) utgér en integrerad del av utrustningen och maste vara standigt tillganglig for operatérer och service personal Maskinen ar avsedd for inomhusbruk och ska endast anvandas for detta Andamal Namco Ltd. bar inget ansvar for olyckor eller skador som orsakats av icke auktoriserade Andringar i maskinen eller felaktigt anvandande av densamma.
SAKERHETSANVISNINGAR
Sakerhetsanvisningarna nedan anvands genomgaende i manualen. Gor dig fértrogen med varje anvisning och
dess innebérd innan installation, service eller justeringar gérs pa denna maskin
VARNING A "Varning” anger en fara som skulle kunna skada eller férorsaka dédsfall. Fortsatt inte vid en sadan varningsanvising innan de pavisade férhallandena 4r férstadda och atgardade i sin helhet.
OBSERVERA (1) "OBSERVERA" anger en fara som skulle kunna férorsaka skada pa maskinen. Fortsatt inte vid en sadan varningsanvising innan de pavisade férhallandena ar férstadda och atgardade i sin helhet.
ALLMANNA SAKERHETSBEAKTANDEN
‘Att inte igang maskinen utan att ha kontrollerat att den ar korrekt installerad och i 6verensstammelse med manualen.
Eftersom delar av maskinen rér sig under spel finns det stallen dar avstandet mellan den stationara delen och den rérliga andras. Det finns varningsanvisningar om att halla hander och fétter borta fran rérliga delar, men skulle operatéren anse att en person ar i nagon som helst fara, ska personen ifraga varnas.
Varningsanvisningarna maste alltid hallas i gott skick och ersattas nar de blir slitna, sa att kunderna kan lasa dem dem tydligt.
Om det uppstar fel eller problem med maskinen, maste anvandningen stoppas omedelbart och problemet rattas till innan den ater anvands.
Installation, service, justeringar eller rutinunderhall ska endast utféras av en fér 4ndamalet kvalificerad person.
For kontinuerligt skydd mot brandfara, ska man férsakra sig om att huvudsdkringarna endast ersatts med samma typ och specifikationer. Anvandandet av andra sakringar eller material ar forbjuden.
Strémfdrsérjningen inne i monitorn haller sig varm och har omraden med hdg spanning, ven nar maskinen stdngts av och det finns risk for brannskada eller elektriska stdtar. Var férsiktig och vidrér aldrig sAdana omraden.
For att forhindra en eventuell elektrisk st6t férorsakad av fel, MASTE maskinen vara férsedd med sakert ansluten JORDAD kontakt.
Om strémfdrsérjningskabeln pa nagot satt skadas, maste den bytas ut omedelbart.
Vrid inte strémbrytaren till ON innan maskinen ar korrekt installerad. OPP P BP BBB Be BB
Innan strémmen sats pa till maskinen, maste man forsakra sig om att den Ar installd pa ratt spanning och att ratt sakringar ar isatta.
A A
A
©
OBSERVERA: Om maskinen ar placerad pa ett polerat goly,
OBSERVERA: For att kunna komma at strémférsérjningen och CPU, se till ATT BEAKTA VID INSTALLATION
‘att aldrig pa strémmen pa maskinen innan installationen 4r Klar.
Fér att férhindra elektriska chocker, férsdkra dig om att maskinen kopplas till strémférsérjning med jordad kontakt
For att undvika skador av spelets rérelser, férsakra dig om att det finns ett avstand pa minst 500 mm till annan maskin eller vagg.
Fér att undvika skador pa maskinen p g a felaktigt handhavande,
forsakra dig om att strémstyrkan ar 230 volt AC.
rekommenderas att placera gummibrickor under nivajusteringen fér att férhindra att maskinen glider pa golvet.
att baksidan av huvudkabinettet ar placerat minst 500 mm fran vagg eller annan maskin.
> P BP Spelet ar férsett med hjul fér att underlatta férflyttningar. Var férsiktig om spelet ska flyttas pa en sluttande yta.
Toppskylten har tyngdpunkten framtill, darfér ar det viktigt att minst 2 personer satter dit eller tar bort den.
Toppskyltens placering ar mycket hégt upp och det ar viktigt att sadana hjalpmedel anvands sa att man nar upp utan att stracka sig (t ex trappstege, pall osv).
Den totala hdjden ar 2230 mm, tank pa eventuella hégt placerade hinder, t ex lampor. ~
~
PRP BP bP BP BP BB ATT TA BORT ELLER BYTA UT ENHETER OCH DELAR
Justeringar och underhall pa denna maskin skall endast utféras av kvalificerad personal.
Gér inga andringar pa denna maskin utan ett godkannande i férvag. Detta kan férorsaka oférutsagbar fara.
Endast delar som ar specificerade av Namco Europe Ltd. ska anvandas vid utbyten eller reparation av delar (inklusive skruvar).
Férsakra dig om att strémmen 4r avstangd innan underhallsarbete pabérjas (felskning, reparationer etc.)
Om arbete ska utféras som inte ar beskrivet i denna manual, ar det viktigt att kontakta aterférsaljaren fér instruktioner eftersom inget ansvar accepteras fér averkan eller personskador.
Delar av stré6mférsérjningen och monitorn ar varma och strémbarande Aven efter strémmen stangts av och kan orsaka brannskador eller elektriska stétar.
Férsakra dig om att maskinen 4r avstangd innan kontakter satts i eller tas ur.
Nar kontakten tas ur maskinen eller ur vaggen, ta alltid tag i kontakten och inte i sladden.
GE) Tasta julkaisusta ei saa ottaa missaan muodossa kopioita yksityis- tai julkiseen kayttéon ilman NAMCO EUROPE LIMITED:in lupaa.
Tassa ohjekirjassa olevat tiedot pitavat julkaisuhetkella paikkansa. NAMCO EUROPE LIMITED:illa on kuitenkin oikeus muutoksiin ilman erillista ilmoitusta
Tama laite on valmistettu EC direktiivien mukaisesti. Se on testattu ja todettu noudattavan seuraavia direktiiveja: 89/336/EEC ja 72/23/EEC (EN55014, EN55104 ja EN 60335-2-82 standardit). Nain ollen tama laite on varustettu CE-merkinnalla. Kaikki tahan laitteeseen kohdistetut muutokset on tehtava EC- direktiivien mukaisesti. Mika tahansa valtuuttamattoman huoltomiehen tekema muutos voi olla direktiivien vastainen.
Laitteen toiminta voi hairiintyé maardityissé olosuhteissa, jotka johtuvat adrimméisist ulkoisista sahkdhairibista, kuten radiolahetys, elektrostaattinen purkaus tai vahvavirrasta syntynyt hairié. Toiminta normalisoituu kuitenkin heti, kun ulkoinen sahkéhairié on poistettu.
Huom:- Jos peliprosessori resetoituu sahkdkatkoksen tai vastaavan johdosta, voivat kaikki pelivaraukset havita
Tama laite ei ole 89/392/EEC direktiivien mukainen kone.
Turvallisuusvaroitus
Taman laitteen turvallinen kaytté edellyttaa kayttdohjekirjan huolellista lukemista ennen laitteen asennusta, sAatda tai kaytt6a. Jos taman laitteen omistaja antaa jollekin toiselle osapuolelle tehtavaksi purkaa, asentaa, sdataa tai muuten huoltaa laitetta, on omistajan varmistuttava siita, ett toinen osapuoli on lukenut ja ymmartanyt kayttéohjekirjan oleelliset osat ennen tyéhon ryhtymista Turvallisuusohjeita on seurattava tarkoin vahinkojen valttémiseksi laitteen ollessa kaytéssa . Tama ohje sek mahdollinen asennusohje muodostavat laitteiston oleellisen osan ja on siksi aina oltava huolto- ja kayttohenkilékunnan kaytettavissa. Tama laite on tarkoitettu vain sisatilakaytt66n. Sit ei saa kaytta& muihin tarkoituksiin. Namco Ltd ei vastaa niista onnettomuuksista, loukaantumisista tai vahingoista, jotka johtuvat laitteeseen ilman Namco Ltd:n lupaa tehdyisté muutoksista laitteen vaarast kaytésta.
Turvallisuusohjeet
Tassa kayttdohjekirjassa on kaytetty seuraavia turvallisuuteen liittyvié huomautuksia. Tutustu jokaiseen naista. Ald asenna, huolla tai s4&da laitteistoa, ennen kuin olet taysin ymmartanyt mita ne tarkoittavat.
VAARA —_/\_ “Vaara” tarkoittaa uhkaa, joka voi johtaa loukkantumiseen tai kuolemaan, Ald koskaan ohita Vaaramerkintaa, ennenkuin ohjeissa esitetyt olosuhteet on ymmérretty taysin.
VAROITUS (7) “Varoitus” tarkoittaa uhkaa, joka voi johtaa laitteen vioittumiseen. Ala koskaan ohita Vaara-merkintaa, ennenkuin ohjeissa esitetyt olosuhteet on ymmarretty taysin.
YLEISET TURVALLISUUNAKOKODAT
Varmista, etd laite on asennettu oikein ja ohjekirjan mukaisesti ennen kayttéénottoa. >e Laite sisaltaa toimiessaan liikkuvia osia. On paikkoja, jossa liikkuvien osien ja paikalla pysyvien osien valimatka muuttuu. Tallaisissa paikoissa on varoitustaulut, joissa kehotetaan pitamaan kasia ja jalkoja poissa liikkuvista osista. Jos kayt 4 mielta, etd joku henkilé on vaarassa, on kayttajan velvollisuus varoittaa vaarassa olijaa.
Varoitustaulut on pidettava hyvassa kunnossa. Jos ne ovat kuluneet, ne on ehdottomasti vaihdettava, jotta asiakkaalla olisi mahdollisuus lukea niita selvasti.
Jos laitteeseen tulee vika tai ongelmia, on se pysdytettava valittémasti ja ongelma selvitettéva ennen uutta kayttddnottoa.
Vain riittavan ai ttipatevyyden omaava henkilé saa suorittaa asennus-, huolto-, saat6- tai muita laitteeseen kohdistuvia rutiinitoimenpiteita.
Jotta palovaaraa ei syntyisi, saa padsulakkeita vaihtaa vain samankokoisiin sulakkeisiin. Muiden sulakkeiden tai materiaalin kaytté on ehdottomasti kielletty.
Monitorin sisalla oleva virtalahde pysyy kuumana ja siina on alueita, joissa on korkeajannite vaikka laite on kytketty pois paalta. Palovammojen tai sahkdiskun saaminen on mahdollista. Ala koske naihin alueisiin.
S&hkéiskujen valttamiseksi vikatapauksissa, laite on ehdottomasti kytkettava maadoitetulla johdolla maadoitettuun pistorasiaan.
Vioittunut verkkojohto on valittémasti vaihdettava.
Ala kytke laitetta paaille, ennen kuin se on oikein asennettu. OPP PB Be Be BP B& Varmista ennen verkkoon kytkemista, etta virtalahteen jannitteen asetus on asetettu oikealle jannitteelle ja etta siina on oikeat sulakkeet.
>
0)
Huomio: Jos tama laite sijoitetaan liukkaalle esim. vahatulle lattialle, ASENNUSHUOMIOITA
Ala koskaan kytke laitetta paalle ennen kuin asennus on suoritettu ;
loppuun.
Taman laitteen virtalahde on kytkettava maadoitetulla johdolla maadoitettuun pistorasiaan, jotta sahkdiskun vaaraa ei olisi.
Varmista, etta laitteen ja seinan tai toisen laitteen valissa on vahintaéan 500 mm, jotta asiakkaat eivat loukkaannu laitteen likkumisesta johtuen.
PLAYZONE: Varmista, etta virtalahteen jannite on 230 V AC, jotta ei laite vioitu.
suositellaan laitettavaksi kumityynyt sAatdjalkoihin likkkumisen estamiseksi.
Huomio: Varmista, etta takaosan taakse jaa vahintéan 500 mm tilaa, jotta virtalahteeseen ja CPU-korttiin paasee kasiksi.
Laite on varustettu kaantyvilla pydrilla. Tama on pidettaéva mieless4, kun laitetta siirretéan kaltevalla alustalla.
Ylaosan painopiste on ylaosan etuosassa. Tasta syysta on ylaosaa asennettaessa tai poistettaessa oltava vahintaan kaksi henkilda.
Ylaosan asennusasento on e' in korkealla. On tarkeaa, etta tarvittavalle korkeudelle paastaan vaivattomasti ilman venyttémista. (esim. kayta tukevia tuoleja tai tikkaita)
Laitteen kokonaiskorkeus on yli 2230 mm. Varmista, ettei katossa ole esteita. esim. valaisimia.
Va ~ PRP BP BBE BP BRB B&B Vain riittévan ammattipatevyyden omaava henkilé saa suorittaa asennus-, huolto-, saat6- tai muita laitteeseen kohdistuvia rutiinitoimenpiteita.
Talle laitteelle ei saa tehda mitdan hyvaksymattémia muutoksia. Se voi aiheuttaa ennalta-arvaamattomia vaaroja.
Vain Namco Europe Ltd:n maarittelemia varaosia saa kayttaa vaihtaessasi tai korjatessasi osia. (sisdltaen ruuvit).
Varmista, eta laite on kytketty POIS PAALTA ennen tyén aloittamista.
Ota yhteytté maahantuojaan ohjeita varten, jos joudut tekemaan tyétehta huoltokirjassa, muuten vastuuta vioista tai loukkaantumisista ei ole.
Virtalahde ja monitori pysyvat kuut kytketty pois p
Varmista, eta laite on kytketty POIS PAALTA ennen johtojen kytkemista tai
Irrottaessasi verkkojohdon seinasta tai laitteesta, ota kiinni itse pistokkeesta, ei johdosta.
- SPECIFICATIONS
POWER SUPPLY:-
AMBIENT OPERATING TEMPERATURE
MONITOR:-
COIN ACCEPTOR:-
DIMENSIONS:- Assembled
Monitor Cabinet Gun Assy Header Assy
WEIGHT:- Assembled
Monitor Cabinet Gun Assy Header Assy
ACCESSORIES:- 230v /390watts AC
+5°C to +25°C
Thomson 46” Projection Monitor
Mars CashFlow - 1 Channel
1116(w) x 1840(d) x 2230(h)
1116(w) x 800(d) x 1840(h) B00(w) x 1040(d) x 1200(h) 1080(w) x 610(d) x 530(h)
220kg
154kg 42kg 24kg
Keys: (Cash Door) . (Coin Door) (Back Door...
IEC Mains Lead .......000 1
Operators Manual .............000005 1 Monitor Manual CashFlow Documents
Security Wrench (M5)............0.... 1
- HOW TO PLAY
. This product is a gun shooting game for one or two players.
. Insert the specified number of coins to obtain the required credits. After establishing credits, press the Start button to start the game.
. When the game starts, shoot the enemies that appear on the screen.
. The player’s gun can shoot up to eight rounds in succession.
. When the gun is out of ammunition, point the gun away from the screen to reload.
. Life items and bonus items are hidden at various points within the stage. Shoot the items to obtain them.
“Life items”: The player’s lives increase by one. The number of lives cannot exceed the “MAX LIFE” set in the Test mode “GAME OPTIONS’ (See 6-2-2 page 45).
“Bonus items”: The score increases. The bonus items include “Garlic”, “Holy water’, “Silver coins”, “Golden skull’, and “Watermelon”.
. The stage in which the boss character appears is cleared by defeating the boss character.
. During one-player play, another player can join during the game. The required credit must be inserted to join the game.
. The player’s lives decrease when shot by enemies. Once all the lives are consumed, the continue play entry starts.
. The game is over when the player has lost all lives. The player may continue the game by selecting continue at game over, (Provided the player has credit established).
. If the player’s score on clearing the game is within the day’s best ten, the player can enter their name.
. The current best ten names are displayed as “RANKING” on the ranking screen in Attract mode.
. The current best ten players’ names and scores are not erased even when the power is switched off. To erase the current best ten names and scores. (refer to 6-2-2 page 45.)
- MAJOR COMPONENNTS
Projector
Gun Assy Sensor Assy
Gun cabinet
Mains-In Assy
- MOVING THE MACHINE
Z\ _ This equipment is fitted with castors to make it easier to move. Take care when moving the equipment on an inclined floor.
Z\ The overall height of this equipment is 2230mm. Take care of any overhead obstructions. (e.g. Light Fittings, Electric Cables etc.)
- INSTALLATION
Notes on Installation
| WARNING | « | NEVER turn the power to the machine ON until installation |
has been completed.
| WARNING | «+ | In order to prevent possible electric shocks, be sure that the |
machine is connected to the mains with a securely connected earthed plug.
| WARNING | ° | So that customers are not injured , ensure that there is at |
least 500mm separation between other machines or walls.
| CAUTION | . | In order to avoid damage to the machine due to mis-operation, |
ensure that the voltage of the mains supply is 230volts AC.
NOTE . If the location site of this machine has a polished floor it is
recommended that rubber pads are fitted under the level adjusters
to prevent the machine sliding on the floor.
In order to gain access to the Power Supply and CPU assemblies,
make sure that the rear of the machine is separated from a wall or other machine by at least 500mm.
When installation is complete, it is imperative that the guns are initialized. (See section 6-2-3-1 page 47)
no
PaOPe
no
OaAPo
=
eoop A
This machine is designed for INDOOR USE ONLY. Do not install in the following places.
Outdoors Direct Sunlight, places with excessive humidity or dust, places where there is water leakage, near air-conditioning or heating equipment, places with excessive heat or cold temperature. Places where it would be in the way of emergency exits or fire extinguishing equipment. Unstable places or places with excessive vibration. Places that are not level. This machine must not be cleaned with a water jet, or installed in an area where a water jet could be used.
DIESES GERAT IST NUR FUR DIE GEWERBLICHE AUFSTELLUNG IN GESCHLOSSENEN RAUMEN BESTIMMT. DAS GERAT DARF AN FOLGENDEN PLATZEN NICHT AUFGESTELLT WERDEN
Im Freien. In direktem Sonnenschein, an extrem feuchten und staubigen Platzen, an Platzen mit Wasseranschliissen und méglichen Leckagen, nahe Klima- und Heizungsanlagen, an Platzen mit extrem hohen oder niedrigen Temperaturen. In der Nahe von Notausgangen oder Feuerléschgeraten. An unstabilen Platzen oder Platzen mit ibermafBiger Vibration. An Platzen, die nicht eben sind. Diese Maschine darf nicht mit einem Wasserstrahl gereinigt oder in einem Bereich installiert werden, in dem Wasserstrahlen verwendet werden.
DENNE MASKINE ER KUN DESIGNET TIL INDEND@RSBRUG INSTALLER IKKE MASKINEN PA FOLGENDE STEDER
Udenders Direkte sollys, steder med hgj fugtighed el. stov, steder med vand udslip, i nerheden af air-condition eller varme udstyr, steder med uszedvanlig hgj el. kold temperatur. Steder hvor den vil sta i vejen for nodudgange eller brandslukningsudstyr. Ustabile steder eller steder med for store vibrationer. Steder der ikke er plane. Maskinen ma ikke renses med en vandstrale eller monteres et sted hvor det er muligt at bruge en vandstrale.
ESTA MAQUINA ESTA DISENADA UNICAMENTE PARA USO EN INTERIORES. NO INSTALE LA MAQUINA EN LOS SIGUIENTES LUGARES.
Exteriores. Bajo luz solar directa, en lugares con polvo o humedad excesiva, lugares donde hay filtraciones de agua, cerca de aparatos de calefaccion o de aire acondicionado, lugares con temperatura ambiente muy alta o muy baja. Lugares donde la maquina obstruya salidas de emergencia o equipos de extincion de incendios. Suelos inestables o lugares con vibraciones excesivas. Lugares con suelos no nivelados. Esta maquina no debera ser lavada con agua a presion. Tampoco debera instalarse en areas donde puedan haber chorros de agua.
© =
vo
PAae
no
PAE
CETTE MACHINE EST DESTINEE UNIQUEMENT A UN USAGE INTERIEUR
NE PAS INSTALLER LA MACHINE DANS LES ENDROITS SUIVANTS
Alextérieur. Directement exposée au soleil, aux endroits excessivement humides ou poussiéreux, aux endroits ou il y a des risques de fuite d’eau, prés de ventilateurs ou source de chaleur, aux endroits trés chauds ou froids. Dans des zones de proximité des sorties de secours ou d’accés aux équipements d’extinction du feu. Dans des emplacements instables ou soumis a de fortes vibrations. Dans des endroits dénivelés. Ne nettoyez pas cette machine sous un jet d’eau et ne l’installez pas a un endroit ou l’on risque d’employer des jets d’eau.
TO MHXANHMA EINAI ZXEAIAZMENO PA XPHZH ZE EZQTEPIKO XQPO MONO MHN TOMOOETHZETE TO MHXANHMA TOYZ AKOAOYOOYE XOPOYE
E&wtepixa Ameu@eiac oTov HAlo,oe PEPH OTou UTaPXéE! UYpaoia fh OKOVN,HEPN OTOU UTIAPXE! a8ovo vepo,kovTa oe air-condition GAAou cidouc GEppavon,péepny pe UTEPROAIKH uwnAn f XapNAn SeppoKpagia. Ze wEpH Orou epTOdiZouv pEoa avayKnes 1.x. MUpooBeoTNHpEs f GAAa. Mn ota8epa pépn f HEPN HE TOAAOUG Kpadaopouc. Mépn nou dev eivai enineda. Ne nettoyez pas cette machine sous un jet d’eau et ne l’installez pas i un endroit ow Von risque d’employer des jets d’eau.
QUESTA MACCHINA E’ PROGETTATA PER ESSERE USATA ESCLUSIVAMENTE IN AMBIENTI INTERNI. NON INSTALLARE LA MACCHINA NEI SEGUENTI LUOGHI.
In ambienti esterni. Alla luce diretta del sole, in posti con eccesiva umidita 0 polvere, in luoghi dove ci siano infiltrazioni d’acqua, vicino ad apparecchi di condizionamento d’aria oppure riscaldamento, in posti eccessivamente caldi o freddi. In luoghi dove potrebbe esserci un uscita di emergenza o un’attrezzatura per lo spegnimento del fuoco. In posti non stabili o con eccessive vibrazioni. In luoghi non piani. La macchina non deve essere pulita con un getto d’acqua, né installata in un’area in cui si utilizza un getto d’acqua.
DENNE MASKINEN ER BARE KONSTRUERT FOR INNEND@RS BRUK IKKE INSTALLER MASKINEN PA FOLGENDE PLASSER.
Utenders Konstant sollys, plasser med mye fuktighet og stov, plasser hvor det er vannlekasje, nere luft kjolere eller varme elementer, plasser med overdreven hoy eller lav temperatur. Plasser hvor det vill sta i veien for nodutganger eller brannslukking utstyr. Ustabile plasser eller plasser med overdreven vibrasjon. Plasser som ikke er i vater. La macchina non deve essere pulita con un getto d’acqua, né installata in un’area in cui si utilizza un getto d’acqua.
INSTALLEER DE MACHINE NIET OP DE VOLGENDE PLAATSEN
@D DEZE MACHINE IS ALLEEN VOOR GEBRUIK BINNENSHUIS ONTWORPEN
Buiten In direct zonlicht, op plaatsen met een zeer hoge vochtigheidsgraad of met veel stof, op plaatsen waar een waterlek is, dichtbij airco’s of verwarmingsapparatuur, op plaatsen met een zeer hoge of koude temperatuur.
- Op plaatsen waar nooduitgangen of blusapparatuur worden geblokkeerd.
- Op onstabiele plaatsen of plaatsen waar grote trillingen voorkomen.
- Op plaatsen die niet viak zijn.
- Deze machine mag niet gereinigd worden met een waterstraal of geinstalleerd worden op een plaats waar een waterstraal gebruikt kan worden.
ESTA MAQUINA FOI CONCEBIDA PARA UTILIZAGAO EM ESPACOS @) INTERIORES APENAS. NAO INSTALAR A MAQUINAS NOS SEGUINTES LOCAIS:-
- Exteriores.
- “Luz solar directa, locais com humidade excessiva ou po, locais aonde existam fugas de agua perto de ar condicionados ou equipamentos calorificos e locais com temperaturas excessivamente quentes ou frias.
- Locais aonde ficaria colocada no caminho de saidas de emergéncia ou equipamentos extintores de fogo.
- Locais estruturalmente instaveis ou locais com vibrag6es excessivas
- Locais nao nivelados.
- Esta maquina nao deve sem limpa com jato de agua, ou instalada em area na qual possam ser usados jatos de agua.
DENNA MASKIN AR AVSEDD ENBART FOR INOMHUSBRUK
‘S) INSTALLERA EJ MASKINEN PA FOLJANDE STALLEN
- Utomhus
- I direkt solsken, platser med extremt hég luftfuktighet eller damm, platser dar det forekommer vattenlackage, nara luftkonditionering eller varmeelement, i extremt hog eller lag temperatur.
- Platser dar den skulle kunna vara i vagen fér n6dutgangar och brandslackningsutrustning.
- Instabila stallen eller dar stark vibration forekommer.
- Platser med nivaskillnad.
- Denna maskin far inte rengéras med en vatten strale, eller monterad inom ett omrade dar en vatten strale kan anvandas.
TAMA LAITE ON SUUNNITELTU VAIN SISAKAYTTOON ALA ASENNA LAITETTA SEURAAVIIN PAIKKOIHIN:
- Ulkotilaan
- Suoraan aurinkovaloon, kost in, vesivuotopaikkojen
POP ldheisyyteen, ilmanvaihto- tai kuumaa tai kyImaa. tavien, muiden pakoteiden tai tulensammutusvilineiden eteen. Epavakaisiin tai iseviin paikkoihi Kaltevalle alustalle. ata laitetta ei saa pesta suihkuttamalla sille vetta eika sijoittaa sellaiseen paikkaan, miss se voi joutua alttiiksi vesisuihkuille. mityslaitteen lahistdlle tai paikkoihin, jossa on erittain
5-1 Removing the Header Assy
The Header assy has a forward centre of gravity, so it is important that at least two (2) people are used to fit or remove the Header assy.
The fitting position of the Header assy is high, and it is important that a means of reaching the height safely, without stretching, is available, (e.g. steps, step stool, etc.).
- Place the Header Assy on to the top of the Monitor Cabinet, and connect the connector.
- Slide the Header Assy back, taking care not to trap any wires, so that it engages under the retaining bracket.
- _ Fit 30ff hex head screws (M6x30) to retain the Header Assy in position.
Header Assy
Hex head screw (M6x30)
5-2 Fitting the Gun Cabinet to the Monitor Cabinet
- Remove 4off hex head screws (M8x30) and remove the Joint Brackets from their shipping position. Refit the Joint Brackets as shown below with the 4off hex head screws (M8x30).
Gun cabinet
Hex head screws (M8x30)
- Place the Gun Cabinet close to the Monitor Cabinet and connect the connectors.
- Place the Gun Cabinet fully up to the Monitor Cabinet, taking care not to trap any wires, and fit 40ff hex head screws (M8x30)
Monitor cabinet \ yo iH
Gun cabinet :
Joint bracket Hex head screw (8x30)
5-3 Adjusting the Level Adjusters
- When the game is in it’s final position, lower the four (4) Level adjusters on the Monitor Cabinet, with a spanner, so that all castors are raised from the floor by approximately 5mm. Tighten the lock nuts with a spanner to ensure that the Level Adjusters do not move.
CO Approx. 5mm
Level adjuster Castor
5-3 Fitting the CD Rom
. The supplied CD-ROMs are designed for this game only. Do not use them with other games. Do not insert any other CD-ROMs. These may result in malfunction. . Always install one CD-ROM to each Game PCB Assy. . Note that the tray automatically closes after approximately 10 seconds.
- Remove the Lower Rear Door from the Monitor Cabinet.
- Press the EJECT button on the CD-ROM drive to open the tray.
CD-ROM tray Operating lamp
EJECT button
Game PCB Assy
- Mount the CD-ROM on the tray with the label (print) surface upwards.
- Press the EJECT button on the CD-ROM drive to close the tray.
- Replace the Monitor Cabinet Rear Door.
6 ADJUSTMENTS
® @GF 08660 6 ® ®@
©
C) A
Adjustment or maintenance on this machine should be carried out by qualified personnel only.
Einstellungen und Wartung des Gerates diirfen nur von dafiir qualifiziertem Fachpersonal vorgenommen werden.
Justeringer eller vedligehold af denne maskine bor kun udfores af kvalificeret personale.
Los ajustes y el mantenimiento de esta maquina deben ser realizados slo por personal cualificado.
L’installation, le service, le réglage, ou la maintenance doivent étre effectués uniquement par les personnes qualifiées.
Metatponéc f emdiop@woeIc oTa PNXAVAYATA Npénel va yivovtal Povo ald e€ouciodoTHpEva GTopa.
Regolazioni e manutenzione su questa macchina devono essere fatti solo da personale specializzato.
Justering eller vedlikehold pa denne maskinen skall bare utfores av kvalifiserte personell.
Aanpassingen of onderhoud aan deze machine dient alleen uitgevoerd te worden door bekwaam personeel.
Afinagées ou manutengao nesta maquina, deverdo ser efectuadas somente por pessoal qualificado.
Justeringar och underhall pa denna maskin skall endast utféras av kvalificerad personal.
Tata laitetta saa saataa tai huoltaa vain siihen ammattipatevyyden omaava henkilékunta.
6-1 Adjustment Switches
The Adjustment switches are located inside the coin door.
- Service Switch. Press this switch to obtain game credits without incrementing the play meter.
- Test Switch Slide the test switch ON to enter test mode. Test mode allows testing and the changing of game settings. (Refer to section 6-2 "Test Mode" page 43)
- Select Up/Down Switch This switch is used to select the test required when in the Test Mode.
- Enter Switch This switch is used to enter a selected test and to change settings within a test.
COIN COUNTER o 2 Amp Q/B (Coin Fuse) O PLAYER 1
UP @| SELECT O DOWN
O *S O o
TEST SERVICE © e)
6-2 Test Mode
- Open the coin door and slide the test switch “ON”. The “Menu Screen” will be displayed on the monitor.
- Use the Select Up / Down switch to step through the tests.
- Activate the required test by pressing the Enter button. Select “EXIT” in each test to return to the “Menu Screen’.
- After testing is completed, slide the test switch to the “OFF” position to return to normal game mode.
The Test Switch must always be in the “OFF” position for normal game mode.
MENU COIN OPTIONS Used to set the price of play GAME OPTIONS Used to set the game options VO TEST Used for testing switches etc. MONITOR TEST Used to adjust the projector SOUND TEST Used to set sound levels ADS DATA Used to view bookkeeping OTHERS Used for factory testing the PCB
SELECT SW:CHOOSEENTER SW: ENTER
6-2-1 Coin Options
- Select “COIN OPTIONS” on the menu screen to set the game cost and related settings. The following screen is displayed.
- Use the Select Up/Down switch choose the required item then press the Enter button.
- Use the Select Up/Down switch to change the setting.
- Select “EXIT” and press the Enter button to return to the menu screen.
COIN OPTIONS [DEFAULT IN GREEN]
GAME COST 1 COIN/S 1 CREDIT (a) CONTINUE COST 1COIN 1 CREDIT (b)
FREE PLAY OFF (c)
SELECT SW: CHOOSE ENTER SW: ENTER
- Number of coins required to establish credit - - - - settable 1~9
- Number of coins required to continue game - - - - settable 1~9
- Free play option - - - - ON (free play) / NO (cash play)
6-2-2. Game Options
(a)
(b)
(c)
(d)
(e) 1. Select “GAME OPTIONS’ on the menu screen to set the game settings. The following screen is displayed.
Use the Select Up/Down switch choose the required item then press the Enter button.
Use the Select Up/Down switch to change the setting.
Select “EXIT” and press the Enter button to return to the menu screen.
PLAYER'S LIFE 3 MAX LIFE DIFFICULTY HIT COLOR HI-SCORE INIT NO
EXIT GAME OPTIONS [DEFAULT IN GREEN] ( 5 (
E(NORMAL-NORMAL ) (
( (
SELECT SW:CHOOSE ENTER SW:ENTER
Number of lives at start of the game settable 1~9
Maximum lives including bonus lives settable 1~9
Difficulty settings A [ra mouoow Easy - Easy Easy - Normal Easy - Hard Normal - Easy Normal - Normal Normal- Hard Difficult - Easy Difficult - Normal Difficult - Hard
Colour displayed on screen when target hit RED / GREEN
Sets whether Hi-Score resets at powerup YES/NO
6-2-3 I/O Test
- Select “I/O TEST” on the menu screen to initialize the guns and to test switches and sensor. The following screen is displayed.
- Use the Select Up/Down switch choose the required item then press the Enter button.
- Use the Select Up/Down switch to change the setting.
- Select “EXIT” and press the Enter button to return to the menu screen.
I/O TEST
GUN INITIALIZE (a)
SWITCH TEST =
SELECT SW:CHOOSE ENTER SW:ENTER
- Enters Gun Initialize mode
- Enters Switch Test screen
6-2-3-1 Gun Initialize
- Select “GUN INITIALIZE” on the ‘I/O Test’ screen. The following screen is displayed.
GUN INITIALIZE
- stout OF SCREEN 1P+ +ourT oF SCREEN 2P (b)
(1P SIGHT MARK) This mark moves around the screen as the 1P gun is moved
(2P SIGHT MARK) AIM AT SCREEN This mark moves around TO CHECK GUN ACCURACY the screen as the 2P gun is moved
PUSH SERVICE SW :ADJUST GUN SIGHT ENTER SW :ENTER
The 1P and 2P gun sights can be checked using the screen above. The crosshair is displayed at the point on the screen at which the gun is pointed. Check that the crosshair appears correctly at the point aimed at. (Check that aiming is correct right to the edges of the frame.) When the gun is pointed away from the screen “+ OUT OF SCREEN 1P +’ (a) is displayed for 1P, and “+ OUT OF SCREEN 2P +’ (b) is displayed for 2P.
If the gun aiming is not correct press the Service switch to enter Gun Initialize mode (see following pages).
If the Service switch is pressed when in the Gun Initialize screen, the following screen is displayed.
1P GUN INITIALIZE
AIM AT CENTRE OF THE CROSS AND PULL 1P GUN TRIGGER
Aim the 1P gun at the cross in the centre of the screen and pull the trigger. The following screen will be displayed.
1P GUN INITIALIZE
AIM AT CENTRE OF THE CROSS AND PULL 1P GUN TRIGGER
Aim the 1P gun at the cross in the top left of the screen and pull the trigger. The following screen will be displayed.
1P GUN INITIALIZE
AIM AT CENTRE OF THE CROSS
AND PULL 1P GUN TRIGGER
Aim the 1P gun at the cross in the top right of the screen and pull the trigger. The following screen will be displayed.
1P GUN INITIALIZE
AIM AT CENTRE OF THE CROSS
AND PULL 1P GUN TRIGGER
Aim the 1P gun at the cross in the bottom right of the screen and pull the trigger. The following screen will be displayed.
1P GUN INITIALIZE
AIM AT CENTRE OF THE CROSS AND PULL 1P GUN TRIGGER
Aim the 1P gun at the cross in the bottom left of the screen and pull the trigger. The screen will revert to showing a cross in the centre of screen. Repeat the above procedures with the 2P gun.
When the 2P gun has been aimed and fired on the screen above, the screen will display the ‘GUN INITIALIZE’ screen.
Recheck that both guns are aiming correctly.
Press the Enter switch to return to the I/O TEST screen or press the Service switch to re-enter the Gun Initialize mode.
When aiming the gun, ensure that the gun is upright and pointing directly to the screen and that the sights are in alignment.
xX SIGHT ALIGNMENT
O
I
6-2-3-2 Switch Test
- Select “SWITCH TEST” on the ‘I/O Test’ screen to test the switches and sensor. The following screen is displayed.
I/O TEST
SWITCH TEST COIN 000 SERVICE OFF
TEST ON UP SELECT OFF DOWN SELECT OFF ENTER OFF START 1P BUTTON OFF
START 2P BUTTON OFF GUN 1P TRIGGER OFF GUN 2P TRIGGER OFF SENSOR OFF
UP SELECT SW+ENTER SW:EXIT
Each time a coin is entered the COIN numbers will increase by one. While a switch is pressed or the sensor is activated the corresponding display will change from OFF to ON. Press the UP Select switch and the Enter Switch together to return to the Main Menu Screen.
Interruption sensor
The game cannot be played if the sensor is blocked by objects placed on top of the Gun stand Assy.
A message appears on the screen if the sensor is interrupted during operation. . The message is displayed after coins are inserted if the sensor is blocked during the attract mode. . The message is displayed during the game play if the sensor is blocked during the game.
Camera Assy
CCD camera ~ (inside)
Interruption sensor (inside)
. Even if the interruption sensor is defective, the game can still be played by removing the sensor. However, the game cannot be played if objects are placed on top of the Gun stand Assy (in front of the CCD camera), and no message is displayed on the screen, disrupting normal operation. The sensor should be replaced promptly.
© SSts
@
e
Ss 6-2-4 Monitor Test
- Select “MONITOR TEST” on the Menu screen to check and adjust the monitor. The following screen is displayed.
- Use the Select Up/Down switch to choose the required item then press the Enter button.
- Press the Enter button to exit each test.
- Select “EXIT” and press the Enter button to return to the menu screen.
MONITOR TEST
GRADATION PATTERN
CROSSHATCH PATTERN (CRT) CROSSHATCH PATTERN (PROJECTOR) WHITE WINDOW (H) WHITE WINDOW (M)
WHITE WINDOW (L) 2easoe ©
INTERLACE PATTERN
VIEW ANGLE ADJUST (CRT) VIEW ANGLE ADJUST (PROJECTOR)
FULL WHITE
EXIT SS
SELECT SW:CHOOSE ENTER SW:ENTER
Displays a colour gradation pattern Displays a crosshatch pattern for a CRT monitor (Not used on this game) Displays a crosshatch pattern for a projector monitor Displays a bright density white square Displays a medium density white square Displays a dark density white square Displays an interlace patterm Displays a height/width adjustment pattern for a CRT monitor (not used on this game) Displays a height/width adjustment pattern for a projector monitor
Displays a full white screen
6-2-5 Sound Test
- Select “Sound Test” on the Menu screen to check and adjust the sound. The following screen is displayed.
- Use the Select Up/Down switch to choose the required item then press the Enter button.
- Use the Select Up/Down switch to change the setting then press the Enter button to return to item select.
- Select “EXIT” and press the Enter button to return to the menu screen.
SOUND TEST [DEFAULT IN GREEN]
| VOLUME | ALL SP | [0~64] | 14 | (a) |
| ATTRACT | [0~64] | 14 | (b) | |
| REQUEST BGM | NO. | 000 | (c) | |
| SE | No. | 000 | (d) | |
| VOICE | NO. | 000 | (e) |
MESSAGE: <d (f) EXIT
SELECT SW :CHOOSE ENTER SW :ENTER SERVICE SW :REQUEST ON/OFF
- Sets the volume during game play. Adjustable 0 (quietest) ~ 64 (loudest)
- Sets the volume during attract mode. Adjustable 0 (quietest) ~ 64 (loudest)
- BGM selection
- Sound effect selection
- VOICE selection
- _ If item (c) is set 001 a stereo sound test can be performed each time the service button is pressed. Sound will be produced from the left speaker then the right speaker and then both speakers together. The message will display which speaker is active.
6-2-6 ADS Data (Book Keeping)
- Select “ADS DATA” on the Menu screen to check all the book keeping data. The following screen is displayed.
- Use the Select Up/Down switch to choose the required item then press the Enter button.
- Press the Enter button to exit each page and return to this ADS Menu screen.
- Select “EXIT” and press the Enter button to return to the menu screen.
ADS DATA
GAME REPORT
GAME HISTOGRAM ADS INITIALIZE SES
SELECT SW :CHOOSE ENTER SW :ENTER
- Displays total games played and average game times.
- Displays the number of game plays for actual game times.
- Resets all book keeping data.
6-2-6-1 Game Report
- Select “GAME REPORT” on the ‘ADS DATA’ Menu screen to check game reports. The following screen is displayed.
- Press the Enter button to exit this page and return to ADS Menu screen.
GAME REPORT
| TOTAL COINS | 00000000 | (a) | |
| TOTAL SERVICES | 00000000 | (b) | |
| POWER ON TIME | 000d00h00m00s | (c) | |
| TOTAL PLAY | 00000000 | 000d00h00m00s | (d) |
| FIRST PLAY | 00000000 | 000d00h00m00s | (e) |
| CONTINUE PLAY | 00000000 | O00D00h00m00s | (f) |
| FIRST CONTINUE | 00000000 | (g) | |
| AVERAGE PLAY | 00m00s | (h) | |
| LONGEST PLAY | 00m00s | (i) |
SHORTEST PLAY 00m00s (ji)
Displays the total
Displays the total
Displays the total
Displays the total
Displays the total
Displays the total
Displays the total number of credit signals from the CashFlow.
number of times the Service button has been used.
time the game has been switched on.
time the game has been in play mode.
time the game has been in first game playmode.
time the game has been in continue play mode.
number of first continue games played.
Displays the average time that a game has taken to be played.
Displays the time of the longest game played.
Displays the time of the shortest game played.
6-2-6-2 Game Histogram
- Select “HISTOGRAM” on the ‘ADS DATA’ Menu screen to check game reports. The following screen is displayed.
- Press the Enter button to exit this page and return to ADS Menu screen.
GAME HISTOGRAM
OM 29S (a) om 59S 1M 298 1M 59S 1M 298 2M 59S 3M 29S 3M 59S 4m 29S 4m 59S 5M 29S 5M 59S 6M 29S 6M 59S 7M 29S 7M 59S gM 29S 59S 00s
00s
00s
00s
00s
00s
00s
00s
00s
00s 298 308 59S OVER 10M00S (b) Perereevecevercereedene
- Displays the total number of games that have been played for specific time lengths
- Displays total number of games that have lasted longer than ten minutes.
6-2-6-3 ADS Initialize
- Select “ADS INITIALIZE” on the ‘ADS DATA’ Menu screen to check game reports. The following screen is displayed.
- Use the Select Up/Down switch to select either NO (no reset) or YES (data reset) then press the Enter button.
- Select “EXIT” and press the Enter button to return to the menu screen.
ADS INITIALIZE
ADS INITIALIZE
SELECT SW :CHOOSE ENTER SW :ENTER
6-2-7 Others
- Select “OTHERS” on the ‘ADS DATA’ Menu screen to set all adjustments to factory defaults. The following screen is displayed.
- Use the Select Up/Down switch to select either NO (no reset) or YES (reset data to factory settings) then press the Enter button.
- Select “EXIT” and press the Enter button to return to the menu screen.
OTHERS
ROM1 Ver .00/12/09 SAT 02:27:14 (a) CLOCK +00/12/22 FRI 16:05:54 (b) S/N 123456-123456 (c)
BACKUP MEMORY INITIALIZE NO (d) YES
SELECT SW :CHOOSE ENTERSW :ENTER
Displays the game software version.
Displays the date and time
Displays the game PCB serial number
Resets all settings to factory defaults.
- MAINTENANCE
A\
Adjustment or maintenance on this machine should be carried out by qualified personnel only. Ensure that the POWER to the machine is turned OFF before commencing any maintenance work. (Trouble shooting, service or repairs etc.)
® Einstellungen und Wartung des Gerates diirfen nur von dafiir qualifiziertem Fachpersonal vorgenommen werden. Vor Beginn aller Wartungsarbeiten (Fehlersuche, Reparaturen etc.) mu8 der Netzstecker gezogen werden.
@®) Justeringer eller vedligehold af denne maskine bor kun udfores af
kvalificeret personale. Sorg for, at strammen til maskinen er slukket for der foretages nogen form for arbejde (fejlfinding, reparation etc.)
©) Los ajustes y el mantenimiento de esta maquina deben ser realizados sélo por personal cualificado. Asegurese de que la maquina esta desconectada antes de comenzar cualquier trabajo de mantenimiento (reparaciones, resolucion de problemas, etc.)
©) Linstallation, le service, le réglage, ou la maintenance doivent étre effectués uniquement par les personnes qualifiées. S’assurer que l’interrupteur soit sor OFF avant de commencer tout travail de maintenance (localisation d’une panne, réparations, etc.)
@ Meratponéc fh emdiop@woeig ota pnXavApaTa Mpénel va yivovtal Povo ard e§ouciodoTHpEva GTopA. Na eivai ciyoupa KAeioTO To peupa Tipiv onoladnMoTE SouAEIG OTO unxavnya.
@) Regolazioni e manutenzione su questa macchina devono essere fatti solo da personale specializzato. Assicurarsi che la macchina sia SPENTA prima di incominciare qualsiasi lavoro di manutenzione (guasti, riparazioni etc.)
@ Justering eller vedlikehold pa denne maskinen skall bare utfores av kvalifiserte personell. Forsikre deg om at strommen er slatt av for du pabegynner noe som helst vedlikeholdsarbeid (feilsoking, reparasjon osv.)
@ Aanpassingen of onderhoud aan deze machine dient alleen uitgevoerd te worden door bekwaam personeel. Zorg ervoor dat de machine UlTgeschakeld is voordat er enig onderhoudswerk wordt verricht (troubleshooting, reparaties etc.)
® Afinagées ou manutengao nesta maquina, deverdo ser efectuadas s6émente por pessoal qualificado. Certifique-se que a maquina se encontra desligada sempre que iniciar qualquer tipo de trabalho de manutengao. (identifagado de avarias, reparagao etc.)
© Justeringar och underhall pa denna maskin skall endast utféras av kvalificerad personal. Férsakra dig om att strémmen 4r avstangd innan underhallsarbete pabérjas (fels6kning, reparationer etc.)
G Tata laitetta saa s4ata tai huoltaa vain siihen ammattipatevyyden omaava henkilékunta. oo. Varmista, etta laite on kytketty POIS PAALTA ennen ty6n aloittamista.
7-1 Cleaning the Camera Window Covers
To ensure gun accuracy, clean the windows of the camera daily with a soft cloth.
If the windows are scratched or damaged, the gun sensor detection may not operate correctly.
Camera
windows
7-2 Replacing the Fluorescent Tube or Starter
- Remove 3off security screw (M5x12) and remove the Retaining bracket.
2. Remove the Header Acrylic
Security screw (M5x12)
Retaining bracket
- Replace the Fluorescent Tube or Starter.
- Reassemble in reverse order.
ener Fluorescent Tube
Header Vac-Form
7-3 Replacing the Camera Assy
- Remove 2off security screws (M5x12), disconnect the connectors and remove the Camera assy.
Security screw (M5x12)
Connectors \ Camera Assy
- Remove 2off Whizz nuts (M4) and remove the Camera Mounting bracket.
Whiz nut (M4) — _— Earth connector
__— Camera mounting bracket
- Remove 2off pozi head screw (M2x30), Camera Filter (note which way round this filter is facing), 2off Spacers and the Camera PCB.
CCD Camera (connector at the bottom)
Pozi head screw (M2x30) f
\ a eK | PZMKX / Connector ae coma filter (note the direction)
- Reasemble in reverse order.
7-4 Replacing the Sensor
Remove the Camera assy. (see 7-3 page 63)
Remove 2off pozi head screws (M2.5x14), with flat and spring washers, and remove the Sensor.
Camera unit
Interruption sensor (note direction)
Pozi head screw (M2.5 x 14) (with flat and spring washers)
- Reassemble in reverse order.
7-5 Removing the Switch Panel Assy
- Remove 6off button head screw (M6x12) and lift the Switch Panel Assy.
Button head screw (M6x12)
Play panel
- Disconnect the connectors and remove the Switch Panel Assy.
Connector
Connectors
- Reassemble in reverse order.
7-6 Replacing the Start Switches
- Remove the Switch Panel Assy. (see 7-5 page 65)
- Remove the Switch Assy by pulling it out of the Switch Body.
Play Panel Assy
1P Start
Switch Assy
Fast-On terminals
Fast-On terminals
- Replace the Switch. When replacing the switch, note which wires are on which terminals.
- Refit the Switch Assy to the Switch Body by pushing the Switch Assy fully into the Switch Body.
7-7 Replacing the Gun Assemblies
- Remove the Switch Panel Assy. (See 7-5 page 65)
- Disconnect the connector.
- Remove 2off Whizz nut (M4) and remove the Rope Hoop.
- Remove 2off Whizz nut (M6) and remove the Gun Assy.
Gun Assy
Rope hoop
Gun bracket support plate —@ Whizz nut (M6) =e
SBN Whizz nut (M4)
Connector
Underside of Play Panel Assy
- Reassemble in reverse order.
7-7-1. Removing the Gun Covers
1. Remove the Switch Panel Assy. (See 7-5 page 65)
- Remove the Gun Assembly. (See 7-7 page 67)
- Remove 1off socket head screw (M4x25) and 1off dome head nut (M4).
- Remove 2off socket cap screws (M3x10) and remove the Gun Cover (R)
- Remove 2off socket cap screws (M3x10) and remove the Gun Cover (L)
Dome nut (M4) Socket cap screw (M3x10)
Gun cover (L)
Socket head screw (M4x25)
Socket cap screw (M3x10) Gun cover (R)
- Reassemble in reverse order.
7-7-2. Separating the Gun Body
- Remove the Switch Panel Assy. (See 7-5 page 65)
- Remove the Gun Assembly. (See 7-7 page 67)
- | Remove the Gun Covers (See 7-7-1 page 68)
- Remove 4off socket head screw (M4x10), 40ff dome nut (M4). 1off socket head screw (M4x25), 1off socket cap screw (M3x10) and remove the Gun Body (R).
Dome nut (M4)
Socket head screw (M4x25)
Gun Body (L)
NF-Gun (DX) PC Board
Socket head screw Gun Body (R) (M4x10) Socket cap screw Socket head screw (M3x10) (M4x10)
“hy Le
i (Curved face to front)
Lens (2)
7-7-3. Replacing the Trigger Switch
- Remove the Switch Panel Assy. (see 7-5 page 65)
- Remove the Gun Assembly. (See 7-7 page 67)
- Remove the Gun Covers (See 7-7-1 page 68)
- Seperate the Gun Body. (See 7-7-2 page 69)
- Replace the Trigger Microswitch.
Trigger switch
(Yellow) N.O. terminal y
(Black) COM. terminal
- Reassemble in reverse order.
7-7-4 Replacing the Gun Cable
- Remove the Switch Panel Assy. (See 7-5 page 65)
- Remove the Gun Assembly. (See 7-7 page 67)
- | Remove the Gun Covers (See 7-7-1 page 68)
- Seperate the Gun Body. (See 7-7-2 page 69)
- Remove 2off socket head screw (M4x10) and remove the Connector Cover.
- Disconnect the terminals from the Trigger Switch.
- Disconnect the Gun PCB connector.
- Remove 1off socket head screw (M4x10) and remove the Gun Cable.
Fast-On terminals Socket head screw (M4x10) Earth terminal
Gun cable
Connector
- Reassemble in reverse order.
7-7 Replacing the RAYS PCB
- Remove 4off button head screws (M6x25) and remove the Maintenance Cover.
Button head screws (M6x25)
Flat woe
A Gun stand Assy \X
- Remove 2off button head screws (M5x10) and remove the Rays Cover.
Button head screws (M5x10)
< Le — RAYS cover Gun stand Assy
- Disconnect the connectors (x6) and remove the RAYS R PCB.
Cap screws (M) (M3 x 6)
RAYS-R PC em
- Reassemble in reverse order.
This page carries no recoverable text. It is a drawing or a photograph. See the original scan.
- PARTS
8-1 Monitor Cabinet
\A \
Item Description Part No
| 1 | Side Decal (RHS) | 40000654 |
| 2 | Side Decal (LHS) | 40000653 |
| 3 | Front Decal | 40000655 |
| 5 | Header Retainiong Bracket | 47000460 |
| 6 | ‘Fork Here’ Decal | 40000072 |
| 7 | Adjustable Foot- M16x95 | 88300079 |
| 8 | Swivel Castor - 75mm | 59000005 |
| 9 | Thompson ON/OFF Switch Cover | 47000477 |
| 1 | Game PCB Assy | XVN-GAMEPCB |
| 12 | Bass Amp PCB Assy | XVN-BASSAMP |
| 13 | Switchmode Power Supply | 1149-010 |
| 14 | 12vDC Power Supply | 83000019 |
| 15 | RCA Harness | 69200001 |
| 16 | USB-A-XH Internal Link Cable | XVN-USB-200 |
| 17 | Joint Bracket | 47000391 |
| 18 | Operators Manaual | 90500127 |
| 19 | CD Rom | XVN-CDROM |
8-2
Service Bracket and Mains-In Assembly
Item Description Part no
| 1 | 3.5~6V Panel Mount Meter | 65000002 |
20mm Panel Mount Fuse Holder 63500786
| . | 20mm Fuse - 2Amp Q/B | 63500501 |
| 3 | Service Switch 7mm Red - F424 | 60000059 |
| 4 | Miniature Slide Switch | 60000023 |
| 5 | Momentary SPDT Switch (SX0792/63) | 60000010 |
| 6 | Shaffner Mains-In Filter Assy | 62500010 |
| 7 | Interlock Switch | 60000006 |
| 8 | Schaffner Boot | 66000017 |
| 9 | Interlock Switch Cover | 39000028 |
8-3 Gun Cabinet
Item Description Part No
| 3 | Gun Cabinet Wooden Closing Plate | 37000063 |
| 5 | Rays PCB Cover | 47000464 |
| 6 | Joint Bracket Internal Support Bracket | 47000392 |
| 8 | Fixed Castor - 50mm | 59000009 |
9 Rays-R PCB XVN-RAYSPCB
| 10 | Bass Loudspeaker - Phillips Type P15 EN79-54F | X006-140 |
| 1 | Bass Speaker Port | 46000837 |
8-4
Camera Assy
Item Description Part no
1 Camera Assy DX XCZ-DX-CAMERA
| 2 | Camera/Sensor Cover Plate | 47000465 |
| 3 | Camera Port Cover | 39000060 |
| 4 | Motion Sensor | 47000010 |
8-5
Play Panel Assy
Item Description Part no
| 1 | Instruction Decal Round | 40000656 |
| 2 | Gun Holster - Red | 47000466 |
| 3 | Gun Bracket Support Plate | 47000405 |
| 5 | Play Panel Vac-Form | 47000454 |
| 6 | Switch Decal | 40000659 |
| 7 | Play Panel Decal | 40000658 |
| 8 | Triangular Start Button Assy - Blue | 60500005 |
| 9 | Gun Holster - Blue | 47000478 |
This page carries no recoverable text. It is a drawing or a photograph. See the original scan.
Item Description Part no
| 1 | Slide Bracket | XVN-702-190 |
2 Gun Cover (L) Set of both items XVN-296-407 3 Gun Cover (R)
4 Gun Slide (L) Set of both items XVN-296-408 5 Gun Slide (R)
| 6 | Trigger | XPB-296-415 |
| 7 | Trigger Spring | XPB-296-421 |
| 8 | Connector Cover | XVN-701-906 |
| 9 | Lens | XPB-296-466 |
| 10 | Gun Tube (Exp) | XVN-702-191 |
| al | NF-GUN (DX) PCB | XVN-GUNPCB |
| 12 | Microswitch | XPB-000228 |
| 13 | Gun Assembly - Complete | XVN-DX-GUN |
Parts Not Shown
StrainRelief Rope 45000708
Gun/Rope Clamps 45000211
Gun/Play Panel Rope Hoop 45000210
Top Clamp Plate 46000872
Gun Bracket Support Plate 47000405,
8-7 Header Assembly
Item Description Part no
1 Header Acrylic 30000071
Speaker Grille 47000472
Header Vac-Form 47000471
Acrylic Upper Retaining Bracket 47000473
Header Vac-Form Fixing BRacket (LHS) 47000474
Header Vac-Form Fixing Bracket (RHS) 47000475,
Speaker - 4%" 62000006
Fluorescent Fitting (complete) 3ft 64500040
Fluorescent Tube 3ft 64500013
12 Starter 63000000
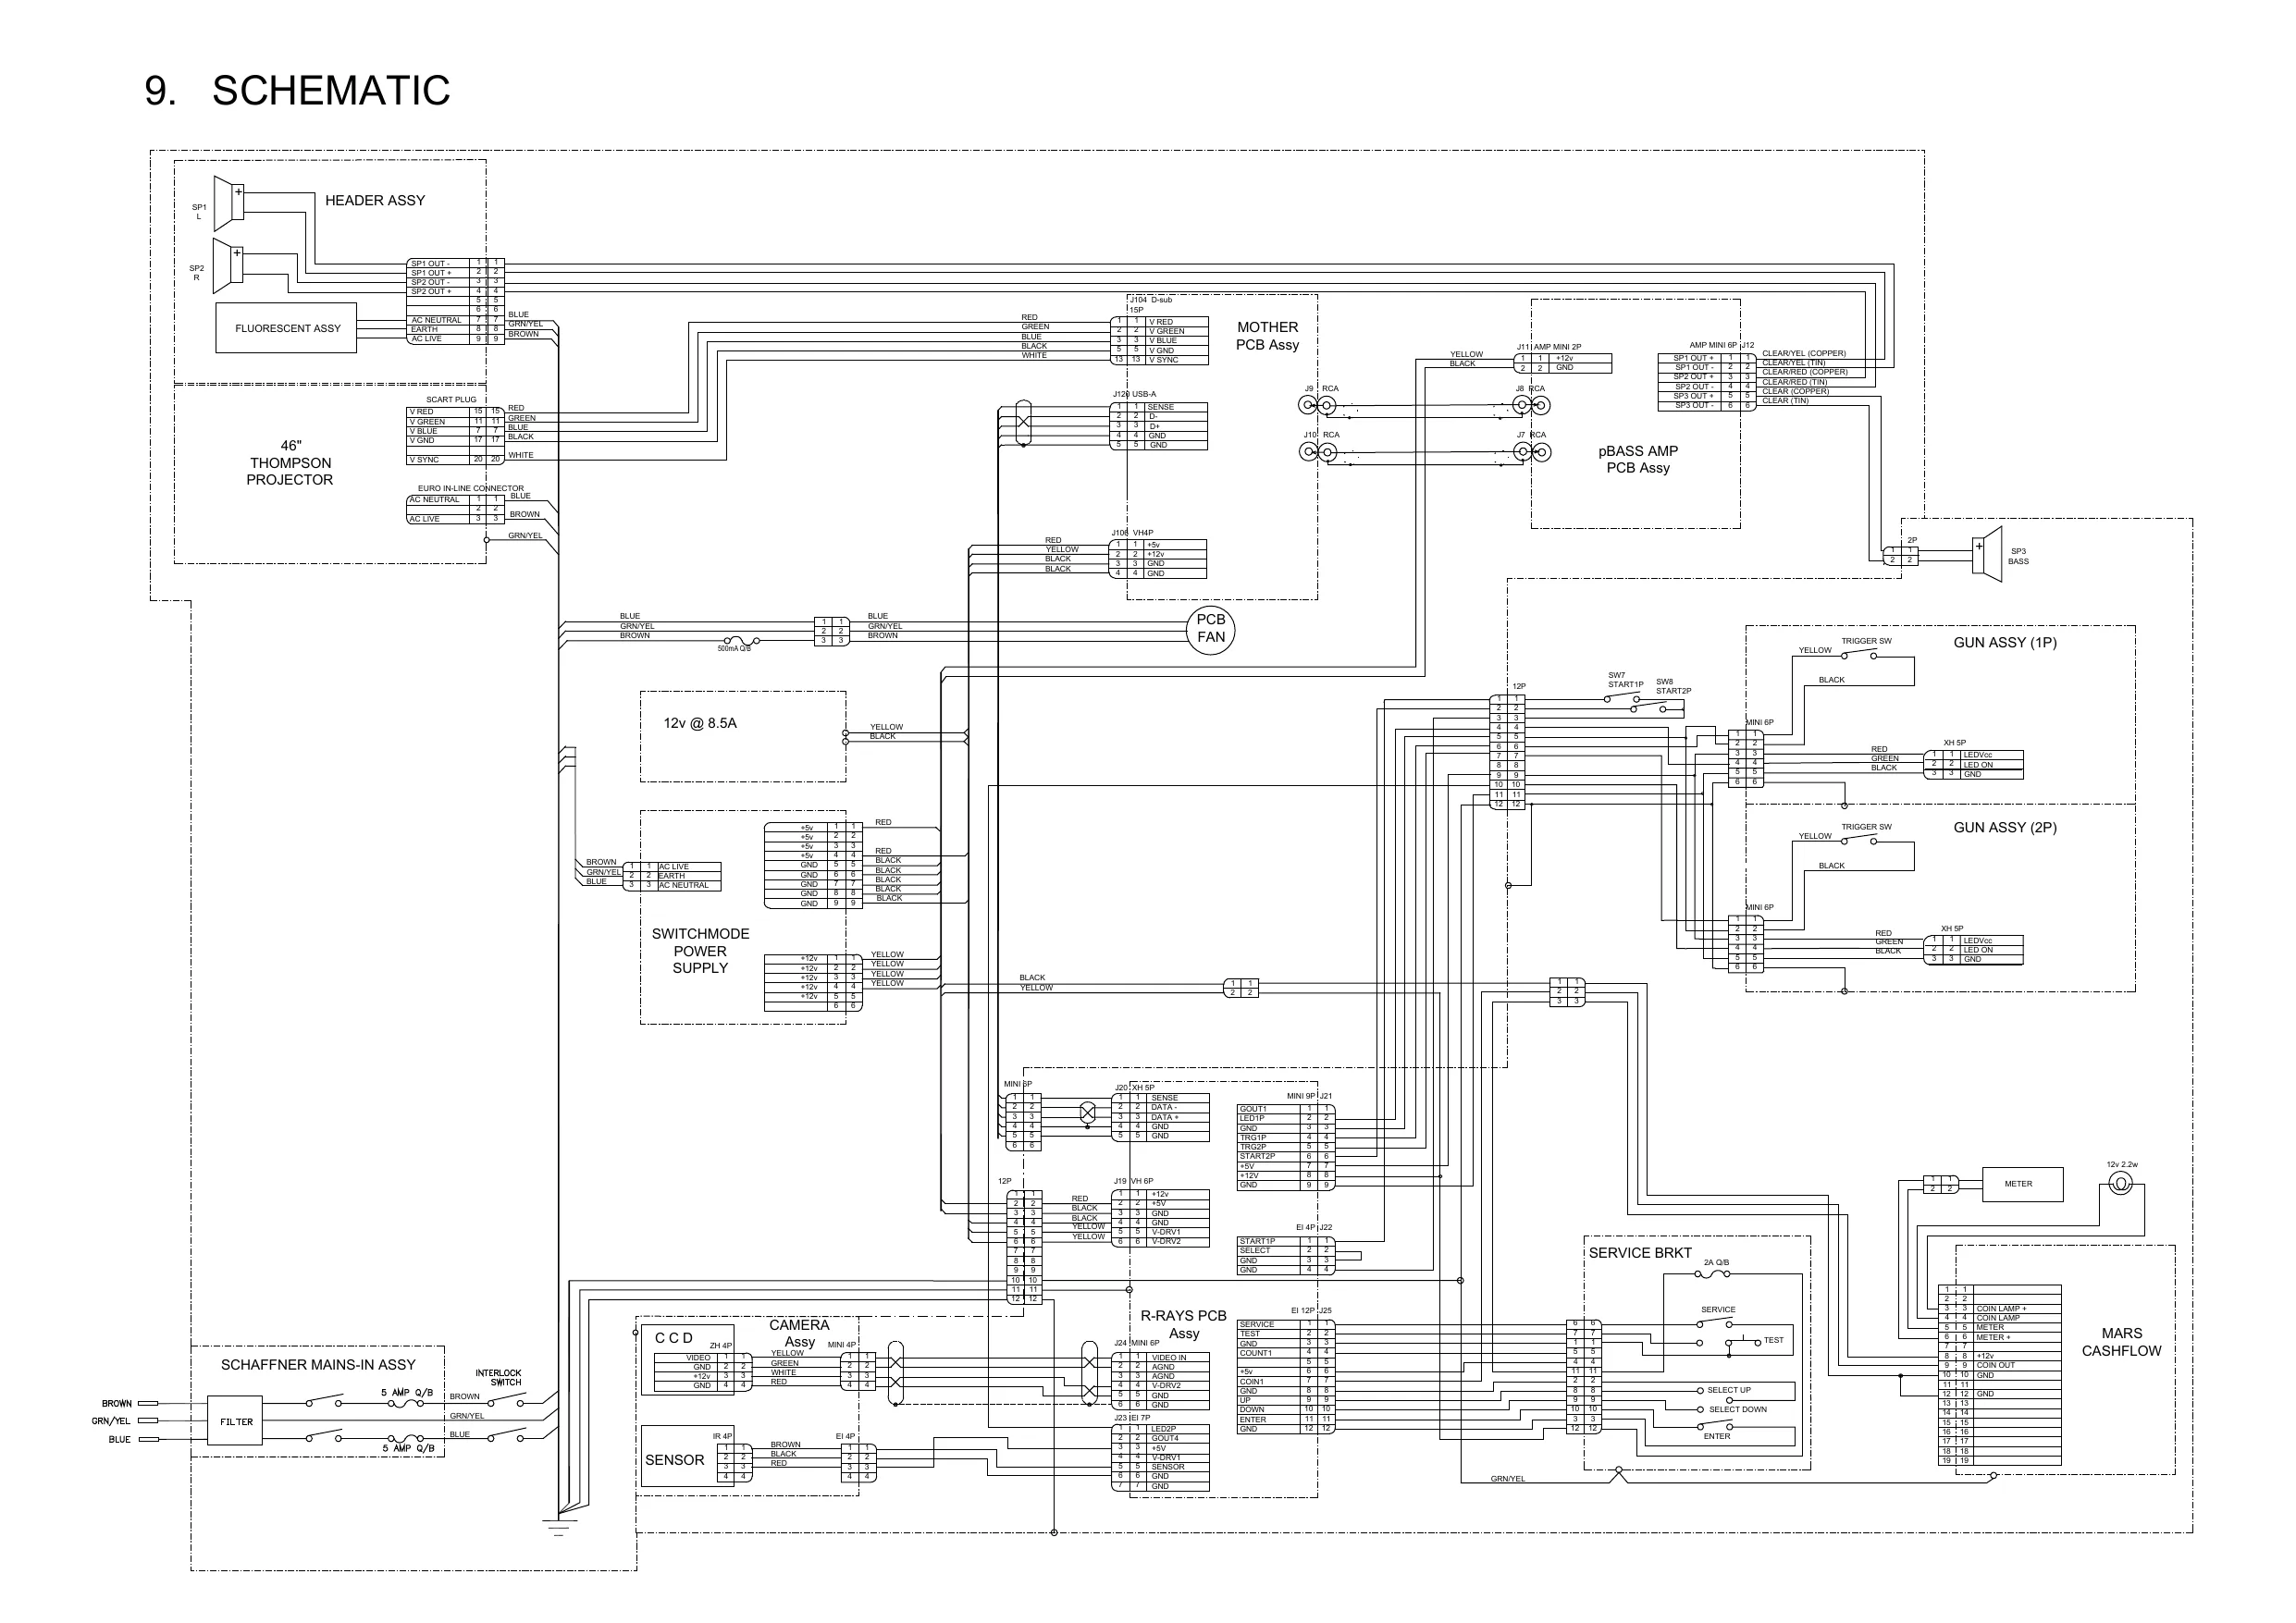
This page is a drawing, shown as the original scan.
Copies of Namco Game Manuals can be downloaded from our website: www.namco.co.uk under Components Distribution
For all Parts or Technical Support contact:
Brent Electronic, Namco House, Units 5-8, Acton Park Estate, The Vale,
London. W3 7QE
www.namco.co.uk
For Technical Support, Warranty and
Advance Replacement Parts:- J +44 (0) 20 8324 6120
For Consumable Parts:- J +44 (0) 20 8324 6102
Fax for both:- fy +44 (0) 20 8324 6126