Pacmania TM-315 1st Printing
Pac-Mania (Namco, 1987) · Technical Manual · 52 pages · 54 sections · original scan
TM-315, Ist Printing
Operators Manual
with Illustrated Parts Lists
Pac-Mania is engineered and designed by Namco Ltd. Manufactured by Atari Games. Trademark and © Namco 1987
This page carries no recoverable text. It is a drawing or a photograph. See the original scan.
Operators Manual
with Illustrated Parts Lists
*Pac-Mania is engineered and designed by Namco Ltd. Sawes Manufactured by Atari Games. Trademark and © Namco 1987.
© 1987 by Atari Games Corporation All rights reserved No part of this publication may be reproduced by any mechanical, photographic, or electronic process, or in the form of a phonographic recording, nor may it be stored ina retrieval system, transmitted, or otherwise copied for public or private use, without permission from the publisher. The game play, all graphic designs, this technical manual, its accompanying schematic diagrams, and the display manual are protected by the U.S. Copyright Act of 1976. This Act provides for increased penalties for violating federal copyright laws. Courts can impound infringing articles while legal action is pending. If infringers are convicted, courts can order destruction of the infringing articles. In addition, the Act provides for payment of statutory damages of up to $250,000 in certain cases. Infringers may also have to pay costs and attorneys’ fees and face an imprisonment of up to five years. Atari Games Corporation will aggressively enforce its copyrights against any infringers. We will use all legal means to immediately halt any manufacture, distribution, or operation of acopy of video games made by us. Anyone who purchases such copies risks forfeiting such a game.
Published by: Atari Games Corporation 675 Sycamore Drive P.O. Box 361110 Milpitas, California 95035
Printed in the U.S.A. 11R Pac-Mania
Pac-Mania
Notice Regarding Non-ATARI® Parts
& WARNING A Use of non-ATARI parts or modifications of any ATARI game circuitry may adversely affect the safety of your game, and may cause injury to you and your players.
You may void the game warranty (printed on the inside back cover of this manual) if you do any of the following:
- Substitute non-ATARI parts in the game. © Modify of alter any circuits in the game by using kits or parts not supplied by Atari Games Corporation.
NOTE
This equipment generates, uses, and can radiate radio frequency energy, and if not installed and used in accordance with the instruction manual, may cause interference to radio communications. It has been tested and found to comply with the limits for a Class A computing device pursuant to Subpart] of Part 15 of Federal Communications Commission (FCC) Rules, which are designed to provide reasonable protection against such interference when operated in a commercial environment. Operation of this equipment in a residential area or modification to this equipment is likely to cause interference, in which case the user, at his own expense, will be required to take whatever measures may be required to correct the interference. If you suspect interference from an ATARI® game at your location, check the following:
- All ground wires in the game are properly connected as shown in the game wiring diagram.
- The power cord is properly plugged into a grounded three-wire outlet.
- On games provided with an Electromagnetic Interference (EMI) ground plane, be sure the game printed-circuit boards (PCBs) are properly installed on the EMI Ground Plane. If you are still unable to solve the interference problem, please contact Customer Service at Atari Games Corporation. See the inside front cover of this manual for service in your area.
iii
Table of Contents
Set-Up How to Use This Manual . . Inspecting the Game .... Control and Switch Locations . . Setting the Coin and Game Option Settings Game Play .
Self-Test Self-Test Switches .. . Service Switch .. Types of Self-Tests . RAM/ROM Test . . . Game Options Screen Switch Test . Sound Test ... Crosshatch Test . Color Test A.D.S. (Auto Data Sampling) Table Screen
Maintenance Preventive Maintenance . Preventive Maintenance Intervals. Removing the Control Panel ...... Cleaning the Push-Button Leaf Switches . Cleaning the Coin Mechanism .... . Cleaning the Interior Components. Joystick Control
Corrective Maintenance ... Removing the Game PCB....... Removing the Video Display Replacing the Video Display Removing the Speaker
Illustrated Parts Lists See List of Illustrations that follows. Pac-Mania
Pac-Mania
List of Illustrations
Figure 1-1
Figure 2-1 Figure 2-2 Figure 2-3 Figure 2-4 Figure 2-5 Figure 2-6
Figure 3-1 Figure 3-2 Figure 3-3
Figure 4-1 Figure 4-2 Figure 4-3 Figure 4-4 Figure 4-5 Figure 4-6A Figure 4-6B Figure 4-7
Table 1-1 Table 2-1 Table 2-2 Table 2-3 Table 3-1 Control and Switch Locations . .
Game Options Screen. . Switch Test Screen . . Sound Test Screen .. Crosshatch Test Screen . Color Test Screen . . . A.D.S. Table Screen
Leaf Switch and Joystick Removal . . Joystick Lubrication Control Panel, Video Display, and Speaker Removal . .
Cabinet-Mounted Assemblies . . . Control Panel Assembly . . . Joystick Assembly Switching/Linear (SL) Power Supply Assembly .. . Coin Acceptors, Inc. Coin Door Assembly. . . Pac-Mania CPU PCB Assembly . . Pac-Mania ROM PCB Assembly . 0 Pac-Mania End PCB Assembly ......--.- 20.2002 0 0s eee eee
List of Tables
Game Specifications RAM/ROM Error Messages Game Option Settings .... . : Special Settings on DIP Switch.............- Recommended Preventive Maintenance Intervals . . . 2-4
2-2
2-7 3-2
vi
Safety Summary
The following safety precautions apply to all game operators and service personnel, Specific warnings and cautions will be found throughout this manual where they apply. & WARNING A Properly Ground the Game. Players may receive an electrical shock if this game is not properly grounded! To avoid electrical shock, do not plug in the game until it has been inspected and properly grounded. This game should only be plugged into a grounded three-wire outlet. If you have only a 2-wire outlet, we recommend you hire a licensed electrician to install a grounded outlet. Players may receive an electrical shock if the contro! panel is net properly grounded! After servicing any parts on the control panel, check that the grounding wire is firmly secured to the inside of the control panel. Only then should you lock up the game. AC Power Connection. Before connecting the game to the AC power source, verify that the game’s power supply is properly configured for the line voltage in your location. Disconnect Power During Repairs. To avoid electrical shock, disconnect the game from the AC power source before removing or repairing any part of the game. When removing or repairing the video display, extra precautions must be taken to avoid electical shock because high voltages may exist within the display circuitry and cathode-ray tube (CRT) even after power has been disconnected. Do not touch internal parts of the display with your hands or with metal objects! Always discharge the high voltage from the CRT before servicing this area of the game. To discharge the CRT: Attach one end ofa large, well-insulated, 18-gauge jumper wire to ground. Momentarily touch the free end of the grounded jumper to the CRT anode by sliding it under the anode cap. Wait two minutes and discharge the anode again. Use Only ATARI Parts. To maintain the safety imegrity of your ATARI game, do not use non- ATARI parts when repairing the game. Use of non-ATARI parts or other modifications to the game circuitry may adversely affect the safety of your game, and injure you or your players. Handle the CRT With Care. If you drop the CRT and it breaks, it may implode! Shattered glass can fly six feet or more from the implosion. Use the Proper Fuses. To avoid electrical shock, use replacement fuses which are specified in the parts list for this game. Replacement fuses must match those replaced in fuse type, voltage rating, and current rating. In addition, the fuse cover must be in place during game operation.
YFUNKY
Set-Up
How to Use This Manual
This manual is written for game operators and service technicians, and provides information for setting up, playing, testing, and maintaining your Pac-Mania* game. The manual is divided into the following chapters: © Chapter 1 contains set-up and game play information. © Chapter 2 contains self-test procedures. © Chapter 3 contains preventive and corrective maintenance procedures. © Chapter 4 contains illustrated parts lists. Schematic diagrams for the Pac-Mania game circuitry are contained in the Schematic Package Supplement (SP-315) included with your game. This chapter includes information required to set up and play your Pac-Mania game. Carefully read this information before applying power to the game.
A WARNING A
To avoid electrical shock, do not plug in the cabinet until it has been properly inspected and set up for the line voltage in your area. This cabinet should only be connected to a grounded. three-wire outlet. If you have only a two-wire outlet, we recommend you hire a licensed electrician to install a grounded outiet. Players can receive an electrical shock if the game is not properly grounded. Do not touch internal parts of the display with your hands or with metal objects.
SUE
*Pac-Mania is engineered and designed by Namco Lid. Manufactured
by Atari Games, Trademark and © Namco 1987.
Pac-Mania Set Up
. b, Ensure that all plug-in integrated circuits on each Inspecting the Game PCB are firmly plugged into their sockets, c. Inspect the power cord for any cuts or dents in the
- Unlock and open both coin doors. Inspect the interior ble 1-1, Game Specifications. of the cabinet as follows: a. Ensure that all plug-in connectors (on the cabinet Control and Swit ch Lo cati ions harnesses) are firmly plugged in. Do not force con- . . nectors together. The connectors are keyed so they The following control and switch descriptions are for the Pac-Mania game. Refer to Figure 1-1 for the locations of only fit in the proper orientation. the controls and switches.
Self-Test Switch
DIP Switch
Service Switch
Volume Control
Figure 1-1 Control and Switch Locations
1-2
Pac-Mania
Table 1-1 Game Specifications
Characteristic Specification
Power Consumption 164 V-A, 118 W RMS maximum
‘Temperature +5° to +38°C
(+37° to + 100° F) Humidity Not to exceed 95% relative Line Voltage 102 to 132 VAC (U.S. games) Width 23'%ain. (61 cm) Depth 32% in, 81 cm) Height 70%, in. (178 cm) Weight 265 Ibs. (120 kg)
Power On/Off Switch
The power on/off switch is located at the bottom rear of the cabinet. (See Figure 4-1.)
Volume Control
The volume control is located in the lower right corner of the Game PCB. The PCB is attached to the lower right side of the cabinet. The volume control adjusts the level of sound produced by the game.
Coin Counter
The coin counter is located on the shelf behind the upper coin door. The coin counter records the number of coins deposited.
Self-Test Switch
The game can be put in the Self-Test Mode to check game operation by turning on one of the two existing self-test switches, One self-test switch is located on the End PCB, connected to the front of the Game PCB. Both PCBs are attached to the lower right side of the cabinet. Asecond self-test switch (switch 1) is located on the dualinline-package (DIP) switch in the upper right corner of the Game PCB. Turning on switch 1 also selects the Self- Test Mode. (With the PCB installed in the cabinet, slide the button down for on.) Refer to Chapter 2 for a complete description of self-test operation.
Service Switch The push-button service switch is located next to the selftest switch on the End PCB. The End PCB is connected to the front of the Game PCB, and both PCBsare attached to the lower right side of the cabinet. This switch has three functions, depending on whether the game is in the Self-Test Mode:
- The switch is used as a coin switch when the game is not in the Self-Test Mode. Pressing the push-button gives the game one credit. Set-Up,
- In the Self-Test Mode, press the push-button to advance to the next test screen.
- To reach the A.D.S. (Auto Data Sampling) main menu, press the push-button service switch while turning off the self-test switch.
Setting the Coin and Game
Option Settings
The Pac-Mania coin and game options are set in the Self- Test Mode. Refer to Chapter 2 for the recommended settings and the procedure for setting the options.
Game Play
This section of the manual describes the theme of the Pac- Mania game and the game play features.
Introduction
Pac-Mania is a one- or two-player (alternating) game in which players maneuver the new Pac-Man through a world of 3-D mazes. He’s back in action . . . but with a new twist, BOUNCE power! Ready for a new generation of Pac-Man players, he can’t wait for the chance to show off his new aerial maneuvers to the crowd! The “boss” ghost Clyde has recuited the talents of two new ghosts, Sue and Funky. Pac-Man must use his speed and cunning to outwit these annoying pests. Pac-Man now faces new challenges as he enters the worlds of Block Town, Pac-Man’s Park, Sandbox Land, and Jungly Steps. Fortunately for Pac-Man, he has the help of two “special items’’—a green and red power pill. The green pill adds temporary speed, and the red awards double points. It’s a whole new ball game for Pac-Maniacs!
Game play begins with the opportunity for players to level select among one of three playfield worlds: Block Town, Pac-Man’s Park or Sandbox Land. With Block Town being the easiest and Sandbox Land being the harder, players are accordingly rewarded for selecting and completing the challenges in this mode. The player’s main objective is to eat all dots and power pills in the mazes while avoiding persistent ghosts. Using the new BOUNCE button, players can bounce their way over the ghosts to avoid being caught. But two new ghosts have been added to insure that Pac-Man doesn’t have it too easy. In fact, one of them can also bounce in the air like Pac-Man. Fortunately, these rivals of Pac-Man are only found in the more demanding worlds and mazes. During play, the appearance of fruit and green/red power pills will trigger the bell. This alerts players immersed in the game who might otherwise miss these valuable items
1-3
Set-Up
the points range from 1,000 to 10,000. A green power pill awards extra speed; it is good until a yellow or red power pill is eaten and expires or a game life is lost. Red power pills award double points, and continue to do so until a game life is lost. An optional continue feature is offered to allow players to continue their progress without having to start back at the beginning. It’s a great way for Pac-Maniacs to learn and
1-4 Pac-Mania
practice strategies without having to re-start games from the beginning. Bonus thresholds are offered at various score values, and are easily adjustable. Four difficulty settings are offered for maximum income. A unique A.D.S. (Auto Data Sampling) bookkeeping system is included to monitor length of play time, where game lives are lost, and where individual games end. The A.D.S. system is described in detail in Chapter 2 of this manual.
Chapter 2
Self-Test
The Pac-Mania* game tests itself and provides visual and audible indications of the condition of the game circuitry, Self-test information is displayed on the screen and through the sound system. No additional equipment is required.
¢ XV We suggest that you perform a self-test when you first set
up the game, each time you collect the money, or when you suspect game failure. Coin and game options are selected in the Self-Test Mode. Five self-test screens provide information pertaining to the game Circuits. The tests are arranged in the sequence in which they occur after the self-test switch is turned on. When the self-test switch is turned on, and then the game power is turned on, the game enters the full Self-Test Mode. During this full self-test, a complete RAM/ROM test is performed before displaying the Game Options screen. If the self-test switch is turned on when the game is in the Attract Mode, the game enters a shorter Self-Test Mode. Turning the self-test switch off at any time during the Self- Test Mode causes the game to return to the Attract Mode.
*Pac-Mania is engineered and designed by Namco Ltd. Manufactured by Atari Games, Trademark and © Namco 1987.
Self-Test
Self-Test Switches
The game can be put in the Self-Test Mode to check game operation by turning on one of two existing self-test switches. One self-test switch is located on the End PCB, connected to the front of the Game PCB. Both PCBs are attached to the lower right side of the cabinet. (See Figure 1-1.) Asecond seif-test switch (switch 1) is located on the dualinline-package (DIP) switch in the upper right corner of the Game PCB. Turning on switch 1 also selects the Self- Test Mode. (With the PCB installed in the cabinet, slide the button down for on.)
Service Switch
The push-button service switch is located next to the selftest switch on the End PCB. The End PCB is connected to the front of the Game PCB, and both PCBs are attached to the lower right side of the cabinet. This switch has two functions, depending on whether the game is in the Self- Test Mode:
- The switch is used as a coin switch when the game is not in the Self-Test Mode. Pressing the push-button gives the game one credit. 2, In the Self-Test Mode, press the push-button to advance to the next test screen.
- Toreach the A.D.S. main menu, press the push-button service switch while turning off the self-test switch.
Types of Self-Tests The Pac-Mania self-test consists of the following screens: Game Options, Switch Test, Sound Test, Crosshatch Test, and Color Test.
RAM/ROM Test When the self-test switch is turned on, and then the game power is turned on, the game enters the full Self-Test Mode. During this mode a complete RAM/ROM testis performed. The RAM Test indicates the condition of the game RAM and the custom integrated circuits (ICs). The ROM Test Pac-Mania
indicates the condition of the game’s ROM circuitry. If these tests pass, No screen message is displayed, and the game proceeds directly to the Game Options Screen. ifthe RAM or any of the custom ICs fail, the message RAM x ERROR or I/O ERROR 64 is displayed. If any of the ROMs fail, the screen displays the message ROM x ERROR (see Table 2-1 for all RAM/ROM error messages).
Game Options Screen
The Game Options screen is shown in Figure 2-1. This screen indicates the current settings of the coin and game options, and is also used to change these settings. Table 2-2 lists the available options and the default (recommended) settings.
Table 2-1 RAM/ROM Error Messages [" NOTE ROM PCB is the larger circuit board. CPU PCB is the smaller circuit board.
Error Message Possible Bad Integrated Circuit
ROMOERROR — ROM at iocation H10 on the ROM PCB ROM 1ERROR = ROM at location K10 on the ROM PCB ROM 2 ERROR ~~ ROM at location L10 on the ROM PCB ROM 3 ERROR = ROMat location M10 on the ROM PCB ROM4ERROR ROM at location N10 on the ROM PCB ROM 5 ERROR — ROM at location P10 on the ROM PCB ROMGERROR = ROMat location $10 on the ROM PCB ROM7ERROR = ROM at location T10 on the ROM PCB
RAM | ERROR* RAM at location B2, D2, or E2 on the CPU PCB RAM 2 ERROR RAM at location D6 or E6 on the CPU PCB RAM 3 ERROR RAM at location S5 on the CPU PCB RAM4 ERROR — RAM at location H1 on the CPU PCB RAMS ERROR — RAM at location L5 on the CPU PCB RAM 6 ERROR* RAM at location B2, D2, or E2 on the CPU PCB RAM7ERROR RAM at location D6, or E6 on the CPU PCB
1/O ERROR 64** RAM at location H1 on the CPU PCB, or the I/O Processor at location M4 on the ROM PCB
- Either of these error messages may be accompanied by a four-digit number. Look at the first of the four lines and ignore the bottom three lines, Also ignore the fact that the entire screen may be upside down. This four-digit number may indicate one specific integrated circuit is bad, as follows;
If the number is between 0002 and 0802, this indicates location B2
If AECD is between 0804 and 1002, this indicates location D2. If ABCD is between 1004 and 1802, this indicates location B2. *"If this error message is accompanied by a four-digit number, iook
If ABCD is between 1004 and 1802, this indicates location B2 at its left two digits. If those digits are 02, this indicates the RAM at Processor at location M4 is bad
location HI is bad. If those digits are not 02, this indicates the I/O Processor at location M4 is bad.
Pac-Mania
Figure 2-1 Game Options Screen
Coin and Credit Options The current coin and credit option settings are displayed on the screen as:
COINI 1 COIN 1 CREDIT
COIN2 1 COIN 1 CREDIT
These are the default (fecommended) settings for coin mechanisms 1 (left) and 2 (right). The available coin and credit options are as follows: Coin 1: 1 to 9 Coin(s) for 1 to 9 Credit(s) Coin 2: 1 to 9Coin(s) for 1 to 9 Credit(s) The coin and credit options can be changed by moving the joystick left/right.
Attract Mode Music Setting The Attract Mode Music setting indicates that music is selected when the game is in the attract mode. This setting is displayed on the screen as:
ATTRACT — SOUND
The default (recommended) setting has the sound on. The sound can be turned off by moving the joystick !eft/ right. Self Test
Table 2-2 Game Option Settings
Option Name Available Settings
Coins to start (Coin 1 4, 2,3, 4.5, 6, 7, 8, 9 Coin(s) for Mech 1 or left one) 4, 2, 3, 4,5, 6, 7, 8, 9 Credit(s)
Coins to start (Coin 4, 2, 3, 4, 5, 6, 7, 8, 9 Coin(s) for Mech 2 or right one) 42,3, 4,5, 6, 7, 8, 9 Credit(s)
Music in attract mede Soundon Sound off
Cabinet type A B c« Video display orienta On <4 tion (“flip”) Off Starting lives (‘“Pac- 1 Man”) per game 2 3-4
Extended play granted 50,000 points at. 100,000 points <4 150,000 points No extended play Game difficulty A (Easy) (“rank”) B (Standard) C (Hard) <4 D (Very Hard) Game end 7 rounds 19 rounds Endless game <4 Game continuation On <4 with add-a-coin Off
Level select On <4 Off Monitor brightness Normal 4 High
<4 Manufacturer's recommended settings
Cabinet Type Setting The Cabinet Type setting indicates that the cabinet is the normal, upright type with one set of player controls. This setting is displayed on the screen as: TYPE C Do not change this default (recommended) setting.
Video Display Orientation Setting
The Video Display Orientation setting is displayed on the screen as: FLIP ON Do not change this default (recommended) setting.
Self-Test
Starting Lives Setting The Starting Lives setting indicates the number of lives granted when game play begins, and is displayed on the screen as:
PACMAN 3 3 lives is the default (recommended) setting. The setting can be changed to 1-5 lives by moving the joystick left/ right.
Extended Play Setting The Extended Play setting indicates at what point score an extra life is granted, and is displayed on the screen as: EXTEND £00000 100,000 points is the default (recommended) setting. The setting can be changed to 50,000, 100,000, 150,000 points Or nothing (no extended play) by moving the joystick left/right.
Game Difficulty Setting
The Game Difficulty setting indicates the difficulty level of the game, and is displayed on the screen as:
RANK Cc
C (hard) is the default (recommended) setting. The setting can be changed to A (easy), B (standard), or D (very hard) by moving the joystick left/right.
Final Round Setting
The Final Round setting indicates how long players can play before the game will automatically end. This setting, is displayed on the screen as: GAME END ENDLESS Anendless game (provided the player makes no mistakes) is the default setting. The setting can be changed to 7 rounds or 19 rounds by moving the joystick left/right.
Game Continuation Setting
The Game Continuation setting indicates game continvation with the add-a-coin feature. This setting is displayed on the screen as: CONTINUE ON
On is the default (recommended) setting. The setting can be changed to Off by moving the joystick left/right.
Level Select Setting The Level Select setting indicates whether this function is wrned on. If turnedon, it lets players choose from among Pac-Mania,
three points at which they may begin the game—round 1, 2, or 4. This setting is displayed on the screen as: SELECT ON On is the default (recommended) setting. The setting can be changed to off by moving the joystick left/right.
Brightness The Brightness setting adjusts the brightness of various types of displays. This setting is displayed on the screen as: BRIGHTNESS NORMAL Do not change this default (recommended) setting.
Switch Test
The Switch Test screen is shown in Figure 2-2. This test indicates the current DIP switch settings, and tests the self-test switch, start switches, coin mechanisms, player control, and buttons.
DIP Switch Settings The Pac-Mania game has One DIP option switch at location 3A on the Game PCB. (See Figure 1-1.) The DIP Switch settings indicate the current settings of the DIP Switch, and are displayed on the screen as: DIPSW 12345678 The row of numbers refers to switches | through 8 on Switch A. When the switch number Is displayed in red,
SWITCH TEST DIPsw 12345878 ‘TESTSW START: START2 CONT = COIN2
up LEFT RIGHT DOWN (STICK)
BI B82 83 (BUTTONS)
Figure 2-2 Switch Test Screen
Pac-Mania
the switch is on. When the number is white, the switch is off.
To change the settings, use a pen or a sharp-pointed instrument to slide the appropriate small buttons to different settings. With the Game PCB installed in the cabinet, slide the button down for on and up for off.
Self-Test Switch
The Self-Test Switch setting indicates the condition of the self-test switch and is displayed on the screen as: TESTSW (This switch is always on in the Self-Test Mode.)
Start Switch
The Start Switch setting indicates the condition of the two black-cap LED Start switches, and is displayed on the screen as: STARTI — START2
Coin Mechanisms
The Coin Mechanisms setting indicates the condition of the left and right coin mechanisms and is displayed on the screen as:
COINI COIN2
COIN refers to the left mechanism and CO/N2 the right mechanism.
Joystick The Joystick setting indicates the condition of the joystick and is displayed on the screen as: UP LEFT RIGHT DOWN (STICK1) Moving the joystick up/down or left/right displays that position in red. STICK2 or joystick 2 is not used in Pac- Mania.
Buttons
The Buttons setting indicates the condition of the buttons and is displayed on the screen as: Self-Test
BI B2 B3 (BUTTONS) B1 is the red Bounce button. B2 and B3 are not used in Pac-Mania.
Sound Test
The Sound Test screen is shown in Figure 2-3. This screen indicates the condition of the sound-effects circuitry (when sound is selected in the Attract Mode setting). This test is displayed on the screen as: VOICE NUMBER 000
PSG NUMBER 00
FM NUMBER 00
AUDIO
3D TEST
VOICE NUMBER indicates the one voice phrase in the game. PSG NUMBER indicates sound effect, and FM NUMBER indicates music. AUDIO tests the channels. (In Pac-Mania one speaker is used for both channels.) The 3D Test is not used.
Moving the joystick up/down or left/right selects the different item number. Pressing the Bounce button starts the selected sound.
Crosshatch Test
The Crosshatch screen is shown in Figure 2-4. This screen indicates the condition of the video display size, linearity, and convergence, and is used to adjust all three. The grid pattern should be white. Check this pattern for the following characteristics: © The four corners of the frame around the grid pattern should touch all four corners of the screen.
SOUND TEST
VOICE NUMBER 000 PSG NUMBER 00
Figure 2-3 Sound Test Screen
2-5
Self-Test
Figure 2-4 Crosshatch Test Screen
- The grid lines should exhibit no pincushioning or barreling. Refer to the display manual included with your game for more detailed adjustment procedures or to determine possible cause of failure.
Color Test
The Color Test screen is shown in Figuie 2-5. This screen indicates the condition of the video display color circuits, and is used to adjust the color and brightness. There should be four vertical bars of white, blue, green, and red. The bars should be brightest at the top of the screen, and darkest (black) at the bottom. The middle of the bars should be dim. If the display characteristics are not correct, refer to the display manual inciuded with your game for the colorgun adjustment procedure, or to determine the possible cause of failure.
A.D.S. Table Screen The A.D.S. (Auto Data Sampling) main menu is shown in Figure 2-6. To reach this screen, press and hold down the push-button service switch, then turn off the Self-Test switch. The A.D.S. bookkeeping function will gather player data only if toggle 5 of the DIP switch on the ROM PCB is turned on; be sure it is on if you want to collect player data. Refer to Table 2-3 for details about the special option settings available on this DIP switch. On the A.D.S. Table main menu, you can select from three different screens. Move the joystick up or down until the desired screen name turns red; then press the BOUNCE button to view thai screen. The three screens are as follows:
- PLAY TIME RECORD: Shows the number of games that were ended during each 30-second time span, from games of 30 seconds and under, to games 19¥2 minutes or longer in length. Pac-Mania
® MISS ROUND RECORD: Shows the number of Pac- Man lives lost during each of the 24 available rounds © OVER ROUND RECORD: Shows the number of games ended during each of the 24 available rounds. To zero out or reset the data in all three screens, on the main menu select the DATA RESET ALL phrase and press the BOUNCE button. To exit from the A.D.S. mode, select the EXIT A.D.S. MODE phrase, and press the BOUNCE button.
Figure 2-5 Color Test Screen
‘ADS. TABLE MENU
‘PLAY TIME RECORD MISS ROUND RECORD . ‘OVER ROUND: RECORD
DATA RESET ALL » EXIT A.D.8. MODE
MOVE STICK TO CHANGE
PUSH BUTTONTO ENTER
Figure 2-6 A.D.S. Table Screen
Pac-Mania Self-Test
Table 2-3 Special Settings on DIP Switch
Settings of 8-Toggle Switch on Pac-Mania ROM PCB (at A3) 1 2 3 4 5 6 7 Option
Self-Test Mode Off Normal play <4 On Enter Self-Test mode Freeze Display Off Normal (moving) display < On Frozen display A.D.S. (Auto Data Sampling)
Off No bookkeeping
On A.D.S. bookkeeping is done <4
4 Manufacturer's recommended settings
This page carries no recoverable text. It is a drawing or a photograph. See the original scan.
Chapter 3
Maintenance
This chapter includes preventive and corrective maintenance procedures for the Pac-Mania game components that are subject to the most use. To assure maximum trouble-free operation from this game, we recommend that preventive maintenance be performed as described in this chapter. Removal and replacement procedures are provided for components that might require corrective maintenance. Chapter 4, Illustrated Parts Lists, can also be used to locate the parts of this game that are mentioned, but not illustrated, in the maintenance procedures.
& Vp
Maintenance Pac-Mania
Preventive Maintenance
Preventive maintenance includes cleaning, lubricating, and tightening hardware. How often preventive maintenance is performed depends upon the game environment and frequency of play. However, for those components listed in Table 3-1 Preventive-Maintenance Intervals, we recommend that preventive maintenance be performed at the intervals specified.
Preventive-Maintenance Intervals
The preventive-maintenance intervals specified in Table 3-L are the recommended minimum requirements for the components listed.
A WARNING A
To avoid possible electrical shock, turn off the game before performing any maintenance procedures.
Removing the Control Panel
Perform the following procedure to remove/replace the contro! panel. (See Figure 3-3.)
- Unlock and open the upper coin door and the front access panel.
- Carefully reach up through the upper coin door opening and access panel. Release the two spring draw latches located under the control panel on each side of the cabinet.
- Grasp the control panel on the top edge (next to the display shield) and gently tilt the panel up slightly. Remove the panel from the front edge of the cabinet. Stand the control panel on its back edge by placing it in the wood slots located under the control panel on each side of the cabinet. The panel is now in position for servicing the leaf switches or the joystick control.
- If you need to remove the control panel, disconnect the control harness connector from the main harness.
- Carefully lift the control panel from the cabinet.
- Replace the control panel in the reverse order of removal.
Table 3-1 Recommended Preventive- Maintenance Intervals
Joystick Control Lubricate and tighten hardware at least every three months. Inspect whenever you Collect coins. Clean at least every three months, Coin Mechanism
Cleaning the Push-Button Leaf
Switches
Perform the following procedure to clean the push-button leaf switch contacts and tighten the securing hardware. (See Figure 3-1.)
- Follow the procedure described in steps 1-3 above for removing the control panel.
- Useelectrical contact cleaner to clean the contacts. Do not burnish them. When the push button is pressed, the wiping action of the cross-bar contacts provides a self-cleaning feature.
- Using a '%-inch open-end wrench, tighten the stamped nut securing the pushbutton leaf switch to the control panel.
Cleaning the Coin Mechanism Use a soft-bristled brush to remove loose dust or foreign material from the coin mechanism. A toothbrush can be used to remove any stubborn build-up of residue in the coin path. After cleaning the coin mechanism, blow out all of the dust with compressed air.
Cleaning the Interior Components Perform the following procedure to clean the components inside the cabinet.
Turn off the game power, but do not unplug the power cord before cleaning inside the cabinet. The power cord provides a ground path for stray static voltages that might be present on the cleaning tools.
1, Unlock and remove the front access panel.
- Use a vacuum Cleaner with a soft long-bristled brush attachment or a soft-bristled paint brush to remove loose dirt and dust accumulated on the inside of the cabinet. Be sure to clean the electrical components thoroughly (power supplies, PCB assemblies, display, etc.).
Maintenance Pac-Mania
Control Panel Decal
A 1-Inch-Long Carriage Bolt Redeuueateny
Control Panel Cross-Bar —_— Button Holder
Bezel
Lock Nut
Push-Button Switch
4-Position Joystick Assy
Figure 3-1 Leaf Switch and Joystick Removal
Joystick Control 1. Remove the control panel as previously described,
Preventive maintenance on the joystick control consists of inspecting the pivot and actuator balls for excessive wear or dirt, lubricating the pivot ball, replacing the microswitches, and, if necessary, replacing or tightening the securing hardware.
Lubricating the Joystick Control
Perform the following procedure to lubricate and tighten the joystick control. (See Figure 3-2.) . Apply a light film of Lithium grease (Atari part no. 107027-001) to the lubrication points shown in Figure 3-2. . Using a %-inch wrench, tighten the four nuts holding the joystick to the contro! panel.
- Using a Phillips screwdriver, tighten the four screws holding the positioning plate to the lower housing.
Corrective Maintenance
moving and replacing the Game PCB, video display, and the speaker follow. Corrective maintenance consists of removing, disassembling, reassembling, and replacing the push-button leaf switches, joystick control, game printed-circuit board (PCB), video display, and speaker. The procedures for re-
Maintenance
A Indicates Lubrication Point _ J} Upper Housing Assembly
Cushion Ring
#4-20 Screw
Actuator
#8-16 Screw
4-Position Plate
Figure 3-2 Joystick Lubrication
Removing the Game PCB
Perform the following procedure to remove/replace the Game PCB. 1, Turn the cabinet power off.
3-4 Pac-Mania
- Unlock and remove the front access panel from the cabinet.
- Disconnect the harness connectors from the End PCB.
- Use a Phillips screwdriver to remove the three screws. and washers holding the Game PCB and End PCB to the cabinet.
- Grasp the front edge of the Game PCB and gently slide it forward out of the slotted guide,
- Disconnect the End PCB from the Game PCB.
- Replace the Game PCB in the reverse order of removal.
Removing the Video Display
Perform the following procedure to remove/replace the video display. (See Figure 3-3.)
- Turn the game power off and wait two minutes. Unplug the power cord. 2, Remove the control panel as described under Preventive Maintenance.
- Remove the video display shield.
- Carefully remove the bezel from the foam tape holding it in place.
- Use a Phillips screwdriver to remove the four screws holding the rear access panel to the cabinet.
A WARNING A
High Voltage The video display contains lethal high voltages. To avoid injury, do not attempt to service this display until you observe all precautions necessary for working on high-voltage equipment X-Radiation The video display has been designed to minimize X-radiation. However, to avoid possible exposure to soft X-radiation, never modify the high-voltage circuitry. Implosion Hazard The cathode-ray tube may implode if struck or dropped. Shattered glass may cause injury within a 6foot radius. Use care when handling the display.
- Discharge the high voltage from the cathode-ray tube (CRT) before proceeding. The display assembly contains a circuit for discharging the high voltage to ground when power is removed. However, to make certain, always discharge the display as follows. a. Attach one end ofa large, well-insulated, 18-gauge jumper wire to ground. b. Momentarily touch the free end of the grounded jumper to the CRT anode by sliding it under the anode cap.
Pac-Mania
Video Display Shield
Split-Lock Washer Washer
Control Panel Lamp Maintenance
Speaker Grille Speaker
Grilte Mounting
Figure 3-3 Control Panel, Video Display, and Speaker Removal
c. Wait two minutes and repeat part b.
- From the back of the cabinet, unplug the display harness connectors from the display.
A WARNING A
Toavoid dropping the video display, use extreme care
when removing the display from the cabinet. We recommend that no one weighing less than 150 pounds should attempt to remove the video display. In addition, we recommend that you wear gloves to protect your hands from the sheet-metal edges.
- Use a % inch wrench to remove the four nuts and washers holding the video display to the cabinet shelf.
- Carefully slide the display out through the front of the cabinet.
- Replace the video display as described in the following procedure.
Replacing the Video Display
Perform the following procedure to replace the video display in the cabinet. (See Figure 3-3.)
- Gently lift the video display through the front of the cabinet.
- Position the display so that the four slots in the chassis are aligned with the corresponding mounting holes in. the cabinet shelf. . Tighten the four mounting nuts and washers using a 34-inch wrench. ow
Maintenance
- Connect the display harness to the display PCB.
- Replace the bezel.
- Replace the video display shield.
Removing the Speaker
Perform the following procedure to remove/replace the speaker. (See Figure 3-3.)
- Use a \-inch square drive bit to remove the five screws holding the speaker grille to the cabinet. Remove the grille. Pac-Mania
a Use a Phillips screwdriver to remove the four screws holding the speaker to the cabinet. . Remove the speaker just far enough to disconnect the two speaker wires. . With the tabs pointed outward, replace the speaker in the reverse order of removal.
Chapter 4
Illustrated Parts Lists
This chapter provides information you need to order Parts for your game. Common hardware (screws, nuts, washers, etc.) has been deleted from most of the parts lists. The PCB parts lists are arranged in alphabetical order by component. Each component subsection is arranged alphanumerically by reference designator. Other parts lists are arranged alphanumerically by Atari part number. In these parts lists, all A-prefix numbers come first. Following these are numbers in sequence evaluated up to the hyphen, namely 00- through 99-, then 000598- through approximately 201000-. When ordering parts, please give the part number, part name, number of this manual, and serial number of your game. This will help us fill your order rapidly and correctly, We hope the results will be less downtime and more profit from your game. Atari Customer Service numbers are listed on the inside front cover of this manual.
Illustrated Parts Lists Pac-Mania
78-6900402 Ya!" xy!" Foam Tape 044850-01 Speaker Cover Grille > 044974-01 044830-01 178056-002 Formed Attraction Panel Display Shield Ya" X Ya" Foam Tape 043276-02 044975-01 Machined Retainer 148007-104 Speaker
044845-01 139021-002 Rear Access Panel Sanyo Display
99-11006 Retainer Clip 171086-001 . Lamp Fixture
170003-001 Fluorescent Lamp
Control Panel Assy See Figure 4-2 A044977-01 Cabinet Assy
4-Position Joystick Assy See Figure 4-3
A044072-01 ae Coin Counter Assy Front Access Panel ‘
Coin Door Assy 038091-01 See Figure 4.5 / Molded Coin Box A044861-01 Main Harness Assy 76-3201 Adjustable Glide
Figure 4-1 Cabinet-Mounted Assemblies A044970-01 A
4-2
Pac-Mania Mlustrated Parts Lists
To comply with emission requirements, the per Federal Communications Commission re AC Harness Assy uires that the ground strap be secured to the PCB ground plate. Do not operate this 034536-02 Vibration Damper game without properly installing the ground strep: A044864-01 Video Harness Assy 044865-01 a +5V Harness Assy 2-01 ‘A044866-01 Louvered Grille Ground Strap Assy
A044866-02 Ground Strap Assy 044831-01 Ground Plate 178013-001 Spring Draw Latch End PCB Assy See Figure 4-7
Game PCB Assy See Figure 4-6
178093-001 Power Supply Assy Fan Blade Guard See Figure 4-4
A043910-01 OnlOtf Switch Assy with Harness
Figure 4-1 Cabinet-Mounted Assemblies, Continued
Illustrated Parts Lists Pac-Mania
Cabinet-Mounted Assemblies Parts List
Part No. Description
A043910-01 4-Inch-Long On/Off Switch Assembly with Harness A044072-01 12 VDC Non-Resettable Coin Counter Assembly A044861-01 Main Harness Assembly
A044862-01 AC Harness Assembly A044864-01 Video Harness Assembly A044865-01 +5 V Harness Assembly A044866-01 Ground Strap Assembly A044866-02 Ground Strap Assembly A044977-01 Cabinet Assembly 78-3201 Adjustable Glide 78-6900402 ¥4 -Inch-Wide x \-Inch-Thick Foam Tape (24 inches required; used on control panel edge resting directly on display shield)
99-11006 Fluorescent Lamp Retainer Clip 034536-02 0.50-Inch-Thick Foam Vibration Damper 037332-01 Louvered Grille 038091-01 Molded Coin Box
042914-01 Ventilation Grille 043276-02 Machined Retainer 044830-01 Video Display Shield 044831-01 Ground Plate 044845-01 Rear Access Panel 044850-01 Speaker Cover Grille 044853-01 Front Access Panel 044974-01 Formed Attraction Panel
044975-01 Video Display Bezel with Graphics 139021-002 Sanyo Model 20-Z2AD 19-Inch Color Raster Video Display 148007-104 4%-Inch Round, 80, 10W, Shielded Speaker 170003-001 18-Inch-Long 50 W Fluorescent Lamp
171086-001 18-Inch-Long 118 V 60 Hz Fluorescent Lamp Fixture 178013-001 Spring Draw Latch 178056-002 ¥e-Inch-Wide x ¥(,-Inch-Thick Foam Tape (4 inches required; used on corners on underside of display bezel) 178093-001 Fan Blade Guard
The following items are the technical information supplements for tbis game: TM-315 Pac-Mania Operators Manual SP-315, Pac-Mania Schematic Package ST-315 Pac-Mania Self-Test Label Sanyo 19” Color Raster Video Display Service Manual
Pac-Mania
044972-01 Corirol Panel
160013-002
62-041 Push-Butten Switch 1-Inch-Long Carriage Bolt
‘A044986-01 _ Harness Assy
Cross-Bar Leaf Switch with Button Holder Illustrated Parts Lists
044973-01 Control Panel Decal
178030-004 75-51168 Red Button Assy
| og
& /
177010-240 \\ Lock Nut
4-Position Joystick Assy See Figure 43
Figure 4-2 Control Panel Assembly A044971-01 B
Control Panel Assembly Parts List
Part No. Description
A040933-01 4-Position Snap-Action Switch Joystick Assembly—see Figure 4-3 A044986-01 Control Panel Harness Assembly 62-041 Black Cap (No LED) SPDT Push-Button Switch 75-5116B #10-24 x 1.00-Inch-Long Black Carriage Bolt
75-9910NO #11-4-Inch Stamped Nut 036895-01 Black Molded Bezel 044972-01 Control Panel 044973-01 Control Panel Decal
160013-002 Cross-Bar Leaf Switch with Button Holder 177010-240 #10-24 Lock Nut 178036-004 Red Button Assembly
Illustrated Parts Lists Pac-Mania
A040932-01 A indicates Upper Housing Assy Lubrication Point ATi,
041287-01 Lower Housing
160044-001
%& i | 044390-01 Cushion Ring
176002-140 +#8-16 Screw
039717-01 4-Position Plate
Figure 4-3 4-Position Joystick Assembly A040933-01 E
Pac-Mania Illustrated Parts Lists
4-Position Joystick Assembly Parts List
Part No. Description
A040932-01 Upper Housing Assembly 93971401 Actuator 039717-01 4-Position Positioner Plate 041287-01 Lower Housing
944390-01 Cushion Ring. 160044-001 Snap-Action Switch 176002-140 #8-16 x 2.50-Inch-Long Self-Tapping Hex Washer-Head Screw 176030-110 #4-20 x .62-Inch-Long Self-Tapping Hex Washer-Head Screw
Illustrated Parts Lists Pac-Mania
A WARNING A The switching power supply has high voltages on it when power is turned on. Therefore, be sure you do not touch this power
179231-002 Terminal Block
‘A043367-01 Jumper Assy
178181-6808 ay, A042384-01 Line Filter Assy
A044337-01 Transformer
Power Supply Chassis Base 17925-2201 Fuse Block 72-HA4806S 034544-01 Fuse Biock Cover Screw
Figure 4-4 Switching/Linear (SL) Power Supply Assembly A044339-02 B
Pac-Mania Mlustrated Parts Lists
Switching/Linear (SL) Power Supply Assembly Parts List
Part No. Description
A042384-01 Line Filter Assembly A043367-01 Jumper Assembly A044089-01 5 V Harness Assembiy A044337-01 Transformer Termination Assembly
A044401-02 5 V Power Supply Harness Assembly 46-2013002 250 V Slow-Blow 3 A Fu 72-HA4608S, #6-32 x %-Inch Cross-Recessed Pan-Head Thread-Forming Screw 72-HA46168 #6-32 x 1-Inch Cross-Recessed Pan-Head Thread-Forming Screw
72-HA48065 #8-32 x Inch Cross-Recessed Pan-Head Thread-Forming Screw 85-22F206 #2-56 x %-Inch Cross-Recessed Pan-Head thread-Forming Screw 034544-01 Fuse Block Cover 037640-01 Power Supply Warning Label
043396-01 Power Supply Chassis Base 043908-01 Power Supply Fuse Label 116024-500 50 Q, 5 W, Chassis-Mount Resistor 149007-001 Astec 5 V/12 V Switching Power Supply 175004-706 #6 Fiber Washer 178181-6808 17 L-Inch ID, ¥-Inch OD, Aluminum Standoff 179225-2201 1-Position Fuse Block 179231-002 2-Position Terminal Block
Astec §-Volt Power Supply Sub-Assembly Model SA40-1304 Parts List
| Designator | Description | Part No. |
Capacitors
| c1,C2 | Capacitor, Met Poly, .1 #E, + 20%, 250 VAC | 99-209076 |
| C3, C4 | Capacitor, Poly, 2200 pk + 20%, 250 VAC | 99-209077 |
| cS | Capacitor, Met Poly, 2200 pk, + 20%, 250 V | 99-209080 |
| C8 | Capacitor, Electrolytic, 220 uF, + 100-+ 10%, 19 V | 99-209072 |
| co | Capacitor, Ceramic, 1000 pF, + 20%, 3 KV, Z5P | 99-209068 |
| C10 | Capacitor, Met Poly, .022 aE, + 20%, 250 VAC | 99-209079 |
| cil | Capacitor, Poly, .22 wk + 10%, 100 V | 99-209014 |
| ci2 | Capacitor, Electrolytic, 2200 nF, + 20%, 16 V, Sxa | 99-209073 |
| C13 | Capacitor, Poly, .01 pE +5%, 50 V | 99-209075 |
| cl4 | Capacitor, Electrolytic, 100 a&, + 20%, 25 V, Sxa | 99-209006 |
| cis | Capacitor, Electrolytic, 1000 pk, + 20%, 16 V, Sxa | 99-209008 |
| C16 | Capacitor, Poly, .022 a + 20%, 50 V | 99-209078 |
| cl7 | Capacitor, Electrolytic, 1000 pF, + 20%, 10 V, Sm | 99-20907 1 |
| C18 | Capacitor, Ceramic, 330 pk, + 20%, 100 V, SI | 99-209069 |
| C19 | Capacitor, Electrolytic, 470 aE, + 20%, 16 V,Sm | 99-209074 |
| C20 | Capacitor, Electrolytic, 100 aE, + 20%, 16 V, Sm | 99-209070 |
| C21 | Capacitor, Poly, .22 ¢F + 10%, 100 V | 99-209014 |
| C23 | Capacitor, Ceramic, .01 wE, + 80-+ 20%, 100 V, Z5U | 99-209003, |
Diodes
| DI | Diode, RGP10A | 99-209083 |
| D2 | Diode, RGP10} | 99-209033 |
Illustrated Parts Lists Pac-Mania
Astec 5-Volt Power Supply Sub-Assembly Model SA40-1304 Parts List, Continued
| Designator | Description | Part No. |
| D3 | Diode, GP10A | 99-209084 |
| D4, D5 | Diode, RGP10J | 99-209033 |
| D6, D7 | Diode, iN4606 | 99-209030 |
| D8 | Assembly, Regulator/SCR/Diode/Heat Sink | 99-209105 |
| D8 | Diode, 12CTQ035 | 99-209107 |
| De | Diode, RGP10B | 99-209034 |
| DIO | Assembly, Diode/Heat Sink | 99-209103, |
| D1 | Diode, 1N4606 | 99-209030 |
| D12,D13 | Diode, 1N4001 | 99-209035, |
| DBI | Diode, Bridge, KBP08 | 99-209085, |
Inductors
| 13 | Inductor, 2.2 pH | 99-209029 |
| L4 | Inductor, 1.5 mH | 99-209028 |
| Ls. | Assembly, Inductor Coil | 99-209059 |
| L6 | Inductor, 4.4 pH | 99-209102 |
Transistors
| Ql | Transistor, NPN, 2SC2120 | 99-209082 |
| Q2 | Assembly, Transistor/Heat Sink | 99-209104 |
| Q3 | Transistor, PNP, 25B5061 | 99-209022 |
Resistors
| RI | Resistor, Carbon Film, 470K 2, + 5%, 2 W | 99-209089 | |
| R2 | Resistor, Wirewound, 332, +53%, 3 W | 99-209097 | |
| R3, R4 | Resistor, Metal Oxide Film, 100K 2, +5%, 1 W | 99-209054 | |
| RS | Resistor, Carbon Film, i1KQ, +5%, 4 W | 99-209086, | |
| RO | Resistor, Metal Oxide Film, 1200, +5%, 2W | 99-209095 | |
| R7 | Resistor, Metal Film, 19, +5%, 1 W | 99-209025 | |
| R8 | Resistor, Carbon Film, 279, +5%, %& W | 99-209040 | |
| RO | Resistor, Carbon Film, 68 Q, +5%, 44 W | 99-209090, | |
| RIO | Resistor, Carbon Film, 109, + 5%, a W | 99-209037, | |
| R11 | Resistor, Carbon Film, 15 Q, +5%, 4 W | 99-209087 | |
| Ri2 | Resistor, Metal Film, .75Q, +5%, 1W | 99-209091 | |
| R13 | Resistor, Carbon Film, 5.62, +5%, 4 W | 99-209046 | |
| Rid | Resistor, Carbon Film, 470, +5%, 4 W | 99-209043 | |
| R15, R16 | Resistor, Carbon Film, 270, 45%, %& W | 99-209041 | |
| RIT | Resistor, Carbon Film, 8.2 2, +5%, 4 W | 99-209049 | |
| R18 | Resistor, Carbon Fiim, 3302, +5%, 4 W | 99-209042 | |
| RI9 | Resistor, Carbon Film, 569, +5%, 4 W | 99-209045, | |
| R20 | Resistor, Carbon Film, 68 @, +5%, 4% W | 99-209090, | |
| R21 | Resistor, Carbon Film, 3302, +5%, 4 W | 99-209042 | |
| R22 | Resistor, Carbon Film, 470 2, +5%, 4 W | 99-209044 | |
| R23 | Resistor, Metal Film, 8.2K Q, +1%, 4 W | 99-209094 | |
| R24 | Resistor, Metal Film, 2.7K Q, | 1%, 4 W | 99-209093 |
| R25 | Resistor, Metal Film, I8KQ, + 1%, 4 W | 99-209092 | |
| R27 | Resistor, Carbon Film, 222, +5%, 4 W | 99-209088 | |
| R28 | Resistor, Carbon Film, 102, +5%, 4 W | 99-209037 | |
| R29 | Resistor, Metal Oxide Film, 1209, +5%, 2 W | 99-209095, |
Pac-Mania Mlustrated Parts Lists
Astec 5-Volt Power Supply Sub-Assembly Model SA40-1304 Parts List, Continued
| Designator | Description | Part | No. |
| R30 | Resistor, Wirewound, 159, +5%,5 W | 99-209096, | |
| R32 | Resistor, Carbon Film, 10, +5%, 4 W | 99-209037 |
Transformers
| Tl | Com Mode Transformer Assembly | 99-209101 |
| T2 | ‘Transformer, Power, AC8154 | 99-209100 |
| 13 | Control Transformer Assembly (J/V) | 99-209058, |
Miscellaneous
| Fl | Fuse, 2 A, 250 V | 99-209081 | |
| Icl | Regulator, 431 | 99-209023 | |
| 1C2 | Assembly, Regulator/SCR/Diode/Heat Sink | 99-209105 | |
| 1C2 | Regulator, UA7912 | 99-209106 | |
| SCRL | Assembly, Regulatot/SCR/Diode/Heat Sink | 99-209105 | |
| SCRI | Thyristor, SCR, 2N6395 | 99-209 108 | |
| TMI, TM2 | Thermistor, | 89, + 20% | 99-209099 |
| VRI | Potentiometer, Trimming, 1K @ | 99-209098, | |
| vA | Diode, Zener, 5.6 V, +5%, 40 mA | 99-20903 1 |
4-11
Illustrated Parts Lists Pac-Mania
99-10140 Panel Assembly
75-9485 Locknut QS : 99-10116 oh lever 99-10152 | Nhe Right Coin Inlet -
171006-035 Coin Mechanism 99-10147 Harness
75-9448 Locknut
99-10096 Fastener
99-10151 Lett Coin Inlet
99-10080 ‘Lamp Socket
99-10105 Bar
99-10104 Bar Retainer
99-10042 thru 98-10045 99-10154 Coin Switch Assembly Bracket Assembly
99-10153 Coin Return Box 99-10150 Switch Cover 99-10068 Coin Chute 65-4416 Coin Switch
99-10075 thru 99-10078 Switch Wires 99-10008 Retainer 7544128
Screw
Figure 4-5 Coin Acceptors, Inc. Coin Door Assembly 171027-001 A
Pac-Mania 1
99-10148 Lock Assembly
72-HA1404C Screw
99-10119 99-10139 . Button Assem! Coin Door a a a
99-10148 Lock Assembly Se BY
ease
L | ie
72-JA1405B - . Screw - :
038091-01 Coin Box
The acceptable substitute for this door (and the one used in games manufactured in Ireland) is the Coin Controls Ltd. Coin Daor Assembly, part number 171034-001. You can obtain a free Coin Controls Ltd. supplement (pan no. CO-305-01); it has ilustrations and a partslist. Write to Atari Games Ireland Limited, Tipperary Town, Ireland. Telephone 062-52155.
Figure 4-5 Coin Acceptors, Inc. Coin Door Assembly, Continued 171027-001 A lustraied Parts Lists
99-10142 lon Housing
99-10134 Cover
99-10118 Button oly
99-1015 Spring
99-10141 Coin Return Cover
99-10117 Coin Return Door
——— 99-10144 Channel Clip
“> 98-15066 Screw
99-10149 Service Door
99-10143 Frame
4-13
Illustrated Parts Lists Pac-Mania
Coin Acceptors, Inc. Coin Door Assembly Parts List
Part No. Description
65-441C Coin Switch 70-11-47 Miniature Bayonet Lamp 72-94068 #4-40 x YInch Truss-Head Screw 72-HA1404C #4-40 x %-Inch Pan-Head Screw
72-JA1405B #4-40 x 0.31-Inch Pan-Head Screw 75-14128 #4-40 x %-Inch Pan-Head Screw 75-9948 #4-40 Locknut 99-10008 Retainer
99-10042 Coin Switch Assembly for Belgian 5 Fr and U.S. 25¢ 99-10043, Coin Switch Assembly for German 1 DM, Japanese 100 Yen, Swiss 1 Fr 99-10044 Coin Switch Assembly for German 2 DM, Italian 100 1, U.S. $1.00. 99- 10045 Coin Switch Assembly for Australian $.20, German 5 DM, British 10 P
99-10068 Coin Return Chute
| 99-10075 | Switch Wire | (included in coin switch assembly 99-10043) |
| 99-10076 | Switch Wire | (included in coin switch assembly 99-10042) |
| 99-10077 | Switch Wire | (included in coin switch assembly 99-10044) |
| 99-10078 | Switch Wire | (included in coin switch assembly 99-10045) |
99-10080 Lamp Socket 99-10081 Key Holder 99-10096 Fastener
99-10104 Bar Retainer 99-10105 Bar 99-10115 Spring 99-10116 Plastic Coin Return Lever
99-10117 Steel Coin Return Door 99-10139 Coin Door 99-10140 Coin Door Inner-Panel Assembly 99-10141 Die-Cast Coin Return Cover
99-10143 Coin Door Frame 99-10144 Channel Clip 99-10147 Harness 99-10148 Lock Assembly
99-10149 Service Door 99-10150, Switch Cover 99-10151 Left Coin Inlet 99-10152 Right Coin Iniet
99-10153 Coin Return Box
99-10154 Bracket Assembly
99-10160 1”-Wide Die-Cast Coin Inlet Housing 99-10161 25¢ Amber Side-Entry Button Assembly
99-15066 Screw for Clamp 171006-035 Metal Coin Mechanism for U.S. 25¢
4-14
This page is a drawing, shown as the original scan.
This page reads as a drawing: its text was drawn rather than typeset, and comes out in fragments. See the original scan.
Illustrated Parts Lists Pac-Mania
Pac-Mania CPU PCB Assembly Parts List
Part No. Description
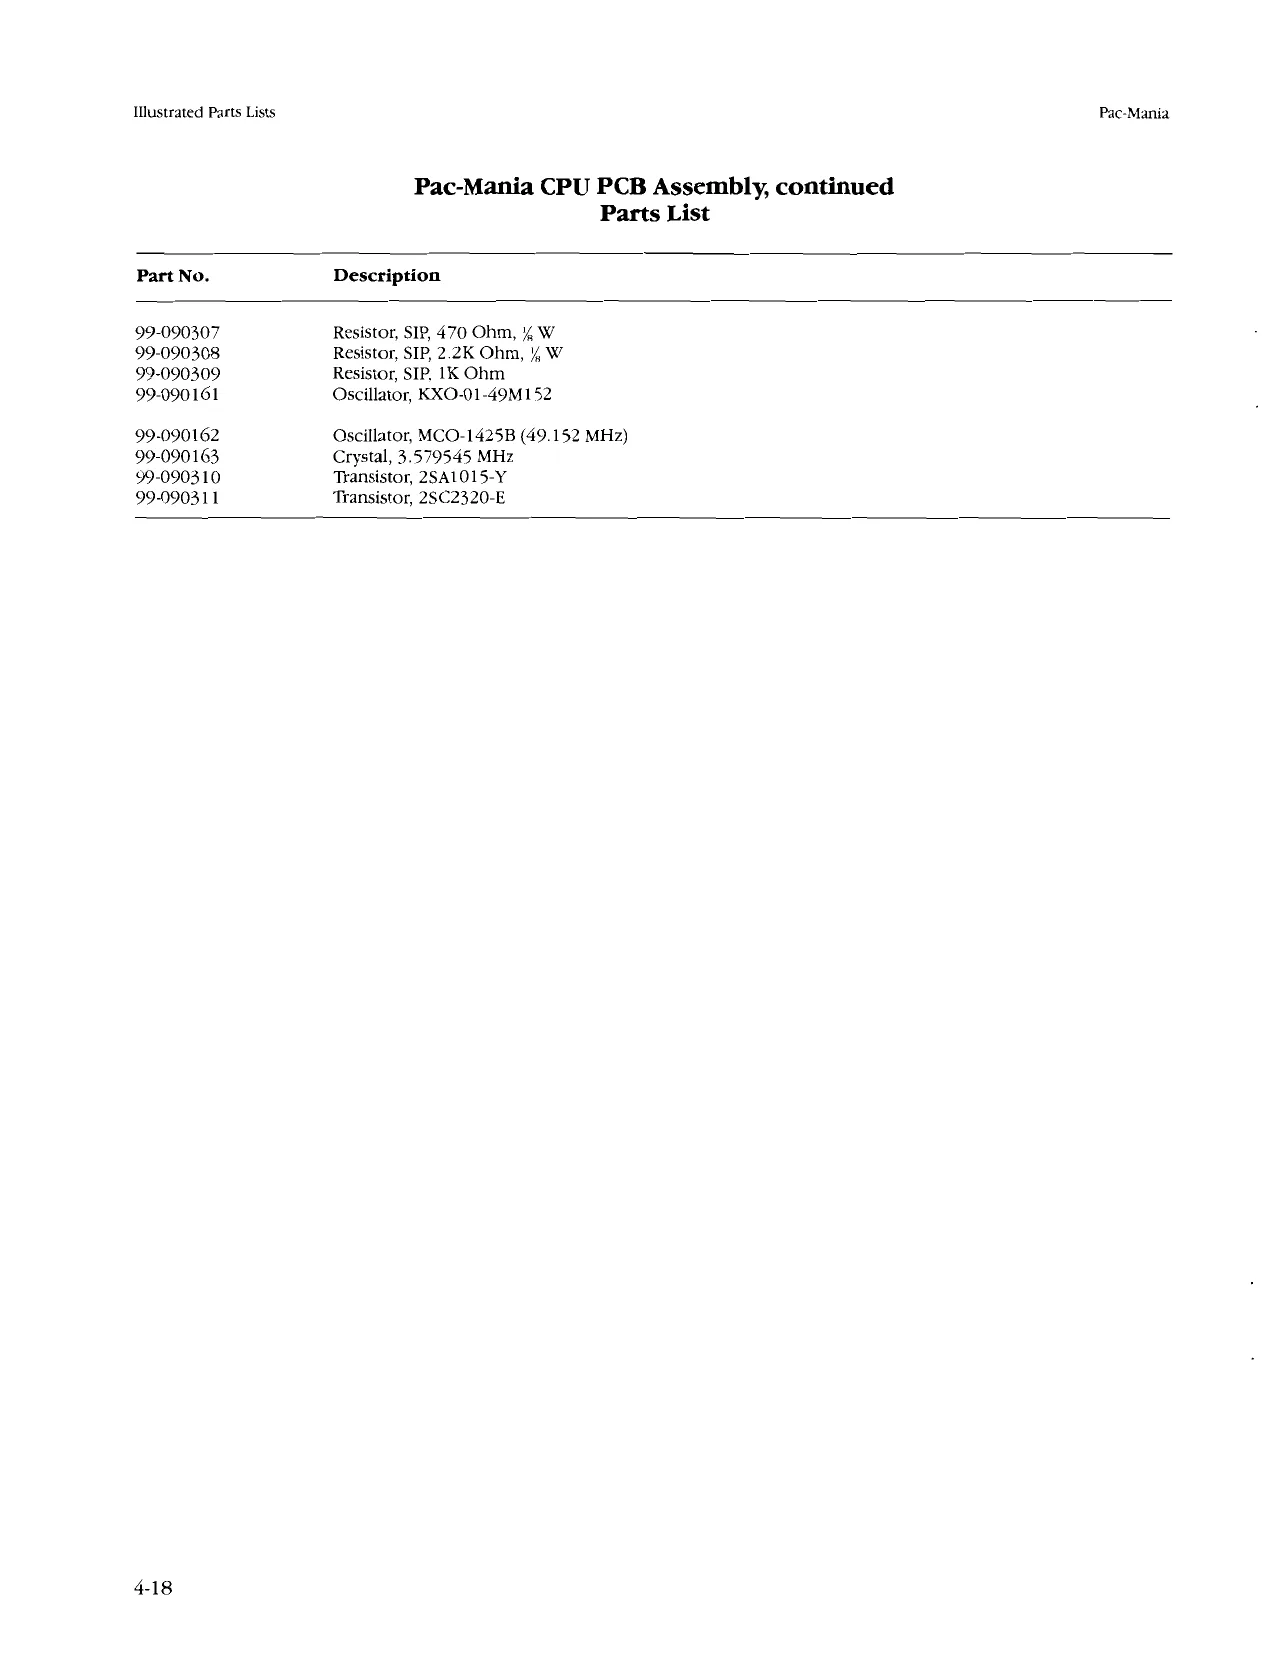
99-0901 11 IC, 74LS08 99-0901 14 IC, 741832 99-090115 IC, 741874 99-090120 AC, 7415157 99-090122 IC, 7418173 99-0901 24 IC, 7418245 99-090125 IC, 7418257 99-0902 45 XC, 7418365 99-090130 IC, 7418377 99-090131 IC, 7418378 99-090288 IC, 74F04 99-090289 IC, 74F08 99-090290 IC, 74HC86 99-090291 IC, 74HC175 99-090292 IC, 74HC646 99-090133 IC, 4069 99-090135 IC, 6BAOSEP 99-090134 IC, HDGBA09E 99-090136 IC, TMM2018D-45 (45 ns) 99-090293 IC, TMM2064P-150 (150 ns) 99-090294 IC, MSMS165P-120 (120 ns) 99-0901 41 IC, TMM2064P-10 (100 ns) 99-090140 IC, M5M5165P-10(100 ns) 99-090295 IC, TMM2018D-55 (55 ns) 99-090142 IC, M5M5165-70 (70 ns) 99-090146 IC, TMM2064P-70 (70 ns) 99-090295, IC, TMM2018D-55 (55 ns) 99-090 142 IC, M5SM5165-70 (70 ns) 99-090296 IC, MSMS825GAP-70 (70 ns) 99-090297 1C, HM65256BP-150 (150 as) 99-090298 IC, HMG62256P-150 (150 ns) 99-090299 IC, PAL, 16L8B-2 99-090147 IC, YM2151 99-090148 IC, Custom 27 99-090149, IC, Custom 30 99-090150 IC, Custom 39 99-090154 IC, Custom 48 99-090300 AC, Custom 116 99-090301 IC, Custom 117 99-090302 IC, Custom 120 99-090303 IC, Custom 121 99-090304 IC, Custom 133 99-090194 Resistor, 4.7K Ohm, 5%, 4 W 99-090199 Resistor, iMeg Ohm, 5%, 4 W 99-090262 Capacitor, Ceramic, 22 pF, 12 V 99-0901 75, Capacitor, Ceramic, 0.1 #F, 25 V 99-090305, Resistor, SIP, 100 Ohm, 4 W 99-090306 Resistor, SIP, 2.7K Ohm, 4 W
a “I
This page is a drawing, shown as the original scan.
Pac-Mania Ulustrated Parts Lists
(4021962198)
ROM IPH TP com] ee | AB AB ELA | Ry 28 | Si2k| EP | MO ago! a7siz 28 | 1 | MASK | 220 32 [in jer |omm N27 | a2 | 277". 6 aya) owma) oma an MASK)
Figure 4-6B Pac-Mania ROM PCB Assembly 99-090356
Illustrated Parts Lists Pac-Mania
Pac-Mania ROM PCB Assembly Parts List
Part No. Description
99-090108 IC, 74LS00 99-0903 12 IC, 74F02 99-090117 IC, 74L$138 99-090118. IC, 74L8139 99-090244 IC, 7418244 99-090124 IC, 7418245 99-090125, IC, 748257 99-090126 IC, 74LS273 99-090127, IC, 74LS373 99-0903 13 IC, 74F138, 99-0903 14 IC, 74F244 99-090315 IC, 74F374 99-090246 IC, 4066 99-090132 IC, 74HC257 99-0903 16 IC, 74HC374 99-0903 17 IC, Custom 64, M4 99-090157 IC, Custom 99, N1 and N2 99-0903 18 IC, Custom 123, S8 99-090155, IC, Custom 95, HI, K1, L1, H2, and K2 99-090158 IC, DAC, YM3012 99-0903 19 IC, PAL, 16L8B-2 99-090320 IC, 78L06 99-090248, IC, Op-Amp, TLO84CN 99-090160 IC, Power Amplifier, LA4460 99-090321 IC, LA4520 99-090322 IC, TA7630 99-090323 IC, LB1760 99-090324 IC, MB3771 99-090250 Diode, 151588 99-090325 Diode, 181885 99-090326 Diode, 126.2 99-090327 Transistor, 2SC1815 99-090310 Transistor, 2SA1015-Y 99-090328 Transistor, 25C2236-Y 99-090187 Resistor, 4.7 Ohm, 3%, 4 W 99-090255 Resistor, 100 Ohm, 5%, 4 W 99-090189 Resistor, 330 Ohm, 5%, 4 W 99-090191 Resistor, 470 Ohm, 5%, 4 W 99-090192, Resistor, 560 Ohm. 5%, 4 W 99-090329 Resistor, 1.5K Ohm, 5%, 4 W 99-090257 Resistor, 2.2K Ohm, 5%, 4 W 99-090194 Resistor, 4.7K Ohm, 5%, 4 W 99-090195 Resistor, 6.8K Ohm, 5%, 4 W 99-090196 Resistor, 10K Ohm, 5%, % W 99-090330 Resistor, 12K Ohm, 5%, 4 W 99-090200 Resistor, 18K Ohm, 5%, 4 W 99-090261 Resistor, 47K Ohm, 5%, 4 W 99-090331 Resistor, 100K Ohm, 5%, 4 W
4-20
Illustrated Parts Lists Pac-Mania
Pac-Mania ROM PCB Assembly, continued Parts List
Part No. Description
99-090199 Resistor, Meg Ohm, 5%, 4“ W 99-090332 Resistor, SIP, 1K Ohm, 4 W 99-090333 Resistor, SIP, 1.2K Ohm, 4 W 99-090334 Resistor, SIP, 1K Ohm, % W 99-090185, Resistor, SIP, 4.7K Ohm x 8, 4 W 99-090335, Resistor, SIF, 10K Ohm, 4 W 99-090336 Resistor, SIP, 1OK Ohm, 4 W 99-090253 Resistor, SIP, 5K Ohm x 8 99-090274 Inductor, 100 #H, SP0406-101K 99-090337 Capacitor, Cer, 2200 pF 25 V 99-090174 Capacitor, Ceramic, 0.01 4, 25 V 99-090175 Capacitor, Ceramic, 0.1 pF, 25 V 99-090338 Capacitor, .0047 pF, 50 V 99-090339 Capacitor, .033 ¢E, 50 V 99-090340 Capacitor, .12 uF, 50 V 99-090341 Capacitor, 01 uF, 50 V 99-090342 Capacitor, 1 pF, 25 V 99-090343 Capacitor, Electrolytic, 47 uF, 66.3 V 99-090344 Capacitor, Electrolytic, 470 hE, 10 V 99-090345 Capacitor, Electrolytic, 2.2 uF, 16 V 99-090346 Capacitor, Electrolytic, 4.7 pF, 16 V 99-090255 Resistor, 100 Ohm, 5%, 4 W 99-090269 Capacitor, Electrolytic, 10 ¢F, 16 V 99-090347 Capacitor, Electrolytic, 22 wE, 16 ¥ 99-090270 Capacitor, Electrolytic, 47 #E, 16 V 99-090348 Capacitor, Electrolytic, 220 #F, 16 V 99-090349 Capacitor, Electrolytic, 1000 uF, 16 V 99-090350 Capacitor, Electrolytic, .47 4E, 50 V 99-090351 Potentiometer, 10K Ohm 99-090352 Switch, DIP, 8-Circuit 99-090357 IC, Custom 151, F10 136058-1101 IC, EPROM, Pac-Mania, PN1 P6, S10
136058-1102 IC, EPROM, Pac-Mania, PN1 P7, T10 136058-1103 IC, EPROM, Pac-Mania, PN1 SO, Al0 136058-1104 IC, EPROM, Pac-Mania, PN1 $1, B10 136058-1105 IC, ROM, Pac-Mania, PN OBJ-0, A9
136058-1 106 IC, ROM, Pac-Mania, PN OBJ-1, BD 136058-1107 136058-1108 136058-1109
136058-1110 136058-1111 136058-1112 IC, ROM, Pac-Mania, PN CHR-0, A8 iC, ROM, Pac-Mania, PN CHR-1, B8. IC, ROM, Pac-Mania, PN CHR-2, E8
IC, ROM, Pac-Mania, PN CHR-3, F& IC, ROM, Pac-Mania, PN CHR-8, U8 IC, ROM, Pac-Mania, PN VOI-0, A4
4-21
IMustrated Parts Lists Pac-Mania
NOTICE TO ALL PERSONS RECEIVING THIS DRAWING CONFIDENTIAL: Reproduction orbilden wathous tne speotc writen permision of an Games Corporation. Mlotas, CA, This diawing 1 only Conattonaly 89466, and neier receipt nor possesson thereol confers tansers any ngniin, ot lense to use, Ie subject matter oie Grawing (oF any dAsign OF technical information shown thereon. ner ary rignt i reproduce ths Giawing o! any pan there! ExcopK fr manulactute OF vendors 0 Atani Games Corporation, and for manutacisre under tne corporation's wrtten reenise, no Aghtis granked 0 rearoduce ths drawing NOTE: Components Rt-A7_ TP*, ana 12 Or he Subject mater neraot unless by wntlen ajeemen ith or wilen permssion tom Me corporavan should not be instaed in the PCB
| eee | i | ; | ° | seeeceets | x | MO0OOG | 2 | Om |
vba le ( i cll) Ses aut o9 9990006 Ls i | tes |
| |B | aoggaet | ; | =y |
le 1 SOL = cas 636 J1 1OC0OC00O a'p eocccocca %° 6,
si Hittrtrtittstrestistes i siti ie we} 0! es It ej _je °
° ° 13 rc ‘ i
. pe 00000
Figure 4-7 End PCB Assembly A044201-01 C
End PCB Assembly Parts List
| Designator | Description | Part No. |
Capacitors
| C1-C21 | 1 pF, 50 V Ceramic Capacitor | 122002-104 |
.001 nF, 50 V Ceramic 122002-102 470 pF, 100 V Ceramic Capacitor 122016471 1 aE, 50 V Ceramic Capacitor 122002-104
| O01, | 50V Ceramic Capacitor | 122002-102 |
1 2E 50 V Ceramic Capacitor 122002-104 Diodes
| CR}, CR2 | Type-1N4001 Diode | 131048001 |
Connectors
| N22 | 11-Ckt., .1-Inch Ctr. Headet Connector | 179118-011 | |
| B | 6-Ckt, .156-Inch Ctr, Header Connector | 179213-006 | |
| M4 | 9-Ckt., .156-Inch Ctr, Header Connector | 179213-009 | |
| Is | ©-Ckt, .I-Inch Ctr, | Header Connector | 1791 18-006 |
| J6 | 56-Ckt., Right-Angle Edge Connector (Acceptable substitute is part no. | 179240-056 |
179240-156) Resistors
| R8 | OQ, £5%, % W Resistor | 110005-001 |
Miscellaneous
| L1-13 | Ferrite Bead | 141003-005 | |
| CC+,CC+ | Test Point, .187 x .031 | 179051-001 | |
| TPS | Test Point, | .250 x .031 | 179051-003 |
SPDT Miniature Slide Self-Test Switch 160040-001 Momentary Push-Button Switch (Service Switch) 160046-001
Pac-Mania* Auto Data Sampling (A.D.S.) Game Statistics
Date:
Play Time Range Data (Play Time Record)
| Range in | Number | Range in | Number |
| Seconds | Eliminated | Seconds | Eliminated |
| 00:00-29 | — | 00:30-59 | |
| 01:00-29 | a | 01:30-59 | |
| 02:00-29 | —— | 02:30--59 | |
| 03:00-29 | —— | 03:30-59 | |
| 04:00-29 | — | 04:30-59 | |
| 05:00-29 | ee | 05:30-59 | |
| 06:00-29 | a | 06:30-59 | |
| 07:00-29 | —e | 07:30-59 | |
| 08:00-29 | —_—__—_. | 08:30-59 | |
| 09:00-29 | — | — | 09:30-59 |
| 10:00-29 | ———__ | 10:30-59 | |
| 11:00-29 | ——— | 11:30-59 | |
| 12:00-29 | —__—_ | 12:30-59 | |
| 13:00-29 | ——____ | 13:30-59 | |
| 14:00~29 | ——— | 14:30-59 | |
| 15:00-29 | ——__—_ | 15:30-59 | |
| 16:00-29 | ——_____ | 16:30-59 | |
| 17:00-29 | —___—_. | 17:30-59 | |
| 18:00-29 | —— | 18:30-59 | |
| 19:00-29 | —— | 19:30— |
Pac-Man Dead Round Data Game Over Round Data (Miss Round Record) (Over Round Record)
| No. | No. | No, | No. | No. | No. | |
| Elimi- | Elimi- | Elimi- | Elimi- | Elimi- | Elimi- | |
| Rnd nated | Rnd nated | Rod nated | Rnd nated | Rnd nated | Rnd nated | |
| 1 | 2 | 3 | 1 | 2 | 3 | |
| 4 | 5 | 6 | 4 | - | 5 | 6 |
| 7 | - | 8 | 9 | 7 | 8 | 9 |
| 10 _ | 11 | 12 | 10 | ul | 12 | |
| 13 | 14 | 15 | 13 | 14 | 15 | |
| 16 | 17 | 18 | 16 | 7 | 18 | |
| 19 | 20 | 21 | 19 | 20 | 21 | |
| 22 | 23 | 24 | 22 | 23 | 24 |
*Pac-Mania is engineered and designed by Namco itd. Manufactured by Atari Games. Trademark and © Namco 1987.
This page carries no recoverable text. It is a drawing or a photograph. See the original scan.
Warranty
Seller warrants that its printed-circuit boards and parts thereon are free from defects in material and workmanship under normal use and service for a period of ninety (90) days from date of shipment. Seller warrants that its video displays and laser video disc players (in games supplied with displays and video-disc players) are free from defects in material and workmanship under normal use and service for a period of thirty (30) days from date of shipment. None of the Seller's other products or parts thereof are warranted. If the products described in this manual fail to conform to this warranty, Seller's sole liability shall be, at its option, to repair, replace, or credit Buyer’s account for such products which are returned to Seller during said warranty period, provided:
- Seller is promptly notified in writing upon discovery by Buyer that said products are defective;
- Such products are returned prepaid to Seller’s plant; and
- Seller's examination of said products discloses to Seller’s satisfaction that such alleged defects existed and were not caused by accident, misuse, neglect, alteration, improper repair, installation, or improper testing. In no event shall Seller be liable for loss of profits, loss of use, incidental or consequential damages. Except for any express warranty set forth in a written contract between Seller and Buyer which contract supersedes the terms herein, this warranty is expressed in lieu of all otber warranties expressed or implied, including the implied warranties of merchantability and fitness for a particular purpose, and of all other obligations or liabilities on the Seller’s part, and it neither assumes nor authorizes any other person to assume for the Seller any other liabilities in connection with the sale of products by Seller.
The use of any non-Atari parts may void your warranty, according to the terms of the warranty. The use of any non-Atari parts may also adversely affect the safety of your game and cause injury to you and others. Be very cautious in using non-Atari-supplied components with our games, in order to ensure your safety. Atari distributors are independent, being privately owned and operated. In their judgment they may sell parts or accessories other than Atari parts or accessories. Atari Games Corporation cannot be responsible for the quality, suitability or safety of any non-Atari part or any modification including labor which is performed by such distributor.
Atari Games Corporation 675 Sycamore Drive P.O, Box 361110 Milpitas, California 95035