Time Crisis 2 Single Player
Time Crisis (World, TS2 Ver.B) (Namco, 1996) · Manual · 79 pages · 51 sections · original scan
ZS000S06 “ON Hed “ATaSIOSYd GAMOT10S SHV TVANVW SIHL NI LNO 13S STIVLEC SHL LVHL SAILVYSdWI SI LI GNV ‘SSWIL TV LV ALASAVS HAWOLSND NIVLNIVW OL YOLVYAdO SHL JO ALITIGISNOdSSY SHL SI L] YSAV 1d ATONIS Z SISIHO AWIL OIJWIeU
This page carries no recoverable text. It is a drawing or a photograph. See the original scan.
PORTABLE APPLIANCE TESTING
Please Note:
During testing of the machine with a portable appliance tester the insulation test will show a failure due to the fitting of two VDRs between Live/Earth and Neutral/Earth.
These components have been fitted to safeguard against high voltage surges that may occur on the mains supply to the machine and to comply with the EMC regulations.
To conduct an insulation test on this machine, the VDRs must be isolated from the circuit first.
Ensure that the VDRs are reconnected after the insulation test has been completed and before the machine is placed back into service.
The VDRs used have been specified and tested as safety critical components.
GB) No part of this publication may be reproduced by any mechanical, photographic or electronic process, or in the form of phonographic recording, nor may it be stored in a retrieval system, transmitted or otherwise copied for private or public use, without permission from NAMCO EUROPE LIMITED.
While the information contained in this manual is given in good faith and was accurate at the time of printing. NAMCO EUROPE LIMITED reserve the right to make changes and alterations without notice.
This machine has been manufactured in accordance with European Community Directives, and has been tested and complies with the Directives 89/336/EEC and 72/23/EEC by the application of EN55014-1, EN55014-2 and EN60335-1 standards and as such bears the C€ marking. Any changes or modifications to this machine must be in accordance with the European Directives. Any unauthorised changes to this product, may contravene such Directives.
Under some conditions of extreme external interference, e.g. radio transmissions, electrostatic discharge or mains borne transients, some degradation of performance may occur. However the machine will recover normal performance once the source of the interference has ceased or been removed. Following abnormally high surges on the mains supply, the video monitor may need to be manualy reset by turning the machine OFF and back ON.
This game is not a machine as defined by the Machinery Directive 89/392/EEC
SAFETY WARNING
In order to use this machine safely, be sure to read this Operators Manual carefully before installation, adjustment or use of this machine.
Whenever the owner of this machine entrusts dis-assembly, installation, adjustment or routine maintenance to another person, the owner should ensure that that person read the appropriate precautions and relevant sections of this manual before starting work.
In order that no accidents occur when the machine is in operation, strictly follow the notes on safety as described below.
This manual along with the Installation Manual (where applicable) form an integral part of the equipment and must be available to the operating and service personnel at all times.
This machine is for indoor use only and should only be used for the purpose intended.
Namco Ltd. bears no responsibility for accidents, injury or damage resulting from unauthorized changes to, or improper use of this machine.
SAFETY NOTES
The following safety notes are used throughout this manual. Familiarize yourself with each of these notes and its meaning before installing, servicing or making adjustments to this machine.
GENERAL SAFETY CONSIDERATIONS
Only operate this machine after checking that it has been installed correctly and in accordance with the manual.
If there is an error or problem with the machine, operation must be stopped immediately and the problem rectified before any further use.
Installation, service, adjustment or routine maintenance should be carried out by suitably qualified persons only.
For continued protection against fire hazard, replace fuses with the same type and rating. The use of other fuses or material is prohibited.
The power supply inside the monitor will remain hot and have areas of high voltage even though the machine has been turned OFF, and there is the possibility of burns or electric shock. Be careful not to touch these areas.
To prevent possible electric shock due to failure, this machine MUST be fitted with a securely connected EARTHED plug.
If at any time the mains supply lead becomes damaged, it must be replaced immediately.
Do not turn the power switch ON until the machine has been installed correctly.
Before connecting the machine to the mains supply, ensure that the machine is set for the correct voltage and that the correct fuses are fitted OPP BPE BBE BP &
Va
Va A NEVER turn the power to the machine ON until installation has
A In order to prevent possible electric shocks, be sure that the
A
0)
machine sliding on the floor. NS WN So:
been completed.
machine is connected to the mains with a securely connected earthed plug
So that customers are not injured by the movement of the machine, ensure that there is as least 500mm separation between other machines or walls.
In order to avoid damage to the machine due to mis-operation, ensure that the voltage of the mains supply is 230volts AC.
that rubber pads are fitted under the level adjusters to prevent the
sure that the rear of the machine is separated from a wall or other machine by at least 500mm. Ne
> BP FP Bb & MOVING THE MACHINE
This machine is fitted with castors to make it easier to move. Take care when moving the machine on an inclined surface.
The Header Assembly has a forward centre of gravity, so it is important that at least two people are used to fit or remove the Header Assembly.
The fitting position of the Header Assembly is high, and it is important that a means of reaching the height safely,without stretching, is available. (e.g. Steps, Step Stool etc.)
The overall height of the machine, with the Header Assembly fitted, is 2310mm. Take care of any overhead obstructions. (e.g. Light Fittings, Electric Cables etc.)
When moving the game, ensure that the game is dis-assembled into 3 parts: Monitor Assy, Coin Tower and Header Assy.
>BP BP B&B BP BP BB REMOVING AND REPLACING PARTS Adjustments or maintenance on this machine should be carried out by suitably qualified personnel only.
Do not make any alteration to this machine without prior approval. Doing so could cause unforeseeable
Only parts specified by Namco Europe Ltd should be used when replacing or repairing parts. (Including screws).
Ensure that the power to the machine is turned OFF before commencing any maintenance work. (Trouble shooting, repairs etc.)
If performing work not described in this manual, be sure to contact your distributor for instructions, as no responsibility will be accepted for damage or injury.
Parts of the Power Supply and Monitor remain hot and carry high voltage even after switching OFF and could cause burns or electric shock. Take care not to touch these parts accidentally.
Make sure that the machine is switched OFF before connecting or disconnecting any plugs or connectors.
When removing the mains connector from the machine, or the mains plug from the wall outlet, always grasp the plug and not the cable.
Dieses Dokument darf in keiner Weise vervielfaltigt werden. Jegliche Tonaufnahmen sowie die Speicherung auf Datentrager (Suchsysteme), die Weitergabe oder sonstiges Kopieren fair den gewerblichen und privaten Gebrauch sind untersagt und bediirfen der vorherigen Genehmigung durch NAMCO EUROPE LIMITED.
Die informationen in diesem Handbuch entsprechen den Tatsachen bei Drucklegung. NAMCO EUROPE LIMITED behalt sich jedoch das Recht zu Anderungen ohne vorherige Bekanntgabe vor.
Dieses Gerat tragt das CE-Zeichen und wurde gemaB den EU-Richtlinien produziert. Es erfillt die Richtlinien 89/336/EEC und 72/23/EEC und Standards EN 55014, EN55104 und EN60335-1 (s. Deckblatt des Handbuches). Alle Veranderungen an diesem Gerat missen in Ubereinstimmung mit den EU-Richtlinien erfolgen. Nicht genehmigte Veranderungen an diesem Gerat verstoBen gegen diese Richtlinien
Extreme duBere Stdrungen, wie z.B. durch Radiobetrieb, elektrostatische Entladung oder zeitweilige Netzschwankungen kénnen zu einer Leistungsminderung flhren. Sobald diese Faktoren jedoch ausgeschaltet oder beseitigt wurden, erreicht das Gerat seine normale Leistung.
Achtung! Falls der Spielprozessor auf Grund von Netzunterbrechungen oder Abnahme der Netzspannung aussetzt, kann es zum Verlust von Spielkrediten kommen.
Dieses Gert fallt nicht unter die Maschinen-Richtlinie 89/392/EEC
SICHERHEITSHINWEISE
Um einen ordnungsgemaBen Bettieb dieses Gerates zu gewahrleisten, muB vor Aufstellung, Inbetriebnahme und Gebrauch das Handbuch sorgfailtig gelesen werden. Sobald der Besitzer dieses Gerates die Demontage, Aufstellung, Inbetriebnahme oder den Service einer anderen Person iibertragt, muB er sicherstellen, daB diese Person vor Arbeitsbeginn die nétigen Sicherheitshinweise und die dazugehérigen Kapitel des Handbuches liest und versteht. Um jegliche Unfalle wahrend des Betriebes zu vermeiden, mussen obige Hinweise strikt befolgt werden. Dieses Handbuch sowie das spezielle Gerate-Handbuch (wenn vorhanden) gehdren zum Gerat und mussen dem Betreiber und Wartungspersonal stets zuganglich sein. Dieses Gerat ist ausschlieBlich fir den gewerblichen Gebrauch in geschlossenen Raumen bestimmt und darf nur dort betrieben werden. NAMCO LTD. dbernimmt keinerlei Haftung fur Unfaille, Verletzungen oder Beschédigungen, die auf nicht genehmigte Veranderungen oder unsachgemaBen Betrieb des Gerdtes zuriickzufihren sind.
SICHERHEITSHINWEISE
Folgende Sicherheitsbegriffe werden im gesamten Handbuch benutzt. Machen Sie sich daher bitte vor Inbetriebnahme, Wartung und Durchfiihrung von Einstellungen am Gerdat mit diesen Warnhinweisen vertraut.
WARNUNG /\ WARNUNG bezeichnet eine Gefahrenquelle fir Leib und Leben. Erscheint dieser Warnhinweis, darf erst weitergearbeitet werden, wenn die entsprechenden Erklarungen vollstandig verstanden und befolgt wurden
VORSICHT (0) VORSICHT bezeichnet eine Gefahrenquelle fiir die Beschadigung des Gerates. Erscheint dieser Warnhinweis, darf erst weitergearbeitet werden, wenn die entsprechenden Erklarungen vollstandig verstanden und befolgt wurden.
ALLGEMEINE SICHERHEITSHINWEISE
Das GerAt darf nur betrieben werden, nachdem es vorschriftsmaBig und in Ubereinstimmung mit dem Handbuch aufgestellt wurde.
Die Warnschilder miissen in gutem Zustand sein und ersetzt werden, wenn sie nicht mehr gut lesbar sind.
Bei Auftreten eines Fehlers oder Problems mu das Gerat sofort abgeschaltet werden und darf erst nach fachgerechter Behebung des Fehlers wieder in Betrieb genommen werden.
Aufstellung, Service, Einstellungen und Wartung dirfen nur von dafiir qualifiziertem Fachpersonal durchgefiihrt werden
Zur Vermeidung von Feuer, defekte Sicherungen nur durch vorgeschriebene Sicherungen ersetzen. Die Verwendung von andersartigen Sicherungen oder unterschiedlichem Material ist untersagt.
Das Netzteil im Monitor bleibt nach Ausschalten des Gerates noch hei8 und fiihrt weiterhin Hochspannung. Daher besteht die Gefahr von Verbrennungen und Elektroschlagen. Diese Bereiche diirfen nicht bertihrt werden.
Zur Vermeidung von Elektroschlagen muB dieses Gerat mit einem ordnungsgemaB geerdeten Netzstecker versehen sein.
Bei Beschadigungen des Netzteiles muB dieses umgehend ersetzt werden
Gerat erst nach abgeschlossener Aufstellung einschalten. OP PBB BB BBE &
Vor Einstecken des Netzsteckers bitte sicherstellen, daB Netzspannung und Gerdtespannung dbereinstimmen, und die vorgeschriebenen Sicherungen verwendet wurden.
Oo FP EB HINWEISE ZUR AUFSTELLUNG
NIEMALS das Gerat einschalten bevor die Aufstellung véllig abgeschlossen ist.
Zur Vermeidung von Elektroschlagen muB das Gerat mit einem ordnungsgemaB geerdetem Netzstecker an die Stromversorgung angeschlossen werden
Um zu vermeiden, daB Kunden durch die Geratebewegungen verletzt werden, muB ein Sicherheitsabstand zu anderen Geraten und Wanden von mindestens 50cm eingehalten werden.
Zur Vermeidung von Beschadigungen durch Fehibetrieb am Gerat sicherstellen, daB die Netzspannung 230 Volt betragt.
Hinweis: Ist das Gerat far einen Aufstellplatz mit glattem FuBboden bestimmt, << missen die Standbeine mit Gummiplattchen unterlegt werden, damit das SSCS wet
Gerat fest steht und nicht auf dem Boden hin- und herrutscht. NS SS Na
Hinweis: Zu Reparaturzwecken am Netzteil und den CPU-Komponenten muB die BX KL
Rickseite des Gerates mindestens 50cm von anderen Gerditen und der Wand entfernt sein. Ne
bP BPE &- Zum leichteren Transport ist das Gerat mit Rollen ausgeriistet. Daher besondere Vorsicht auf abschissigem Boden
Der Schwerpunkt des Aufsatzes liegt sehr weit vorn. Daher werden flr den Ab- und Aufbau des Aufsatzes mindestens 2 Personen bendtigt.
Der Aufsatz wird in groBer Hohe montiert. Daher muB aus Sicherheitsgriinden eine Steighilfe, wie z. B. eine Leiter, ein Tritt oder 4hnliches, verwendet werden.
Die Gesamthohe de Gerates betragt 2.31m. Daher Vorsicht bei tiefer hangenden Beleuchtungskorpern.
Fir den Transport oder bei einem Platzwechsel Ge Fahreinheit in drei Teile zerlegen: Kopfteil, Vorderteil, und
\
PBPBBPBB PB B&
r AUS- UND EINBAU VON KOMPONENTEN UND TEILEN
Aufstellung, Service, Einstellung und Wartung dirfen nur von dafir qualifiziertem Fachpersonal durchgefiihrt werden.
Es diirfen keierlei Verainderungen ohne vorherige Genehmigung am Gerat vorgenommen werden. Zuwiderhandlungen stellen eine Gefahrenquelle dar.
Fur die Repartur dirfen nur Originalersatzteile (incl. Schrauben) von NAMCO EUROPE LTD. verwendet werden
Vor Beginn aller Wartungsarbeiten (Fehlersuche, Reparaturen etc.) muB der Netzstecker gezogen werden
Bei Arbeiten, die nicht in diesem Handbuch beschrieben werden, muB vorher der Handler zu Rate gezogen werden, da sonst keinerlei Haftung bei Beschadigungen und Verletzungen Gbernommen wird.
Teile des Netzteiles und Bilschirmes bleiben nach Abschalten noch hei® und fihren Hochspannung. Dies kann zu Verbrennungen oder einem Elektroschlag fihren. Diese Teile dirfen nich beriihrt werden.
Vor der Montage oder dem Entfernen von Steckverbindungen und Steckern muB das Gerat ausgeschaltet werden
Bei Ziehen des Geratesteckers oder des Netzsteckers aus der Wandsteckdose stets den Stecker greifen und nicht das Kabel
Denne udgivelse ma ikke reproduceres af nogen som helst mekanisk, fotografisk eller elektrornisk proces eller i form af indspilning, den ma heller ikke lagres i et eftersogningssystem transmitteres eller kopieres til nogen form for offentlig benyttelse uden tilladelse fra Namco Europe Limited.
Da informationerne i denne manual er givet med god tro og var korrekt pa udskivningstidspunktet, forbeholder Namco Europe Limited sig retten til, at foretage zendringer og forandringer uden varsel.
Denne maskine er frernstillet i overensstemmelse med Det Europziske feellesskabs direktiver og er blevet testet og fuldendt med direktiverne 89/336/EEC og 72/23/EEC standarder (se manualens forside) og som sadan beerer CE meerket. Enhver form for zendring eller modiflkation af denne maskine skal vere i overensstemmelse med Det Europeiske feellesskabs direktiver.
| tilfeelde af forbigaende ekstreme eksterne forstyrrelser, sA som radio udsendelser, elektronisk afgivelse eller forstyrrelser pa ledningsnettet, kan nedbrydning forekomme. Maskinen vil dog kore normalt sa snart forstyrrelsen ophorer eller bliver fjernet.
Bemeerk:- Hvis spilleprocessoren resetter p.g.a. en forstyrrelse eller reduktion af hovedstrommen kan de etabledrede kreditter gA tabt.
Dette spil er ikke en maskine defineret af maskin direktivet 89/392/EEC -
SIKKERHEDS ADVARSEL
For at betjene denne maskine sikkert, lags da denne brugemanual grundigt for installation, justering eller brug af maskinen. Nar som helst ejeren af denne maskine overlader demontering, installation, justeringer eller daglig vedligehold til en anden person, skal ejeren sikre sig at denne person leser de sikkerhedsregler og relevante punkter i denne manual for arbejdet begynder. For at undga ulykker nor maskinen er i gang, folg noje de sikkerhedsregler der er beskrevet herunder. Denne manual sammen med installations manualen er en uloselig del af udstyret og skal altid veere til raidighed for det arbejdende og servicerende personale. Denne rnaskine er kun til indendors brug og bor kun bruges til det beregnede formal. Namco Ltd. beerer intet ansvar for ulykker eller skader som er et resultat af uautoriserede zendringer eller fejlagtig brug af denne rnaskine.
SIKKERHEDSREGLER
De folgende sikkerhedsregler er brugt helt igennem denne manual. Gor dig bekendt med hver enkelt af dem og meningen heraf for installering, servicering eller justering af denne maskine. ADVARSEL /\ Advarsel betegner en episode der kan resultere i skader eller dod. Begiv dig ikke forbi et advarselsskilt for de indikerede betingelser er fuldstaendig forstaet FORSIGTIG (7) _ Forslgtig betegner en episode der kan resultere i odelaeggelse af maskinen. Begiv dig ikke forbi et advarselsskit for de indikerede betingeser er fuldsteendig forstaet.
GENERELLE SIKKERHEDSOVERVEJELSER
Betjen kun maskinen efter at have tjekket, at den er korrekt installeret og er i overensstemmelse med manualen.
Advarselsskiltene skal altid veere i god stand og erstattes hvis de er slidt, sa kunden tydeligt kan lzse dem
Hvis der er en fejl eller et problem med maskinen skal betjening straks stoppes, og problemet afhjalpes for yderligere brug.
Installations service, justeringer eller daglig vedligehold bor kun udfores af en kvalificeret person.
For fortsat beskyttelse mod brandfare, sikres at hoved sikringerne kun erstattes med samme type kapacitet. Brug af anden kapacitet eller materiale er forbudt.
Stromforsyningen inde 1 monitoren vil forblive varin og have omrader med hoj spzending selvom maskinen har veeret slukket og der er fare for brandskader eller elektrisk stod. Pas pa med at rore disse omrader
For at undga elektrisk stod p.g.a. en fejl skal denne maskine veere forbundet med et sikkert jordstik
Hvis hoved ledningerne pa noget tidspunkt bliver beskadiget skal de strakt erstattes
Teend ikke for strommen for maskinen er korrekt installeret. OBBeP BP BBP BBE
For tilslutning af maskinen til hovedstrommen sikres, at maskinen er indstillet til den rette spending.
OP BBE
BEM/ERK : Hvis denne maskine placeres pa et poleret gulv, anbefales det at ligge S BEMAERK : For at f€ adgang til stromforsyningen og CPU justeringer sikres, at SS Na
bagsiden af hoved kabinettet star adskilt fra andre maskiner eller RS ‘ OO Nt
PUNKTER OM INSTALLATION
Teend aldrig for strommen til maskinen for installering er fuldfort.
For at undga mulige elektriske stod sikres, at maskinen er forbundet til hovedstrommen med sikkert monterede jordstik.
For at kunder ikke kommer til skade ved spillets bevaegelser sikres, at der er mindst 50cm afstand til andre maskiner og veegge.
For at undga skader pA maskinen p.g.a. fejlbetjening sikres, at speendingen pa hovedstrommen er 230 volt AC.
gummimatter under justeringsfodderne for at undga at maskinen glider pa gulvet.
veeggen med mindst 50cm.
> Maskinen er smurt med olie for at gore den lettere bevaegelig. Pas pa nar maskinen flyttes pa en skra overflade.
Hoved sektionens forreste center er meget tung, det er derfor vigtigt, at mindst 2 personer benyttes til at montere el. flytte hoved sektionen.
Monterins hojden af hoved sektionen er meget hgj og det er vigtigt, at have hjzelpemidler til at na sikkert uden at skulle straekke sig. (fek.s. trapper, trappestole el. lign.).
Den fulde hgjde af hoved sektionen er 2.31 m. Pas pa ovre forhindringer f.eks. lys inventar.
Nar spillet skal flyttes eller baeres skal det sikres at den er demonteret i 3 dele: - Hoved sektion - Front sektion - Kore sektion
bPRP BP BP BP PBB AT FJERNE OG UDSKIFTE SEKTIONER OG DELE. )
Justeringer eller vedligehold af denne maskine bor kun udfores af kvalificeret personale.
Skift ikke noget pa maskinen uden godkendelse, det kan fore til uforudset fare.
Der bor kun bruges dele specificeret af Namco Europe Limited nar der skiftes eller repareres dele (inklusiv skruer).
Sorg for, at strommen til maskinen er slukket for der foretages nogen form for arbejde (fejlfinding, reparation etc.)
Hvis der foretages arbejde der ikke er beskrevet i denne manual, kontakt da din leverandor for at fa kyndig vejledning, da intet ansvar vil blive accepteret ved skader.
Dele af stromforsyningen og monitoren forbliver varme eller baerer hoj speending selv efter maskinen er slukket, det kan fore til forbraendinger eller elektriske stod. Pas pa ikke at rore disse dele ved et uheld.
Leeg meerke til at maskinen er slukket for samlinger eller stik tages ud eller szettes i.
Nar hovedsamlingen fjernes fra maskinen eller hovedstikket fjernes fra veeggen, tag da altid ved stikket, ikke ledningen.
© No se permite la reproduccién total ni parcial de esta publicacién por ningin medio mecanico, fotografico 0 electronico, grabaciones fonograficas, ni su almacenamiento informatico, su transmision o su copia, ya sea para uso pUblico o privado, sin permiso de NAMCO EUROPE LIMITED.
Si bien la informacion contenida en este manual se da de buena fe y es correcta en el momento de su impresion, NAMCO EUROPE LIMITED se reserva el derecho de hacer cambios y alteraciones sin previo aviso.
Esta maquina ha sido fabricada segun las directrices de la Comunidad Europea, ha sido probada, y se ajusta a las directrices 89/336/EEC y 72/23/EEC, mediante la aplicacion de los estandares EN65014, EN65104 y EN60335-1 (véase cubierta del manual) y por ende lleva el sello de la C.E. Cualquier cambio o modificacion que se haga a esta maquina ha de ajustarse a las directrices de la Comunidad Europea. Cualquier cambio no autorizado hecho al producto pudiera contravenir estas directrices.
Bajo ciertas condiciones de extrema interferencia externa, p. ej. transmisiones de radio, descargas electrostaticas u oscilaciones de la red eléctrica puede tener lugar un descenso del rendimiento. No obstante, la maquina recuperara su rendimiento normal una vez que la fuente de interferencias sea retirada 0 cese de producirlas. Nota: Si el procesador de juegos se reinicializa a causa de caidas o interrupciones en la alimentacion eléctrica, se perderan todos los créditos.
Este juego no se ajusta a la definicion de maquina de la Normativa de Maquinaria 89/392/EEC
AVISOS DE SEGURIDAD.
Para utilizar esta maquina con seguridad, lea cuidadosamente este Manual de Operador antes de proceder a la instalacion, ajuste 0 uso de esta maquina. Cada vez que el propietario de esta maquina confie a terceros su desmontaje, instalacion, ajuste 0 mantenimiento tutinario debera asegurarse de que tales personas lean las precauciones adecuadas y las secciones relevantes de este manual antes de comenzar su trabajo Para que no ocurra accidente alguno mientras la maquina se encuentre en funcionamiento, siga estrictamente las notas de seguridad tal como mas adelante se describen. Este manual, junto con el Manual de Instalacion (cuando proceda), forma parte integral del equipo y debe estar a disposicién del personal de mantenimiento y operacion en todo momento. Esta maquina es unicamente para ser usada en interiores, y solo debe usarse para aquello para lo que ha sido creada. Namco Ltd. queda exenta de cualquier responsabilidad por accidentes, heridas 0 dafios causados por cambios no autorizados 0 uso indebido de esta maquina.
NOTAS DE SEGURIDAD.
En este manual se usan las notas siguientes. Familiaricese con cada una de ellas y su significado antes de instalar, revisar, o hacer ajustes en esta maquina.
AVISO. /\ Aviso sefiala un riesgo que puede ocasionar lesiones o la muerte. Tras ver esta nota, no continue hasta entender completamente y cumplir las condiciones exigidas. PRECAUCION. (1) Precaucién sefiala un riesgo que puede ocasionar dafios a la maquina. Tras ver esta nota, no continue hasta entender completamente y cumplir las condiciones exigidas.
CONSIDERACIONES GENERALES DE SEGURIDAD.
Opere sélo con esta maquina tras comprobar que ha sido instalada correctamente y de acuerdo con este manual.
Las notas de aviso deben mantenerse siempre en buen estado y reemplazarse si estuvieran desgastadas para que los usuarios puedan leerlas con claridad.
Si hubiera algun error o problema con la maquina, debe interrumpirse su operacion inmediatamente, y subsanar el problema antes de volver a usarla.
Las revisiones de instalacién, los ajustes, y el mantenimiento rutinario deberan llevarse a cabo s6lo por personal cualificado.
Para asegurar una continua protecci6n contra riesgo de incendios, asegurese de que los fusibles eléctricos sean reemplazados solamente por otros del mismo tipo y especificaciones. El uso de otros fusibles 0 material esta prohibido.
La fuente de alimentacion del monitor se mantiene caliente, y tiene zonas de alto voltaje incluso cuando la maquina ha sido desconectada, existiendo el riesgo de quemaduras y descargas eléctricas. Tenga cuidado de no tocar estas zonas.
Para evitar posibles descargas eléctricas por cortes, esta maquina debe estar provista de un enchufe debidamente conectado, con TOMA DE TIERRA.
Si en cualquier momento el cable de alimentacién se dafiara, debera ser reemplazado inmediatamente.
No encienda el interruptor de la maquina hasta que ésta haya sido correctamente instalada.
Antes de enchufar la maquina a la red eléctrica, asegurese de que la maquina esta preparada para el voltaje correcto, y de que se usan los fusibles adecuados. OPP P BP PB BP BE
~
Oo FP BP -
Notas :
Notas : NOTAS DE INSTALACION.
JAMAS ENCIENDA Ia maquina antes de haber completado la instalacion.
Para evitar posibles descargas eléctricas, asegurese de que la maquina esta conectada a la red con un enchufe provisto de toma de tierra.
Para que los usuarios no sufran lesiones debido al movimiento del juego, asegurese de que hay al menos 500 mm de separacion entre éste y otras maquinas o las paredes. Para evitar dafios a la maquina causados por operaci6n incorrecta, aseguirese de que el voltaje de la red es de 230 voltios, corriente alterna.
Si el lugar donde se instalard la maquina tiene un piso pulido, se é
recomienda colocar tacos de goma bajo los ajustadores de nivel para NN OS
evitar que la maquina se deslice por el suelo NS NN
Para acceder a las unidades de Fuente de Alimentacion y CPU, AGS
asegirese de que la parte trasera del mueble principal esta separada de — muros u otras maquinas al menos 500 mm.
El juego tiene ruedecitas para hacer mas facil su traslado. Tenga cuidado al mover la maquina en una superficie inclinada.
La Unidad de Igualaci6n tiene el centro de gravedad desplazado hacia adelante. Es importante que su montaje y desmontaje se haga por al menos dos personas.
La posici6n de la Unidad de Igualacion es bastante alta, y es importante que haya un medio de alcanzar su altura con seguridad, sin estirarse (p. ej. una escalera, un taburete, etc.)
La altura total de la Unidad principal es de 2.31 mm. Tenga cuidado de que no haya obstaculos p. ej. luces.
Cuando traslade o mueva el juego, asegurese de que éste haya sido desmontado en 3 partes: Unidad de Igualaci6én, Unidad Frontal, y Unidad de Juego. S/
> P PBB BP Be B&B RETIRAR Y REEMPLAZAR PARTES Y UNIDADES.
Las revisiones de instalacién, los ajustes, y el mantenimiento rutinario deberan llevarse a cabo solo por personal cualificado.
No realice alteraciones en esta maquina sin aprobacién previa. De hacerlo asi, pueden causar peligros imprevisibles.
Solo deben usarse las partes especificadas por Namco Europe Ltd. para reparaciones o reemplazos (incluidos los tornillos).
Asegiirese de que la maquina esta desconectada antes de comenzar cualquier trabajo de mantenimiento (reparaciones, resolucion de problemas, etc.)
Al realizar trabajos no descritos en este manual, pongase en contacto con su distribuidor para recibir instrucciones. Se declina cualquier responsabilidad por dajios o lesiones.
Hay partes de la fuente de alimentacion y del monitor que se mantienen calientes o almacenan alto voltaje incluso tras desconectar la maquina, y pueden producir quemaduras o descargas eléctricas. Tenga cuidado de no tocar accidentalmente estas partes.
Asegilrese de que la maquina esta apagada antes de conectar o desconectar cualquier enchufe o conector.
Al retirar el conector principal de la maquina, o la clavija de alimentacion del enchufe de la red, agarre siempre la clavija y no el cable. ~
yy,
©) Aucun élément de cette publication ne sera reproduit, ni par procédé mécanique, photographique ou électronique, ni par un moyen d'enregistement phonographique. Ces informations ne seront ni stockées grace un procédé de récupération, ni transmises ou autrement copiées pour un usage publique ou privé, sans l'autorisation de NAMCO EUROPE LIMITED.
Malgré le fait que les informations contenues dans ce manuel soient données de bonne foi et étaient actualisées au moment de leur impression, NAMCO EUROPE LIMITED se réserve le droit de procéder & des changements ou a des modifications sans avis préliminaire.
Ce jeu a été fabriqué en respect des normes de la Communauté Européenne, aprés avoir été testé il repond aux normes 89/336/EEC et 72/23/EEC, en application des standards EN55014, EN55104 et EN60335-1 (voir la couverture du manuel), et comme tel il comporte l'autocollant de conformité avec les normes de la Communauté Européenne. Tout changement non’autorisé sur ce produit pourrait contrevenir & ces normes.
Sous certaines conditions extrémes d'interlérence exteme, par example des transmissions radio, des décharges électrostatiques ou bien de interférences passagéres sur le réseau, certaines dégradations ou anomalies peuvent se produire. Le jeu retrouvera cependant son état normal de fonctionnement lorsque la cause de ces anomalies aura cessé ou se trouvera déplacée.
Not Si le processeur du jeu se reprogramme suite une interruption ou une réduction de l'alimentation, les crédits qu'il aurait pu contenir peuvent se trouver perdus.
Ce jeu n’est pas une machine, telle que définie par la norme sur les machines 89/392/EEC
MESURES DE SECURITE
Afin d'utiliser ce jeu en toute sécurité, bien lire ce manuel d'utilisation avant de procéder a son installation, son réglage ou son exploitation. Si le propriétaire de ce jeu en confie la démontage, installation, le réglage ou la maintenance habituelle & une autre personne, il devra s'assurer que cette personne ait lu les conseils d'utilisation et les passages du manuel se rapportant a ce théme, avant qu’elle ne commence son travail. Afin d’éviter tout accident pendant la durée d’exploitation de ce jeu, se conformer strictment aux conseils de sécurité décrits a la suite. Ce manuel ainsi que le manuel d'installation du jeu (la o nécessaire) font partie des éléments nécessaires a l'installation de la machine et doivent étre mis a la disposition de l'utilisateur et du personnel de maintenance a tout moment. Ce jeu est uniquement destiné a un usage intérieur et devra étre utilisé comme tel. Namco Ltd. ne sera aucunement tenu responsable en cas d’accidents, de blessure ou de dommage quelconque résultant de modifications non autorisées ou d'usage impropre du jeu.
REMARQUES SUR LA SECURITE
Les termes de sécurité détaillés a la suite seront utilisés tout au long de la lecture de ce manuel. Il convient de vous familiariser aves chacun de ces tetmes ainsi que leur signification avant de procéder a installation, la maintenace ou au réglage du jeu
AVERTISSEMENT /\ Ce terme annonce un danger qui pourrait éventuellement avoir des conséquences dommageables ou mortelles. Ne pas passer oitre ce signal jusqu’a ce que les conditions indiquées soient entiérement comprises et effectuées.
ATTENTION O) Ce terme indique qu'un danger menace la machine. Ne pas passer oiitre ce signal jusqu’a ce que les conditions indiquées soient entiérement comprises et effectuées. (> > ase»
CONSIGNES GENERALES DE SECURITE
Allumer l'appareil seulement aprés avoir vérifié qu'il a été correctement installé, et que les instructions du manuel ont été respectées
Les notes de mise en garde doivent constamment demeurer en bon état et étre remplacées en cas de disparition, afin que le client puisse les lire clairement.
S'il y una erreur ou un probléme avec la machine, l'utilisation doit étre immédiatement interrompue et le probleme résolu avant toute nouvelle utilisation.
L’installation, le service, le réglage, ou la maintenance doivent étre effectués uniquement par les personnes qualifiées.
Afin d’éviter un éventuel incendie, s'assurer que les fusibles soient remplacés par le méme type de fusibles et au bon voltage. L'utilisation d'autres sortes de fusibles ou autres matériels est interdite.
L’alimentation a l’intérieur du moniteur reste chaude et comporte des zones de haute tension méme si la machine est éteinte. Il existe donc un risque de brulure ou d’électrocution. Attention a ne pas toucher ces endroits.
Pour prévenir une éventuelle électrocution due 4 un défaut matériel, ce jeu DOIT étre muni d’une prise de TERRE connectée en toute sécurité
Si A tout moment les fils électriques sont endommagés, il faut les remplacer immédiatment
Ne pas mettre le jeu en mode de fonctionnement avant qu’il n’ait été correctement installé. OPP BPBPBPBBPB BE BE
Avant de connecter la machine au réseau, s’assurer que la machine est installée sous la bonne tension et que les fusibles correspondent.
NE JAMAIS mettre le jeu en marche avant que l'installation ne soit complétement effectuée.
Afin de prévenir une éventuelle électrocution, s'assurer que la machine est connectée au réseau avec une prise de terre reliée selon les normes de sécurité
Afin que les clients ne soient pas blessés par les mouvements du jeu, s'assurer qu'il existe au moins 500 mm de séparation aves les autres jeux ou les murs.
Afin d’éviter que la machine ne soit abimée suite a une mauvaise opération, s'assurer que la tension sur le réseau principal soit de 230 volts AC.
Si Fendroit ot doit étre installée la machine a un sol pdli, il est WO"
recommandé de poser des tampons feutrés sous les vérins pour NS SS Na
3 \ ~ XQ_oCV? éviter que le jeu ne glisse sur le sol
Afin de facilité l'accés aux CPU at a l'alimentation, s’assurer qu'il y a
un espace d’au moins 500 mm entre l'arriére du meuble et le mur ou tout autre jeu.
Le jeu est foumi avec des roulettes pour une meilleure mobilité. Prendre garde quand la machine est déplacée sur une surface inclinée.
Le centre de gravité de la partie supérieure du jeu est situé sur I’avant, il est donc indispensable que deux personnes au moins soient employées pour installer ou déplacer la partie supérieure.
L'installation de la partie supérieure du jeu s’effectue en hauteur, il est donc important d’utiliser un élevateur quelconque pour en effectuer le montage.
La hauteur totale de l'assemblage principal est de 2310 mm, prendre garde aux encombrements de la partie supérieure (ex : illuminations du bandeau).
Quand le jeu est déplacé ou transporté, s'assurer qu'il est séparé en 3 parties: l'assemblage du haut (le bandeau), l'assemblage de devant (la cabine), l'assemblage mobile.
PRP BBP BPP Be B&B DEPLACER ET REMPLACER LES UNITES ET LES PIECES DETACHEES.
L'installation, le service, le réglage, ou la maintenance doivent étre effectués uniquement par les personnes qualifiées.
Ne pas apporter de modifications sur cette machine sans autorisation préalable, faute de quoi cela pourrait entrainer un danger
Seules les piéces détachées Namco Europe Ltd. doivent étre utilsées pour le remplacement ou la réparation de piéces (y compris les vis)
S'assurer que l'interrupteur soit sor OFF avant de commencer tout travail de maintenance (localisation d'une panne, réparations, etc.)
Si dans ce manuel il manque une information pour réaliser un quelconque travail, contacter votre distributeur, car aucune responsabilité ne sera acceptée en cas de domage ou de blessure
Les piéces de |’alimentation et du moniteur restent chaudes, a tension élévée méme lorsque la machine est hors tension, elle pourrait occasionner des brilures ou des électrocutions. Attention de ne pas toucher ces endroits accidentellement.
S’assurer que la machine soit hors tension avant de brancher ou débrancher toute prise ou connecteur.
Lorsque l'on manipule la prise au réseau de la machine, ou lorsque les prises principales doivent étre débranchées, saisir toujours la prise, et non le cable.
Kavéva pépos avtiig ms éxdoans Sev pmopei va avanapayOel pe omoWdH MOTE |MZAVIKS ,POTOYPAGIKS H NLEKTPOVIKE [LEGO , H HE HOP GovNTIKs NZoYPaPHaNs Kat obtE va anoONKEDTE: He ENaVOPHOTIKO GbaTHHEL , Va LETASOBEt 1 Va avttypaget ya SHpdoIEG H WroTIK! zpi}on , opis my dev tag NAMCO EUROPE LIMITED.
Kadts avrés ot tanpopopies oe avtd to eyerpidto éyouv Soei we KaAA mioTH KL aKPIBag THY dpa THs THnMANS , n ETUIpE!A NAMCO EUROPE LIMITED xpataet to dikaiopa va Kaver onorecdinore adhayés opis erdonoinan,
Ta pnyaviipata éxovv KatacKevactel cppava je Tous pone Hs Evpamaixys Kowdrytag , Kat Exovv eheyDel cbppova pe Tos VoLoug 89/336/EOK kat 72/23/EOK pe my aitnon tov ENSS014 , EN55104 Kat EN60335-1 otavtapts (Ses jimpoata oto eyze\pid10) Kai ha Exovv to CE onpa . Onoadiinote adLayi H petatpom} ce avd to uNZévnpa mpéret va eivar copOOV HE TOUS Opovg THs Evpanaixiys Kowotntac, Oxotecdinore adkayés yopic ddera ce aut to mpoldv nope’ Va Mupapei avtOvS TOVs dpoUs. Ze Knots nepimtdoers vmepPokuaje etworeprrig Rape Podiig ,7.7, pudlopovixés petaddaets , NrextpootatiKés pETAPOREs H MapodtKés EUBORES , Hmopei va mapovaiaotoby Kano1Es aOAOTHTES oTHYTAPOVGIaGN . Tdvta< To jMLavN}LA Oa. EMAVEAIEL GtHY PLALOAOYLKH TapOvGiaEN Ep GOV AMY THE mapELPoAAs oTapaTHGEL 1 aRopaKpoVOE .
Enueiaon : Edy yivet reset otov processor tov pn Zavijpatos KaTé TH StapKeIa THE KOpIag RapOZIs , NoVTOI ToD éxovv KEpdnOei propeEt va zaboov.
Avté to naryvidt dev civar pnZavnpa dnos mpoodtopiCerat and tovg dpovg Myzavypétov 89/392/EOK .
OAHTIEY ALMAAEIAL
Pa thy aopadi xprion tov pngaviiparos , xpéner va diafdaers to eyxerpisio ypHang mpooEKTIKG API THY EyKATaETUGH ,tonoDETHAN F ZPHION TOD aviyporto. Ono rors © WioKrieNs avto0 Tov LNZavH|ATOS CyTaEL ANd KémOI0 TPdGeRo Va EyKaTUGTIOEL , Va KavEL OROLUd!TOTE arLaYA H édeyZO povtivas oto ymyavnpia , mpéner va. civat ciyoupos dui éze1 StaBdoet Tig Odnyies avtOd Tov eyxe1pdiov mpwv va apyioet va ovdE Tpog axopuyiy oxotovdirore atuziwatos Katd THY AeITOUpyia. TOV |NZAVAHATOS , avoTHPas UKOAOLDODVTAL OL OdNyiEs ao~PAAELAS dna< divovtat napaKéco . Avté 10 eyzeipidwo at ovvdvacpd We to eyze1pib10 eyKaréotaaNs (Snov duetiDeTa1) anotedei Eva OLOKANPOREVO LEpos TOV RapoOYov Kat mpénEL va. civat diadésyio 1a Thy Aettovpyia Kat to service omoidixoTE oTLYLN. Avté 10 pngavnja evan p1a YpHON LSVO GE eowtEplKG ZApO Kat Oa MPEREL Va. YPHOYLOROLEItaI LSVO 1a. Tos A6YOUS yta TOUS Omo{oUg KaTaoKevdatnKe. H_eraipeia NAMCO Ltd dev pépet Kapia evdivy ya atuyhpata , mAnyés H KatAatpOGés AOD HiRopEt Va mPoKANDOdY and arAayés Zopic dea Ge H e1ayeyeig avtod tov pNyZaviiLatos
XHMEIQLEIL AL@AAEIAL
O1 axdhovdes onperdsers aogddcrag ypnoyonoodyea pécw avtod tov eyfeiprdion . AtéPuce avtés npooeKTIKG ya. va. yiveL Kotavontd to voNHG Tous APL THY EyKUTHOTAGN , GépfIC H OnoLAdH|ROTE AdAUyH yiver oto LN ZavHLA.
TIPOEIAONOIHEH /\ H xposidoroinan apopé Kivévvo o onoiog propsi va sivar R6yos Oavarou . Na wy mpozapiiesis o& onowadyrote Kivyoy pézpL avtoi or Spor yivovv KatTavonToI.
TIPOZOXH GH xposoxh agope kivSuvo o oxoi0g ptxopet va xpoxadécet mpOPAnpia oto jngavngia . Na nv mpoyaphosic of onowdr}xore Kivnon stézpt avtoi o1 Spot yivovv Katavontoi.
EEETAZH PENIKHE AZ@AAEIAD Agod é721 KatavonBEi avtd to eypEIpidi0 , ROvo TétE va AeLTopyoEt To UNZavHRA H Va iver EAETL0s Ep daov Eyer yiver eykatéstasn.
Ot xposdonoujoris npénei va pévooy Kabapés KaL ot Kaa} KaTéSTUGH Hote o nedATHS va TIs dLapacEL KaBapG.
Eéy vmépyet 2.400¢ 4 mpopiqna pe to uNZavNHG., y Aettoupyia mpénst va ctapaTast apésas Kat va dtopBGveTaL to L480s mp_W onovadynote 220 zpHon.
Eykaréotaon , petatpomi ¥ éAeyZ0s povtivas unopsi va yivetan povo ané eLoverodoTpéva drone «
Tia ovvep} mpootasia and pond , npéner o1 asparsies va avtiKaBlotosvTAL jE {St0D THnOD .H pron Gi.OV aogars1dv H aytiKeipévo anayopsvetat.
To tpogodoriké oto cowtepiKé tov jZavyjnatos Oa mapapciver Ceots KaL vRApoDV mepLozés WE DYNIa} Téen Rap"6d0 TOD TO mnzavqna dev dovicber , Kai vndpyet | MOavStHTa NdEKTpLKOD GOK . HIposoyh Va UNV akODpMaEIC aDTés TIs nepLozés.
Tia THY anogvy) nextprKdy cox L670 BLGPng , To jZGvNAG TIPENEL va. ézet mpOra eves pe yeioon.
Edy Kénowa ottyp} Kataotpagei n KOpia napoyi , mpéneL va avtKUTasTAOEi apésos.
Na py avéyyer to pryzavnpa (switch ON) pézpr va ézet eyKataotade! coord Kat Mhipas.
Tpw thy napoxi pespatos oto pnyavnia , va eica aiyoupoc 611 ta voltage Kat Shes ot agpéderEs Eivar cwoté eveptéva KaL tonolempéva. OPP BP BBP BBR B&B
~
>be -
0)
ZHMEIOZH: Edy to xétapia oto onoio eiv
We EHMEIOSH: Ta my edKodn apdoPacn omy Kvpiag napoy H to CPU mpénet n nico NS WS Na Opta ToD pnZavipatos Va anéyer tOVAcGtOV 500mm axd tov toto H N ; \ P Hnygavn patos zn 0 Vo NN XHMEIQZEIS PIA THN EPYKATAZTAZH
TOTE va jy avaper to pyzavypa cay dev ée1 odoKANpOOei y eyKatéotan.
Tia thy anopuyl mhextpikdy Gox mpénct to pZavana va Eze ye1O0E4.
Tia thy anopvyi KWddvoD oe KéxoLov naiktH , mpéner to UNZavyHA va Eye axéotacy tovddzistov 500mm and 42.0 uZavH}a H TOizZ0. Ta thy anopvyi BrGfng oto pnZévHHA Koyo A400g Aerovpyiag , apéreL napoyi va eivat 230volt AC..
1 TomoBeTHpLEVO TO pNZéVHH yAVOTPAELeivaL KORG va. punet éva. KOPPATI HOKETUS ya aAOQUYA} HLETaKivnGNs TOD JmZavipwatos ev dpa Aettoupyiag tov
Gddo ygavyqia.
>Re BBE BE To unzavqna civar cpodiaspévo te Kapoohia ya THY cbKOA.N [ETaKiv|GH TOD.
To exdveo pépos tov jmzavtiratos és emmd£ov Papos pavtd zperdtovtar dbo ya THY HeTAPoPA.
H kepady (kandxt) tov pyzavijnatos civar noAb WHP6 Kar Lats ypedCera mposoy oTHY ToROBETHAH TOD , Va. TV qeomiost H Katastpagsi.
To ovvonixé sos THs KEpaAs iva 2310mm . Opévtise va pyY ZromoEL GF hipines KAT.
‘Otay petaxweirar to pZavnna. , mpémer va iver oe 3 pépy: Kegady (kandxi), Mapooté pépos (o06ves), Kadiopa
be BP BRP BBB ATIOMAKPYNZH KAI ANTIKATALTALZH MEPON - ANTAAAAKTIKON
Eykaréotaon , etatpom} ¥ éheyyos poutivas wxopet va. yiverar pévo ané sZoverodoTmHEva Gropa .
Aey apénei va yivovrai petatponés ota wnzaviinata opis EyKpion . Mropei va npoKinOei ampoBientoc Kivevvos.
Mévo pépy nov dtevxpwiGovtar axé thy etaipcia NAMCO EUROPE Ltd propoty va zpnomonomPod ya ayrixatéataan i emd.6p0oon. (cvMTEPU.apPavovte Kat o1 Bids)
Na sivar otyoupa Ki.c1t6 to pedpa mpw onovadynote Sovde1d oto pyZavyja.
Eay yiver kéroia dovd16 oto pZavana Zopic va dtevKpwierar oto eyysipidio , va emKOWEVI|aEIs HE TOV aytizpésono ya odnyics ati Kapia cvdivy dev PEpovpe ya KatastpOgés BLABES.
Mépy tov tpogodoriKod a tov pévitop napapévouy Ceord H Ezov vYMAH Té0n aKdLG Kat étay oPrjost To HZavNRA Kal Lxopovy va mpoKarésovy Kaynpo H AKTpOGdK.F GUTS dev mpénEI va Epyovtal oe ExapH je ZEpIO . To wnzavnua xpénci va civar oBnoté Kata THY GbvdEGH H anoGsvdcon mpiac H KovéKTOpA.
Kara thy anopdxpoven tov Kevtpixdy KovéKtop axé to uNZavnna H THs KUpiag ApiLas , mpéneI va mavoupE to mhastikd Epos Kat 671 To KaAAALO.
@ Nessuna parte di questa pubblicazione pud essere riprodotta con processo meccanico, fotografico o lettronico, né sotto forma di registrazione fonografica, nd pud essere memorizzata in un sistema di salvataggio, trasmessa o in altro modo copiata per uso pubblico 0 privato, senza l'autorizzazione di NAMCO EUROPE LIMITED. Le informazioni contnute in questo manuale sono state date in buona fede ed erano accurate al momento della pubblicazione. Tuttavia NAMCO EUROPE LIMITED, si riserva il diritto di apporre cabiamenti e variazioni senza alcun preawviso.
Questo apparecchio é stato costruito in conformita alle Direttive della Comunita Europea, ed @ stato provato e soddisfa le Direttive 89/336/EEC e 72/23/EEC per l’'applicazione degli standards delle norme EN55014, EN55104 e EN60335-1 (vedi fronte del manuale), e per questo porta il marchio CE. Qualsiasi cambiamento o modifica di questo apparecchio deve essere in conformita con le Direttive della Comunita Europea.
In caso di condizioni di estrema interferenza dall'esterno, per esempio trasmissioni radio, scariche elettrostatiche o transitori sulla linea, pud verificarsi un decadimento delle prestazioni. Comunque l'apparecchio ritornera al rendimento normale quando la sorgente dell,interferenza avr cessato di emettere o sara stata rimossa.
Nota bene: se il processore del gioco “resetta” a causa di una interruzione o diminuzione del voltaggio di linea, un eventuale credito, gia concesso, pud essere annullato.
Questo goco non é una macchina cosi come viene definita dalla Direttiva Macchine 89/392/EEC.
AVVERTENZE PER LA SICUEZZA
Allo scopo di usare questo apparecchio in sicurezza, leggere questo Manuale dell’operatore attentamente prima dell’installazione, regolazione 0 uso di questa macchina. Tutte le volte che il proprietario di questo apparecchio affida lo smontaggio, l'installazione, la regolazione o la manutenzione ordinaria ad un’altra persona, il proprietario stesso deve assicurarsi che quella persona legga le precauzioni necessarie e i paragrafi importanti di questo manuale prima di iniziare a lavorare. Perché non succeda alcun incidente quando la machina é operante, seguire rigorosamente le note sulla sicurezza come specificato piu avanti. Questo manuale insieme con il manuale di installazione (dove si pud applicare) forma una parte integrante dell'apparechio e deve essere disponibile sempre al personale operante e di servizio. Quest macchina deve essere usata solo in interni e deve essere usata solo per gli scopi per cui é progettata. Namco Europe Ltd non si assume responsabilita per incidenti, ferite o damni risultanti da cambiamenti non autorizzati o da uso improprio della macchina.
Le seguenti note sulla sicurezza sono usate dal principio alla fine di questo manuale. Valutare attentamente ciascuna di queste note ed il loro significato prima di installare, fare assistenza o regolazioni su questa macchina.
CONSIDERAZIONI GENERALI SULLA SICUREZZA
Mettere in funzione l’apparecchio solo dopo aver controllato che |’installazione sia stata effettuata correttamente ed in conformita alle istruzioni del manuale.
Gli avvisi “Warning” devono sempre essere conservati in buone condizioni e sostituti se consumati, cosicche il cliente li possa leggere chiaramente. Se vi sono errori o problemi con la machina, si deve interrompere il funzionamento immediatamente e risolvere il problema prima di ogni ulteriore uso.
L'installazione, l'assistenza, le regolazioni e la manuzenzione ordinaria devono essere eseguite solo da persone idonee e qualificate.
Per una protezione costante contro il rischio di fuoco, assicurarsi che i fusibili sulle alimentazioni siano solo sostituiti con lo stesso tipo e caratteristiche. L’uso di altri fusibili o materiali é proibito.
L’alimentatore all'interno del monitor rimane caldo ed ha zone di alto voltaggio anche se la macchina é stata spenta, c’é quindi la possibilita di bruciature o scosse elettriche. Fare attenzione a non toccare queste zone
Per prevenire possibili scosse elettriche dovute a difetti, quest macchina DEVE essere installata con un connettore sicuramente MESSO A TERRA.
In caso il cavo di alimentazione di rete risultasse danneggiato deve essere sostituito immedatamente.
Non accendere la macchina finché la stessa non é stata installata completamente e correttamente. OPP PBB BEB BE B&
Prima di collegare la macchina alla rete, assicurarsi che la macchina sia preparata per il voltaggio corretto e che siano inseriti i fusibili adatti.
Oo FP BB
NON ACCENDERE MAI Ia macchina finché l'installazione non & stata completata.
Allo scopo di prevenire possibili scosse elettriche, la macchina deve essere obbligatoriamente collegata alla rete con un connettore messo a terra con connessioni sicure.
Perché i clienti non siano feriti dal movimento del gioco, assicurarsi che ci siano almeno 500mm di distanza rispetto alle altre macchine o rispetto al muro.
Per evitare danni alla macchina durante la messa in opera, assicurarsi che il voltaggio della rete sia 230 volts AC.
I uogo di destinazione della macchina deve avere il pavimento liscio
e si raccomanda di sistemare dei cuscinetti di gomma sotto i piedini
di livellamento per prevenire lo sciovolament della macchina sul CSV
pavimento. N WN \ E XX SS N Per garantire l'accesso all’alimentatore e alla scheda madre, — assicurarsi che il retro del mobile principale sia separato dalla parete 0 da altre macchine di almeno 500mm.
ll gioco é@ fornito di ruote per rendere piu facile il suo spostamento. Fare attenzione quando si muove la macchina su una superficie inclinata.
La testata ha il baricentro spostato in avanti, é percid importante che ci siano almeno 2 persone per montare o smontare la testata stessa.
La posizione di fissaggio della testata é molto alta, ed é importante che ci sia un mezzo disponibile per raggiungere tale altezza in sicurezza e senza allungamenti. (Ad esempio scalini, scale portatili etc.)
L’altezza totale della parte principale é 2310mm, fare attenzione ad eventuali ostacoli sopra la testata ovvero ad eventuali installazioni di luci.
Quando si muove 0 si trasporta il gioco assicurarsi che sia smantato in 3 parti: Testata, Parte frontale, Parte mobile ~\
S
>BP BBB BB BE RIMOZIONE E SOSTITUZIONE DI GRUPPI E PARTI STACCATE
Liinstallazione, l’'assistenza, le regolazioni e la manuzenzione ordinaria devono essere eseguite solo da persone idonee e qualificate. Non apporre alcuna modifica alla macchina senza autorizzazione preventiva. Il fare questo pud causare un pericolo non prevedibile.
Quando si rimpiazza o si riparano delle parti (incluse le viti) si possono usare solo parti approvate dalla Namco Europe Ltd
Assicurarsi che la macchina sia SPENTA prima di incominciare qualsiasi lavoro di manutenzione (guasti, riparazioni etc.)
Se state per iniziare un lavoro non descritto in questo manuale, contattate il vostro distributore per instruzioni poiché non si accetta alcuna responsabilita per danni o ferite. Parti dell'alimentatore e del monitor rimangono caldi o portano alta tensione anche dopo aver spento V'apparecchiatura e possono causare bruciature o scosse elettriche. Attenzione a non toccare queste parti accidentalmente.
Assicurarsi che la machina abbia l'interruttore nella posizione OFF prima di inserire o disinserire qualsiasi connettore o spina.
Quando vengono rimossi i connettori principali dalla machina oppure la spina dell’alimentazione dalla parete bisogna sempre afferrare il connettore e non il cavo. ~\
w
@)
Ingen del av denne utgivelsen ma reproduseres av noen mekaniske, fotografiske elle elektroniske prosesser, eller i form av fotografiske opptak, og ikke kan det lagres i et gjenvinnbart system, sendt eler kopiert for offentlig eller privat bruk, uten tillatelse fra NAMCO EUROPE LIMITED.
Da informasjonen i denne manualen er gitt i god tru og var korrekt da den ble utgitt, tillegger NAMCO EUROP LIMITED seg retten til A lage forandringer uten varsel.
Denne maskinen er produsert i samsvar med direktiver framsatt av det Europeiske samfunn. Maskinen er testet og samsvarer med direktivene 89/336/EEC og 72/23/eec med anvendelse av EN55014, EN55104 og EN60335-1 standarder (se i begynnelsen av manualen), og derfor beerer CE merket. Hvilken som helst forandring eller modifisering ma skje etter direktivene sat av det Europeiske samfunn. Uautoriserte forandringer pa dette produktet, kan motstride disse direktivene.
Under noen forhold av ekstreme ytre forstyrrelser, f.eks radio sendere, elektronisk utladning eller transiente spenninger, kan man regne med noe senket ytelse. Men maskinen vil oppna normal ytelse nar kilden til forstyrrelsene opphorer eller er fysisk fjernet.
Merk:- Hvis spillets prosessor resettes p.g.a et Kutt eller reduksjon av hovedspenningen kan oppsparte kreditt pa spillet forsvinne.
Dette spillet er ikke en maskin som er definert ved Maskin direktivet 89/392/EEC.
Sikkerhets advarsel.
For & bruke denne maskinen uten noe form for fare, sorg for & lese denne manualen noye for installasjon, justeringer eller bruk av maskinen. Nar eieren av denne maskinen overlater avmontering, installasjon, justering eller rutine vedlikehold til en annen person, skal eieren forsikre seg om at denne personen leser de passende forsiktighetsteglene og relevante deler av manualen for han starter pa arbeidet. For a forhindre at ulykker inntreffer nar maskinen er i drift, folg strengt teksten om sikkethet som beskrevet nedenfor. Denne manualen sammen med installasjons manualen (hvor det er anvendelig) er en intrigert del av utstyret og ma vaere tilgjengelig for drift- og servispersonell til alle tider. Denne maskinen er bare for innendors bruk og skal bare benyttes etter mente hensikter. Namco Ltd. beerer intet ansvar ved ulykker, kvestelse eller skade som folge av uautoriserte forandringer, eller for uriktig buk av maskinen.
Sikkerhets beskjeder.
Folgende sikkerhets punkter er brukt ut denne manualen. Gjor deg kjent med disse punktene og deres mening for installasjon, service eller du utforer noen innstillinger pa denne maskinen.
ADVARSEL /\ Advarsel innebeerer en risiko som kan fore til kvestelse eller dod. Ikke fortsett utover advarslen for den er ordentlig forstatt og mottiltak er igangsatt. FORSIKTIG (4) _ Forsiktig innebeerer en risiko som kan medfore skade pa maskinen. Ikke fortsett utover advarslen for den er ordentlig forstatt og mottiltak er igangsatt.
Vanlige sikkerhetstiltak.
Bruk bare denne maskinen etter 4 ha kontrollert at den er korrekt installert ifolge manualen.
Advarsel skiltene ma bestandig holdes i skikket stand og eventuelt byttes ut hvis det oppstar skade pa dem, slik at kunden uten vanskelighet kan lese dem Hvis det er en feil eller et problem med maskinen, ma den straks settes ut av funksjon. Og ma under ingen omstendigheter startes for problemet er rettet pa.
Installasjon, service, justering eller rutine vedlikehold skal bare utfores av kvalifiserte personer.
For fortsatt beskyttelse mot brann, forsikre deg at hoved sikringen bare byttes ut med en av samme type og verdi. Bruk av andre sikringer eller materiale er forbudt.
Stromforsyningen inne i monitoren vill vzere varm og ha omrader med hoy spenning selv om maskinen har blitt slatt av. og det er muligheter for skader og elektriske sjokk. Veer forsiktig s& du ikke berorer disse omradene. For a forhindre mulige elektriske sjokk grunnet funksjonsfeil, ma denne maskinen vzere ordentlig jordet Hvis ledningen til hoved stromforsyningen skades ma den straks byttes ut.
Ikke sl& pa maskinen for den er korrekt installert.
For du kopler maskinen til stromnettet, forsikre deg om at maskinen innstilt for den korrekte spenningen og de riktige sikringene benyttes. OPP BP BBP BP BB
Oo Pe -
Ns
MERKNADER: Hvis plassen hvor spillet skal plasseres har polerte gulv
We
justeringene, for 4 forhindre at maskinen kan flytte pa seg. NN SS
MERKNADER: For a fa adgang til stromforsyningen og CPU-kort, forsikre AGG L
MERKNADER VED INSTALLASJON
SIA ALDRI pa maskinens stromforsyning for installasjonen er fullfort.
For & forhindre eventuelle elektriske sjokk, forsikre deg om at
maskinen er koplet til et stromnett med ordentlig jording.
For & forhindre at kundene blir skadet av spillets bevegelige deler forsikre deg om at det er minst 500mm avstand mellom andre maskiner eller vegger.
For a forhindre skade pa maskinen p.g.a. feil bruk, sorg for at spenningen til hoved stromforsyningen er 230Volt AC.
anbefales det at du benytter gummi sko under niva
deg om at bakparten av hoved kabinettet er skilt fra vegger eller andre maskiner med minst 500mm.
PR EPP & Spillet har montert hjul for A gjore det letter & flytte pa. Hver forsiktig nar det skal flyttes pa en hellende overflate.
Hoved enheten i spillet har tyngdepunktet i fronten, sd det er viktig at minst 2 personer blir brukt til 4 montere eller flytte denne enheten.
Monterings posisjonen til hoved enheten er veldig hoy, og det er viktig at denne hoyden nas sikkert, uten at man ma strekke seg. Benytt deg av hjelpemiddel. (f.eks sto, krakk, gardintrapp osv)
Den totale hoyden pa hoved enheten er 2310mm. veer forsiktig med hoye hindringer som f.eks lysror.
Nar spillet skal flyttes, forsikre deg om at spillet er delt i 3 deler: Topp enhet, Front enhet, Hoved enhe
> BP BBP BP PBB FJERNE OG UTSKIFTE ENHETER OG DELER.
Installasjon, service, justering eller rutine vedlikehold skal bare utfores av kvalifiserte personer.
Ikke lag noen forandringer pa denne maskinen uten godkjenning. Dette kan medfore uforutsette farer.
Bare deler spesifisert av Namco Europe Ltd. skal benyttes ved utskifting eller reparasjon av deler (dette gjelder ogsa skruer).
Forsikre deg om at strammen er slat av for du pabegynner noe som helst vedlikeholdsarbeid (feilsoking, reparasjon osv.)
Hvis du utforer arbeid som ikke er beskrevet i denne manualen, ta kontakt med din distributor for instruksjon da ikke noe ansvar vill bli akseptert for skade pa maskin eller pa personer.
Deler av stromforsyningen og monitoren er fortsatt varm eller beerer hoye spenninger selv etter strommen er slatt av og kan forsake skader eller elektriske sjokk. Forsikre deg om at du ikke berorer disse delene.
Forsikre deg om at maskinen er slatt av for du kopler sammen eller tar fra hverandre plugger eller koplinger.
Nar du fjerner hoved koplingene fra maskinen, eller hoved pluggen fra stopselet, ta bestandig tak i pluggen og ikke ledningen
@D Niets uit deze publikatie mag worden gereproduceerd door enig mechanisch, fotografisch of electronisch proces, of in de vorm van een fonografische opname, noch mag het opgeslagen worden in een retrieval systeem, doorgezonden of anderszins gekopieerd voor publiek of privégebruik, zonder toestemming van Namco Europe Limited.
Ofschoon de informatie in deze handleiding in goed vertrouwen is gegeven en nauwkeurig was ten tijde van het drukken, houdt Namco zich het recht voor om veranderingen en aanpassingen te maken zonder bericht.
Deze machine is geproduceerd volgens Richtlijnen van de Europese Gemeenschap, en is getest en is in overeenstemming met de Richtliinen 89/336/EEC en 72/23/EEC door de toepassing van de standaards EN55014, EN55104 en EN60336-1 (zie voorin de handleiding) en draagt als zodanig het CE-merk. Enige veranderingen of aanpassingen aan deze machine dienen in overeenstemming te zijn met de Richtliinen van de Europese Gemeenschap. Enige ongeauthoriseerde veranderingen aan dit produkt kunnen in strijd zijn met deze Richtlijnen.
Onder sommige omstandigheden van extreme externe storingen, bijv. radiotransmissies, electrostatische ontladingen of pieken op het net, kan prestatieteruggang optreden. De machine zal echter normaal presteren zodra de storingsbron gestopt of verwijderd is.
Let op: - als de spelprocessor reset a.g.v. een onderbreking of vermindering van de netstroom, dan kunnen opgebouwde credits verloren gaan.
Dit spel is niet een machine zoals omschreven in de Machinery Directive 89/392/EEC.
Veiligheidsopmerkingen Om deze machine veilig te kunnen gebruiken, dient voor installatie, aanpassing of gebruik van deze machine, de Bedieningshandleiding zorgvuldig gelezen te worden. Telkens wanneer de eigenaar van deze machine de demontage, installatie, aanpassing of routine-onderhoud toevertrouwd aan een andere persoon, dient de eigenaar er voor te zorgen dat deze persoon de juiste voorzorgsmaatregelen en relevante gedeeltes uit de handleiding lest voordat hij begint. Om er voor te zorgen dat geen ongelukken gebeuren als de machine gebruikt wordt, dienen onderstaande veiligheidsaanwijzingen Zorgvuldig opgevolgd te worden. Deze handleiding maakt samen met de installatiehandleiding (waar van toepassing) een integral deel uit van de apparatuur en moet te allen tijde ter beschikking staan van exploitatie- en onderhoudspersoneel. Deze machine is alleen bedoeld voor gebruik binnenshuis en dient alleen gebruikt te worden voor bedoelde doeleinden. Namco Ltd. is niet verantwoordelijk voor ongelukken, letsel of schade die voortkomt uit ongeoorloofde veranderingen aan of onjuist gebruik van deze machine
Veiligheidsopmerkingen
}e volgende veiligheidsopmerkingen worden overal in deze handleiding gebruikt. Maak uzelf vertrouwd met deze opmerkingen en hun betekenis voor installatie, het plegen van onderhoud of het aanbrengen van aanpassingen aan deze machine.
WAARSCHUWING A Waarschuwing geeft een gevaar aan dat zou kunnen resulteren in letsel of de dood. Ga niet verder dan een waarschuwingsopmerking totdat de aangegeven omstandigheden volledig begrepen zijn en hieraan voldaan is.
VOORZICHTIG ©) _ Voorzichtig geeft een gevaar aan dat zou kunnen resulteren in schade aan de machine. Ga niet verder dan een voorzichtigheidsopmerking totdat de aangegeven omstandigheden volledig begrepen zijn en hieraan voldaan is is]
Algemene veiligheidsoverwegingen
Stel deze machine alleen in gebruik nadat gecontroleerd is of de machine correct en overeenkomstig de handleiding is geinstalleerd.
De waarschuwingsstickers dienen altijd in goede staat te worden gehouden en vervangen indien versleten, zodat de klant ze goed kan lezen.
Als zich een fout of probleem voordoet met de machine, dan dient de machine onmiddellijk stopgezet en het probleem verholpen te worden voordat de machine verder gebruikt wordt.
Installatie, service, aanpassingen of routine-onderhoud dient alleen uitgevoerd te worden door hierin bekwame personen.
Om blijvende bescherming tegen brandgevaar te garanderen, dient ervoor gezorgd te worden dat de netzekeringen alleen vervangen worden door zekeringen van hetzelfde type en dezelfde sterkte. het gebruik van andere zekeringen of ander materiaal is verboden.
De voeding in de monitor blijft warm en er kunnen componenten electrisch geladen blijven ondanks dat de machine UlTgeschakeld is, waardoor er brandwonden of electrischee schokken kunnen worden opgelopen. Ben voorzichting en raak deze delen niet aan
Om mogelijke electrische schokken a.g.v. storingen te voorkomen, MOET deze machine voorzien zijn van een goed vastzittende aardstekker.
Mocht het netsnoer op enig moment beschadigd worden, dan moet deze onmiddellijk vervangen worden.
Zet de machine niet AAN totdat deze correct is geinstalleerd.
Voordat de machine op het lichtnet wordt aangesloten, dient gecontroleerd te worden of de machine op het correcte voltage staat atgesteld en of de correcte zekeringen zijn aangebracht. OPP P BP BBP BB &
Oo FP BP -
Ne OPMERKING: Als de machine op een gladde ondergrond wordt gebruikt, Opmerkingen aangaande Installatie
Sluit de machine nooit aan op de stroomtoevoer totdat de installatie
Om mogelijke electrische schokken te voorkomen, dient ervoor gezorgd te worden dat de machine middels een goed vastzittende aardstekker op het lichtnet is aangesloten
Om ervoor te zorgen dat klanten niet gewond raken door de beweging van het spel, dient ervoor gezorgd te worden dat er minimaal 500mm ruimte is tussen andere machines of muren.
Om schade aan de machine door verkeerd gebruik te voorkomen, dient ervoor gezorgd te worden dat het voltage van het lichtnet 230volts AC bedraagt.
is het raadzaam rubber matjes onder de stelpootjes te We
bevestigen om te voorkomen dat de machine over de vioer NS SY
gaat glijden. NN SQ We Maal OPMERKING: Om toegang te krijgen tot de voeding- en de CPUassemblies, dient ervoor gezorgd te worden dat de achterkant van het kabinet minimaal 500mm verwijderd is van de muur of andere machines.
PRP BRP BP B&B Het spel is voorzien van wieltjes, waardoor het gemakkelijker is om te verplaatsen. Wees voorzichtig als de machine op een hellend viak gereden wordt.
Het zwaartepunt van de Header Assembly ligt aan diens voorkant, waardoor het belangrijk is dat minimaal 2 personen de Header Assembly aanbrengen of verwijderen
De Header Assembly moet op een hoge positie geplaatst worden en het is dus belangrijk dat deze hoogte veilig kan worden bereikt zonder veel te strekken. (bijv. middels een trap of een kruk)
De hoogte van het hoofdgedeelte is 2310mm: kijk dus uit voor obstakels zoals lampen.
Als de machine verplaatst of gedragen wordt, dient ervoor gezorgd te worden dat deze in 3 delen wordt afgebroken: Header Assembly, Front Assembly, Ride Assembly
a a oo
> & Verwijderen en vervangen van Assemblies en onderdelen
Installatie, service, aanpassingen of routine-onderhoud dient alleen uitgevoerd te worden door hierin bekwame personen
Maak geen veranderingen aan deze machine zonder goedkeuring vooraf. Dit kan onvoorzien gevaar opleveren.
Alleen onderdelen die door Namco Europe Ltd. zijn gespecificeerd dienen gebruikt te worden bij het vervangen of repareren van onderdelen (incl. schroeven)
Zorg ervoor dat de machine UlTgeschakeld is voordat er enig onderhoudswerk wordt verricht (troubleshooting, reparaties etc.)
Bij het verrichten van werkzaamheden die niet in deze handleiding staan beschreven, dient voor instructies altijd contact opgenomen te worden met de verdeler aangezien geen verantwoording wordt genomen voor schade of letsel.
Delen van de voeding en de monitor blijven warm of behouden hoogspanning zelfs nadat de machine UlTgeschakeld is en zouden verbrandingen of electrische schokken kunnen veroorzaken. Ben voorzichting en raak deze delen niet per ongeluk aan
Zorg ervoor dat de machine is UlTgeschakeld voordat pluggen of connectors ingestoken of uitgetrokken worden.
Als het netsnoer uit de machine of uit het stopcontact verwijderd wordt, dient altijd de stekker vastgepakt te worden en niet het snoer. S
@
Nenhuma parte desta publicacdo podera ser reproduzida por processos mecanograficos, fotograficos, electrénicos ou ainda sob a forma de gravacdo sonora nem téo pouco podera ser gravada através de sistemas informaticos transmissiveis ou de outra forma copiados para uso publico ou privado sem autorizagdo expressa da NAMCO EUROPA LIMITADA.
A informagao contida neste manual foi fornecida de boa fé, sendo rigorosa na altura da sua publicagao. A NAMCO EUROPA LIMITADA, reserva-se o direito de proceder a mudangas e alteragdes sem qualquer aviso prévio Esta maquina foi fabricada de acordo com as Directivas Comunitarias Europeias e tem sido testada em conformidade com as seguintes Directivas: 89/336/EEC e 72/23/EEC através dos requerimentos normativos, EN55014, EN55104 e EN60335-1 (ver capa frontal do manual) e como tal sustenta 0 certificado de marca de CE. Quaisqueres alteragdes ou modificagdes efectuadas nesta maquina deverao ser em conformidade com as Directivas da Comunidade Europeia. Quaisquer alteragdes nao autorizadas a este equipamento poderdo infrigir tais Directivas.
O funcionamento normal desta maquina, podera ser afectado debaixo de algumas condicées extremas de interferéncias externas tais como; transmissées via radio, descargas electroestaticas e passagens de corrente na rede de alimentacao. Contudo o seu funcionamento normal sera restabelecido logo que a fonte de interferéncias tenha cessado ou tenha sido neutralizada.
Nota :- Se 0 processador de jogo for inicializado devido a uma interrup¢ao ou quebra da corrente principal, quaisqueres creditos obtidos poderao desaparecer.
Este jogo por si sé nao contitui uma maquina tal como defenido pelas Directivas de Maquinaria de 89/392/EEC8.
AVISOS DE SEGURANGA Afim de usar esta maquina com seguranga, cettifique-se que Ié este manual de operador atentamente antes de proceder 4 montagem e afinacao ou uso da mesma. Sempre que o proprietario desta maquina confiar a desmontagem, instalagdo, afinag4o ou manutengdo preventiva da mesma a outra pessoa, devera este assegurar - se que a pessoa em questao Ié as precaugées apropriadas e capitulos relevantes deste manual antes de iniciar o trabalho. Afim de evitar qualquer tipo de acidente quando a maquina estiver em funcionamento, devera seguir rigorosamente os procedimentos de seguranga descritos abaixo. Este manual juntamente com o manual de instalagdo (aonde aplicavel), contituem parte integrante do equipamento e deverao estar sempre disponiveis ao operador e pessoal tecnico de assisténcia. Esta maquina destina-se a ser operada em espacos interiores apenas e a sua utlizagdo deve circunscrever-se somente aos fins previstos. A Namco Ltd. declina qualquer responsabilidade por acidentes, ferimentos ou danos resultantes de modificagdes nao autorizadas ou uso indevido desta maquina.
AVISOS DE SEGURANCA
Os seguintes avisos de seguranga sao usados através de todo o manual. Familarize-se com cada um destes avisos e respectivos significados antes de instalar, assistir ou efectuar qualquer afinacdo nesta maquina.
PERIGO /\_ Perigo revela uma situacao anormal que podera resultar em ferimentos ou morte. Ndo avance para além de um aviso de Perigo sem que todas as condigées indicadas estejam completamente esclarecidas e resolvidas.
CAUTELA (1) — Cautela revela uma situagéo anormal que poderé resultar em danos materiais para a maquina. Nao avance para além de um aviso de Cautela sem que todas as condigées indicadas estejam completamente esclarecidas e resolvidas. (eo 83s
AVISOS DE PERIGO
Esta maquina sé devera ser colocada em funcionamento apés ter sido verificado que se encontra instalada correctamente e de acordo com o manual de instrugées.
Os avisos de perigo devem ser sempre mantidos em boas condigdes de leitura de forma a permitir uma leitura clara por parte do utilizador, caso se encontrem danificados deverao ser substituidos
Caso esta maquina manifeste algum erro ou problema durante o seu funcionamento, devera ser imediatamente parada até que o problema em questao seja rectificado.
A montagem, assisténcia e afinagdes ou manutengo de rotina desta maquina, deverao ser somente executadas por tecnicos ou pessoas devidamente qualificadas para o efeito.
Afim de garantir uma protegdo anti - fogo permanente nesta maquina, certifique-se que os fusiveis de protegao sdo sempre substituidos por fusiveis de igual valor ou calibre aos de origem. O uso de outro tipo de fusiveis ou material é proibido.
A fonte de alimentacao do monitor encontrar-se-a quente, tendo zonas de alta voltagem, mesmo apés a maquina ter sido desligada. Deste facto poder resultar a ocurréncia de queimaduras ou choques electricos. Seja cuidadoso para evitar contacto com estas zonas.
Esta maquina deve estar sempre equipada com uma ficha com circuito de protecgao a Terra, afim de evitar possiveis choques electricos, caso surga uma falha no sistema.
Se a qualquer altura o cabo de alimentacao principal ficar danificado, devera ser imediatamente substituido.
Nao ligar a maquina sem que esta tenha sido correctamente instalada.
Antes de ligar a maquina a tomada da rede de alimentagdo principal, certifique-se de que a maquina esta preparada para a voltagem correspondente e de que também se encontra protegida com os fusiveis apropriados. OPP PP BP BBP BB B&
© PP BB)
NOTAS :
NOTAS :
NOTAS SOBRE A INSTALACAO
NUNCA ligar a maquina sem que a instalacdo esteja completamente finalizada.
Afim de evitar possiveis choques electricos, certifique-se que a maquina esta ligada a rede de alimentacao com uma ficha protegida com circuito de terra.
Afim de evitar ferimentos pessoais nos clientes, provocados pelo movimento da maquina, certifique-se que existe pelo menos 500mm de separagdo entre outras maquinas ou paredes
Afim de evitar danos na maquina causados por falhas de operagao, certifique-se que a voltagem da rede de alimentagao principal é de 230volt AC.
Se esta maquina estiver colocada sobre um chao polido, recomenda-se a utilizagdo de tapetes de borracha debaixo dos pes niveladores, afim RN
de prevenir a maquina de deslizar no chao. NS Na
Quando precisar de aceder a fonte de alimentacao e as placas (CPU), certifique-se que a parte trazeira do movel central esta separada da parede ou de outras maquinas pelo menos 500mm afim de ganhar espago de manobra.
S
> BP BP BP Esta maquina esta equipada com rodas afim de facilitar a sua deslocacao tenha cuidado ao mover a maquina num plano inclinado.
O bloco Superior (Cabega) tem o centro de gravidade para a frente, porconseguinte é importante que pelo menos sejam utilizadas duas pessoas para montar ou desmontar este Bloco Superior.
A posigao do bloco superior quando montado na maquina 6 muito alta. Torna-se importante ter meios seguros de alcance, tais como; escadotes ou escadas afim de evitar riscos desnecessarios
A altura total do bloco principal, é de 2310mm, tenha cuidado com qualquer tipo de obstrugdes existentes em altura como por exemplo; calhas electricas ou candeiros
Ao deslocar ou transportar a maquina, certifique-se que se encontra desmontada em 3 blocos: Bloco Superior, Bloco Frontal, Bloco da Cabine de Condugao ~\
bP BP BBB BP B&
SUBSTITUICAO E MONTAGEM DE PECGAS
A montagem, assisténcia e afinagdes ou manutengo de rotina desta maquina, deverao ser somente executadas por tecnicos ou pessoas devidamente qualificadas para o efeito
Nao faca qualquer tipo de alteracao prévia nesta maquina sem aprovagao prévia. Se tal acontecer podera provocar danos e perigos imprevisiveis.
A substituigdo ou reparacao de pegas devera ser feita apenas com pegas de origem ou especificadas pela “Namco Europa Ltd.” (incluindo parafusos)
Certifique-se que a maquina se encontra desligada sempre que iniciar qualquer tipo de trabalho de manutengao. (identifacao de avarias, reparagao etc.)
Caso esteja a efectuar um trabalho nao descrito neste manual, certifique-se que contacta o seu distribuidor para obter instrugdes, caso contrario nao serao aceites responsabilidades por danos causados ou ferimentos.
Algumas zonas da fonte de alimentagao e do monitor ficam quentes e transportam correntes de alta voltagem, mesmo depois de a maquina ter sido desligada, podendo causar queimaduras e choques electricos. Tome cuidado para nao tocar acidentalmente estas zonas.
Certifique-se que a maquina esta desligada antes de ligar ou desligar qualquer tipo de fichas ou jungdes
Quando desligar a ficha principal da maquina ou a ficha do cabo de alimentagao das tomadas da parede, devera sempre agarrar na ficha e nunca puxar pelo cabo da mesma.
Ss Ingen del av denna publikation far reproduceras, varken fotografiskt, elektroniskt eller i négon form av ljudinspelning. Det far inte heller lagras i nagot atervinningssystem, dverséndas eller pa annat satt kopieras fr offentlig eller privat anvandning, utan tillstand fran NAMCO EUROPE LIMITED.
Eftersom informationen i denna manual lamnas ut i god tro och var korrekt nar den trycktes, reserverar sig NAMCO EUROPE LIMITED f6r andringar.
Denna maskin har tillverkats enligt direktiv fran europeiska unionen, ar testad och uppfyller direktiven enligt 89/336EEC och 72/23/EEC med tilampning av EN55014, EN55104 och EN60335-1 standard (se manualens framsida) och bar dairmed ocks CE-market. Varje férandring eller modifiering av denna maskin maste ske i dverens-stammelse med EU-direktiven. En férandring i denna produkt, som inte ar auktoriserad, kan strida mot dessa direktiv.
Under vissa omsténdigheter nar det gller extrema externa stdrmingar, t ex radiosaindningar, elektrostatiska urladdningar eller natburna strémstdrningar, kan resultera i en nagot nedsatt funktion. Maskinen kommer dock att aterga till normal funktion, sd snart stérningen har upphért eller aviagsnats
OBS! Om spelprocessorn startar om till {éljd av ett avbrott eller reducering av strémmen kan registrerade krediter ga férlorade.
Detta spel ar inte en maskin enligt definitionen i Maskindirektivet 89/392/EEC
SAKERHETS VARNING
For att maskinen ska kunna anvandas pa ett sakert sat, ska manualen lasas noggrant fére installation, anvandning eller justering.
Om agaren till maskinen anfértror nagon annan person att montera isar, installera, justera maskinen eller utféra rutinunderhall, ska dgaren férsakra sig om att denna person laser om férsiktighetsatgarder och tillmpliga delar av denna manual innan arbetet pabérjas.
For att frhindra att nagon olycka hander nar maskinen ar igang, maste sakerhetspunkterna beskrivna nedan fdljas strikt.
Denna manual tillsammans med installationsmanualen (nar tillampligt) utgdr en integrerad del av utrustningen och maste vara standigt tillganglig fdr operatérer och service personal.
Maskinen ar avsedd fér inomhusbruk och ska endast anvandas fér detta andamal.
Namco Ltd. bar inget ansvar for olyckor eller skador som orsakats av icke auktoriserade andringar i maskinen eller felaktigt anvandande av densamma.
SAKERHETSANVISNINGAR
Sakethetsanvisningarna nedan anvands genomgaende i manualen. Gér dig fortrogen med varje anvisning och dess innebord innan installation, service eller justeringar gérs pa denna maskin.
VARNING A *Varning” anger en fara som skulle kunna skada eller fororsaka dédsfall. Fortsatt inte vid en sadan varningsanvising innan de pavisade férhallandena ar forstadda och atgardade i sin helhet.
OBSERVERA ® "OBSERVERA" anger en fara som skulle kunna férorsaka skada pa maskinen. Fortsatt inte vid en sadan varningsanvising innan de pavisade férhallandena ar férstadda och atgardade i sin helhet.
ALLMANNA SAKERHETSBEAKTANDEN
Satt inte igang maskinen utan att ha kontrollerat att den ar korrekt installerad och i 6verensstammelse med manualen.
Varningsanvisningarna maste alltid hallas i got skick och ersattas nar de blir slitna, sa att kunderna kan lasa dem dem tydligt.
Om det uppstar fel eller problem med maskinen, maste anvandningen stoppas omedelbart och problemet rattas till innan den ater anvands.
Installation, service, justeringar eller rutinunderhall ska endast utféras av en fér andamalet kvalificerad person
For kontinuerligt skydd mot brandfara, ska man férsakra sig om att huvudsakringarna endast ersatts med samma typ och specifikationer. Anvandandet av andra sakringar eller material ar férbjuden.
Strémférsérjningen inne i monitorn haller sig varm och har omraden med hég spanning, aven nar maskinen stangts av och det finns risk for brannskada eller elektriska stdtar. Var frsiktig och vidrér aldrig sadana omraden.
Fr att forhindra en eventuell elektrisk stét fororsakad av fel, MASTE maskinen vara forsedd med sdkert ansluten JORDAD kontakt.
Om strémférsérjningskabeln pa nagot satt skadas, maste den bytas ut omedelbart.
Vrid inte stro6mbrytaren till ON innan maskinen ar korrekt installerad. OPP BP BBB BB B&B
Innan strémmen sats pa till maskinen, maste man férsakra sig om att den ar installd pa ratt spanning och att ratt sakringar Ar isatta.
A A
A
0)
OBSERVERA: Om maskinen ar placerad pa ett polerat golv, rekommenderas
OBSERVERA: For att kunna komma at strémf6rsdrjningen och CPU, se till att ATT BEAKTA VID INSTALLATION
Satt aldrig pa strommen pa maskinen innan installationen ar klar.
For att forhindra elekti kopplas till stromférsé ‘a chocker, forsakra dig om att maskinen ing med jordad kontakt
Fér att undvika skador av spelets rérelser, forsakra dig om att det finns ett avstand pa minst 500 mm till annan maskin eller vagg.
Fér att undvika skador pa maskinen p g a felaktigt handhavande,
forsakra dig om att strémstyrkan Ar 230 volt AC.
att placera gummibrickor under nivajusteringen fr att frhindra att maskinen glider pa golvet. RW
baksidan av huvudkabinettet ar placerat minst 500 mm fran NS WS Nae
vagg eller annan maskin. Wo OO [
>EeP PB &- Spelet ar férsett med hjul fér att underlatta férflyttningar. Var frsiktig om spelet ska flyttas pa en sluttande yta.
Toppskylten har tyngdpunkten framtill, darfr ar det viktigt att minst 2 personer satter dit eller tar bort den.
Toppskyltens placering ar mycket hégt upp och det ar viktigt att sAdana hjalpmedel anvands sa att man nar upp utan att stracka sig (t ex trappstege, pall osv).
Den totala héjden ar 2310 mm, tank pa eventuella hégt placerade hinder, t ex lampor.
Om spelet ska flyttas eller baras, kontrollera att spelet ar monterat isar i 3 delar: Toppskylt, Monitorenhet, Spelkontrollenhet
> bP EP PB
> ATT TA BORT ELLER BYTA UT ENHETER OCH DELAR >)
Justeringar och underhall pa denna maskin skall endast utféras av kvalificerad personal.
Gér inga andringar pa denna maskin utan ett godkannande i férvag. Detta kan fororsaka oférutsagbar fara.
Endast delar som ar specificerade av Namco Europe Ltd. ska anvandas vid utbyten eller reparation av delar (inklusive skruvar).
Férsakra dig om att stroémmen 4r avstangd innan underhallsarbete pabérjas (felsékning, reparationer etc.)
Om arbete ska utféras som inte ar beskrivet i denna manual, ar det viktigt att kontakta aterférsaljaren fér instruktioner eftersom inget ansvar accepteras fér averkan eller personskador.
Delar av str6mférsérjningen och monitorn ar varma och stroémbarande aven efter str6mmen stangts av och kan orsaka brannskador eller elektriska stotar.
Forsakra dig om att maskinen ar avstangd innan kontakter sAatts i eller tas ur.
Nar kontakten tas ur maskinen eller ur vaggen, ta alltid tag i kontakten och inte i sladden. wy
GE)
Tasta julkaisusta ei saa ottaa missdan muodossa kopioita yksityis- tai julkiseen kaytt66n ilman NAMCO EUROPE LIMITED:in lupaa.
TAssa ohjekirjassa olevat tiedot pitavat julkaisuhetkella paikkansa. NAMCO EUROPE LIMITED:illa on kuitenkin oikeus muutoksiin ilman erillista ilmoitusta.
Tama laite on valmistettu EC direktiivien mukaisesti. Se on testattu ja todettu noudattavan seuraavia direktiivej4: 89/336/EEC ja 72/23/EEC (EN55014, EN55104 ja EN 60335-1 standardit). Nain ollen tama laite on varustettu CE-merkinnailla. Kaikki tahan laitteeseen kohdistetut muutokset on tehtava EC- direktiivien mukaisesti. Mika tahansa valtuuttamattoman huoltomiehen tekema muutos voi olla direktiivien vastainen.
Laitteen toiminta voi hairiintya maaratyissa olosuhteissa, jotka johtuvat 4arimmaisista ulkoisista sahkéhairidista, kuten radiolahetys, elektrostaattinen purkaus tai vahvavirrasta syntynyt hairid. Toiminta normalisoituu kuitenkin heti, kun ulkoinen sAhkéhairié on poistettu.
Huom:- Jos peliprosessori resetoituu sahkékatkoksen tai vastaavan johdosta, voivat kaikki pelivaraukset havita.
Tama laite ei ole 89/392/EEC direktiivien mukainen kone.
Turvallisuusvaroitus
Tamén laitteen turvallinen kaytté edellyttaa kayttéohjekirjan huolellista lukemista ennen laitteen asennusta, sdatda tai kayttéa.
Jos témain laitteen omistaja antaa jollekin toiselle osapuolelle tehtavaksi purkaa, asentaa, saat tai muuten huoltaa laitetta, on omistajan varmistuttava siita, etté toinen osapuoli on lukenut ja ymmartanyt kayttéohjekirjan oleelliset osat ennen tyohén ryhtymista.
Turvallisuusohjeita on seurattava tarkoin vahinkojen valttamiseksi laitteen ollessa kaytéssa .
Tama ohje sek mahdollinen asennusohje muodostavat laitteiston oleellisen osan ja on siksi aina oltava huolto- ja kayttéhenkildkunnan kaytettavissa.
Tama laite on tarkoitettu vain sisatilakaytté6n. Sita ei saa kayttaa muihin tarkoituksiin.
Namco Ltd ei vastaa niist& onnettomuuksista, loukaantumisista tai vahingoista, jotka johtuvat laitteeseen ilman Namco Ltd:n lupaa tehdyisté muutoksista laitteen vaarasta kaytésta.
Turvallisuusohjeet
Tass kayttéohjekirjassa on kaytetty seuraavia turvallisuuteen liittyvié huomautuksia. Tutustu jokaiseen naista. Ala asenna, huolla tai sda laitteistoa, ennen kuin olet taysin ymmartanyt mit ne tarkoittavat.
VAARA “Vara” tarkoittaa uhkaa, joka voi johtaa loukkantumiseen tai kuolemaan, Ala koskaan ohita Vaara-merkintaa, ennenkuin ohjeissa esitetyt olosuhteet on ymméarretty taysin.
VAROITUS, © “Varoitus” tarkoittaa uhkaa, joka voi johtaa laitteen vioittumiseen. Ald koskaan ohita Vaara-merkintaa,
YLEISET TURVALLISUUSNAKOKOHDAT
Varmista, ett laite on asennettu oikein ja ohjekirjan mukaisesti ennen kayttddnottoa.
Varoitustaulut on pidettava hyvassa kunnossa. Jos ne ovat kuluneet, ne on ehdottomasti vaihdettava, jotta asiakkaalla olisi mahdollisuus lukea niita selvasti.
Jos laitteeseen tulee vika tai ongelmia, on se pysaytettava valittémasti ja ongelma selvitettéva ennen uutta kayttddnottoa.
Vain riittavan ammattipatevyyden omaava henkilé saa suorittaa asennus-, huolto-, saat6- tai muita laitteeseen kohdistuvia rutiinitoimenpiteita.
Jotta palovaaraa ei syntyisi, saa padsulakkeita vaihtaa vain samankokoisiin sulakkeisiin. Muiden sulakkeiden tai materiaalin kaytté on ehdottomasti kielletty. Monitorin sisalla oleva virtalahde pysyy kuumana ja siind on alueita, joissa on korkeajannite vaikka laite on kytketty pois paalta. Palovammojen tai sahkéiskun saaminen on mahdollista. Ala koske naihin alueisiin.
SAhkdiskujen valttamiseksi vikatapauksissa, laite on ehdottomasti kytkettéva maadoitetulla johdolla maadoitettuun pistorasiaan.
Vioittunut verkkojohto on valittémasti vaihdettava.
Ala kytke laitetta paalle, ennen kuin se on oikein asennettu. OPP BBB BEB BP BE
Varmista ennen verkkoon kytkemist, etta virtalahteen jannitteen asetus on asetettu oikealle jannitteelle ja etta siina on oikeat sulakkeet.
Oo FP EP &
Huomio: Jos tama laite sijoitetaan liukkaalle esim. vahatulle lattialle, ASENNUSHUOMIOITA
Ala koskaan kytke laitetta paalle ennen kuin asennus on suoritettu loppuun
Taman laitteen virtalahde on kytkettava maadoitetulla johdolla maadoitettuun pistorasiaan, jotta sahkdiskun vaaraa ei olisi.
Varmista, etd laitteen ja seinan tai toisen laitteen valissa on vahintéan 500 mm, jotta asiakkaat eivat loukkaannu laitteen likkumisesta johtuen.
Varmista, etta virtalahteen jannite on 230 V AC, jotta ei laite vioitu RW suositellaan laitettavaksi kumityynyt satdjalkoihin likkumisen —C—Wn Na estamiseksi. RK
Huomio: Varmista, etta takaosan taakse ja@ vahintaéan 500 mm tilaa, jotta virtalahteeseen ja CPU-korttiin padsee kasiksi.
S/
PRP PB ~\ Laite on varustettu kaantyvilla pydrilla. Tama on pidettava mielessA, kun laitetta siirretaan kaltevalla alustalla.
Yldosan painopiste on ylaosan etuosassa. Tasta syysta on ylaosaa asennettaessa tai poistettaessa oltava vahintaan kaksi henkilda.
Ylaosan asennusasento on erittain korkealla. On tarkeaa, etta tarvittavalle korkeudelle paastaan vaivattomasti ilman venyttamista. (esim. kayta tukevia tuoleja tai tikkaita)
Laitteen kokonaiskorkeus on yli 2310 mm. Varmista, ettei katossa ole esteita. esim. valaisimia.
Kun siirrat tai kannat laitetta varmista, ett laite on purettu neljéan osaan. Yldosa, koottu, Etuosa, koottu, Liikkuva ajo-osa, koottu A
PEP BP BE BP B B& ~\ Vain riittavan ammattipatevyyden omaava henkilé saa suorittaa asennus-, huolto-, saaté- tai muita laitteeseen kohdistuvia rutiinitoimenpiteita.
Talle laitteelle ei saa tehda mitéan hyvaksymattomia muutoksia. Se voi aiheuttaa ennalta-arvaamattomia vaaroja.
Vain Namco Europe Ltd:n maarittelemia varaosia saa kaytt@a vaihtaessasi tai korjatessasi osia. (sisaltéen ruuvit).
Varmista, etta laite on kytketty POIS PAALTA ennen tyén aloittamista.
Ota yhteytté maahantuojaan ohjeita varten, jos joudut tekemaan tydtehtavid, joita ei ole esitelty huoltokirjassa, muuten vastuuta vioista tai loukkaantumisista ei ole.
Virtalahde ja monitori pysyvat kuumina ja niissa on alueita, joissa on korkeajannite vaikka laite on kytketty pois paalta. Palovammojen tai sahkdiskun saaminen on mahdollista. Ala koske naihin laitteisiin.
Varmista, etta laite on kytketty POIS PAALTA ennen johtojen kytkemista tai irrottamista.
Irrottaessasi verkkojohdon seinasta tai laitteesta, ota kiinni itse pistokkeesta, ei johdosta.
Contents
PORTABLE APPLIANCE TESTING GENERAL SAFETY CONSIDERATIONS MOVING THE MACHINE ...............000 REMOVING AND REPLACING PARTS . NOTES ON INSTALLATION .............-++ ALLGEMEINE SICHERHEITSHINWEISE .. GENERELLE SIKKERHEDSOVERVEJELSER CONSIDERACIONES GENERALES DE SEGURI CONSIGNES GENERALES DE SECURITE.. 12 0 i rer ne 14 CONSIDERAZIONI GENERAL! SULLA SICUREZZA 16 VANLIGE SIKKERHETSTILTAK............ ALGEMENE VEILIGHEIDSOVERWEGINGEN.. AVISOS DE PERIGO.........ceceeeeeees ALLMANNA SAKERHETSBEAKTANDEN.. YLEISET TURVALLISUUSNAKOKOHDAT.
- SPECIFICATIONS
- HOWTOPLAY.....
- MAJOR COMPONENTS.
- MOVING THE MACHINE
- INSTALLATION ........... 5-1 Fitting the Header Assembly 5-2 Adjusting the Level Adjusters 5-3 Fitting the Coin Tower ...... 5-4 Fitting the Pedal Assembly 5-5 Linking two Machines
- ADJUSTMENTS. .......... 6-1 Turning on the Power 6-2 Adjustment Switches . 6-3 Test Mode .. 6-3-1 Coin Option: 6-3-2 Game Options... 6-3-3 VO Test ........ 6-3-3-1 I/O PCB Check. 6-3-3-2 Gun Initialize 6-3-3-3 Switch Test .. 6-3-3-4 Solenid Test . 6-3-4 Monitor Test . 6-3-5 Sound Test 6-3-6 ADS Data. 6-3-7 Others .......
- REMOVING AND REPLACING ASSEMBLIES AND PARTS. 7-1 Replacing the Monitor ........0. cee 7-2 Replacing the Fluorescent Tube or Starter 7-3 Replacing the Pedal Switch . 7-4 Greasing the Pedal Assy Plung' 7-5 Replacing the Pedal Plunger 7-6 Gun Assembly ............0000 7-6-1 Replacing the Gun Assembly 7-6-2 Removing the Gun Slide .. 7-6-3 Removing the Gun Cover 7-6-4 Replacing the Solenoid .... 7-6-4 Replacing the Solenoid 7-6-5 Replacing the Flexible Gun Conduit.
- PARTS...
- SCHEMATICS
- SPECIFICATIONS
POWER SUPPLY:- 230volts / 220watts AC
AMBIENT OPERATING +5°C to +25°C TEMPERATURE:
MONITOR:- Hantarex 28” Polo (Auto Degauss)
COIN ACCEPTOR:- Mars CashFlow - 1 Channel
DIMENSIONS:- Assembled 765(w) x 1510(d) x 2090(h)
Monitor Cabinet 765(w) x 790(d) x 1730(h) Coin Tower 260(w) x 720(d) x 1110(h) Header Assembly 720(w) x 380(d) x 480(h) Pedal Assembly 250(w) x 250(d) x 160(h)
WEIGHT:- Assembled 166kg
Monitor Cabinet 111kg Coin Tower 35kg Header Assembly 16kg Pedal Assembly 4kg
ACCESSORIES:- Keys: (Cash Door). (Coin Door).. (Back Door).
IEC Mains Lead .......ccceeeeeeee 1
Operators Manual ..........:ccceee 1
Monitor Manual .........cccceseseeeeeeee 1
CashFlow Document ...........006 1
Pedal ASSY siccscinieiessssssssssccscare 1
Pozi Pan Head Screw (M6x30)... 2 Flat Washer (M6)........::csceeeeee 2 Spring Washer (M6) ..........0cc08 2
Hex Head Screw (M8x25) Flat Washer (M8) ” Spring Washer (M8) ...........0ccc08
M5 Security Wrench.. M6 Security Wrench..
- HOW TO PLAY
This is a gun shooting game where players press on a foot pedal to hide
behind an object to avoid an enemy attack, then release the pedal to get out from behind the object and attack the enemy.
HOW TO CONTROL
- Step on the pedal = attack position. In this position you can shoot the enemy. You are also subject to an attack.
- Release the pedal = defence position. In this position you are hidden behind an object and cannot be hit by the enemy. Releasing the pedal also reloads the gun.
MODES
- Linked play mode: This mode is for two player co-operative play. If
(2 Games Linked) selected by a single player an additional player can
join the game after it has started.
- Solo play mode: This mode is for a single player only. No one can join the game once it has started.
- Modes are selected on the Mode Selection Screen at the start of the game.
RULES
1. Every time you are hit by the enemy you lose a life. You also lose a life if
the time period for that scene reaches zero. the time period is restored at the start of a new life or when the scene has been completed. The game is over when all lives are lost.
- Aplayer’s achievement is assessed by score at the end of the game. The higher the score, the higher the achievement.
Demonstration video clips between games can be skipped by aiming and shooting the gun at the screen.
- MAJOR COMPONENTS
Header Assy
Monitor
Monitor Cabinet
Pedal Assy
Coin Tower
Mains-In ON/OFF & Fuses
Game PCB Assy
4.
5. MOVING THE MACHINE
This machine is fitted with castors to make it easier to move. Take care when moving the machine on an inclined surface.
The overall height of the machine is 2090mm. Take care of any overhead obstructions. (e.g. Light Fittings, Electric Cables etc.)
When moving the game, ensure that the game is dis-assembled into 3 parts: Monitor Assembly, Coin Tower, and Header Assembly.
INSTALLATION
Notes on Installation
| WARNING | - | NEVER turn the power to the machine ON until |
installation has been completed.
| WARNING | - | In order to prevent possible electric shocks, be sure |
that the machine is connected to the mains with a securely connected earthed plug.
| WARNING | + | So that customers are not injured , ensure that there is |
at least 500mm separation between other machines or walls.
| CAUTION | =: | In order to avoid damage to the machine due to mis- |
operation, ensure that the voltage of the mains supply is 230volts AC. )
NOTE . If the location site of this machine has a polished floor it is
recommended that rubber pads are fitted under the level adjusters to prevent the machine sliding on the floor.
. In order to gain access to the Power Supply and CPU assemblies, make sure that the rear of the machine is separated from a wall or other machine by at least 500mm.
. When installation is complete, it is imperative that the game is initialized. (See section 6-3-3-2 page 19)
This machine is designed for INDOOR USE ONLY. Do not install in the following places.
Outdoors
- Direct Sunlight, places with excessive humidity or dust, places where there is water leakage, near air-conditioning or heating equipment, places with excessive heat or cold temperature.
- Places where it would be in the way of emergency exits or fire extinguishing equipment. Unstable places or places with excessive vibration. Places that are not level. This machine must not be cleaned with a water jet, or installed in an area where a water jet could be used. our
DIESES GERAT IST NUR FUR DIE GEWERBLICHE AUFSTELLUNG IN @) GESCHLOSSENEN RAUMEN BESTIMMT. DAS GERAT DARF AN FOLGENDEN PLATZEN NICHT AUFGESTELLT WERDEN
- Im Freien.
- In direktem Sonnenschein, an extrem feuchten und staubigen Platzen, an Platzen mit Wasseranschlissen und méglichen Leckagen, nahe Klima- und Heizungsanlagen, an Platzen mit extrem hohen oder niedrigen Temperaturen. In der Nahe von Notausgangen oder Feuerléschgeraten. An unstabilen Platzen oder Platzen mit UbermaBiger Vibration. An Platzen, die nicht eben sind. are
(OK) DENNE MASKINE ER KUN DESIGNET TIL INDENDORSBRUG
INSTALLER IKKE MASKINEN PA FOLGENDE STEDER
Udendors
- Direkte sollys, steder med hgj fugtighed el. stov, steder med vand udslip, i nzerheden af air-condition eller varme udstyr, steder med uszedvanlig hoj el. kold temperatur. Steder hvor den vil sta i vejen for nodudgange eller brandslukningsudstyr. Ustabile steder eller steder med for store vibrationer. Steder der ikke er plane. apo
ESTA MAQUINA ESTA DISENADA UNICAMENTE PARA USO EN INTERIORES. NO INSTALE LA MAQUINA EN LOS SIGUIENTES LUGARES.
Exteriores.
- Bajo luz solar directa, en lugares con polvo o humedad excesiva, lugares donde hay filtraciones de agua, cerca de aparatos de calefaccion o de aire acondicionado, lugares con temperatura ambiente muy alta o muy baja.
- Lugares donde la maquina obstruya salidas de emergencia 0 equipos de extincion de incendios. Suelos inestables o lugares con vibraciones excesivas. Lugares con suelos no nivelados. as
ask
no
ar
Ro A
CETTE MACHINE EST DESTINEE UNIQUEMENT A UN USAGE INTERIEUR
NE PAS INSTALLER LA MACHINE DANS LES ENDROITS SUIVANTS
A Vextérieur. Directement exposée au soleil, aux endroits excessivement humides ou poussiéreux, aux endroits ou il y ades risques de fuite d’eau, prés de ventilateurs ou source de chaleur, aux endroits trés chauds ou froids. Dans des zones de proximité des sorties de secours ou d’accés aux équipements d’extinction du feu. Dans des emplacements instables ou soumis a de fortes vibrations. Dans des endroits dénivelés.
TO MHXANHMA EINAI XXEAIAZMENO IIA XPHEH LE ELQTEPIKO XQPO MONO MHN TOMNOOETHZETE TO MHXANHMA XTOYE AKOAOYOOYE XQPOYE
Efortepika Arev0ziag otov HA10,c€ hépy Ozov vmapyEl Vypacia i GKOvy,HEpY Ozov vTApPyEL GPBovo vepd,Kovté o¢ air-condition i GAdov eidoug Oéppavon,népy pe vTEepPorKy vWHAH H yan SeppoKpacia. Le pépy Sov eprodiCovv péca. avayKys 7.x. TpooPeotHpeEs H GAA. My otabepa pépy q pépy pe toAAONs Kpadacpots. Mépy nov dev sivar exineda.
QUESTA MACCHINA E’ PROGETTATA PER ESSERE USATA ESCLUSIVAMENTE IN AMBIENTI INTERNI. NON INSTALLARE LA MACCHINA NEI SEGUENTI LUOGHI.
In ambienti esterni. Alla luce diretta del sole, in posti con eccesiva umidita 0 polvere, in luoghi dove ci siano infiltrazioni d’acqua, vicino ad apparecchi di condizionamento d’aria oppure riscaldamento, in posti eccessivamente caldi o freddi. In luoghi dove potrebbe esserci un uscita di emergenza o un’attrezzatura per lo spegnimento del fuoco. In posti non stabili o con eccessive vibrazioni. In luoghi non piani.
DENNE MASKINEN ER BARE KONSTRUERT FOR INNENDORS BRUK IKKE INSTALLER MASKINEN PA FOLGENDE PLASSER.
Utendors Konstant sollys, plasser med mye fuktighet og stov, plasser hvor det er vannlekasje, nzere luft kjolere eller varme elementer, plasser med overdreven hoy eller lav temperatur. Plasser hvor det vill sta i veien for nodutganger eller brannslukking utstyr. Ustabile plasser eller plasser med overdreven vibrasjon. Plasser som ikke er i vater.
A
QL) DEZE MACHINE IS ALLEEN VOOR GEBRUIK BINNENSHUIS ONTWORPEN
aR
as
@)
Aw INSTALLEER DE MACHINE NIET OP DE VOLGENDE PLAATSEN
Buiten In direct zonlicht, op plaatsen met een zeer hoge vochtigheidsgraad of met veel stof, op plaatsen waar een waterlek is, dichtbij airco’s of verwarmingsapparatuur, op plaatsen met een zeer hoge of koude temperatuur. Op plaatsen waar nooduitgangen of blusapparatuur worden geblokkeerd. Op onstabiele plaatsen of plaatsen waar grote trillingen voorkomen. Op plaatsen die niet vlak zijn.
ESTA MAQUINA FOI CONCEBIDA PARA UTILIZACAO EM ESPACOS INTERIORES APENAS NAO INSTALAR A MAQUINAS NOS SEGUINTES LOCAIS:-
Exteriores. ‘Luz solar directa, locais com humidade excessiva ou p6, locais aonde existam fugas de agua perto de ar condicionados ou equipamentos calorificos e locais com temperaturas excessivamente quentes ou frias. Locais aonde ficaria colocada no caminho de saidas de emergéncia ou equipamentos extintores de fogo. Locais estruturalmente instaveis ou locais com vibragdes excessivas. Locais nao nivelados.
DENNA MASKIN AR AVSEDD ENBART FOR INOMHUSBRUK INSTALLERA EJ MASKINEN PA FOLJANDE STALLEN
Utomhus | direkt solsken, platser med extremt hég luftfuktighet eller damm, platser dar det forekommer vattenlackage, nara luftkonditionering eller varmeelement, i extremt hdg eller lag temperatur.
Platser dar den skulle kunna vara i vagen fér néddutgangar och
brandslackningsutrustning. Instabila stallen eller dar stark vibration férekommer. Platser med nivaskillnad.
TAMA LAITE ON SUUNNITELTU VAIN SISAKAYTTOON ALA ASENNA LAITETTA SEURAAVIIN PAIKKOIHIN:
Ulkotilaan Suoraan aurinkovaloon, kosteisiin tai pdlyisiin paikkoihin, vesivuotopaikkojen laheisyyteen, ilmanvaihto- tai lammityslaitteen lahistélle tai paikkoihin, jossa on erittain kuumaa tai kylmaa. Varauloskaytavien, muiden pakoteiden tai tulensammutusvalineiden eteen. Epavakaisiin tai tariseviin paikkoihin. Kaltevalle alustalle.
5-1 Fitting the Header Assembly
The Header Assembly has a forward centre of gravity, so it is important that at
least two people are used to fit or remove the Header Assembly.
The fitting position of the Header Assembly is very high, and it is important that a means of reaching the height safely, without stretching, is available. (e.g. steps, step stool etc.)
1.
2.
3. Place the header on to the monitor cabinet and slide it forwards so that it engages under the fixing brackets at the front.
Connect the connector.
Header Assy
Retaining brkt Retaining brkt
Slide forward
Connector
Retain the header in position with 2off pozi head screws (M6x30)
5-2 Adjusting the Level Adjusters
- When the monitor cabinet is in its final position, lower the four (4) level adjusters with a spanner so that the machine is level and all castors are raised from the floor by approx. 5mm. Tighten the lock nuts with a spanner to ensure that the level adjusters do not move.
Level Adjuster
5-3 Fitting the Coin Tower
- Remove 4off security screw (M5x12) and remove the joint box top cover.
Security screw (M5x12)——_____
a a
Joint box cover plate
Joint box
- Place the coin tower up to the joint box taking care not to trap any wires.
- Retain the coin tower to the joint box with 4off hex head screws (M8x20), flat and spring washers.
Hex head screw (M8x20) with Flat & Spring washers
Coin tower assy
Joint box
- Connect the connector and refit the joint box cover plate with 4 off security screw (M5x12).
- Adjust the level adjusters on the coin tower so that the coin tower is stable and level with the monitor cabinet. (see section 5-2 page 37)
5-4 Fitting the Pedal Assembly
- Fit, finger tight only, the joint brackets to the coin tower, with 4off security button head screw (M5x12).
- Place the pedal assembly close to the coin tower and connect the connector.
- Fit the pedal assembly inside the joint brackets, taking care not to trap any wires and fit, finger tight, the 4off security button head screws (M5x12).
Coin Tower
Joint Brkt
Security Screw
(M5x12)
Pedal Assy (Msx12) 5X
Joint Brkt
- Ensure that the pedal assembly is flat on the ground and tighten fully the 4off security button head screws (M5x12) and the 4off security button head screws (M5x12).
- Security button head screw (M5x12)
Security button head screw (M5x12)
5-5 Linking two Machines
- Switch both machines off.
- Remove 2off pozi head screws (M5x12) and remove the Link Cover Bracket.
a ~ Poal Hoad Serew (MSx12) ~
- Fit the Link Cables (supplied) as shown in the following diagram.
Rear ol Game (1) — fra
ak cables (supplied)
- Refit the Link Cover Bracket with the 2off pozi head screws (M5x12).
- Seperate the Coin Tower from the Monitor Cabinet on the right hand game (viewed from the front). (see 5-3 page 37)
Security screw (M5x16)
Rear panel
Gun /O PCB
Coin tower
- Remove 6off security screw (M5x16) and remove the rear panel.
- Connect together the 1way connectors fitted to the 4way El header on the right hand game (viewed from the front)..
Gun I/O PCB
Jumper connectors
- Re-assemble in reverse order.
- ADJUSTMENTS ( ®
® © 0268 6066 8 © ® @ Adjustment or maintenance on this machine should be carried out by qualified personnel only.
Aufstellung, Service, Einstellung und Wartung durfen nur von dafir qualifiziertem Fachpersonal durchgefihrt werden.
Justeringer eller vedligehold af denne maskine bor kun udfores af kvalificeret personale.
Los ajustes y el mantenimiento de esta maquina deben ser realizados sOlo por personal cualificado.
L’installation, le service, le réglage, ou la maintenance doivent étre effectués uniquement par les personnes qualifiées.
Metatponéc 1 extd10pO0doeic ota pyHyYavipata mpéreEr va yivovtat povo and eSovoiodsotypéva atone.
Regolazioni e manutenzione su questa macchina devono essere fatti solo da personale specializzato.
Justering eller vedlikehold pa denne maskinen skall bare utfores av kvalifiserte personell.
Aanpassingen of onderhoud aan deze machine dient alleen uitgevoerd te worden door bekwaam personeel.
Afinagdes ou manutengao nesta maquina, deverao ser efectuadas sOmente por pessoal qualificado.
Justeringar och underhall pa denna maskin skall endast utféras av kvalificerad personal.
Tata laitetta saa saataa tai huoltaa vain siihen ammattipatevyyden omaava henkilékunta.
6-1 Turning on the Power
After the machine has been installed, turn ON the power. The power switch is located on the rear of the monitor cabinet.
6-2 Adjustment Switches
The Adjustment switches are located inside the coin door.
1. Service Switch. Press this switch to obtain game credits without incrementing the play meter.
Test Switch Slide the test switch ON to enter test mode. Test mode allows testing and the changing of game settings. (Refer to section 6-3 "Test Mode" page 44)
Select Up/Down Switch This switch is used to select the test required when in the Test Mode.
Enter Switch This switch is used to enter a selected test and to change settings within a test.
COIN COUNTER
2 Amp Q/B (Coin Fuse) ° fe)
PLAYER 1 PLAYER 2
UP UP @| SELECT @| SELECT DOWN DOWN
SELECT SELECT
| O | “oe | O | “oe |
| TEST | SERVICE | TEST | SERVICE |
| © | t | 2) |
6-3 Test Mode
- Open the coin door and slide the test switch “ON”. The “Menu Screen” will be displayed on the monitor.
- Select the test required by using the select up/down switch. The colour of the selected test will change.
- Activate the test by pressing the Enter switch. Select “EXIT” in each test to return to the “Menu Screen’.
- After testing is completed, slide the test switch to the “OFF” position to return to normal game mode.
The Test Switch must always be in the “OFF” position for normal game mode.
( MENU »
COIN OPTIONS — i haeeeecsessssesesteesetsees Used to set the price of play
GAME OPTIONS —eeeeeececsessesestetseesees Used to set the game options
VO TEST —aceesestetesstsesteeeees Used for testing switches & Gun
MONITOR TEST —heesesseseeteseseseseeeeees Used for setting the monitor
SOUND TEST —— i eeeeescetssssesesseseeeeees Used for setting the volume
ADS DATA aseaesssessesseseesee need Used to view bookkeeping
OTHERS —eceeseetstsstseseeteteess Used for testing the PCB
LINK MALFUNCTION 1 2 3 a) GAME DIFFICULTY L/R:NOT THE SAM (b) Do not appear when OK The internal battery’s dead (c)
\ SELECT SW :CHOOSE ENTER SW: ENTER }
- Error message related to link play . A message appears if the link play is defective. The number displayed represents the type of error
. when 1 or 2 is displayed either the main PCB or memory PCB may be
defective. Contact your distributor. . If 3 is displayed, the software version on the left game PCB is different from that on the right game PCB. Contact your distributor.
- Error message related to difficulty settings ° A message appears if the difficulty settings of the left and right game PCBs are different. Enter GAME OPTIONS inthe test mode and set both PCBs the same.
- Low battery display . A message appears if the Main PCB battery is faulty. Contact your distributor.
6-3-1 Coin Options
- Select “COIN OPTIONS” on the menu screen to set the game cost and related settings. The following screen is displayed.
- Use the Select Up/Down switch to choose the required item then press the Enter button.
- Use the Up/Down switch to change the setting.
- Press the Enter button after the changes have been made to return to the options.
- Select “EXIT” and press the Enter button to return to the menu screen.
"4 ~ COIN OPTIONS
<DEFAULT IN GREEN>
GAME COST 1 COIN (S) 1 CREDIT CONTINUE COST 1 COIN (S) 1 CREDIT
FREE PLAY OFF aes ee. (C)
EXIT
SELECT SW:CHOOSE ENTER SW: ENTER
Ne 7
Item Description Factory Set
- Game Cost Coins required for number of credits ---- settable 1~9 1Coin 1Credit
- Continue Coins required to continue ---- settable 1~9 1Coin 1Credit
- Free Play No coins required for credit ---- On (Yes) / Off (No) OFF
6-3-2 Game Options
1. Select “GAME OPTIONS” on the menu screen to set the game variables. The following screen is displayed.
- Use the Select Up/Down switch to choose the required item then press the Enter button.
- Use the Up/Down switch to change the setting.
- Press the Enter button after the changes have been made to return to the options.
- Select “EXIT” and press the Enter button to return to the menu screen.
(— >) GAME OPTIONS
<DEFAULT IN GREEN>
| PLAYER’S LIFE | 4 | saa sivataanseaad svssssesnvnnens | (a) |
| DIFFICULTY | C (MEDIUM) — o.eseeeeeseseseefeceeseeeeeeeeee | (b) | |
| ATTRACT SOUND | ON ——_aaaexnnncasaseree| esacsazcerneanes | (c) | |
| HI-SCORE INIT | NO | heceestetstsetsefeceeseseeeeees | (d) |
YES
EXIT
SELECT SW : CHOOSE ENTER SW: ENTER XX J
Item Description Factory Set
- Player’s Life | Number of lives at game start ---- settable 1~9 4 A (Very Easy) B (Easy)
- Difficulty C (Medium) C (Medium) D (Hard) E (Very Hard)
- Attract Sound | Sound in attract mode ON / OFF ON
- Hi-score Init Hi-score initialized at power-up YES /NO NO
6-3-3 I/O Test
- Select “I/O TEST” on the menu screen to switches and lamps. The following screen is displayed.
- Use the Select Up/Down switch to choose the required item then press the Enter button to enter the test.
- Select “EXIT” and press the Enter button to return to the menu screen.
( > VO TEST DIP 4 — 12345678 [ON:OFF] ——vescsssessssesssssssseseesfecsssesesteneecees (a)
| LINK | ON2 | — — —— | eittttetteteteeeea feces | (b) |
/O0 PCB CHECK (c)
| GUN INITIALIZE | : | w. | (d) |
| SWITCH TEST | (—aeeeceteestestetsesessteefeseseeeeceeeees | (e) | |
| SOLENOID TEST | (——aeececeteestetstsesessesefeseseeeseeeeees | (f) |
EXIT
SELECT SW : CHOOSE ENTER SW : ENTER Ne
Shows the condition of the DIP Switches on the PCB. In normal operation all switches are OFF. (If a switch is ON, it will be displayed in red.)
Checks that both game PCBs are communicating.
If the communication is good LINK ON 2 will be displayed
If link data is wrong LINK OFF will be displayed. If unrecognisable data is being received LINK NG will be displayed.
Checks function of I/O PCB.
Used to test and initialize the gun operation (see Section 6-3-3-2 page 48)
Selecting this item allows all switches and pedal sensor to be checked. (See 6-3-3-3 page 50)
Selecting this item allows the testing of the gun recoil solenoid. (See 6-3-3-4 page 51)
6-3-3-1 I/O PCB Check
1. Select ‘I/O PCB CHECK’ from the I/O Test Screen. The following screen is displayed:-
a VO TEST DIP 4 12345678 [ON:RED] LINK ON2
1/0 PCB CHECK
Master TX 3536 NAMCO LTD.
Time Crisis 2 ; Ver1.00 ; JPN
1/0 PCB Connect OK namco Itd.
TSS-1/0;Ver2.02;JPN;GUN-EXTENSION
EXIT
SELECT SW : CHOOSE ENTER SW : ENTER ~
6-3-3-2 Gun Initialize
1.
2. Select ‘GUN INITIALIZE’ from the I/O Test Screen. TI screen is displayed:-
( > GUN INITIALIZE
GUN INITIALIZE (CRT)
GUN INITIALIZE (PROJECTOR)
EXIT
SELECT SW : CHOOSE ENTER SW : ENTER he following
Ne 7
Use the Up/Down switch to select ‘GUN INITIALIZE (' CRT)’, and press the Enter switch. The following screen is displayed.
GUN INITIALIZE (CRT)
+
SHOOT AT SCREEN
TO CHECK GUN ACCURACY
PUSH ENTER SW : ADJUST GUN SIGHT
UP SELECT SW + ENTER SW: EXIT
Aim the gun at the screen and pull the trigger. A white spot will appear. If the spot appears where you aimed, the gun initialization is O.K. If the spot is not where you aimed, press the Enter button to initialize the gun. The following screen will be displayed.
(— >)
a
AIM AT CENTER OF THE CROSS
AND PULL GUN TRIGGER Ne w
Aim the gun at the centre of the cross and pull the trigger.
Slide the test switch OFF to return to normal game mode.
Enter test mode and select ‘GUN INITIALIZE’ from the I/O test screen and check the gun initialization. Repeat initialization if necessary
6-3-3-3 Switch Test
- Select “Switch Test” on the I/O menu screen to test the switches. The following screen is displayed.
- The display shows the current state of the switches.
- Press the Up Select switch and the Enter switch together to EXIT and return to the I/O menu screen
( SWITCH TEST >)
DIP 4 123456787 [ON/OFF] LINK ON 2
SWITCH TEST COIN 000 SERVICE OFF TEST ON UP SELECT OFF DOWN SELECT OFF ENTER OFF TRIGGER OFF
UP SELECT SW + ENTER SW : EXIT Ne wy,
- Not Used
- The display will change from OFF to ON as each switch is operated.
- The game will return to normal play mode if this switch is turned off.
(d to h) The display will change from OFF to ON as each switch is operated.
6-3-3-4 Solenid Test
- Select “solenoid Test” on the I/O menu screen to test the switches. The following screen is displayed.
(— >) VO TEST DIP 4 12345678 [ON:RED] LINK ON2
SOLENOID TEST
PULL GUN TRIGGER TO ACTION
EXIT
SELECT SW : CHOOSE ENTER SW : ENTER NX 7
- The gun recoil solenoid will operate each time the trigger is pressed.
- Select ‘EXIT’ and press the Enter button to return to the I/O menu screen.
6-3-4 Monitor Test
- Select “MONITOR TEST” on the menu screen to test and adjust the Monitor. The following screen is displayed.
- Use the Select Up/Down switch to choose the required item then press
the Enter button. To return to the Monitor Test Menu from a test pattern
press the Enter button.
- Select “EXIT” and press the Enter button to return to the menu screen.
MONITOR TEST
GRADATION PATTERN CROSSHATCH PATTERN (CRT) CROSSHATCH PATTERN (PROJ) WHITE WINDOW (H) WHITE WINDOW (M) WHITE WINDOW (L) INTERLACE PATTERN VIEW ANGLE ADJUST (CRT) VIEW ANGLE ADJUST (PROJ) FULL WHITE EXIT
SELECT SW: CHOOSE ENTER SW: ENTER Ne
Items (c) and (i) are not used on this game.
6-3-5 Sound Test
1. Select “I/O TEST” on the menu screen to switches and lamps. The following screen is displayed.
Use the Select Up/Down switch to choose the required item then press the Enter button.
Use the Up/Down switch to change the setting.
Press the Enter button after the changes have been made to return to the options.
Select “EXIT” and press the Enter button to return to the menu screen.
Va SOUND TEST <DEFAULT IN GREEN>
VOLUME FRONTLSP (0~64) 40... FRONT RSP (0~64) 40...
EXIT
SELECT SW: CHOOSE ENTER SW: ENTER Ne SERVICE SW : REQUEST ON/OFF REQUEST SONG NO. 000 oo. eeeeeeseeeeeees
MESSAGE = —«—-_—_— CC esttennit averse snzesasance ~
Volume setting for left channel speaker. Settable from 0 ~ 64 with 0 quietest and 64 loudest.
Volume setting for right channel speaker. Settable from 0 ~ 64 with 0 quietest and 64 loudest.
Each number will produce a different sound each time the Service button is pressed. (for a maximum of ten seconds) 001 when selected will produce a sound from the left speaker only, then the right speaker only and then both speakers together as a stereo check. The message field shows which speaker is active.
Displays the song No. details.
6-3-6 ADS Data
By selecting ADS Data from the menu screen, all of the bookkeeping details can be read and/or reset.
6-3-7 Others
- Select “OTHERS” on the menu screen. The following screen is displayed.
- Use the Select Up/Down switch choose the required item then press the Enter button.
- Select “EXIT” and press the Enter button to return to the menu screen.
( OTHERS »)
| ROM1 Ver. | 97/07/07 | MON | 21:15:59 | J (a) |
| ROM2 Ver. | 97/06/27 | FRI | 20:11:35 | |
| CLOCK | 97/08/27 | WED) | 28:11:12 | _...... eestseeeeeeeees (DB) |
PCB TEST a LANGUAGE ENGLISH. BACKUP MEMORY INITIALIZE NO YES EXIT
SELECT SW: CHOOSE ENTER SW: ENTER Ne wy,
(a,) Displays game software version.
- Allows the internal clock and calendar to be set.
- Used to test the PCB. (this function is only for factory testing)
- Sets the language displayed on the screen:
English : ENG
German : GER French : FRA Spanish : SPA Portugese : POR Italian : ITA
- When selected the Data Initialization Menu appears. To reset all game settings to factory setting and clear all stored data , select YES from the Data Initialization menu then press the Enter button.
- REMOVING AND REPLACING ASSEMBLIES AND PARTS
7-1 Replacing the Monitor
The monitor is heavy. At least two people are required to remove the monitor.
- Remove the 2off upper security screw (M5x12) and slacken the 2off lower security screw (M5x12), and remove the monitor rear access panel.
- Remove the pozi head screw (M4x10) and remove the Earth wire and connectors from the monitor.
Security screw (M5x12) | {] \ SS nnn ; mann oh
panel : Le # rar”
Pozi head screw (M4x10)
- Remove 8off security screw (M5x16) and remove the monitor vac-form.
Security Screw (M5x16)
Monitor vac-form
- Remove 4off pozi head screws (M6x25), with flat washer (1”x%4”), and remove the monitor by tilting the forward and lifting it out.
Flat washer 1x"
Pozi head screw (M6x25)
Monitor
7-2 Replacing the Fluorescent Tube or Starter
- Remove 2off security screw (M5x12) and remove the top retaining bracket and header acrylic.
- Replace the fluorescent tube or starter.
- Refit the header acrylic and top retaining bracket.
Security screw (M5x12)
Starter Top retaining bracket
Fluorescent tube
Header acrylic
7-3 Replacing the Pedal Switch
- Remove 4off security screw (M5x12) and remove the switch cover plate.
‘Security screw (M5x12)
Switch cover plate
- Remove 2off pozi head screw (M3x16) and remove the switch. When replacing the switch, ensure that the wires are fitted to the correct terminals.
- Slacken the 2off whizztite nuts (M4) and adjust the microswitch bracket so that the switch plunger operates the switch correctly without bending the switch lever against the switch body.
- Refit the switch cover plate and 4off security screw (M5x12).
7-4 Greasing the Pedal Assy Plunger
- Remove 4off security screw (M5x12) and remove the switch cover plate.
‘Security screw (M5x12)
Switch cover plate
- Remove 2off whizztite nuts (M4) and remove the switch.
- Remove 4off whizztite nuts (M4) and remove the plaunger assembly.
- Remove any old grease and dirt from the plunger and pedal plate.
- Grease both the plate and spherical portion of the plunger.
Microswitch — Holder 7 Plunger Whizztite nut (M4) Lo r—_| Whizztite nut (M4)
Grease here
- Reassemble in reverse order.
7-5 Replacing the Pedal Plunger
1.
2.
3.
4. Remove the plunger assembly. (See 7-4 page 59 )
Pull the plunger out of the holder. Replace with the new plunger. (The new plunger should have grease applied all over prior to fitting).
Holder
Plunger fe a
Plate
Grease here
Reassemble in reverse order.
7-6 Gun Assembly
7-6-1 Replacing the Gun Assembly
- Remove 8off security screws (M8x20) and remove the gun pod complete with the gun.
Security screw (MB> Security screw (MBy
- Disconnect the connectors and remove the 2off whizztite nuts (M6).
Whizztite nut (M6)
Connectors
Whizztite nut (M6)
Fixing plate
- Remove the gun assembly from the gun pod.
7-6-2 Removing the Gun Slide
- Remove 4off cap screws (M3x10), 1off button screw (M4x25), and 1off hex nut (M4), and detach the gun slides (L) and (R).
- Reassemble in reverse order.
Gun slide (L) Button bolt (M4 x 10) Gun slide (R)
Cap bolt (M3 x 10) Hexagon box nut (M4) Cap bolt (M3 x 10)
7-6-3. Removing the Gun Cover
- Remove the gun slides (L) and (R). (See 7-6-2 page 62)
- Place the gun (L) face down, and remove the 4off button screws (M4x10), 1off button screw (M4x25), 4off hex nuts (M4), and 1off cap screw (M3x10). Remove the gun cover (R) taking care that the lens does not fall out.
Button bolt Gun cover (R) {M4 x 25) / Cap bolt (M3 x 10)
Button bolt (M4 x 10)
Lens
Hexagon box nut (M4) eee
- Reassemble in reverse order. (Ensure that the flat face of the lens is facing the back of the gun).
Ensure that the flat face of the lens is toward the back of the gun
7-6-4 Replacing the Solenoid
- Remove the gun cover and gun slide (R). (See 7-6-2 page 62 and 7-6-3 page 63)
- Disconnect the solenoid connector.
- Remove 1off cap screw (M3x10) on the gun cover (L) and remove the solenoid bracket.
- Remove 1off cup screw M (M3x8) and detach the earth wire.
- Loosen the nuts (16mm dia.) and remove the solenoid.
- Remove 2off cup screws M (M4x6) and detach the slide guide.
- Pull out the solenoid plunger, taking care not to lose the spring.
. Cup screw (M) Spring Plunger (M4 x 6) | Solenoid
g? Nut (16mm in nominal diameter) ei ete ed
Solenoid bracket L
Cup screw (M)(M3x8) — Toothed Slide guide
washer Ground wire
- Reassemble in reverse order.
Spacers Slide guide Solenoid
:
Harness outlet (it must Solenoid bracket face downwards) Plunger —_ E-type snap rings
7-6-5 Replacing the Trigger Switch
- Remove the gun cover and gun slide (R). (See 7-6-2 page 62 and 7-6-3 page 63)
- Replace the microswitch. Take care when replacing the switch that the correct wires are fitted to the correct terminals.
- Reassemble in reverse order.
Microswitch Connect the black harness. Connect the blue hamess.
7-6-6 Replacing the Flexible Gun Conduit.
- Remove the gun assembly. (See 7-6-1- page 61).
- Remove the 2off security screws (M4x10), then detach the connector cover.
- Remove the gun cover and gun slide (R). (See 7-6-2 page 62 and 7-6-3 page 63).
- Detach the solenoid bracket and detach the solenoid connectors and earth wire. (see 7-6-4 page 64).
- Disconnect the sensor and detach the fast-on connectors from the micro switch.
- Remove the button head screw (M4x10) fixing the conduit to the gun cover (L) and detach the conduit.
- Reassemble in reverse order.
Fast-on terminal (microswitch) Ground wire, _-— Security screw (Maxt iS Connector (solencid)
Connector cover
Gun cover (R) Gun cover (L)
Flexible conduit
- PARTS
Item Description Part No
| 4 | |Header Fixing Bracket | 46000836 |
| 5 | |Monitor Vac-Form | 46000982 |
| 7 | |Monitor - Hantarex 28" Polo w/o Remote | 84000026 |
| 8 | |Bass Loudspeaker - Time Crisis 2 - Pioneer SWM 1034 | X006-115 |
| 9 | |Bass Port tube | 46000837 |
| 10 | |Sub Bass Speaker Grille | 46000828 |
12 | Adjustable Foot - M16x95 88300079 13 | Swivel Castor - 75mm 59000005 15 | Monitor Rear Access Door 46000831 16 |Link PCB XFF-TRANSIT 2 PCB 17 | Amplifier PCB X5GB-BASSAMPPCB SchaffnerMains-In Filter Assy 62500010
| 18 | Schaffner Boot | 66000017 |
19 | Interlock Switch 60000006 20 | Interlock Switch Cover 39000028
| 21 | |Fuse 20mm 1A Q/B | 63500421 |
22 | Fuse 20mm 500mA Q/B 63500608 23 | Monitor Vac-Form Top Decal 40000174 24 | Monitor Vac-Form Play Instruction Decal 40000501 26 | Vac-Form Decal A 40000167
| 27 | |Vac-Form Decal B | 40000166 |
28 | Cabinet Side Decal (LHS) 40000143 29 | Cabinet Side Decal (RHS) 40000145 30 | Cabinet / Gun Join Bracket Top Cover 46000833
| 31 | |Join Bracket Reinforcing Bracket | 46000980 |
32 | Cabinet / Gun Join Bracket 46000979
lO)
Item Description Part No
| 2 | |Header Acrylic Closing Bracket - Top / Bottom | 46000984 |
3 | Header Acrylic 30000047
| 4 | |Fluorescent Tube - 2ft | 64500011 |
6 | Header Speaker Grille 46000984 7 | Starter 43000000
| 8 | |Loudspeaker 4%e' 20watt | 62000006 |
| 9 | |Header Decal (LHS) | 40000020 |
10 | Header Decal (RHS) 40000215
eo
Item Description Part No
5 | Fixed Castor - 50mm 59000009
| 6 | |Coin Tower Underside Cover | 46000987 |
| 7 | |Pedal Mounting Bracket | 46000988 |
14 | Strain Relief Rope 45000708 16 | Rotary Moulded Gun Station - Red 46000845 17 | Relief Rope Gun Hoop 45000210
| 18 | |Gun Assembly - Blue | XPB-Gun-Blue |
| 21 | |VO PCB Assy | XTC2-IOPCB |
22 | Adjustable Foot - M16x95 88300079
Item Description Part No 4 | Spring (A) XTC-631-221 5 | Spring Cover XTC-631-218 7 | Rubber Stopper XTC-631-217 8 | Plunger XTC-631-219 10 | Spring (B) XTC-631-222 12 | Microswitch - KSL 13 XTC-000-027
Item Description Part No
1 | Switchmode Power Supply - 5v @ 32A 83000008
| 2 | |3v3 10A Converter | 83000002 |
3 | Converter Cover 46000855
| 4 | |Fuse 1..!" 500mA Slo-Blo | 63500637 |
| 5 | |Fuse 1..." 2A Q/B | 63500504 |
| 6 | |Capacitor 22,000 F 25v | 70200043 |
7 | Transformer 18v @ 3A 67700015 8 | Bridge Rectifier 71000040
| 9 | |Game PCB Assy | XTC-1P-PCB |
10 | Fan 4%e' 230v 67000015 11 | Finger Guard 39000169 12 | Fan Gasket 46000724
zz ebeg
Item Description Part No Gun Assembly - Red XPB-Gun-Red Gun Assembly - Blue XPB-Gun-Blue
| 1 | Gun Cover (LHS) - Red | XPB-Cover-LR |
Gun Cover (LHS - Blue XPB-Cover-LB 2 | Trigger Spring XPB-296-421 Trigger - Red XPB-trigger-R
| = | Trigger - Blue | XPB-Trigger B |
4 | Solenoid - ST-O860A2 XPB-004-056 5 | Tube Bracket (A) XPB-296-418 6 | Gun Cord Harness Assy XPB-296-401 7 | Tube Bracket (B) XPB-296-423
| 8 | |Connector Cover | XPB-296-424 |
Gun Cover (RHS) - Red XPB-Cover-RR
| : | Gun Cover (RHS) - Blue | XPB-Cover RB |
| 40 | Gun Slide (RHS) - Red | XPB-Slide-RR |
Gun Slide (RHS) - Blue XPB-Slide-RB 11 | Slide Rail E20+F15R2/60L XPB-296-425 12 | E-Type Snap Ring XPB-Eclip 13 | Spacer XPB-296-422 14 | Slide Guide XPB-296-417 Gun Slide (LHS) - Red XPB-Slide-LR
| 8 | Gun Slide (LHS) - Blue | XPB-Slide LB |
16 | Back Spring Xpb-296-420
| 17 | |Lens Na-V1472050 | XPB-296-426 |
18 | Sensor PCB XPB-296-467 19 | Microswitch SS-01G12T XPB-000-228 20 | Solenoid Bracket XPB-296-416 21 | Silencer Rubber XPB-296-428
Item Description Part No
1 | Panel Mount Meter -3.5~6v 65000002 20mm Panel Mount Fuseholder 63500786 2 Fuse 20mm 2A Q/B 63500501
SPDT Toggle Switch - Momentary Action 60000010
Pushbutton Switch 7mm - Red 60000059
Miniature Slide Switch 60000023
This page carries no recoverable text. It is a drawing or a photograph. See the original scan.
- SCHEMATICS
enw mye. awe sass See
Se sec seal 7 wore |) ss aie taper | Th aor
Ee [ a 3.3V CONVERTER PCB conor at HEADER ASSY mestaven
oF FaEaay eae ine
oe +
Se Fetes 28" MONITOR ASSY a an
menart ete ISWITCHMODE POWER sets SUPPLY satel
ama 08 “1 SCHAFFNER MAINS-IN FILTER wrescc aoe = J eee ure SS ETEL ‘om j Stet el
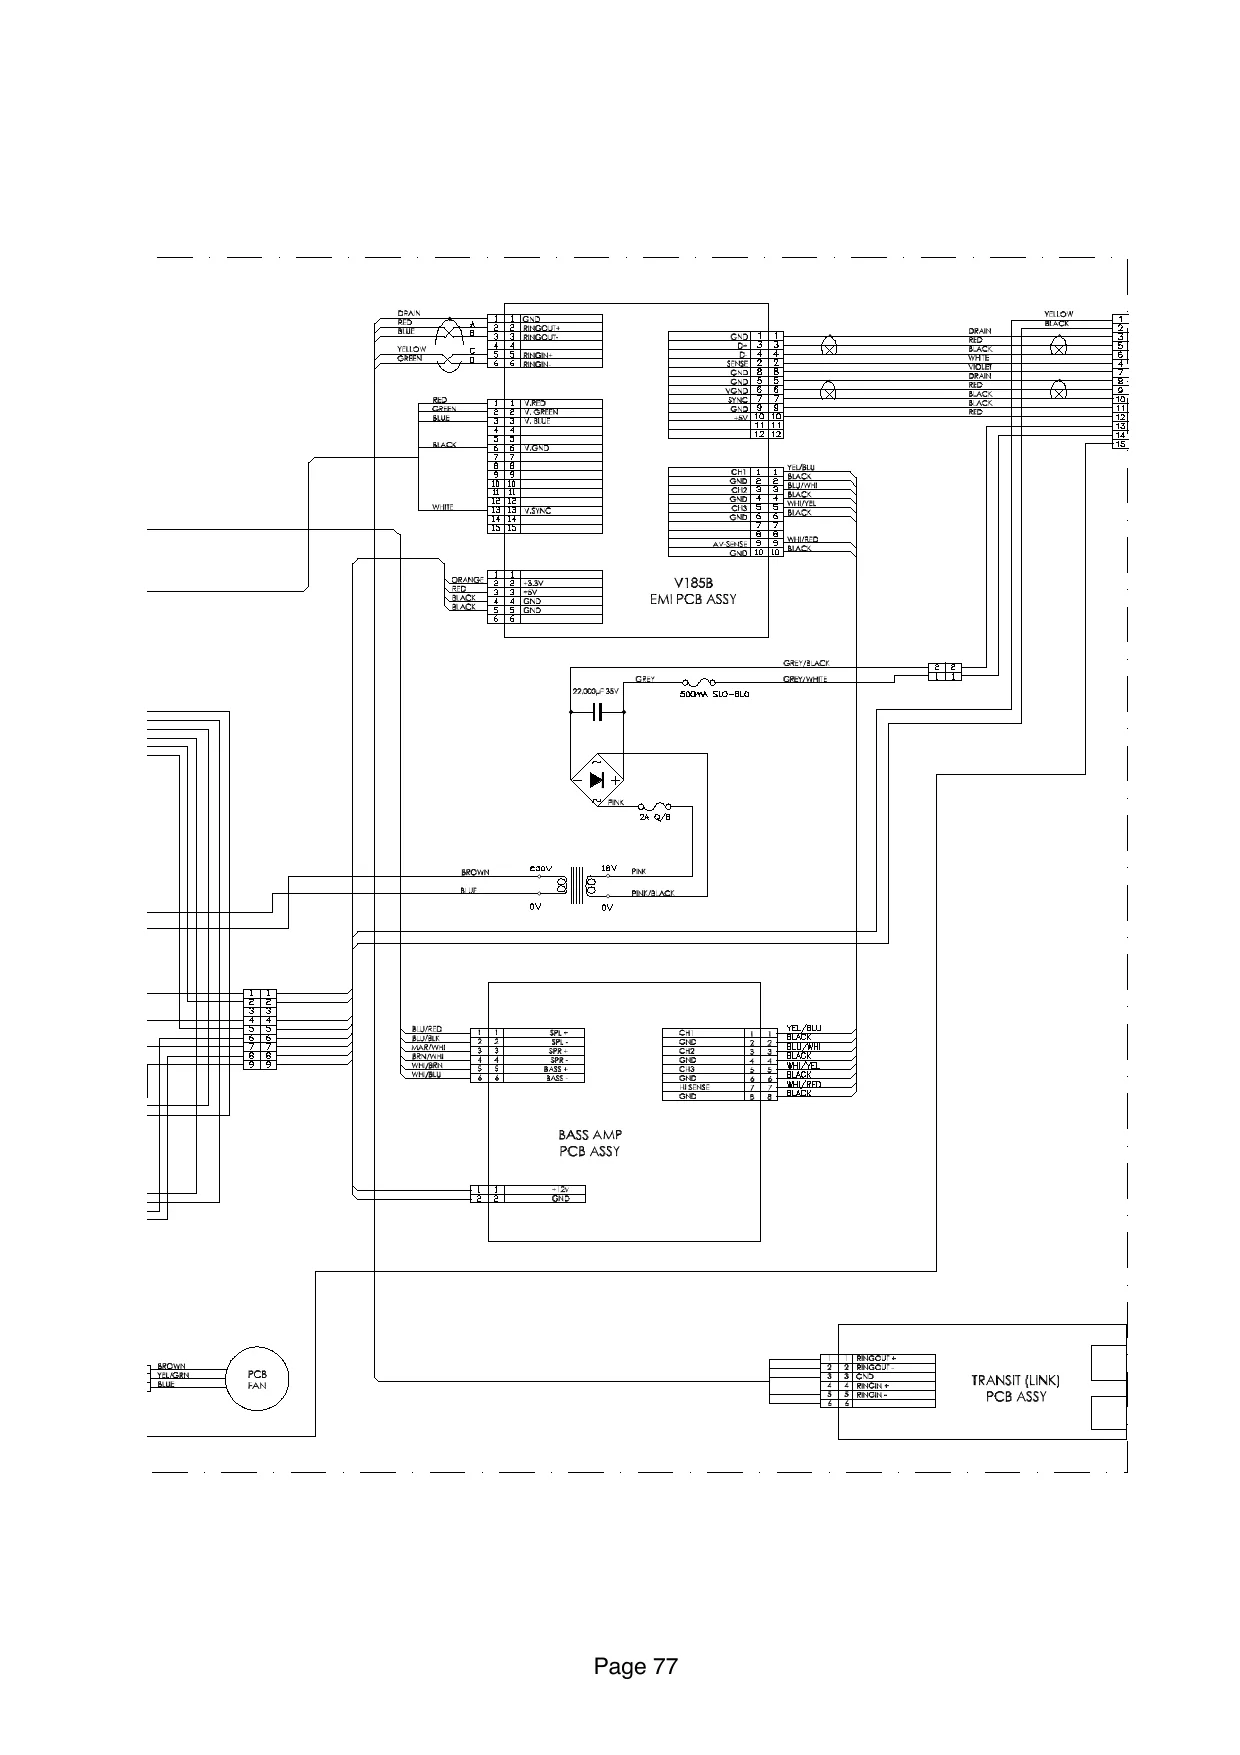
This page is a drawing, shown as the original scan.
gz e6eq ai ASSv Bed Dd O/I SBIA oem Es ED se 2 ES 2
coerutiow dT ———— T GUNASSY TE] S02
rte] Sunrcs | a} assy | |
aneca ee PEDAL ASSY | centr PES, ————!
mm
ERVET Siac oe strersow SREENET SERVICE BRACKET
sescrooun 2 pall cxTR a sree
12v2aw ‘CASHFLOW OQ 2INK Exe SHU
non won,