Alpine Racer 52in
Alpine Racer (World, AR2 Ver.D) (Namco, 1994) · Document · 50 pages · 9 sections · original scan
Operators Manual
IT IS THE RESPONSIBILITY OF THE OPERATOR TO MAINTAIN CUSTOMER SAFETY AT
ALL TIMES, AND IT IS IMPERATIVE THAT THE DETAILS SET OUT IN THIS MANUAL ARE FOLLOWED PRECISELY,
Part No. 90500085
© 1994 NAMCO LIMITED all rights reserved.
No part of this publication may be reproduced by any mechanical, photographic or electronic process, or in the form of phonographic recording, nor may it be stored in a retrieval system, transmitted or otherwise copied for public or private use, without permission from NAMCO EUROPE LIMITED
While the information contained in this manual is given in good faith and was accurate at the time of publication, NAMCO EUROPE LTD. reserve the right to make changes and alterations without notice.
This machine has been manufactured in accordance with European Community directives (1st. January 1996), and as such bears the C € marking. Any changes or modifications to this machine must be in accordance with European Community directives (1st. January 1996).
If you make any unauthorised changes to this product, you may contravene European Community directives (1st. January 1996)
Published by: NAMCO EUROPE LIMITED Namco House, 8 Acton Park Estate, The Vale, London. W3 7QE
Phone:- 0208-324-6000 Fax:- 0208-324-6010
SAFETY WARNING
In order to use this machine safely, be sure to read this Operators Manual carefully before installation, adjustment or use of this machine. Whenever the owner of this machine entrusts disassembly, installation, adjustment, routine maintenance or trouble shooting to another person, the owner should ensure that that person read the appropriate precautions and relevant sections of this manual before starting work. In order that no accidents occur when the machine is in operation, strictly follow the notes on safety described below. Also, carefully read section 2, "Precautions"
Warnings for Operation (€ € Requirements) r »
Warnings for Disassembly, Installation, Routine Maintenance, and Troubleshooting.
Va
- SPECIFICATIONS
POWER SUPPLY :-
MONITOR :-
COIN ACCEPTOR
DIMENSIONS :-
Assembled Monitor Cabinet Ski Assembly Header
WEIGHT :-
Assembled Monitor Cabinet Ski Assembly Header
ACCESSORIES :- 230volts AC
Thomson 52" Projector Monitor (RP52)
Mars CashFlow - 1 Channel
1265(w) x 2245(d) x 2320(h) 1250(w) x 645(d) x 1940(h) 1265(w) x 1600(d) x 1220(h) 1145(w) x 350(d) x 380(h)
458kg 200kg 240kg 18kg
Keys: (Cash Door) . yn (Coin Door) .. (Service Door). De)
IEC Mains Lead... Operators Manual Installation Manual Monitor Manual.... Monitor Remote Control W/Batteries Cashflow Data .. Floor Safety Mat & Decal Floor Safety Mat Securing Plate Floor Safety Mat Support Bracke’ Joint Bracket - LHS . Joint Bracket - RHS. Potentiometer Baa4anpneasnanain
M10x35 Hex Head Set Screw - S/Steel M10 Flat Washer - S/Steel ... M10 Spring Washer - S/Steel.. M8x20 Hex Head Set Screw - S/Steel . M8 Flat Washer - S/Steel .. M8 Spring Washer - S/Steel. M6 Dome Head Nut - Chrome M6X25 Hex Head Screw - BZP M6 Flat Washer H/Duty - BZP.. M6 Spring Washer - BZP ..........ccccsceeseeees NNNOA AR WMO OO
M4 Security Wrench .........ccccccsesesesseeeeesees 1 M5 Security Wrench... M6 Security Wrench...
- PRECAUTIONS
Be sure to read this section carefully.
2-1 Notes on Operation (C € Requirements)
(~ NOTE:
Parts of this machine swing to the left and right during game play. In order to maintain the customer's safety, the operator should strictly follow the appropriate precautions.
2-2 Safety Mechanisms and Controls
For safety, this machine is equipped with a locking mechanism for securing the steps when the machine is not being played.
The step locking mechanism is controlled as describe below.
After selecting the course, the step lock is released before game start.
At game over, the steps are locked.
If the steps are moved left or right while they are locking or unlocking, the motor temporarily stops in order to prevent damage to the step-lock motor. When the steps are no longer being moved left or right, the motor will restart. To prevent damage from occurring, do not move the steps while the motor is running.
When the machine is first turned ON, the step-lock mechanism is checked automatically by unlocking and re-locking the steps.
If the step-locking system fails, an error message will be displayed on the monitor screen. Refer to section 6-4-3 "Handling Motor Errors" and section 8 "Trouble Shooting".
Restriction plate
(a) = ale
ba Eo fg Step
Unlocked step (free state)
The restriction plate moves to the side of the steps and locks the steps.
Step
Locked step
2-3 Cautions When Transporting.
a. Do not subject the game to physical shock when transporting or moving it.
b. Always return the levellers to the UP position before moving the machine, even for short distances.
c. The monitor cabinet, ski assy and header assy must be separated before shipping.
d. Take care not to rope any moulded (plastic) parts when transporting.
e. Always ship the monitor section upright.
THIS MACHINE IS NOT DESIGNED TO BE MOVED BY FORK LIFT. DO NOT USE
2-4 Cautions When Installing.
This machine is designed for indoor use only. Do Not install the machine in the following places 1.
ro) Direct sunlight, places with excessive humidity or
dust, places where there is water leakage, near airconditioning or heating equipment, places with excessively high or cold temperature.
[ @® Places where it would be in the way of emergency exits or fire extinguishing equipment.
® Places that are not level.
If this machine is installed next to walls or other machines, ensure that there is 2. plenty of space between them.
: So that customers are not injured by the movement of the Ski Tray, ensure that there is at least 300mm separation between other machines or walls. If two Alpine Racer machines are next to each other the space between them must be at least 600mm.
: In order to gain access to the Power Supply and CPU assemblies, make sure that the rear of the machine is separated from a wall or other machine by at least 500mm.
| 30cm 306m
50cm
50cm
/ KEEP CLEAR 4) ‘mtr LL fff
- HOW TO PLAY
This game is based on Alpine ski racing. The player stands on the steps and moves them left or right to control the skier. By using the inner edge when moving the steps, the skier slows down and turns quickly.
. Race Mode The player races the computer skiers and the object is to cross the goal line first. The game is over when the player crosses the finish line within the given time period, or the time period reaches zero. The time period is increased each time a player passes a check point. If a player wins in a fast time they can enter their initials. Select letters using the select buttons and enter them by using the decision (Viewpoint) button.
. Time-Trial Mode The object of the game is to pass between the flags (gates) and to cross the finish line in the fastest time. The rules require the player to go through the gates, so more technique is needed for this mode than the normal race mode. The game is over when the player crosses the finish line within the given time period, or the time period reaches zero. The time period is increased by one second each time a player passes through a gate. If a player completes a course in a fast time they can enter their initials. Select letters using the select buttons and enter them by using the decision (Viewpoint) button. A player is not disqualified for not passing through a gate, however the player will not be able to enter their initials even if they cross the finish line in a good time.
‘ Game Mode Selection After inserting sufficient credit, the "Game Mode Selection" screen is displayed. The player selects either the "Race Mode" or "Time-Trial Mode" by using the L/R selection buttons, and pressing the decision (Viewpoint) button.
. Course Selection After the game mode has been selected, the "Course Selection" screen is displayed. The player can select one of three courses, "Novice", "Intermediate" and "Expert".
. Viewpoint Selection The viewpoint button can pressed at any time during a game to switch between the player's view and behind view.
Players View: This is the view as seen by the skier. This provides an exciting view while skiing. The race mode starts in this view.
Behind View: This is the view from behind the skier. This view can be used to get an understanding of the skiers posture and surrounding conditions. The time trial mode starts in this position.
- MAJOR COMPONENTS
- INSTALLATION
5-1 Fitting the Header Assembly
The Header Assembly has a forward centre of gravity, so it is important that at least two people are used to fit or remove the Header Assembly.
The fitting position of the Header Assembly is very high, and it is important that a means of reaching the height safely, without stretching, is available. (e.g. steps, step stools etc.)
- Place the Header Assembly on to the monitor cabinet, connect the connectors and pass the connectors in to the cabinet, slide the header back ensuring that it engages fully in to the retaining brackets at the front of the monitor cabinet.
- Fit the 2off M6x25 Hex Head Screws, Spring and Flat washers to retain the Header Assembly to the cabinet.
Hex Head Screw (M6x25)
Connectors
5-2 Connecting the Ski Assy to the Monitor Cabinet.
- Connect the connectors between the Ski Assembly and Monitor Cabinet.
- Push the Ski Assembly fully up to the monitor cabinet, taking care not to trap any wires.
- Fit, finger tight, a joint bracket to each side using 4off Hex Head Set Screws (M10x25), Spring and Flat Washers on each bracket. Tighten fully all screws. (Note: Joint Brackets are handed, ensure bracket is fitted with fixing holes uppermost.)
Hex Head Set Screw (M10x25) Joint Bracket \e .
Joint Bracket
Hex Head Set Screw (M10x25)
Connectors
—— — TT mad I Level adjuster | Lock nut
If this machine is installed on a smooth or shiny floor, it is recommended that rubber slip mats be placed under each adjustable foot to prevent the machine from moving when being played.
5-3 Fitting the Safety Mat
- Assemble the Floor Safety Mat by fitting the securing plates from underneath, the support brackets from the top and retaining the assembly together with the M6 Dome Nuts.
M6 Dome Nut
Floor Safety Base |
Securing Plate YY
Place the assembled Safety Mat into position under the Ski Step Assy. 2.
- Retain the Safety Mat in position with the Hex Head Set Screws (M8x20), Spring Washers and Flat Washers
Hex Head Sel Serew 1M@%20)
- ADJUSTMENTS
6-1 Turning on the Power
After the machine has been installed, turn ON the power. The power switch is located on the rear of the monitor cabinet.
6-2 Adjustment Switches
The Adjustment switches are located inside the coin door.
1. Service Switch. Press this switch to obtain game credits without incrementing the play meter.
Test Switch Slide the test switch ON to enter test mode. Test mode allows testing and the changing of game settings. (Refer to section 6-3 "Test Mode" (page 12))
COIN COUNTER °
°
TEST LEFT PLAYER O O
SERVICE ‘e) RIGHT PLAYER O
TEST O
SERVICE O
Service Bracket
6-3 Test Mode
- Open the coin door and slide the test switch "ON". The menu screen will be displayed on the monitor.
- Select the test required by pressing the ‘Left or Right Selection' push button. The selected test will ‘blink’.
- Enter the selected test by pressing the 'Decision' push button. Select "EXIT" to return the "Menu Screen".
- After testing is completed, ensure that the test switch is returned to the "OFF" position to return to normal game mode.
The Test Switch must always be in the "OFF" position for normal game mode.
Ne MENU
COIN OPTIONS
GAME OPTIONS
VO TEST
SOUND TEST
MONITOR TEST ~\
ADS TEST 9 wresecneensefenne
OTHERS
L/R SELECTION BUTTON : CHOOSE DECISION BUTTON : ENTER S
Select L/R Buttons Sets the price of play (See 6-3-1)
Sets the game options (See 6-3-2)
Used for testing switches and controls (See 6-3-3)
Used for testing sound and setting volumes (See 6-3-4)
Used for adjusting the monitor
Displays accumulated game data
Used for testing the PC Boards and for initializing all of the settings
| | | Decision Button
6-3-1 Coin Options
Select item (1) "COIN OPTIONS" on the menu screen to set the game cost and related settings.
Press 'Select L/R' to select the required item.
Use the 'Decision' button to adjust the settings.
Select "EXIT" to return to the menu screen. COIN OPTIONS
[ DEFAULT IN GREEN ]
GAME COST 1 COIN 1 CREDIT
FREE PLAY OFF
EXIT
SELECT L/R BUTTON DECISION BUTTON Ne CHOOSE : CHANGE +
ITEM following table.
CONTENTS FACTORY SET
- Game Cost
- Free Play No of Coins required for No. of credits
Yes/No settable 1-9 1 Coin 1 Credit
NO
6-3-2 Game Options
- Select item (2) "GAME OPTIONS" on the menu screen to set the game options and related settings.
- Press 'Select L/R' to select the required item.
- Press the 'Decision' button to adjust the settings. Standard settings are displ jayed in green.
- Select "EXIT" and press 'Decision' to return to the menu screen.
(— >) GAME OPTIONS [ DEFAULT IN GREEN ]
GAME DIFFICULTY B SOUND IN ATTRACT ON HI SCORE INITIALIZE NO
SELECT L/R BUTTON : CHOOSE
DECISION BUTTON : CHANGE +
AUTO HIGH SCORE INITIALIZE OFF -------f---
EXIT
N S
ITEM DESCRIPTION FACTORY SET
| (a) Game Difficulty | A (easy) to C (hard) | B | |
| (b) Sound in Attract | On / Off | On | |
| (c) Hi Score Initialize | Yes/No | (If Yes Hi Score will be reset when exiting test) | No |
. (If Yes Hi Score will be reset every time the machine i:
- Auto High Score Initialize | Yes / No switched OFF) Off
6-3-3 I/O Test
- Select item (3) "I/O Test" on the menu screen to test the switches, motor and step adjust.
- Press 'Select L/R' to select the required item, then press the 'Decision' button to enter the test.
- Select "EXIT" and press the ‘Decision’ button to return to the menu screen.
(— >» VO TEST
DIP 4 12345678 oovseeseesesseeesecseefece (a)
SWITCH TEST MOTOR TEST STEP ADJUST EXIT
SELECT L/R BUTTON : CHOOSE DECISION BUTTON : ENTER Ne S/
- Shows condition of DIP SW 4 on the PCB. In normal operation all switches are OFF. (If a switch is ON, it will be displayed in red.)
- For testing Switches and Control Pots. (See 6-3-3-1 )
- For testing the Step-Lock Motor. (See 6-3-3-2)
- For initializing the Step Control Pots. (See 6-3-3-3)
6-3-3-1
1.
Select Switch Test from the 'I/O Test' menu. The following screen will appear on the monitor.
- Onentering Switch Test the Skis will be unlocked. Ensure that the Skis are returned to the locked condition at the end of the test by entering Motor Test (See 6-3-3-2)
( SWITCH TEST *)
| TEST SW | ON | i eceetesesefeceee |
COIN SW ON SERVICE SW ON R SELECTION BUTTON DECISION BUTTON L SELECTION BUTTON
| SWING | 0000 | 0000 | CENTER |
| EDGE | 0000 | 0000 | CENTER... |
SEStecsres
(UR SELECT + DECISION : EXIT
The word 'ON' will appear next to items (a) to (f) each time the respective switch is operated. When the skis are pushed left, ‘SWING-CENTRE' will change to 'LEFT' and 'OK' will appear just before it reaches the extreme left,. When the skis are pushed right, 'CENTRE' will change to 'RIGHT' and 'OK' will appear just before it reaches the extreme right. '0000' will increase when the skis are moved to the right and decrease when they are moved to the left. When the skis are tilted, 'EDGE-CENTRE' will change to 'LEFT or RIGHT' and 'OK' will appear just before they are fully tilted. '0000' wil change as the skis are tilted.
Lett step Right step "EDGE" ‘OK' will only appear if you stand and apply weight to the edges of the ski steps. There is no problem if 'OK' is not displayed when standing on the steps in the same way =? as normal play.
If 'OK' is not displayed when the edge is tilted left or right, re-initialize as described in section 6-4 "Initialization After Replacing Parts".
Operate both of the 'Select L/R' buttons and 'Decision' button together to exit and return to the 'I/O Test! menu screen.
6-3-3-2 Motor Test
- Select Motor Test from the 'I/O Test' menu. The following screen will appear on the monitor.
4 MOTOR TEST
NOW MOTOR STATE : LOCK..
GOMOTOR :FREE een...
EXIT
L/R SELECT BUTTON : CHOOSE DECISION BUTTON: EXIT
Ne /
- Displays the current condition of the Skis. Display will show 'LOCK - FREEING - FREE - LOCKING' as the Skis are tested.
- Allows the Skis to be locked and unlocked. Display will show 'FREE - NOW MOVING - LOCK' as the Skis are being tested.
6-3-3-3 Step Adjust
- Select Step Adjust from the 'I/O Test' menu.
On entering 'STEP ADJUST ' test, Step Adjust on the 'I/O' Menu Screen will blink and ‘INITIALIZE COMPLETED' will appear and be blinking.
Ski Step initialization is now completed.
- Select EXIT to return to the Main Menu Screen.
6-3-4 Sound Test
- Select item (4) "Sound Test" on the menu screen to test the sound and speakers.
- The following screen will appear on the monitor.
( » SOUND TEST
VOLUME LEFT SP. a (a)
RIGHT SP. | ee rn (b)
REQUEST SONG No. 0 en (c)
EXIT
L/R SELECT BUTTON : CHOOSE DECISION BUTTON : ENTER Ne y
- Select the required item by ‘Select L/R' buttons. The selected item will ‘blink’.
- Pressing the Decision button will cause the selected value setting to blink.
- Pressing 'Select R' will increase the value and ‘Select L' will decrease the value.
- Press ‘Decision’ button to return to item select mode.
- When selecting the 'Request Song No.' test, ‘Select R' button will increase the song number and ‘Select L' will decrease the number. The 'Decision' button will produce the sound of the song number selected. (Request Song 01 will produce a stereo sound test. Sound will be produced from the speakers in the following order:- Left speaker, Right speaker, Both speakers)
- Press both Select L/R buttons and Decision button together to return to Sound Test Menu from Request Song No. Test
Item Description Factory Set
a Setleftspeakervolume = =——_—-- ------ 00 Quietest - 3F Loudest 3A b Set right speaker volume ss - --- -- 00 Quietest - 3F Loudest 3A Select sound for testing. Each number will produce a different sound. 01 will generate a stereo test.
6-3-5 Monitor Test
- Select item (5) “Monitor Test” on the menu screen to set up and adjust the monitor.
- Onentering monitor test, the screen will display one of the following test patterns.
GRADATION PATTERN CROSSHATCH GREEN CROSSHATCH WHITE WHITE WINDOW (H) WHITE WINDOW (M) WHITE WINDOW (L) INTERLACE PATTERN VIEW ANGLE ADJUST (CRT) VIEW ANGLE ADJUST (PROJECTOR) FULL WHITE
- Use 'Select L/R' buttons to change to the next pattern and 'Decision' button to return to the Main Menu.
- Refer to monitor manual for monitor adjustments.
6-3-6 ADS Data
- Select item (6) "ADS Data" on the menu screen to view machine history details.
- The following screen will appear on the monitor.
(~ ADS >)
RACE T.T.
| NOV | INT | EXP | NOV INT | EXP |
| PLAY | 0000 0000 0000 | 0000 0000 0000 | ||
| GOAL | 0000 0000 0000 | 0000 0000 0000 |
EXTO 0000 0000 0000 EXT1 0000 0000 0000 EXT2 0000 0000 0000 GATE ---- ---- ----
NOV INT EXP
| RACE | _000'00"00 | 000'00"00 | 000'00"00 |
| TT. | 000'00"00 | 000'00"00 | 000'00"00 |
PLAY TIME —_000' 00" 00 PLAY NUMBER 0000 INITIALIZE EXIT L/R SELECT CHOOSE DECISION ENTER XN S
Item Description
- Play Total number of games played at each difficulty level for each course.
- Goal Total number of games completed at each difficulty level for each course.
- Exto Number of games finishing at 1st extended time gate at each difficulty level in race game.
- Ext1 Number of games finishing at 2nd extended time gate at each difficulty) level in race game.
- Ext2 Number of games finishing at 3rd extended time gate at each difficulty level in race game.
- Gate Total number of gates completed for each difficulty level in T.T. game.
- Race Total time in Hrs, Mins, Secs each difficulty level has been played in race game.
- T.T. Total time in Hrs, Mins, Secs each difficulty level has been played in T.T. game.
- Play Time Total time in Hrs, Mins, Secs game has been played.
- Play Number Total number of game plays.
- Initialize Resets all ADS Data to zero.
6-3-7 Others
- Select item (7) "Others" on the menu screen.
- Onentering 'Others' the following screen will appear on the monitor.
OTHERS (DEFAULT IN GREEN)
BACK UP MEMORY INITIALIZE NO
EXIT
L/R SELECTION BUTTON : CHOOSE DECISION : CHANGE +
- Selecting Back Up Memory Initialize will return all adjustable settings to factory preset.
6-4 Initialization After Replacing Parts
Initialization must be performed after replacing the game PC board, Rom or Step Controls. If initialization is not performed, the game will not function correctly. During initialization, ensure that the step edges are level.
6-4-1 Adjustment Method (a)
- When the power is turned ON the step-lock motor is automatically checked. The motor check first locks the steps (If not already locked), unlocks, then locks them again.
- If the first lock is not completed within fifteen seconds from power up, an error display screen appears. If this happens, refer to section 6-4-2 "Adjustment Method (b)", and initialize the MOTOR ERROR 1 controls. If the error display screen is still showing after the controls have been initialized, refer to section 6-4-3, "Handling Motor Errors". After the motor check is successful the attract screen is displayed. PLEASE STEP ADJUST
- To initialize the controls, Switch the test switch ON while pressing the service button. The screen displays the "SWITCH TEST" screen with INITIALIZE COMPETED flashing, Initialization is completed.
- Turn the test switch OFF to return to normal game mode.
(~ SWITCH TEST *)
TEST SW ON COIN SW ON SERVICE SW ON R SELECTION BUTTON On DECISION BUTTON ON L SELECTION BUTTON ON SWING 0000 0000 CENTER EDGE 0000 0000 CENTER
INITIALIZE COMPLETED \ LR SELECT + DECISION: EXIT yy
6-4-2
6-4-3 1. Adjustment Method (b)
Slide the test switch ON.
Turn the power OFF and then back ON again.
Select "I/'O TEST" and press the decision button (View Change).
Select "STEP ADJUST" and press the decision button. The controls are now initialized.
After initialization is completed, turn the test switch OFF. The motor check begins. If the motor still does not operate correctly, there is a problem with the motor or switches, and an error will be displayed on the screen. Refer to section 6-4-3, below, "Handling Motor Errors", for fault finding.
Handling Motor Errors
If a problem has occurred with the step-lock motor, an error message and method of rectifying will be displayed on the screen.
Errors at Start-up
When the power is turned ON the step-lock motor is automatically checked. The motor check first locks the steps (If not already in locked position), unlocks, then locks them again.
If the first lock is not completed within fifteen seconds from power up, the following error display screen appears. If this happens, refer to section 6-4-1 "Adjustment Method (a)", and initialize the controls.
MOTOR ERROR 1 PLEASE STEP ADJUST
If an error other than the one shown above is displayed, it is possible that a fuse has blown, there is a problem with the step-motor mechanism or the steps are not moving freely.
d. If the first lock is completed within fifteen seconds, but the steps cannot be MOTOR ERROR 2 released, Motor Error 2 screen is OPERATION STOP!! displayed until the fault is rectified.
e. If after the steps have been freed, they do not re-lock, as an emergency measure, Motor Error 3 screen is displayed. This allows the step-lock mechanism to be MOTOR ERROR 3 overridden and the game to be DO YOU WANT TO OPERATE operated with the steps permanently in the free position. YES>PUSH DECISION BUTTON NO>PUSH L/R SELECT BUTTON
If the game is to be operated with the steps in the free condition, press the decision button. If either the Left or Right Select button is pressed the game will cease to function until the fault has been rectified.
- An Error Occurs During Play.
a. If the motor stops function during game play, the following error screen will be displayed.
b. Turn the power OFF and then back ON. The motor will be checked automatically.
c. If there is still a problem, follow the instructions detailed in section 6-4-3 (1), "Errors At Start-up".
- MAINTENANCE
7-1 Care of the Projector Monitor
The projection tube lenses have been manufactured from plastic material. Prevent contact with the lenses, because various lens faces have been provided with a special coating which is easily damaged.
Only the side of the lens directed towards the mirror, the mirror and the projection screen are allowed to be cleaned.
If cleaning is absolutely necessary, observe the following points :
. Blow off dust, or remove with a dust brush or soft lint-free cloth.
. If necessary, clean with a soft lint-free cloth, moistened with water to which a little detergent has been added.
. DO NOT USE organic solvents such as alcohol, dry cleaning naptha, trichlorethylene, acetone, etc., these agents may cause permanent damage to the plastic lenses or projection screen.
TUBE LENSES
7-2 Replacing the Fluorescent Tube
- Remove the ten socket button head screws (M5x12), and remove the side vacforms (five screws on each vac-form)
- Remove the two countersunk screws (M5x12) from the bottom of the acrylic.
- Remove the two socket button head screws (M4x25), and remove the header acrylic retaining bracket.
- Remove the header acrylic.
- Replace the fluorescent tube.
- Reassemble in reverse order.
Socket Button Head Screw (M4x25)
Header Acrylic Retaining Bracket
Fluorescent 3°
Pozi Sovnrersunk Screw wwsxi2)/
7-3 Replacing Push Button Switches and Lamps
- Remove six security screws (M5x20) and two security screws (M5x12), and lift off the top cover taking care not to strain the wiring.
- Disconnect the connector.
a Security Screw (M5x12) _-~ | _ Lt Security Screw (M5x20)
Security Screw (M5x20) Top Cover
Connector
- Separate the switch/lamp holder from the button by pulling it directly away from the button.
Pushbutton
- Replace the lamp or switch ensuring that the correct wires are replaced on the terminals.
- Reassemble in reverse order.
7-4 Replacing the Step Limit Switches
- Remove the top cover. (See Section 7-3)
- Remove four security screws (M5x12) securing each side vac-form to the mast assembly and remove both side vac-forms and front vac-form as one assembly.
Side Vac-Form Right
Security Screw (M5x12)
Side Vac-Form Left
Front Vac-Form
- Remove two pozi head screws (M4x10) and remove the limit switch mounting bracket.
Pozi Head Screw (M4x10)
Switch Mounting Brkt
- Remove two pozi head screws (M3x16) and replace the limit switch ensuring the wires are replaced on the correct terminals.
Switch Mounting Bracket
Micro Switches
Pozi Head Screw (M3X16)
- Reassemble in reverse order.
7-5 Replacing the L/R Turn Control Pot
- Remove eight security screws (M5x20) and remove the front Vac-form.
- Remove two pozi head screws (M4x10) and remove the control pot cover.
Side Vac-Form (L)
LR Pot Cover
XS f
Pozi Head screw (M4x10) /
- Disconnect the connector, slacken the pot retaining grub screw (M4x8) and remove the control pot and bracket.
- Replace the control pot taking care to ensure that the wires are replaced to the correct terminals.
Grub Screw (M4x8)
Connector
- Reassemble in reverse order.
- Re-initialize game. (See 7-7 "Adjustments When Replacing Parts")
Grub Screw (M4x8)
7-6 Replacing the Tilt Control Pot
- Remove the front vac-form. (See Section 7-3)
- Remove four security head screws (M5x12) and remove the Ski Step front vacform.
‘Security Screw (M5x12)
\ Security Screw (M5x12)
- Disconnect the connector, slacken the pot retaining grub screw (M4x8) and remove the control pot and bracket.
Connector
Grub Screw (M4x8) Ski Step
- Replace the control pot taking care to ensure that the wires are replaced to the correct terminals.
- Reassemble in reverse order.
- Re-initialize game. (See 7-7 "Adjustments When Replacing Parts")
Tilt Control Pot Grub Screw (M4x8) Mounting Bracket
| Pot Shaft
7-7 Removing the Step Rubber
- Remove three security screws (M5x12) and retaining bracket from the outside edge of the step rubber, Lift the rubber edge and remove the three inner security screws (M5x12) and retaining bracket.
Security Screw (M5x12)
Ski Step Assy
Rear Vac-Form
Retaining Brkt
- Tilt the step assembly and remove three security screws (M5x12).
Security Screw (M5x12)
ay
Retaining Brkts
2 a)
\_Security Screw (M5x12)
- Remove the step rubber.
- Refit in reverse order.
7-8 Step-Lock Maintenance
7-8-1
7-8-2 Releasing the Step-Lock
Turn the power switch ON
Press the service switch, and start the game.
When the game starts, the restriction plate (see diag.) moves to the released position.
When the steps are released, turn the power OFF.
To re-lock the steps turn the power ON and the steps will re-lock in the power up motor check.
Greasing the Step-Lock
The step-lock should be greased every three to four months.
1. Remove the control panel and vac-forms (See sections 7-3 and 7-4).
Apply grease to the following locations.
Between the restriction plate and guide rails, and between the cam follower. Screw shaft Pillow shaft Sub torsion bar axle
Cam follower Guide rail
Pillow screw Restriction plate
Screw shaft od
ed om ara [ a. =
—_— _ i "
i Sub-torsion bar axle ‘
7-8-3 Inspecting the Pillow Unit
When greasing the step-lock, inspect the pillow assembly for any problems.
- Release the step-lock and swing the steps to the left and right, and check the pillow units for any wear. Also check that the Hex Head Screws (M14x45) are tight.
- Swing the steps left and right, and check that the main torsion bar is secure. Also check that the Hex Head Screws (M10x25) are tight.
- Reassemble the vac-forms and control panel. Remember to connect the connector when refitting the control panel.
Hexagonal bolt (M10 x 25) ES.
Main torsion bar
Pillow unit
Hexagonal bolt (M14 x 45)
- TROUBLE SHOOTING
Ensure that the power is turned OFF before making adjustments or replacing parts.
If none of the items below correspond to your problem, or if the problem is not corrected by the treatment described below, contact your dealer for further advice.
Always return PC Boards to your dealer for repair. Never test the PC board for continuity with a multimeter or similar device. The PC Board contains sensitive devices which could be damaged or even destroyed by the internal voltage of such test equipment.
When sending parts for repair, clearly indicate the problem, and send them in secure and adequate packing. Especially in the case of sending PC Boards, wrap them in sponge or bubble wrap prior to packing, so that they do not receive excessive shock.
8-1 General Problems
Symptom Cause Treatment Ref. Page
The machine does not work even though the power is ON. Switch OFF and back ON.
Operation is unstable or the machine does not operate correctly. Is the mains supply within 10% of the rated voltage. Remove any heavy duty equipment (air conditioners, large rides, etc.) from the same| power line, and ensure that the supply is within the correct limits.
Have parts been changed. Reinitialize the game. pg21 6-4
The game goes off. ls the mains-in plug secure.
Has a fuse blown. Switch the power OFF and check the mains-in filter fuse and fuses on the PSU board.
8-2 Projector Assy
Symptom Cause Treatment Ref. Page
There is no picture on the Monitor switched OFF. Check ON/OFF switch on front monitor. of monitor.
ls the signal loom connected properly. Check SCART connector is secure and connected to the AV1 connector.
8-3 Header Assembly
| Symptom | Cause | Treatment | Ref. Page |
| The fluorescent lamp does noij Is the connector loose or | Connect the connector | pg44. | |
| come on. | disconnected. | securely. | schematic |
| Is the fluorescent tube or | Replace tube or starter. | pg25 7-2 |
starter burned out.
8-4 Mast Assembly
| Symptom | Cause | Treatment | Ref. Page |
| There is no sound from a | Is a connector loose or | Connect the connector. | pg44 |
| speaker. | disconnected. | schematic | |
| Is the volume too low. | Adjust volume setting. | pg18 6-3-4 | |
| "WARNING!" is displayed. the] Is a connector loose or | Connect the connector. | pg44 | |
| step lock does not work. | disconnected. | schematic |
Is a fuse blown. Check and replace fuse on PSU board.
| Pushbutton lamp does not | Is a connector loose or | Connect the connector. | pg44 |
| light. | disconnected. | schematic |
Is the lamp loose in the holder. | Insert lamp properly. pg26 7-3
| Is the lamp burned out. | Replace lamp. | pg26 7-3 |
8-5 Step Assembly
| Symptom | Cause | Treatment | Ref. Page |
| The step control does not work. | Is a connector loose or | Connect the connector. | pg44 |
disconnected. schematic Has the game been initialized. _| Initialize the game. pg21 6-4
| Is the control pot broken. | Perform the switch test to | pgi6 |
check control. 6-3-3-1
Replace the control pot. pg28 7-5
| The tilt control does not work. | Is a connector loose or | Connect the connector. | pg44 |
disconnected. schematic Has the game been initialized. _| Initialize the game. pg21 6-4
| Is the control pot broken. | Perform the switch test to | pg16 |
check control. 6-3-3-1
Replace the control pot. pg30 7-6
- PARTS
ITEM DESCRIPTION PART No.
| 1 | HEADER ACRYLIC | 30000222 |
| 2 | HEADER VAC-FORM - RHS | 45000721 |
| 3 | HEADER VAC-FORM - LHS | 45000720 |
| 4 | HEADER WOODEN HOUSING | 37100086 |
| 5 | HEADER METAL HOUSING COVER | 45000584. |
| 6 | HEADER ACRYLIC RETAINING BRACKET | 45000581 |
| 7 | HEADER VAC-FORM DECAL LHS/RHS | 40000266 |
| 8 | FLUORESCENT TUBE 3ftx1" 20w T8 | 64500013 |
ITEM DESCRIPTION PART No
| 1 | THOMSON 52" PROJECTION MONITOR | 84000030 |
| 2 | PROJECTOR CABINET SIDE DECAL - LHS/RHS | 40000284 |
| 3 | |ALPINE RACER PCB ASSY - SYSTEM 22 | XAR-PCB |
| 4 | SMPSU 5v/30A - 12v/5A | 83000001 |
| 5 | ELKAY BLOCK 5 WAY | 66000014 |
FUSE 1%" 2A QUICK-BLO 63500504
| 8 | FUSE 1%" 3A SLO-BLO | 63500547 |
| 7 | BRIDGE RECTIFIER 25amp | 71000040 |
| 8 | |TRANSFORMER | 67700019 |
| 9 | 13 CHANNEL POWER AMPLIFIER | 45000725 |
| 10 | |SCHAFFNER MAINS-IN FILTER | 66000016 |
| 11 | |ADJUSTABLE FOOT M16x95 | 88300079 |
| 12 | |SWIVEL CASTOR 75mm | 59000005 |
| 14. | |PROJECTOR CABINET FRONT DECAL | 40000283 |
ev ebeg
ITEM DESCRIPTION PART No
| 1 | MAIN BASE METALWORK | 45000585 |
| 2 | MAIN BASE EXTENSION ARM - RHS | 45000586 |
| 3 | MAIN BASE EXTENSION ARM - LHS | 45000587 |
| 4 | MAIN BASE EXTENSION ARM VAC-FORM - LHS | 45000588 |
| 5 | MAIN BASE EXTENSION ARM VAC-FORM - RHS | 45000589 |
| 6 | SNOW FIELD VAC-FORM - LHS | 45000590 |
| 7 | SNOW FIELD VAC-FORM - RHS. | 45000591 |
| 8 | SIDE WOOD - LHS | 37100078 |
| g | SIDE WOOD - RHS | 37100079 |
| 10 | SIDE WOOD DECAL - LHS | 40000267 |
| 1 | SIDE WOOD DECAL - RHS | 40000268 |
| 12 | COIN TOWER | 45000592 |
| 13 | PLAY INSTRUCTION DECAL, | 40000276 |
| 15 | FRONT CENTRE EXTENSION BOX | 45000595 |
PROJECTOR/BASE JOINT BRACKET - LHS. 45000722
| ‘6 | PROJECTOR/BASE JOINT BRACKET - RHS | 45000723 |
| 17 | FRONT EXTENSION BOX - LHS/RHS | 45000597 |
| 18 | REAR EXTENSION BOX - LHS/RHS. | 45000598 |
| 19 | STEP ON FLOOR BASE | 45000599 |
| 20 | STEP ON FLOOR BASE SAFETY DECAL, | 40000269 |
| 21 | FLOOR BASE SUPPORT BRACKET - LHS/RHS, | 45000600 |
| 22 | FLOOR BASE SECURING PLATE | 45000601 |
| 23 | SKI POLES FRONT SUPPORT BAR, | 45000602 |
SKI POLE - LHS 45000710
| * | SKI POLE - RHS | 45000711 |
| 25 | SKI POLES FRONT SUPPORT BAR CLAMP. | 45000604 |
| 26 | SKI POLE GRIP BAR - LHS/RHS. | 45000605 |
| 27 | SKI POLE GRIP WASHER | 45000606 |
| 28 | SKI POLE/GRIP BAR JOINT - RHS | 45000607 |
| 29 | SKI POLE/GRIP BAR JOINT - LHS | 45000608 |
| 30 | FRONT CENTRE TOP COVER PLATE | 45000609 |
| 31 | SNOW FIELD VAC-FORM SUPPORT BRACKET REAR - RHS. | 45000611 |
| 32 | SNOW FIELD VAC-FORM SUPPORT BRACKET REAR - LHS | 45000610 |
| 33 | SNOW FIELD VAC-FORM REAR SECURING BRACKET | 45000612 |
| 34 | BASE EXTENSION ARM VAC-FORM TOP FIXING BRACKET | 45000613 |
| 35 | BASE EXTENSION ARM VAC-FORM LHS/RHS FIXING BRACKET | 45000614 |
| 36 | SKI POLE DECAL | 40000270 |
| 37 | MAST SIDE VAC-FORM LOWER KICK BRACKET | 45000615 |
| 40 | SWIVEL CASTOR - 75mm | 59000009 |
| 41 | SWIVEL CASTOR - 50mm | 59000001 |
| 42 | ADJUSTABLE FOOT M20x70mm_ | 25000010 |
| 43 | SKI POLE GRIPS (pair) - BLACK | 45000617 |
This page carries no recoverable text. It is a drawing or a photograph. See the original scan.
°
PAC EI @ @ £9 @ A-A
| ITEM | DESCRIPTION | PART No. | ITEM | DESCRIPTION | PART No. |
| 1 | |MAIN MAST METAL WORK | 45000643 | 21 | JOINT AL-050-12 | 45000667 | |
| 2 | _|MAST FRONT COVER VAC-FORM. | 45000644 | 22 | PLAY INSTRUCTION ACRYLIC | 30000220 | |
| 3 | _|MAST SIDE VAC-FORM - LHS. | 45000645 | 23 | |CONTROL PANEL DECAL | 40000271 |
| 4 | _|MAST SIDE VAC-FORM - RHS | 45000646 | 24 | |FRONT CLOSING BRACKET COVER PLATE | 45000662 | |
| 5 | |CONTROL PANEL VAC-FORM | 45000647 | 25 | |SPONGE RETAINING BRACKET | 45000663 |
| 6 | |SPEAKER MESH FRONT SUPPORT BRACKET | 45000648 | 26 | |BEARING UCFL201 | 45000669 | |
| 7 | |LOUDSPEAKER WOODEN CABINET | 37100081 | 27 | JOINT AL-050-10 | 45000666 | |
| 8 | |LOUDSPEAKER GRILLE | 45000649 | 28 | |L/R STOP BUMPER K1-40 | 45000664 |
| 9 | |LOCKING PLATE GUIDE RAIL | 45000650 | 29 | ADJUSTABLE FOOT M16x95 | 88300079 | |
| 10 | |THREAD ROLLED DRIVE SHAFT CS-16V149 | 45000715 | 30 | |LOCKING MOTOR 24Vdc-350.8RPM-0.221A | 45000714 | ||
| 11 | [LIMIT MICRO SWITCH MOUNTING BRACKET | 45000652 | 31 | |LIMIT MICRO SWITCH 1541025 | 60000012 | |
| 12 | |FRONT CLOSING BRKT SUPPORT BRACKET | 45000653 | 32 | |FAN SWITCH MOUNTING BRACKET | 45000697 | |
| 13 | |FRONT CLOSING BRACKET | 45000654 | 33 | |PUSHBUTTON MCPB - RED | 60200247 |
| 14 | |LOCKING PLATE | 45000655 | 34 | |PUSHBUTTON RPB - YELLOW | 60200227 |
| 15 | |THREAD ROLLED DRIVE GUIDE | 45000656 | 35 | |LOUDSPEAKER 5¥2" FULL RANGE | 62000065 |
| 16 | |L/R POT COVER | 45000658 | 36 | |MOTOR FILTER BOARD | 45000743 |
| 17 | |WOODRUFF KEY 25x4x4 | 45000659 | 37 | AXIAL FAN 130mm | 67000074 | |
| 18 | |SPEAKER GRILLE SPONGE | 45000660 | 38 | |SUB BASS DRIVE SPEAKER - 614" | 62000068 |
| 19 | PLAY INSTRUCTION MOUNTING BRACKET | 45000661 | 39 | |SUB BASE SPEAKER GRILLE | 45000701 | |
| 20 | JOINT L-050 | 45000668 | 40 | |SUB BASS WOOFER CABINET | 37100084 |
i ZZ ZZZZ LLL ELA \ SSS
ITEM DESCRIPTION PART No
| 1 | STEP ASSY MAIN METAL STRUCTURE | 45000618 |
| 2 | STEP TRAY ASSY | 45000619 |
| 3 | STEP VAC-FORM - FRONT | 45000620 |
| 4 | STEP VAC-FORM - REAR | 45000621 |
| 5 | STEP RUBBER | 45000622 |
| 6 | ROSTA SPRING BRACKET - FRONT 38x60 | 45000623 |
| 7 | ROSTA SPRING BRACKET - REAR 38x60 | 45000624 |
| 8 | ROSTA SPRING SWING BRACKET 38x60 | 45000625 |
| 9 | STEP CENTERING ARM | 45000626 |
| 10 | STEP RUBBER RETAINING BRACKET | 45000627 |
| 1 | STEP SWING BEARING | 45000628 |
| 12 | STEP SWING BEARING SPACER | 45000637 |
| 13 | SWING L/R POT MOUNTING BRACKET | 45000628 |
| 14 | EDGES POT MOUNTING BRACKET | 45000629 |
| 15 | STEP LOCATING PLATE - UPPER | 45000630 |
| 16 | STEP RUBBER SUPPORT BRACKET | 45000631 |
| 17 | EDGES POT COVER BRACKET | 45000632 |
| 18 | ROSTA SPRING BRACKET | 45000639 |
| 19 | ROSTA SHAFT BEARING BRACKET - TOP. | 45000640 |
| 20 | ROSTA SHAFT BEARING BRACKET - BOTTOM | 45000641 |
| 21 | BEARING LFB-1410 | 45000642 |
ROD EYE RBL-6-D 45000633
| * | CONNECTING SHAFT 160x8 | 45000634 |
| 23 | ROSTA SPRING DRS38x60 | 45000572 |
24 ROSTA SPRING DRS27x100 XEHO09-262-262
| 25 | ROSTA SPRING DRS18x30 | 45000573 |
| 26 | ROSTA SPRING DRS18x50 | 45000574 |
| 27 | ROSTA SPRING RETAINING BRACKET BR-18 | 45000575 |
| 28 | PILLOW BEARING UCP-208 | 45000635 |
| 29 | ROLLER BEARING CF12-1-A | 45000636 |
| 30 | POTENTIOMETER | X008-023 |
- SCHEMATICS
i i MONITOR CA
‘ eee Pees ort ey aS: PSU/P CE BOARD i | i i Trans 1
| i | HEADER ASSEMBLY | eae | a |
! Hoa fu ; | mF by 8 Ov
| i | | BLUE | i i |
i an i me
| S15 | Bue | 7 |
| i | ‘BLUE | — |
| i | {1 | — |
i —A
| : | A | BLUE |
Led ! | i
| i | i | FL ea s/B | |
| i | FE | i} | |
| i | E| | Fe ea sB | |
| ! | E | anu, | —— |
lk | J 4 eeNeL
| i | 5) 38) ful 3} 3] | UE ete ryt |
| ! | S)2e eg aa/g| oa | | |
i i Pg
| i | j | 5 |
I mon LPT i mia Ww ete te
| ! | it | AUDIO I+ RESTS |
: oo Teer secakee #144
| r | S18 | LEFT Speake = | |||
| i | | | migar eacce sles | |||
| : | scpeen | EIGHT CoE ACER = | |||
| i | | aimay scart [8 | j | | teaase tats | ||
| i | ED | Tig} 10th | i | | | |
| i | athe naive | |_| AMPLIFIER ASSY | |||
| i | Sine | Pep} sae | : | aie | iii |
| i | SOND | elie | |||
| i | a | Eee | = | & | = |
zs aaa
| i | | | STE | ats im |
| ij Sor | ahaa | ats | |
| 1 | I | YELLOW | = |
| i, PROJECTOR | 2 | at | |
| ; MONITOR | | | 218 |
: aay
| I | ‘Zalv AC ele | ay Ti} 8 |
i see rrr ane Sete il Seat i ait sts i SMPSU ND pel i! an et aal ee ay Dh
| ' 'SCHAFFNER MAINS-IN FILTER! | INTERLOCK | Cts | capa tet | |
| INPUT iy | 5 ane | SWITCH | | ={- | raga |
| BROWN | { | oO | ||
| ORN/YEL | {] FILTER | | | I |
awe oS ALL EARTH WIRES GREEN/YELLOW
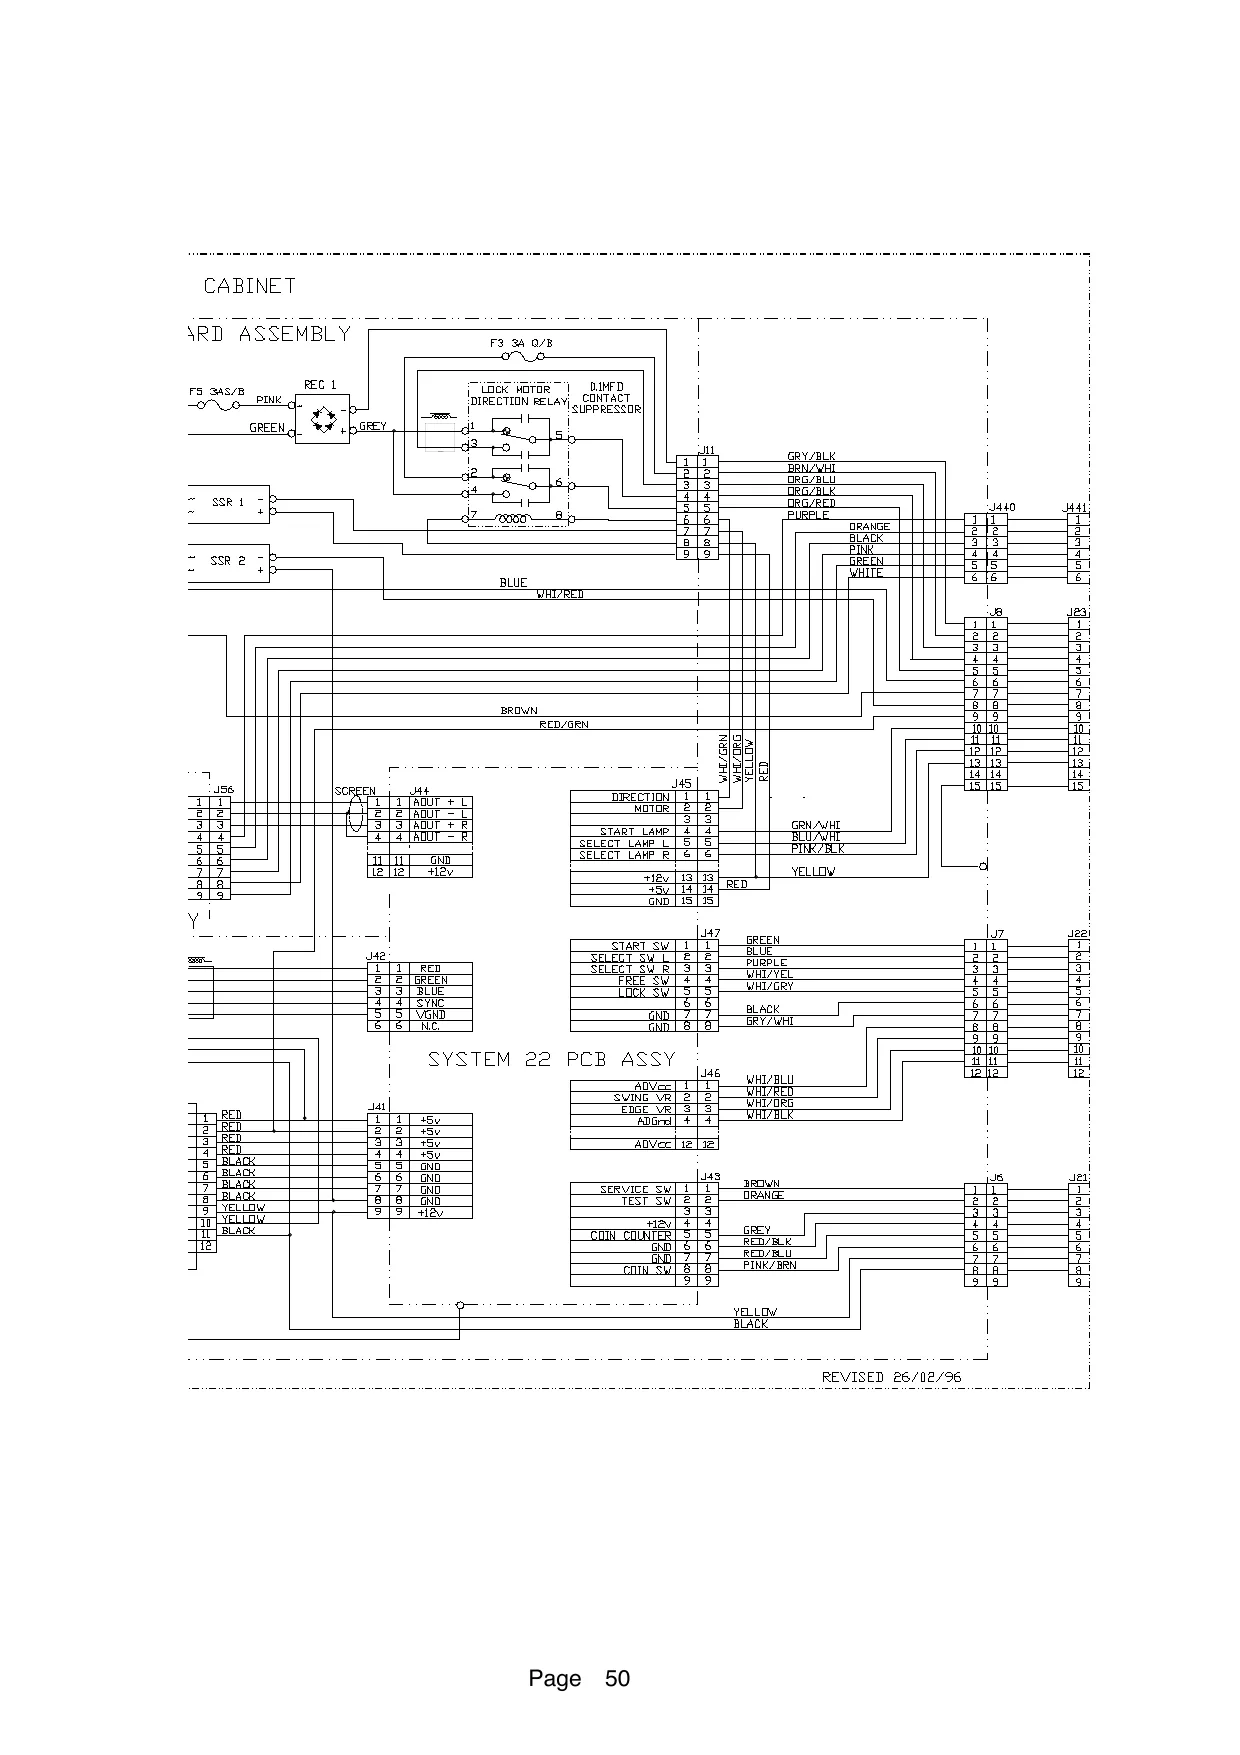
This page is a drawing, shown as the original scan.
T
| pit4 | sea | MAST ASSEMBLY | Cae |
| TLEURPLE | cht | ct | |
| {ORANGE | man | cars |
313 313 ‘4 [4 ata
| EI | S15: | if |
fet ete i 717 ate LPLAY_ PANE : 313 i 40 [10 cra ap geyaLk rare ve} BRN WHT 14 [14 +5{oeG BLU he Ta tORG/BLK LE ORG/RED. L ue ‘2 tetoe a r aR aR
| fe BLUE | TEE Hotae [ere | fore |
Le WHI/BeT 2 fey ficrerya [2 3 [3 Heoaen iy an pene STEP LOCK
| Pi ELUAWAL | 1300 | ioe tad |
iy iii
| pelos | a | FAN | oJ |
Tat 213 CF foew/veL 2? : Tt
| i | a | ete |
zg 313
| i | 2 | 4 [4 |
| 1 | fc | S15 |
: 6 16
| 717 | meee | ee |
sls EARTH GRN/YEL a a |i 133
| a | 12 he | TfL | ii |
| 1] GREEN | 212 | 212 | |
| eT ELUE | ats | ERE | |
| <3 PURPLE | ata | 414 |
Swe EL Po TS} WHIZGE 3 TEL BLACK GRY /WHI
| = LWHIBLU | oa | 2 | wR, |
“5 WHI/RED He
| yy Hweii/oRG | a5 | NB 1k ohms |
yy TWHI/BL KC i We
| ie | _ | COIN TOWEF |
| | | GRN/YEL | = |
ii , 2[e 1
| BROWN. | ae Si, | t |
RANGE
| GREY | été | SERVICE 1] | |
| RED/BLACK | 26 | 7b] CASHFLOW | —— |
| RED/BLUE | cH | eis | NET |
| PINK/BROWN | até | BBE 1 | |
| ae | Hf | in |
4[4
717 37 oe 11 a ele
a S15
| 1302 |
| “q| | Th | i |
4 | plete H | CONTROL PANEL ASSEMBLY
| “Te | | “Tl | | TQ) wasiov |
AY PANEL Lsup Bass” > | SWITCH |
ran |
2[3 i ras S15 ae 616 f— © | rawd até SELECT Bie SWITCH a> |
| a | | | =a | ee |
1 6 {sar ery sw rom | ie) SAFETY SW (Reard SELECT | | SWITCH (RD
FREE sw | |
| 2) | 2 Se Htree sw | ee |
ee
| He | 2, 4 VRE | i |
| fe | EGE | i |
NB. 1K ohms i
i
i
i STEP ASSEMBLY i
i
= i JWER_ ASSEMBLY i
| oo a service | | | ; |
savolt i
| ° FS rest | | Bewatt | i |
0; ;
| VICE BRACKET | | | cae | ! |
PINK HS--s !
| METER | | | PINK "44 | t |
YEL/BLK STS i Se 6 [6 717 ! a{e MARS i En) CASHFLOW i io [io SINGLE [i CHANNEL ! te [le i 43 [13 a4 [14 1 4515 : 18 [16 12 2 ! REVISED 26/02/96 43 3 '
i
i