Superman
Superman (World) (Taito Corporation, 1988) · Document · 12 pages · 6 sections · original scan
cwsmes = TAKITO SNe 12139C
OPERATING MANUAL
APE TRADEMARKS OF OC COMICS INC. ©1968
TAIT S wieeli os CORPORATION ThiTO #5 se 520-92 ax 312) 520-1908 Part No. 130-288967
Page Numbers
GAME DESCRIPTION & INSTRUCTIONS. ...cccccccccccccccscecessvvssees = 3
GENERAL INFORMATION. .cccccescccccccccccccscescccsscssscssccsseed = 5
GAME PREPARATION & CONVERSION INSTRUCTIONS..cccccscccecccseeees6 = 7
OPTION DIP-SWITCH SETTINGS. ......cceeccccecesccccecereesseseesB — 9
WIRING DIAGRAMS. .eecccceccerccvcccccccccsccsccrscssccessssceesel®
CONTROL PANEL LAYOUT. .cccscecccccccccccsccssccccscccscsccscsseoll
GAME INSTRUCTIONS
GAME DESCRIPTION:
SUPERMAN is a horizontal video game and may be played by one or two Players interactively. The second Player, controlling a red Superman Character, teams up with the first Player in his battle against the evil alien super-powers., Each player uses a joystick to move his Superman character while walking or in flight. Two buttons aside each joystick are used to throw Punches, Kick or emit Superman's Heat Vision, a high-intensity laser which destroys all in its path. By Pressing the Punch button and holding it momentarily, Superman can throw a Blast Punch. As Superman picks up various colored crystals, he is awarded with additional energy and weapons including a Super Blast Punch and Mass Terminator. The Mass Terminator destroys all enemies presently on the screen. Items such as cars, gasoline cans, etc. can also be picked up and hurled at approaching enemies.
Taito's SUPERMAN makes it possible for a second Player to join the game at any time. And the players can keep Playing with Taito's "Continue Play" option,
HOW TO PLAY:
- To start a game using the left side controls press the Player 1 Start button. To use the right side controls press the Player 2 Start button,
- During the battle scenes, use PUNCH and KICK buttons to knock down the enemies,
- During the shooting scenes, use PUNCH and HEAT VISION to destroy all obstacles,
- Hold the PUNCH button down momentarily to release a BLAST PUNCH.
- Crouch down, then stand up to pick up crates, cars, gas cans, etc. Throw item by pressing PUNCH button.
- When held by enemy, shake loose with JOYSTICK.
GAME CONTROLS:
JOYSTICK - to Move Superman.
PUNCH BUTTON - to Throw a Punch.
KICK BUTTON - to Kick or emit Heat Vision
EXPLANATION OF ROUNDS:
- In each round, the player must clear three stages to proceed to the next round. In the fifth round, the player must clear five stages to finish the game. 1ST ROUND - NEW YORK (Three Stages)
‘'2ND ROUND - SAN FRANCISCO (Three Stages)
3RD ROUND - LAS VEGAS (Three Stages)
4TH ROUND - WASHINGTON (Three Stages)
5TH ROUND - ALIEN SPACE SHIP (Five Stages)
- when the player's life gauge has been fully exhausted, he may continue play from the same point by inserting additional coins and pressing the Player 1 or Player 2 Start button. *-A second player can join the game at any time by simply inserting coins and pressing the appropriate Player Start button.
- The game ends when the player's life gauge is fully exhausted and he chooses not to continue or when the player successfully completes the fifth and last round.
EXPLANATION OF POWER INCREASING CRYSTALS:
(Blue) ----- Superman's life gauge increases by one.
(Yellow) --- Awards Superman with one Super Blast Punch. Up to 18 may be stored at one time.
(Red) ------ Mass Termination of all enemies when picked up.
This manual will guide you in the conversion of your color monitor upright video game into a "SUPERMAN" game. We urge you to read _ through the instructions before beginning the conversion.
WARNINGS AND NOTICES For safety and reliability, Taito America Corporation does not recommend nor authorize any substitute parts or modifications of Taito America Corporation equipment.
Use of non-Taito America parts and modifications of game circuitry may adversely affect game performance and safety.
Substitute parts or equipment modifications may void FCC acceptance.
Since "SUPERMAN" is protected by Federal copyright, trademark and patent laws, unauthorized versions of this game are illegal under Federal Law. This also applies to unauthorized facsimiles of Taito America equipment, logos, designs, publications, assemblies and games (or features not deemed to be in the public domain) whether manufactured with Taito America components or not.
NOTICE
Parts salvaged from your old game are required to complete your kit. These salvaged parts MUST operate perfectly, or the converted game can not perform properly or safely. Always repair circuit board malfunctions and cabinet damage before conversion is attempted.
Check the parts supplied in this kit against the parts list included in this manual.
For safe operation it is recommended the game be properly grounded. Your game should be equipped with a three conductor power cable. The third conductor is the ground conductor and when the cable is Plugged into an appropriate receptacle, the game is grounded. The offset pin on the power cable's three-prong connector is the ground pin on the power cord.
NOTICE This kit is not intended for use with X-Y monitors. Suitable monitors are the horizontal or vertical raster-scan with inputs for red, green and blue video as well as composite negative sync. (These should be Compatible with TTL logic levels.)
NOTICE
Be sure the power supply from your old game is capable of +5 vdc regulated at 7A, -Svdc regulated at 1A and +12vdc regulated at 1A. These operating voltages are necessary for your kit. Please note the enclosed warning with the PC Board Assembly.
TAITO AMERICA
- (130-201618)
- (138-261611)
- (138-261612)
~ (136-281813)
- (136-201016)
~ (138-288064)
- (138-268963)
- (136-288892)
~ (138-288661)
~ (136-288812)
- (138-285802)
- (138-288885) a
ray (138-398688)
4 - (130-299004)
1 - (138-288987) CORPORATION KIT PARTS PROVIDED
Red 8-Way Joystick Assembly
Blue 8-Way Joystick Assembly
Red Buttons
Blue Buttons
Button Labels
“SUPERMAN” Control Panel Overlay
Control Panel Cover (Clear Acrylic)
“SUPERMAN” Monitor Bezel
"SUPERMAN" Marquee
"SUPERMAN" Side Cabinet Decals
Wiring Harness (JAMMA Type)
Instruction Sheet With Removable Control Stickers
"SUPERMAN" PC Board Assembly
PC Board Mounting Legs & Hardware
Operating Manual
TOOLS AND SUPPLIES REQUIRED
Screwdriver Pliers Hex Driver posrenrenresren rans Grease Pencil Or Marker Soldering Iron And Solder Hacksaw, Jigsaw Or Tablesaw Phillips Screwdriver Wire Cutters X-Acto Knife Electric Drill With Bits 188-Grit Sandpaper Electrical Tape Or Papers renter)
With Carbide-Tipped Blade Heat-Shrink Tubing
All games require a certain amount of maintenance to remain in good operating condition. A periodic check of mechanical controls would be beneficial to guarantee your game will be profitable.
GAME PREPARATION CLEANING The exterior of the game, all metal parts and all plastic Parts can be cleaned with non-abrasive cleaner. Caution should be used when Cleaning the plastic. A dry cloth can cause scratches and result in a foggy worn appearance, Plexiglas cleaner on a soft cloth is suggested to maintain and keep your monitor crt cover looking new.
Inspect your cabinet for any gouges or items stuck on the cabinet like chewing gum. Remove all foreign objects and fill in the gouges with any type of quick hardening wood putty. Sand to ensure the surface is smooth. Wipe the outside of the old cabinet clean. Remember the reason you are converting your old game is to have the increased earnings of a new game. Making your game look like a new game will spark new player-interest.
NOTICE Please make sure you clean the coin mechanisms. It is important that you service them in order for this game to achieve the maximum Possible earnings.
CONVERSION INSTRUCTIONS
Remove the new "SUPERMAN" Marquee from the kit. This new Marquee provided with your kit is specifically designed for ease of handling. Place and center the old Marquee on top of the new Marquee. Place masking tape on the area where you intend to cut the new Marquee. Using an X-Acto knife score the new Marquee and simply break at this score. If your old Marquee is made of glass, remove the paint of the old Marquee and attach the new Marquee behind this glass. If your old Marquee is made of Plexiglas, it is recommended that new clear Plexiglas be used to best provide the brilliance of your new Marquee.
Remove the new "SUPERMAN" monitor bezel from the kit. Place the bezel around the existing monitor. Using an X-Acto knife trim the new monitor bezel to neatly fit around the monitor.
CONTROL PANEL Remove the old control Panel lexan decal, buttons and joysticks,
Place the template provided in this kit on the control panel to design the best possible positioning for your joysticks, buttons and control panel instructions. A representation of joystick and button placement is provided as a guide.
Leave your 1 and 2 player start buttons where they are on the old Control panel. (Use the enclosed 1 and 2 player stickers if needed.) Drill holes as needed for installation of the joysticks and other buttons. Clean any burrs from around holes. Any hole that is no longer needed we suggest Plugging with wood, putty or epoxy.
Cut the new "SUPERMAN" lexan to the appropriate size needed to cover the panel. Leave enough lexan to wrap a small lip around the top and bottom of the panel.
Remove the backing from the "SUPERMAN" lexan and apply it over the old control panel being careful to avoid air pockets.
After the lexan is securely applied, cut the holes on the control panel with an X-Acto knife or razor blade. Install the new joystick, buttons and any hardware that might have been removed on the control panel and tighten them down.
Attach the additional stickers marked "A" and "B" to the control panel.
WIRING PROCEDURES
INSTALLING INTERBOARD WIRING
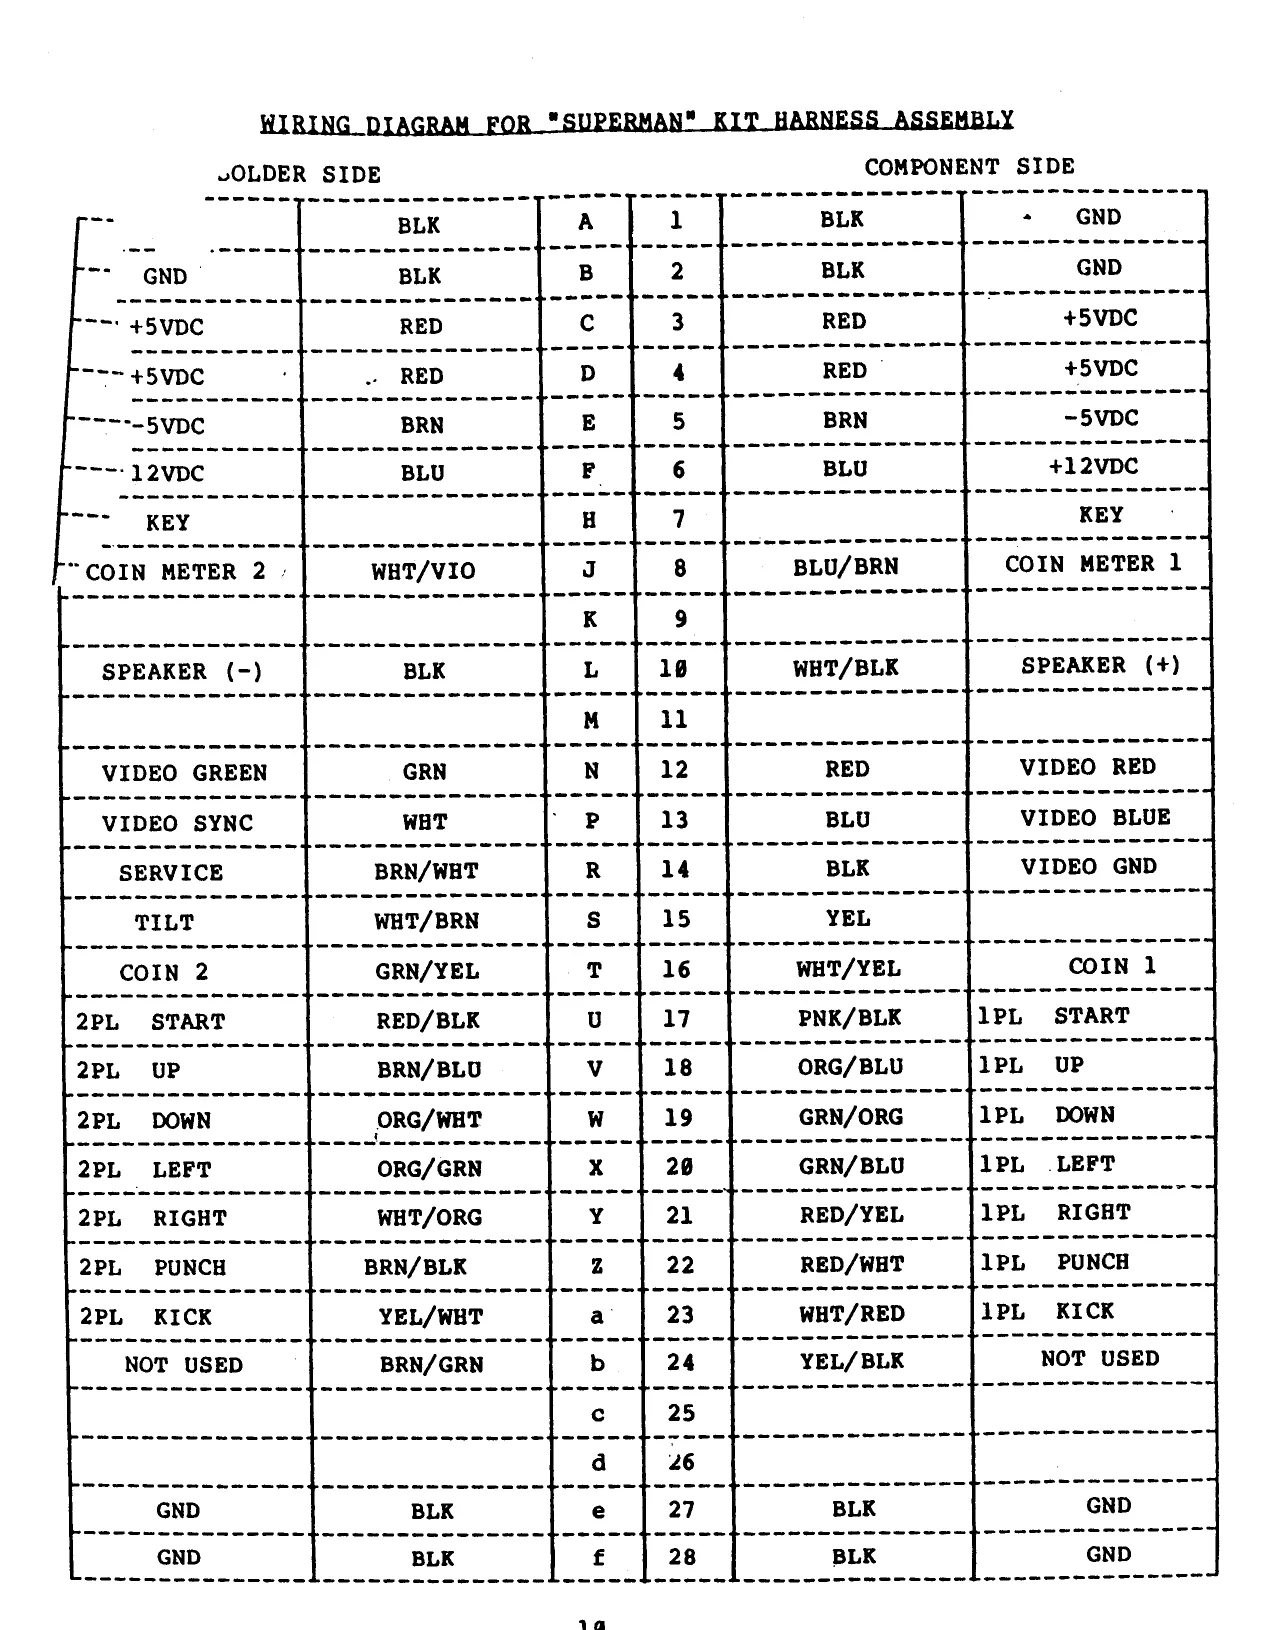
This game comes with a color-coded cable for easy installation. Refer to the wiring diagram included in this manual for quick connections.
Disconnect the old wiring harness from the old CPU board.
Carefully remove old circuit boards and FCC cages from the game.
Using the diagrams from your old game, carefully note the function of each wire.
Leaving several inches of wire from the old wiring harness at each connector, cut the wires near the game's coin door, monitor, control panel, power supply and speaker wires. Install the new wiring harness to those points following your wiring diagram. Use electrical tape or heat-shrink tubing to insulate all splices.
Install your FCC cage where the old board set was,
Mount the "SUPERMAN" PCB assembly with the mounting blocks provided in the center of the FCC cage. Plug the wiring harness onto the PCB and Close the cage securely. The board cage in this kit must be properly installed and terminated to ground.
Check and clean the input jack on the power supply board. Replace any burned or, damaged pins.
DIP SWITCH SETTINGS The folowing option switch settings were designed to allow the customizing Of SupfRMAN's various game features to suit different environments. If used wisely, the flexibility they offer can maximize game performance and increase Potentil earnings.
MUST REMAIN IN "OFF" POSITION
SCREEN REVERSE
TEST MODE
ATTRACT SOUNDS
PLAY PRICING COIN A
PLAY PRICING
- WHEN THE PLAY PRICING IS SET AT 2 COINS PER PLAY (2 CO = 1 PL), THE PLAYER PAYS THE FULL AMOUNT (2 COINS) FOR HIS FIRST GAME AND THEN PAYS ONLY 1 COIN - TO CONTINUE HIS GAME.
RCTIVATED AUTOMATICALLY WHEN THE DIP-SWITCHES ARE SET AT
co = 1 PL,
MEDIUM EASY HARD
FXTENDED PLAY
NUMBER OF SUPERMEN
MUST REMAIN IN “OFF* POSITION
EXTENDED PLAY IS AWARDED TO THE PLAYER FOR REACHING 59,008, 158,008 AND THEN EVERY 156,008 POINTS. (IE. 58,000..158,000..300,008..458,008..ETC.) BOTH SWITCHES 3 & 4 MUST BE IN THE "OFF" POSITION TO ENABLE THE EXTENDED PLAY FEATURE. IF EITHER OF THESE SWITCHES IS IN THE "ON" POSITION, THIS FEATURE WILL BE DISABLED.
SUGGESTED CONTROL PANEL LAYOU™
IF POSSIBLE, DO NOT
OBSTRUCT ARTWORK
This page is a drawing, shown as the original scan.